Starkey Table Microphone User manual

Pairing
The 2.4 GHz Table Microphone must be paired to interact with compatible 2.4 GHz hearing aids on the Thrive platform.
Pairing occurs once, then the hearing aids and Table Microphone will automatically recognize each other. The Table
Microphone can be paired within Inspire X, or outside of Inspire X.
Pairing within Inspire X
1Launch Inspire X, connect and detect hearing aids.
2Select Accessories on the left navigation bar.
3Ensure the Table Microphone is powered on
by holding the power button for 2–3 seconds
until the brackets light up green.
4Place the hearing aids within 6 inches of the
Table Microphone.
5Place the Table Microphone in pairing mode by
pressing the Hearing Aid Pairing button on the
bottom of the device for 2 seconds. The blinking
blue brackets on the top of the device indicate
the Table Microphone is in pairing mode.
6Select Pair to put the hearing aids in pairing mode.
7Pairing is successful when the Table Microphone
displays on the Accessories screen.
8Use the drop-down menu below the Table Mic to set
Hearing Aid Mic while Streaming. The default is
Mic Off while streaming.
9Select the information icon for pairing instructions if needed.
2.4 GHz
Table
Microphone
6
7
8
9
Volume Buttons
Directional
Touch Keys
Mode
Switching
Button
Power
Button
Segments
Hearing Aid
Pairing Button
Magnetic Interface
For Hanger
Microphones
Automatic
Mode
Indicator
MicroUSB Jack

Pairing (Continued)
Pairing outside of Inspire X
1Power Off any mobile phone or other accessories
that were previously paired with the hearing aids.
2Power off, then power on the hearing aids to place
in pairing mode.
3Place the hearing aids within 6 inches of the Table
Microphone.
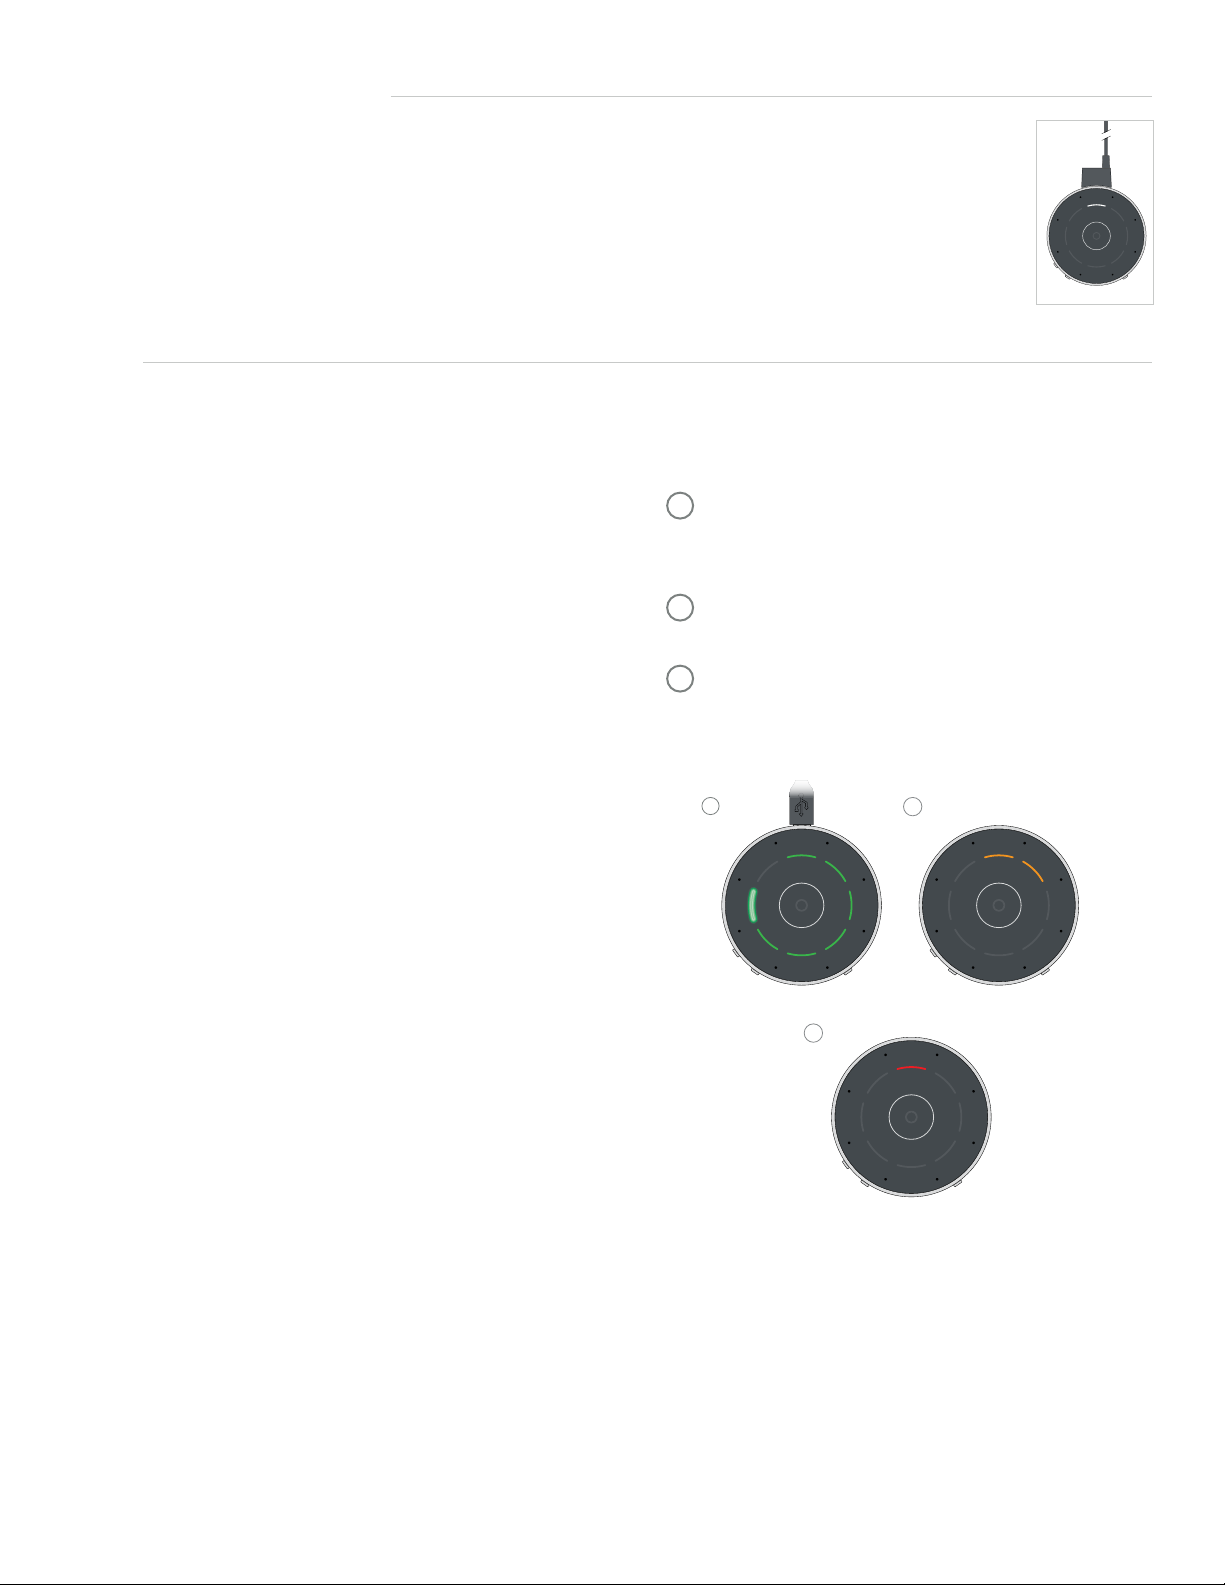
4Place the Table Microphone in pairing mode by
pressing the Hearing Aid Pairing button on the
bottom of the device for 2 seconds. The blinking
blue brackets on the top of the device indicate
the Table Microphone is in pairing mode A.
5A green bracket indicates pairing is successful B.
One bracket is for the left hearing aid, and
one bracket is for the right hearing aid.
How it Works
The Table Microphone is designed to improve listening in noise by allowing the user to focus on the primary speaker
in a multiple-speaker environment such as a meeting. The Table Microphone also functions as a body-worn remote
microphone, or as a TV streamer.
Use Modes
Automatic Mode: Press the Mode
Switching Button (center). The O will
illuminate in blue when the Automatic
Mode is engaged. When the Automatic
Mode Indicator is illuminated, Table
Microphone automatically follows the
primary speaker. The blue segment
indicates the active listening direction.
Manual Mode: Single Direction
• Tap any segment to focus in
a specific direction.
• Tap another segment to focus
in a different direction.
Manual Mode: Dual Direction
• Tap a 2nd segment and hold for 1
second to focus in a second direction.
• Tap another segment to focus in a
different direction.
Surround Mode: Designed for listening to
multiple speakers in a quiet environment.
• Tap the Mode Switching Button to
de-select Automatic Mode and place
the Table Microphone in Surround
Mode. All blue segments indicate
listening in all directions.
Remote Microphone: The Table
Microphone can be used as a remote
microphone when worn on a lanyard around
the neck. The Table Microphone should be
within 8 inches of the speaker’s mouth.
• Attach the magnetic hanger to the back
of the Table Microphone. Make sure the
hanger is properly secured.
• When the Table Microphone is worn by the
speaker the top indicator will light up for 3 seconds.
Hearing aid pairing successful
B
Searching for hearing aids
A

Use Modes (Continued)
TV Audio Streaming: The Table Microphone can be used to stream audio from a TV to your hearing aids.
• Insert the TV streaming cable into the microUSB jack.
• Insert the 3.5 mm audio plug of the TV streaming cable into the TV’s audio jack.
Use
The Table Microphone can be paired to one set of compatible 2.4 GHz hearing aids on the Thrive platform.
For best performance, make sure the Table Microphone volume and power buttons are facing you.
• Audio streaming will begin automatically when the
Table Microphone is powered on. Audio streaming
will stop when the Table Microphone is powered off.
• Additionally, audio streaming can be started/
stopped in several ways:
Hearing Aid User Control: Push & Hold
or Double Tap
Remote Control: Favorite Button
Thrive Hearing Control app
• To adjust the stream volume, press the + or – buttons
on the Table Microphone. The white top segment
blinks when volume is increased and the white
bottom segment blinks when volume is decreased.
• The Table Microphone operating range is up to
50 feet (15 meters).
• The Table Microphone can stream for up to 12 hours
on a single, full charge.
• The Table Microphone reaches a full charge in
about 2 hours.
• Battery Status Indicators:
AGreen segments indicate battery charge level.
Each segment represents 1 hour. The blinking
green segment indicates the current level.
BOrange segments indicate less than 2 hours of
battery life.
CA Red segment indicates less than 1 hour of
battery life.
Starkey, Inspire, Thrive and the Starkey logo are registered trademarks of Starkey Laboratories, Inc.
©2020 Starkey. All Rights Reserved. 3/20 FLYR3655-00-EE-GS
B
C
A
Line-in/Line-out connection:
White top segment blink indicates
line-in connection (e.g., TV audio).
Other manuals for Table Microphone
1
This manual suits for next models
1
Other Starkey Microphone manuals