Starr Labs Ztar Z55 User manual

Starr Labs, Inc.
8868 Clairemont Mesa Bl. Ste. N San Diego, CA 92123
Starr Labs © 2013-2020
Getting Started Guide
for Ztar Models Z55,
Z5S, Z6/S, Z7S,
MiniZ/S/X, and
BabyZ
Model Configurations
The Ztar MIDI Guitar controller is manufactured in a variety of formats, body styles
and with a variety of installed options. The installed options will generally concern
hardware that is programmed in the onboard Sensors menu. That portion of the
software is generally the same for all of our instruments, whether or not all of the
options are installed.
Z5S, Z6S, Z7S, and MiniZS instruments all have String Triggers.
Z5, Z6, Z7 instruments all have Trigger Bars.
The BabyZ is a reduced size instrument with six programmable sections per
rubber Trigger Bar.
The MarkIII Ztars have String Triggers and a trapezoid-shaped front panel
with 12 Pads.
In general, models marked “-S” have String Triggers, “-X” have a bank of
Pads, and “-P” have a bank of Pots.
The newer Z7/Z7S instruments use the same rear connector panel as the
babyZ instrument.

`Starr Labs, Inc.
8868 Clairemont Mesa Bl. Ste. N San Diego, CA 92123
2
Table of Contents
Getting Started Page 3
Power Up Page 4
Basic Performance Set-Up Page 5
String Triggers Page 6
Ztar Embedded RF Transceiver Instructions Page 7
Ztar Trigger Cap Assembly ExpressionPad Option Page 8
Basic Connections:
Fun Tricks with TCA1 Page 10
MIDI I/O –PB-1 Phantom Power Adapter Page 10
Mini-Z Jack Panel Page 11
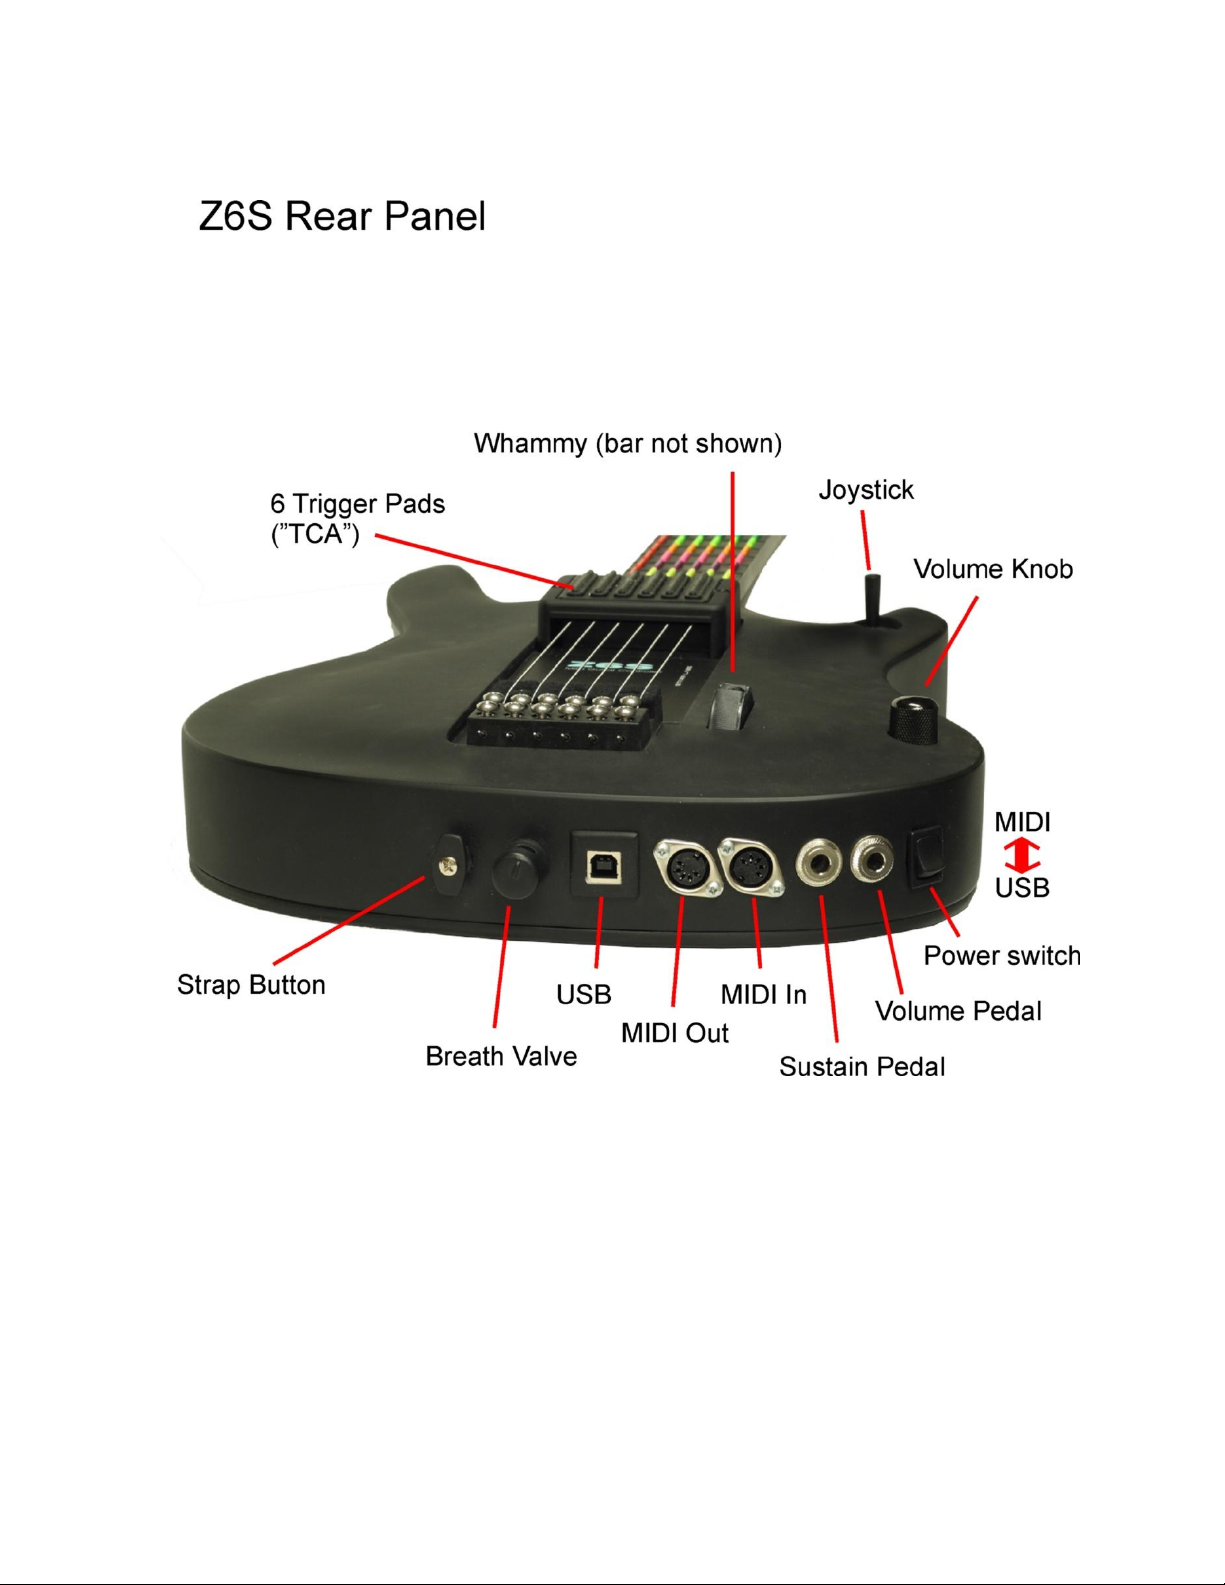
Z6 Rear Panel Page 12
How to Charge Starr Labs Battery Pack Page 13
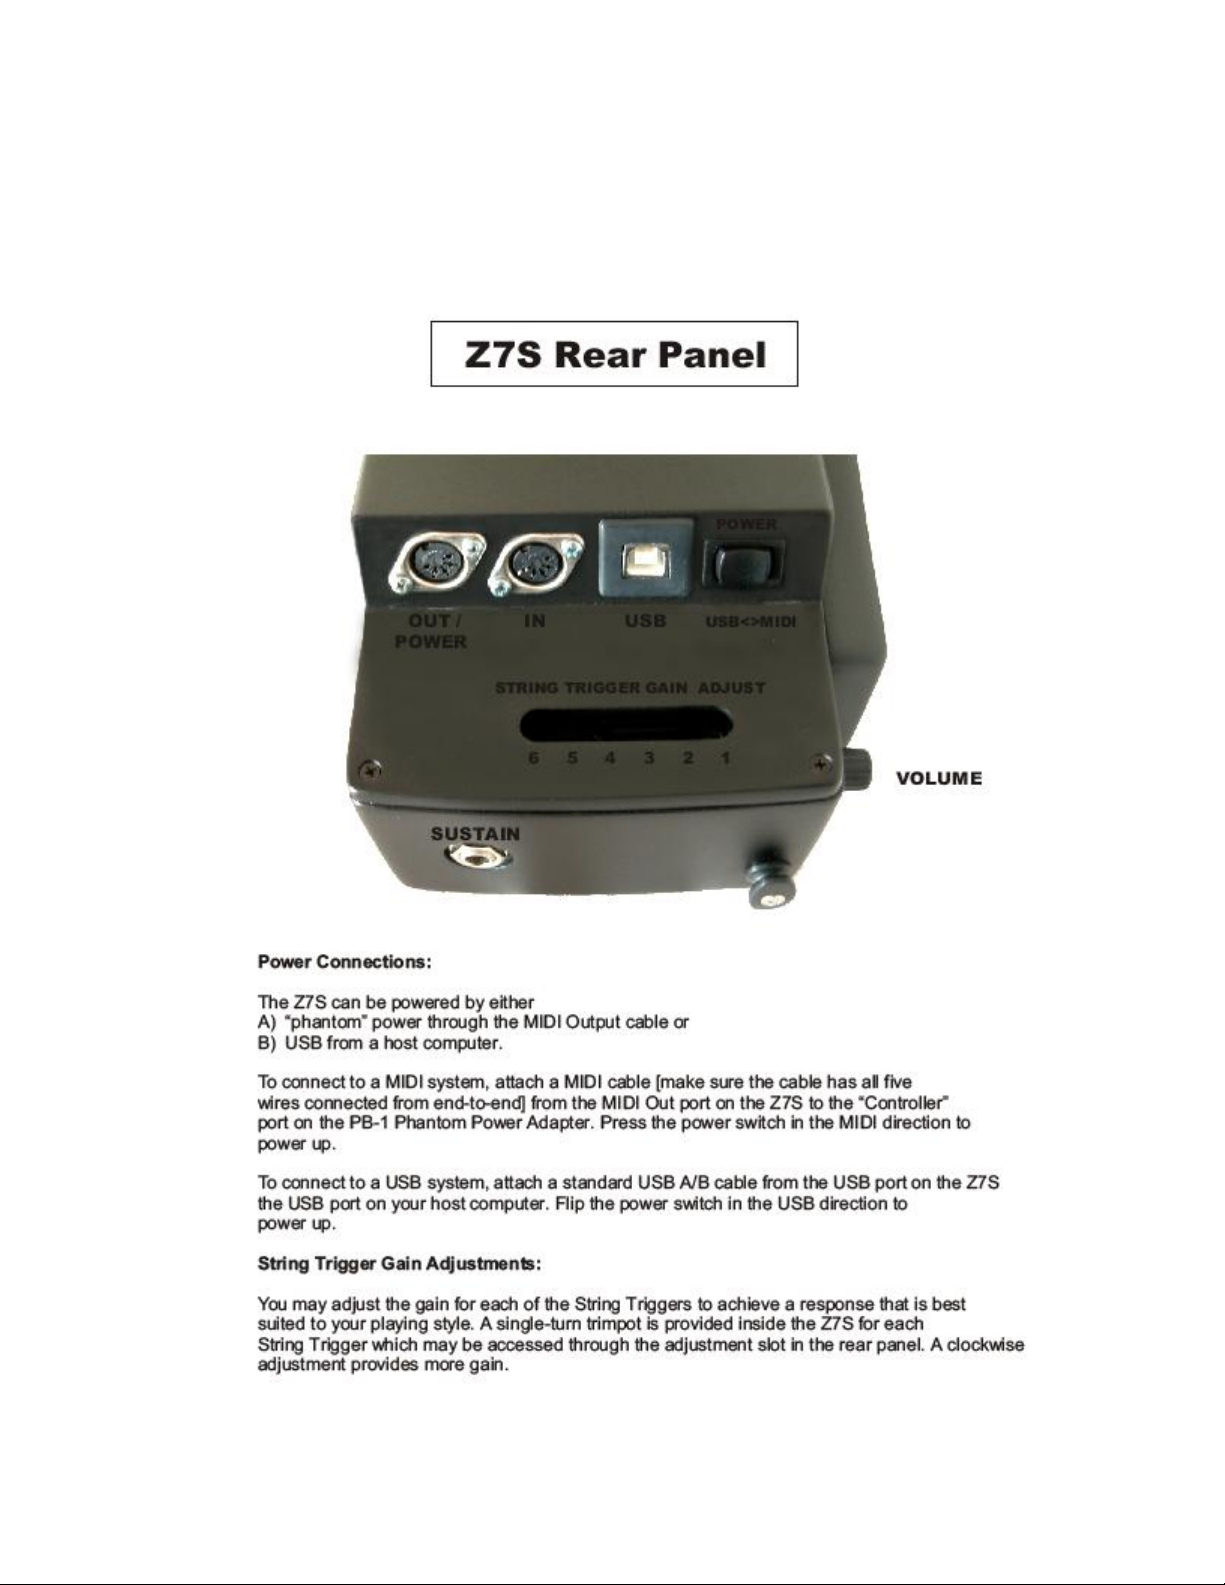
Z7S Rear Panel Connections Page 14
Baby Z Read Panel Connections Page 15

`Starr Labs, Inc.
8868 Clairemont Mesa Bl. Ste. N San Diego, CA 92123
3
GETTING STARTED
If you’re absolutely new to MIDI and want to know more, you can find the MIDI specifications at
www.midi.org
Congratulations on your purchase of the Ztar. No matter which hardware configuration you have, you can
be sure that you will find a deep source of musical control features that will be flexible to your needs and
provide many years of happy musical exploration!
NOTES:
Please reference our website for the full manual and support documentation, sysex setups and other
software.
It is not necessary to load a USBMIDI driver for any Ztar manufactured since 2012. These instruments are
plug-and-play with Lac and PC computers.
Basic layout of the instrument:
1] The Ztar hardware is divided into two main performance groups, the Fretboard and the Sensors. The
Sensors include the String Triggers and all the Pads, Pots, Pedals and other performance devices on the
instrument.
2] There is also a row of Function “HotKeys” on the top of the Z7S and MiniZ and at the side of the
guitar-shaped Z5/6 models of Ztar. These HotKeys control functions that you are most likely to change
quickly while you are playing music.
3] There is also a Programming/Display module onboard that you will use to setup up the various
functions of the Ztar in detail.
Press EDIT and you will see selections for programming the features of the Ztar.
The Fretboard is programmed in the Fretboard or Zones screen.
The Sensors are assigned MIDI Events in the Sensors screen .

`Starr Labs, Inc.
8868 Clairemont Mesa Bl. Ste. N San Diego, CA 92123
4
The physical response of the Fretboard and the Sensors is set up in the Response screen and
the Curves screen.
Power Up the Ztar:
The Ztar can be powered from either a DC power supply or a USB 2.0 port on your
computer. The instrument is equipped a 3-position power switch with DC <>OFF<>USB
power positions. If you have a sound card or LED lighting installed in your instrument,
those accessories will only power on in the DC position of the switch.
To Power from the AC/DC adapter:
Use a 5-conductor MIDI cable (all 5 pins must be wired) from the Ztar MIDI Output
to the Controller connection on the PB-1 power supply adapter.
Connect a MIDI cable from the SYNTH jack of the PB-1 to the MIDI IN on your synth
or other MIDI system.
Connect the supplied DC wall-supply to the PB-1.
Flip the power switch on the instrument and you should see the display light up. If it
doesn’t, check your MIDI cable and wall-wart for correct type and connections. If
you’re stuck here go the Troubleshooting section at the rear of the manual.
DC power is supplied to the instrument from a wall-mount AC/DC power supply that
connects to your PB1 phantom power adapter. A standard 5-wire MIDI cable from the
PB1 to your Ztar MIDI Out Port will power the Ztar and route MIDI data to your synth.
Move the 3-position rocker switch to the DC position.
If you have a Starr Labs Phantom Battery Supply for use with your onboard MIDI
wireless transmitter, connect it to the Ztar input port instead of the MIDI cable.
Connecting to USB Power:
Connect a USB cable from the USB port on the Ztar to the USB 2.0 compliant USB port
on your computer.
Move the 3-position rocker switch to the USB position.
New Ztars built after July 2012 have a plug-and-play, class-compliant USB interface and
no driver is required for operation with USB-MIDI compatible computers.

`Starr Labs, Inc.
8868 Clairemont Mesa Bl. Ste. N San Diego, CA 92123
5
She’s Up and Running when you see the first bank of 8 presets
showing on the Display Screen.
Note:
In the startup Display menu you will see the first bank of eight presets or zTar “Songs”.
Song #1, ‘Guitar’ is set up to play like a guitar, the String Triggers are ON and the
fingerboard is playing one-note-per-string with Hammers=ON, Guitar-tuning.
Song #2, ‘Chords’ is set up to demonstrate the chording mode. Each fingerboard key
holds an entire chord. Press a key them strum the strings to hear the chord. Other mode
settings will affect how the chords hammer-on or stack up.
Plugging in the Battery Pack:
Connect the 5-pin MIDI cable from the battery to the MIDI Out connector on the Ztar.
Newer Ztars use an external USB Power Bank for battery power.
Basic Performance Setup:
The Ztar can be strummed and picked like a guitar or tapped like a keyboard, or both
together. Use the function keys and the Fretboard (Zones) screens in the programmer
to set up the Ztar the way you like it. Your settings are saved in battery-backed memory.
The basic HotKey functions:
If the TRIG and G/POLY LEDs are now lit you’re set up like a guitar so start picking!
Press the TRIG button to toggle between the fingerboard Tapping-style and Strumming-
style. Press the G/Poly button to toggle between playng one-note-per-string with
hammer-ons (like a guitar) and playing multiple notes per string.
The PATCH+ and PATCH- buttons increment and decrement the ProgramChange
number output to your synthesizer.
The OCT+and OCT-buttons increment and decrement the octave setting for the
fingerboard.
Use the Top-level Menu to select onboard patches or SONGS using the UP/Down
arrows.
Hit the EDIT-KEY on the DisplayKeypad to enter the Song Menu, the Ztar’s top-level
Edit-screen. From there you’ll access all of the edit functions.
Use the Zone Menu to set up the fingerboard according to your needs. This includes
defining areas of the neck for selected voices, MIDI channels, transpositions,
polyphony, Volume settings and more.

`Starr Labs, Inc.
8868 Clairemont Mesa Bl. Ste. N San Diego, CA 92123
6
Use the Sensor Menu to program the Pads, Triggers, Joystick, and Pedals for MIDI
effects, chords, and sequences.
Use the Fretboard/Tuning Menu to set the tuning for the fingerboard, the Open
Strings, Right/Left switch and Enable the HammerOns/PullOffs, Tuning Map selection,
and more.
Use the Triggers front-panel key to turn on/off the Triggers. With the Triggers On you
can strum them like a guitar. With the Triggers Off you can tap the fingerboard like a
keyboard.
Use the Guitar/Poly key to switch between One-Note-per-String or All-Notes-per-
String. You can play the "Open Strings" in GUITAR mode with the TRIGGERS ON.
Strike the Trigger with nothing fretted to hear the open string.
Use the Pat+/Pat- and Oct+/Oct- Hotkeys to set the synth patch(es) and Octave.
After you've created a special setup, or “Song” in Ztar-speak, for the Fingerboard and
the Sensors according to your needs you can save it to battery-backed memory by
using the Write key or the "Write" menu from the display.
String Triggers
Adjusting String Tension:
If the string tension is incorrect you can adjust it at the tailpiece using the row of screws
nearest the center of the zTar. The bank of screws toward the rear of the instrument
clamp the strings in place. You may need to remove the cover cap over the bridge to
tighten these screws. You might try leaving the cover off so that you can try out the
Palm-Muting feature.
Adjusting String sensitivity:
Using the trimpot adjustment tool provided with your instrument, turn the trimpots
clockwise to increase the gain for each string. When the gain is too high, the string will
play when just touching it so back off a bit from the high setting. The strings in the Ztar
are numbered with the LowE for a righty as #1. Enter the RESPONSE/SENSORS menu
and pluck a string to verify the string response.
[ When the trimpot is turned to a full stop in either direction, do not turn further or the
trimpot will be damaged.]
Also, in the RESPONSE/SENSORS menu you will find a threshold adjustment that you
can reduce to increase the bottom-end response sensitivity. Response for a Sensor
can be altered by changing the Curve assignment in RESPONSE/CURVES.

`Starr Labs, Inc.
8868 Clairemont Mesa Bl. Ste. N San Diego, CA 92123
7
Also, the fingerboard response may be altered by changing the Curve assignment in the
RESPONSE/FRETBOARD menu. Refer to the manual for more details on setting
RESPONSE
IF YOU GET STUCK AND NEED HELP PLEASE CALL:
STARRLABS, 858-271-9827

`Starr Labs, Inc.
8868 Clairemont Mesa Bl. Ste. N San Diego, CA 92123
8
Ztar Embedded RF TRANSCEIVER Instructions
Your instrument may be equipped with either a Standalone Receiver or a RF-MIDI USB dongle
receiver.
Power:
The Ztar Embedded Transmitter is connected to the power supply inside the instrument and it is always
powered-up with the Ztar.
The AirPower receiver may be powered either of three ways:
1) (2) AA batteries
2) 9VDC wall adapter
3) USB
The Receiver’s 3-way power switch settings are USB/Batteries<>OFF<>DC Power
MIDI Port:
On the transmitter the MIDI data that feeds its MIDI Input Port is wired internally directly to the Ztar’s MIDI
Output.
On the Receiver the MIDI port is connected to the MIDI Input of your synth or MIDI system.
Also, you can connect the AirPower receiver via USB to your host computer which will both power the
receiver and send USB-MIDI data into the computer.
Receiver Indicator Lamps:
Power: Power will blink if the battery is low
MIDI: The lamp will blink when MIDI information is being transmitted.
Link: The lamp shows when the transmitter and receiver are connected and will blink when the link is
experiencing a fringe reception condition.
Channel select:
The Transmitter and receiver are equipped with 16-position rotary switches to select a vacant RF
channel, 0,1,2,3,4,5,6,7,8,9,A,B,C,D,E,F. The Transmitter embedded in the Ztar has its channel selection
set at the factory to 0 in most cases.
When selecting a different channel, set the Transmitter and set the receiver to match. Power-cycle both
the transmitter and receiver to re-initialize the channel settings n both units.
When the transmitter is embedded in the Ztar, you can set the RF channel in the Ztar menu system. Go to
UTILITIES/MORE/WIRELESS. Set the RF channel to match the Receiver switch setting and set
Wireless=ON. When the channels match the LINK LED will illuminate.
9.6V Main Battery Supply (MIDI Battery)
[Newer Ztars are wirelessly powered over the USB port using a USB Power bank rather than the battery
wired to the MIDI plug.]
In order to be completely free of cables, when the Ztar is using the AirPower wireless data connection,
you can supply main power to the Ztar system by means of the special Starr Labs MIDI Battery. Simply
plug the battery into the Ztar’s MIDI Output port and it will supply phantom power through its MIDI cable
connection.

`Starr Labs, Inc.
8868 Clairemont Mesa Bl. Ste. N San Diego, CA 92123
9
To charge the MIDI battery:
Connect the Smart charger to the PB1 DC input jack.
Connect the MIDI battery to the PB1 Controller jack.
The indicator lamp on the smart charger will light up when the battery is charging. The light will
turn off when the battery is charged.
Ztar Trigger Cap Assembly ExpressionPad Option:
The TCA-1 (TriggerCapAssembly-1) is an optional set of Expression Pads that are
added to the Ztar top surface in place of the standard hex pickup cover. The TCA-1 is
comprised of six narrow rubber pads resting in line with the strings on the fingerboard
and the StringTriggers for the picking hand. These six Pads may be programmed to a
variety of MIDI event such as Notes, chords, Sequences, Loops, Program changes,
EFX level changes, and Continuous Control messages. These pads may also be used
to Trigger notes fretted on the fingerboard.
The TCA-1 pads are referred to as “TriggerPads” or “TPads” in the menu system.
As a default they are programmed to a set of Drum notes on MIDI Channel 10. With a
little practice it’s easy to fingerpick a drum pattern on the TriggerPads.
The settings for the TriggerPads can be easily changed to accomplish a variety of MIDI
functions. To make these settings go to the SENSORS screen in the menu system and
tap one of the TPads. You should see the screen jump to an edit-screen for that TPad.
Refer to the discussion regarding the SENSORS menu for details about making the
settings.
SENSOR SETTINGS
In general you will be setting three things:
1) the PlayFunction shown at the top of the SENSORS screen shows BASIC, ALL,
SEQUENTIAL, CONTINUOUS-CONTROL, ETC. This sets what type of
messages are sent and in what sequence. BASIC and ALL are for sending
Notes.
2) The EVENTS screen shows the settings for up to 8 events such as Notes, CC
changes, Program Changes, and more. By combining different Events with
different PlayFunctions you can achieve a huge variety of performance
techniques.
3) The TIMING screen is set to
a. TOUCH if the duration or the Events (notes) is simply as long as the Pad
is held down,

`Starr Labs, Inc.
8868 Clairemont Mesa Bl. Ste. N San Diego, CA 92123
10
b. TIMED when the Events’ duration is set in terms of milliseconds or MIDI
clocks (governed by the MIDI clock source such as the internal
metronome or external clock) or,
c. LATCHED which plays the Events and holds them until you hit the Pad
again.
Some fun tricks with the TCA1
1) Hold a chord on the fingerboard. Press the “REC” hotkey and see the “REC” LED
flash. While holding the chord, tap one of the Trigger Pads and the chord will
appear there.
If you only hear one note, go into the SENSORS/ EVENTS screen for that TPad
and set the PlayFunction from BASIC to ALL. Now you’ll hear the full chord. You
can tap the chord with one finger and play a bassline or melody on the
fingerboard with the other hand. Set up all six TPads with chords this way.
You can also turn one of these chords into a sequence in the
SENSORS/EVENTS by setting the PlayFunction to “SEQUENTIAL” to make the
chord a sequence. Also, in the SENSORS/EVENTS screen you can change the
note-duration from milliseconds to MIDI-clocks so you can adjust the sequence-
timing with the onboard metronome. Press the softkey where it says gate-time
and see the asterix(*) appear after the number to indicate MIDI-CLOCKS.
Then, go to the SENSORS/TIMING screen to set the Hit-Mode to TIMED so the
TPad will play out its notes using the onboard metronome rather than timing the
notes from your touch. Set the BPM where you like it in the UTILITIES/CLOCKS
screen.
These little (up to 8-note) sequences may be also single-stepped by setting the
PlayFunction to ALT-UP, ALT-DN, or ALT-RANDOM.
Bend individual strings from the TCA-1
1) Set up a Ztar Song (preset) such as “6STRING” that has each fingerboard
string on a different MIDI channel.
2) In the SENSORS screen, tap a TPad to select it. Set the MODE to EVENTS.
3) In the EVENTS screen set the PlayFunction to “ContCtl”
4) At the bottom of the EVENTS screen set the (only one) Event to PitchBend-
Up and set the MIDI channel to the channel of the corresponding fingerboard
string. If you set up all the TPads to match the fingerboard strings this way
you’ll be able to hold a chord and bend individual strings by pressing the
proper TPads.

`Starr Labs, Inc.
8868 Clairemont Mesa Bl. Ste. N San Diego, CA 92123
11
`Starr Labs, Inc.
8868 Clairemont Mesa Bl. Ste. N San Diego, CA 92123
12

`Starr Labs, Inc.
8868 Clairemont Mesa Bl. Ste. N San Diego, CA 92123
13
`Starr Labs, Inc.
8868 Clairemont Mesa Bl. Ste. N San Diego, CA 92123
14

`Starr Labs, Inc.
8868 Clairemont Mesa Bl. Ste. N San Diego, CA 92123
15
This manual suits for next models
6
Table of contents
Other Starr Labs Recording Equipment manuals


