Starr Labs ZBoard User manual
GETTING STARTED !!!
If you’re absolutely new to MIDI and want to know more, you can find the MIDI specifi-
cations at www.midi.org/about-midi/tutorial/tutor.shtml
NOTE: If your instrument has String Triggers, you will notice that there is a metal strip
on the back of the neck. This is not a protective tape and do not remove it!
Basic layout of the instrument:
1] The Zboard is divided into two main sections, the Fretboard and the Sensors. The
Sensors include the String Triggers and all the Pads, Pots, Pedals and other perform-
ance devices on the instrument, everything other than the fingerboard
2] There is a row of Function “HotKeys” on the top of the Zboard. These HotKeys con-
trol functions that you are most likely to change quickly while you are playing music.
3] There is also a Programming/Display module onboard that you will use to setup up
the various functions of the Zboard in detail.
Press EDIT and you will see selections for programming the features of the
Zboard.
The Fretboard is programmed in the Fretboard (or Zones) screen.
The Sensors are assigned functions and MIDI Events in the Sensors and Sen-
sors/Events screens
The physical touch response for the Sensors and the Fretboard is set up in the
Response menu screens and the Curves screen.
The Zboard can be powered from either a DC power supply or a USB 2.0 port on your
computer.
If the instrument is equipped with USB, a 3-position power switch is provided :
DC<>OFF<>USB

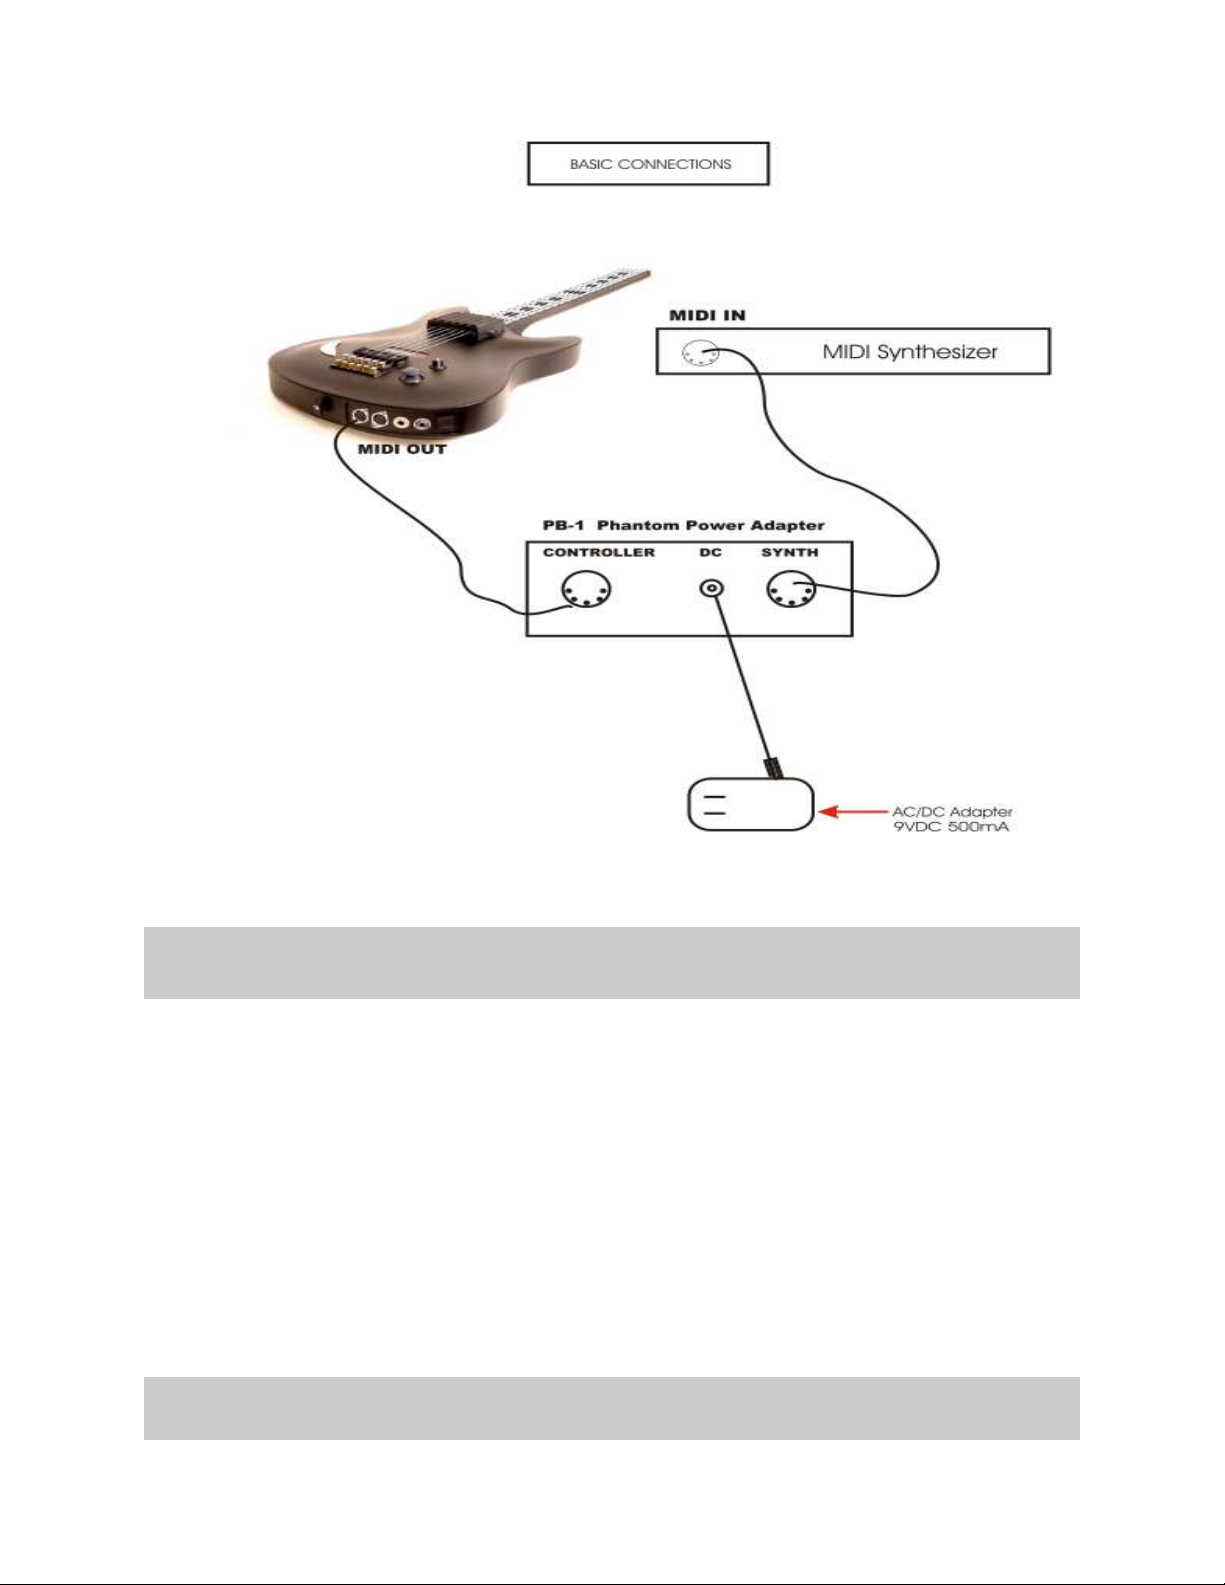
To Power from the AC/DC adapter:
• Use a 5-conductor MIDI cable (all 5 pins must be wired) from the Zboard MIDI
Output to the Controller connection on the PB-1 power supply adapter.
• Connect the supplied DC wall-supply to the PB-1.
• Connect a MIDI cable from the SYNTH jack of the PB-1 to the MIDI IN on your
synth or other MIDI system.
• Move the 3-position rocker switch to the DC position and you should see the
display light up. If it doesn’t, check your MIDI cable and wall-wart for correct type
and connections. If you’re stuck here go the Troubleshooting section at the rear
of the manual.
DC power is supplied to the instrument from a wall-mount AC/DC power supply that
connects to your PB1 phantom power adapter. A standard 5-wire MIDI cable is con-
nected from the PB1”Controller” port to your Zboard MIDI Out Port and will power the
Zboard as well as route MIDI data to your synth.
If you have a Starr Labs Phantom Battery Supply for use with your onboard MIDI wire-
less transmitter, connect it to the Zboard input port instead of the MIDI cable.
Connecting to USB Power:
♦
Connect a USB cable from the USB port on the Zboard to the USB 2.0 compliant
500mA USB port on your computer.
♦
Move the 3-position rocker switch to the USB position.
♦
Because of the power requirements of the Sound Card there is a need for a larger
power supply to power the system 9VDC @ 1000 mA.
♦
A USB 2.0 port on your computer will power the Zboard but not both the Zboard and
a Sound Card.
Turning On the Zboard:
If there is a Sound Card installed in your ZBoard
Use a 5-conductor MIDI cable (all 5 pins must be wired) from the controller to the PB-1,
power supply.
Plug into the MIDI Output connector, closest to the center of the guitar. From this posi-
tion the connectors are: MIDI Out, MIDI In, Sustain, Volume and Reset.
Connect the Zboard MIDI Out cable to the Controller input of the PB-1 power adapter.
Connect a MIDI cable from the SYNTH jack of the PB-1 to the MIDI IN on your synth.
Connect the supplied DC wall-supply to the PB-1.
Flip the power switch on the instrument and you should see the display light up. If it
doesn’t, check your MIDI cable and wall-wart for correct type and connections. If you’re
stuck here go the Troubleshooting section at the rear of the manual.

The Starr Utilities disc provides both WinXP and Mac USB drivers.
The XP driver is installed by “StarrLabs_Driver_Setup.exe”. The installation guide is
also on the disc, “Starr USB Installation Guide.pdf”.
The Mac driver is “zTar Mac Driver 2.1.pkg”
If the Display lights up and displays the first bank of Song presets, you’re
up and running.
If the TRIG and G/POLY LEDs are now lit you’re set up like a guitar so start picking!
Hold a key and press the TRIG button to play the fingerboard tapping-style. Press the
G/Poly button to play more than one note per string.
Use the Live Menu, the power-up run-time to select onboard patches or SONGS.
Hit the EDIT-KEY to enter the Song Menu, the Zboard’s top-level Edit-screen. From
there you’ll access all of the edit functions.
Use the Zone Menu to set up the fingerboard according to your needs. This includes
defining areas of the neck for selected voices, MIDI channels, transpositions, Velocity
Inversion, and Base Volume setting.
Use the Sensor Menu to program the Pads, Triggers, Joystick, and Pedals for MIDI
effects, chords, and sequences.
Use the Utilities/Tuning Menu to set the tuning for the fingerboard, the Open Strings,
Right/Left switch and Enable the HammerOns/PullOffs.
Use the Triggers front-panel key to turn on/off the Triggers. With the Triggers On you
can strum them like a guitar. With the Triggers Off you can tap the fingerboard like a
keyboard. Hold a fingerboard key and press the TRIG key.
Use the Guitar/Poly key to switch between One-Note-per-String or All-Notes-per-
String. You can play the "Open Strings" in GUITAR mode with the TRIGGERS ON.
Strike the Trigger with nothing fretted to hear the open string.
Basic Operation
USB Drivers

Use the Pat+/Pat- and Oct+/Oct- Hotkeys to set the synth patch(es) and Octave.
After you've created a special setup for the Fingerboard and the Sensors according to
your needs you can save it to battery-backed memory by using the Write key or the
"Write" menu from the display.
SENSORS
The “Pads” are our general term for the input hardware, the Triggers. Occasionally we
refer to a Sensor as a “Pad” in this manual and in the menu-system as the structure that
holds setup assignments for each of the hardware inputs within each SONG.
ZONES in the Zboard are similar to the Layers that are often found in MIDI keyboards.
EVENTS
An Event may be a MIDI note, Continuous Control message, Program change, or any of
a number of other MIDI data-types. Each Pad may be assigned up to eight events or a
sequence of variable-length.
SONGS
The full group of Sensor inputs may be assembled with all of their various assignments
along with the various assignments to the fingerboard and the metronome to form on-
board patches or SONGS. There are currently 24 Songs in the Zboard without the addi-
tion of a RAM card.
HOTKEYS
These are the strip of named function keys the are mounted on the top or side of the
instrument and are provided for quick access to commonly used features.
Congratulations on your purchase of a ZBOARD MIDI guitar controller. With its combination
of hardware and software features it may be the most versatile and expressive electronic
musical instrument that can be had at any price and it should afford you a lifetime of crea-
tive exploration.
You can skip this section if you want to jump right into programming the instrument. In gen-
eral, it’s a good idea to look over this manual, just to see what’s in your new instrument.
Basic Building Bloc s

The Zboard 24x24 keyboard provides an array of 576 programmable keys, four program-
mable rotary pots, Sustain and Volume pedal jacks, and a 4-way programmable joystick.
Use the FRETBOARD menu to program the Keyboard and the SENSORS menu to make
assignments to the pots and other Sensors.
Use the Response menu to set up the physical response for both the Keyboard and the
Sensors.
User Interface
The ZBOARD is supported by a Programming/Display system with a 2 line by 40 character
backlit LCD and a ’softkey’ based User Interface. What this means is that the eight keys
that surround the display are used to select items depending on the context of the particu-
lar menu screen. The menu-system is a tree-like structure. The Zboard has to manage
quite a bit of programmable information but every effort has been made to keep the nesting
of menus to a minimum and the navigation of the system as simple and intuitive as possi-
ble.
The EDIT key is used both to enter an edit-screen in some menus and more often to exit
from a menu-screen when you’re finished programming. In general, pressing EDIT several
times will back you out of a series of menus and bring you back to the top SONG-MENU, or
LIVE-mode
The Zboard Operating System has a LIVE mode and an EDIT mode. Pressing the EDIT
key from the SONG-MENU enters the EDIT-Mode to alter the various setup parameters of
the fingerboard, pads, triggers, joystick and pedals. The ZBOARD will continue to play
while in the EDIT mode; however, make sure to exit back to the LIVE mode after complet-
ing an edit as you may accidentally re-program one of your setups by hitting the joystick or
another programming key. Also, the instrument will play a bit faster in the LIVE mode as
there it isn’t a necessity to update the Edit screens and look for programming input.
Programming, Mode Selection and Data Entry:
Many of the programming features on the ZBOARD have been implemented in the screen/
menu system and also in shorthand fashion on the front-panel "hot-keys". In the screen/
menu system the eight "soft" keys surrounding the display will be physically near their se-
lections on the screen. Use of the hot-keys will save a number of keystrokes. Also, the joy-
stick is used both as a performance tool and a data entry device in conjunction with the
data Up/Down buttons when programming the system.
OVERVIEW of the Z-Board

“Chase” features
In several of the menus a String, or a Key, or other Sensor may be selected by simply
touching it, in addition to using the Display keys
A little more Terminology
In an effort to make the ZBOARD as fully user-programmable as possible some existing
MIDI concepts have been expanded and are slightly re-defined:
Patches for the ZBOARD are called SONGS or KITS. You will see both references used. A
Song stores the complete configuration for the instrument. This includes all of the finger-
board splits/zones, transpositions, patches, tunings, and all of the MIDI control assignments
for the SENSORS, including any recorded Notes, Chords or Drums, Continuous Control
EFX, and a list of other parameters. SONGS may be thought of as ‘Kits’ in the sense used
in an electronic percussion device, a set of assignments of hardware Triggers to MIDI out-
put functions and the player’s response setups for all of the hardware. There is no analo-
gous term in guitar playing so we chose ‘SONGS’ as you might use a different configuration
for each song in a set, different voices, etc.
ZONES in the ZBOARD environment are arbitrary rectangular areas of the fingerboard de-
fined by two diagonal corner points like a select-window on a computer screen. Zones are
each assigned a MIDI channel as well as a number of other values. You can use the Zon-
ing system to create some magical performance setups!
Up to 32 zones may be configured at any time. A zone may be as small as one note or as
large as the entire fingerboard. Where Zone boundaries overlap they will share qualities in
those areas. A ‘keyboard-split’ occurs where adjacent zones do not overlap. Zones may be
defined by simply picking a high and a low note from the fingerboard. When all of the de-
sired parameters influencing a zone have been punched in, the zone may be saved into a
Song Memory location. Zones maythus be set up to perform melody, accompaniment,
percussion and effects all from a single instrument. Library functions are available for copy-
ing a previously configured Song for use as a template in creating a new Song.

Several function keys have been placed on the surface of the Zboard to allow quick
changes to the setup of the instrument:.
The PAT, OCT, and SOLO keys are ‘Zone-based’controls that allow you to select a zone by playing and hold-
ing a note within it and adjust the parameter for just thatZone. So, ifyou have say two zones on the finger-
board, you can touch a key in one (or both) and then press the hotkey to change the Patch, etc for that zone.
This shortcut lets you make changes while you're performing rather than having to wade through menus to re-
program the system.
OCT Up/Down: These buttons allow you to change the Octave for any Zone on the fingerboard
giving you access to the full MIDI note range.
PAT Up/ Down: These buttons allow you to access up to 128 MIDI patches within any Zone
PANIC!:
The first time you hit Panic! It sends All NotesOff and Reset All Controllers to each active chan-
nel.
The second time you hit Panic! It sends the same messages to all channels.
The third time and every time thereafter that you hit the Panic! we use the brute force
approach that sends a Note-off to every note and a Data-zero (or 127) to reset every
Continuous Controller for every MIDI channel . This takes about 2 seconds but should
definitely clear any stuck messages for any synth,
JOYSTICK
The joystick is used as a performance device by programming MIDI messages to any of its
four directions. Also, when programming the menu-system, the joystick is used for data-
entry by scrolling vallues underneath the blinking cursor.
PADS
These are the touch-sensitive surfaces that come in a variety of shapes and are mounted
to many Zboard configurations and are programmed to a variety of performance controls.
PEDALS
There are commonly two jacks provided on a Zboard for pedals, Sustain and Volume which
use a SPSPT Normally-open switch and a 50K linear pot, respectively.
POTS AND SLIDERS
The Zboard has one volume pot as a standard feature, and a ModWheel and additional
pots available as options.
HOTKEYS/ FUNCTION KEYS
SENSOR HARDWARE

- Every function in the Zboard is listed here according to the Menu Screen in which it appears.
[ MENU SCREENS are listed in all CAPS. Functions are listed in lower case]
LIVE-SCREEN [Top-level Runtime screen]
“EDIT” button [Enters the top of the menu system, and Exits from all other menus]
SONG-MENU:[Top-level Edit-Screen]
NAME-EDIT
WRITE
UTILITIES
LIBRARIAN
Songname
Save
Copy
Delete
Swap
Copy-Pad
INITIALIZE
Songs
Response
Sequences
Curves
Triggers
Chains
Coldstart
TUNING
Map#
Presets
EDIT-KEYMAP
CHORD-GENERATE
CHORD-EDIT
BULK-DUMPS
Send
Receive
CLOCKS
Metronome Enable
Metronome Channel
Note#
TempoPad Enable
Clock: Internal/ External
MIDI Clock Output
BPM Setting
Time Signature
MORE>
Time Signature Editor
MORE>
ClockBend
ZBOARD Programmer Menu Tree

CURVES
(8) Force-Velocity Points
SEQUENCES
Insert-Event
Delete-Event
Programming-Lock
MORE>
MIDI-IN
TRIGGERS
AREPEGGIATOR
FRETBOARD:
Zone-Mode;
Boundaries
TUNING/ TRANSPOSITION:
Map#
Curve
Velocity
Invert
TUNING
MORE>
Solo
Unison
Transposition
MIDI
Patch/Velocity Send ON/OFF
Channel#: RIGHT/LEFT
SEND Pgm Chg and Volume
Patch#
Channel BankMSB#/ BankLSB#
Channel Volume
SCAN-MODE
AutoSustain: On/Off or Fingerboard-Sustain for Key-Trigger units
Trigger-Capture: On/Off
Zone-Solo (Audition): On/Off
Scan-Mode: Guitar/Polyphonic
SPECIAL
Zone Mode
First Pad (for Pad-Zone type)
Fingerboard Mask
Fingerboard Threshold
SENSORS
Sensor Mode
Fingerboard String to Strum
6-TRIGGER, Guitar setup Macro
TIMING MENU
EVENTS
Event-type
Velocity-Window
MACROS
CHORD-GENERATOR
Velocity-Window settings
(8) Event-Settings
OUTPUT SETTINGS
Curve

MIDI Port select
LINKS Enable and 4 Link selections
TRIGGER-FUNCTIONS
Mode select
DUAL Mode
Aftertouch Threshold
Aftertouch CURVE
RESPONSE
Gain
Response Bargraph
Chase On/Off
Scan-Time
Mask-Time
Threshold
Chase On/Off
Trigger-Mask
MORE>
Fingerboard :
Mask
Threshhold
Gain
Curve
Peak readout 0-255
SHOWALL
SONGS
PADS
EVENTS
GATES
LINKS
CHAINS
PATCHES

MENU SYSTEM - DATA ENTRY
The menu system uses eight “soft” keys around the perimeter of the display to select
various functions as indicated by the messages on the screen. Press the button nearest
to your desired selection in order to activate it. An UP and a Down key are provided for
data entry. The joystick, when installed, may also be used for data entry. Use the EDIT
key to enter and exit the programming menus. The soft-keys are numbered here for ref-
erence in this manual.
Up Softkey#1 Softkey#2 Softkey#3 Softkey#4
Down
EDIT Softkey#5 Softkey#6 Softkey#7 Softkey#8
LIVE-MODE MENU
Up Softkey#1 Softkey#2 Softkey#3 Softkey#4
Down
EDIT Softkey#5 Softkey#6 Softkey#7 Softkey#8
This is the top-level menu, which appears when the ZBOARD is in LIVE-mode. The
zboard is in LIVE-MODE when you first power-up.
It displays the names of the various system configurations that have been saved as
“SONGS”. A drummer would refer to these as “KITS”; A SONG is a collection of hard-
ware with all of our computer-assigned options and setups. The newest zboard systems
(4.1.08) currently provide 36 Song locations to store your setups. The first few songs
are provided from the factory as templates for your use and these are saved in flash
ROM. All of the Songs that appear in the menu screens are automatically copied into
battery-backed RAM so they can be edited and your changes will remain after you re-
move power from the ZBOARD. The Song banks may also be stored off-line via the
MIDI Bulk-Dump utility.
Use the EDIT key to leave the LIVE mode and enter the EDIT mode. After editing, use
the EDIT key again the return to the LIVE mode.
ZBOARD CHORDS DRUMS ORCHES-
TRA

Up Softkey#1 Softkey#2 Softkey#3 Softkey#4
Down
EDIT Softkey#5 Softkey#6 Softkey#7 Softkey#8
This is the top-level edit screen, which displays sub-menus for the various programma-
ble features for each Song.
SONG-MENU Sub-Menus:
Press Sotkey#1 to select the Song-number and use the Up/Dn arrow keys to
change number
NAME-EDIT: Press SoftKey#2 above the name of the SONG to enter the Name-Edit
screen.
WRITE: Takes you to the Write screen so that you may save your current setup.
UTILITIES: enters the Utility menu to edit a variety of objects.
FRETBOARD: enters the Fretboard-Zone menu to set up the fingerboard. All of your
settings can be made into 32 independent fingerboard Zones.
SENSORS: enters the Sensor menu to set up the Pads/Triggers/Joystick MIDI
Performance configuration.
RESPONSE: enters the Response Editor to set up the physical response for all of the
Sensors and the Fingerboard.
SHOWALL: Press Softkey#8 to enter the SHOWALL screens for viewing groups of
settings at a glance.
SONG #01: GUITAR WRITE UTILITIES
FRETBOARD SENSORS RESPONSE SHOWALL
SONG MENU, the Top-Level SONG-EDIT screen
- this is the Entry screen for the Zboard Editor -
A Song (or “Kit”) consists of:
1) One or more Fretboard Zones with all of their programmed settings.
2) Assignments for the Sensors.
3) Physical response settings for the Sensors.
4) A Tuning for the fingerboard keys and Open-Strings, and settings for Triggering modes.
5) A setup for the metronome.

The top-left of the screen shows the Song number followed by its name. By placing the
cursor over the song number and using the joystick or Up/Down buttons you may scroll
through the Song Banks without going back to the LIVE menu to make your selection.
To enter a new Song name: Place the cursor over the name field using the softkey#2
button above the name. Use the Joystick or Up/Down buttons to enter a character,
then use the soft keys to the left and right of the “CURSOR” message to move the cur-
sor over to the next character position.
Up Softkey#1 Softkey#2 Softkey#3 Softkey#4
Down
EDIT Softkey#5 Softkey#6 Softkey#7 Softkey#8
SONG-MENU\ NAME-EDIT screen
SONG:01 GUITAR
<---------------CURSOR------------>
Table of contents
Other Starr Labs Recording Equipment manuals


Popular Recording Equipment manuals by other brands

Cochlear
Cochlear Nucleus Kanso 2 quick guide

Mitsubishi Electric
Mitsubishi Electric DX-TL4509E series user manual

Amptone Lab
Amptone Lab XY MIDIPAD MINi user manual

MadgeTech
MadgeTech IFC406 Quick installation guide

ITS Telecom
ITS Telecom 6520 Operation manual

Tascam
Tascam Portacapture X8 Reference manual


