stayer ROCKY MHL14K User manual

ROCKY
MHL14K
www.grupostayer.com
Manual de instrucciones
ES
Área Empresarial Andalucía - Sector I
Calle Sierra de Cazorla nº7
C.P: 28320 Pinto (Madrid) SPAIN
Email: sales@grupostayer.com
Email: info@grupostayer.com
Istruzioni d’uso
IT Operating instructions
GB Bedienungsanleitung
DE Instructions d’emploi
FR Manual de instruções
PKullanma Kılavuzu
TR

A

B
C
D

L dB(A)
PA
78
L dB(A)
WA
89
2
a m/s
h
2,5
6.1.
ROCKY
MHL14
V
14.4
-1
min
0-850
-1
min
0-4800
J
1
Ø max
8
Ø max
10
Ø max
10
kg
1.3
rpm
ipm
K=3 dB
2
K=1.5 m/s
kg
V
Ah
1.3
min
60

Always wait until the machine has come to a complete
stop before placing it down. The tool insert can jam and
leadtolossofcontroloverthepowertool.
Before any work on the machine (e. g., maintenance,
tool change, etc.) as well as during transport and
storage,settherotationaldirectionswitchto thecentre
position. Unintentional actuation of the On/Off switch can
leadtoinjuries.
Protectthe power tool against heat, e. g., against
continuous intense sunlight, fire, water, and
moisture.Dangerofexplosion.
In case of damage and improper use of the battery,
vapours may be emitted. Provide for fresh air and seek
medical help in case of complaints. The vapours can
irritatetherespiratorysystem.
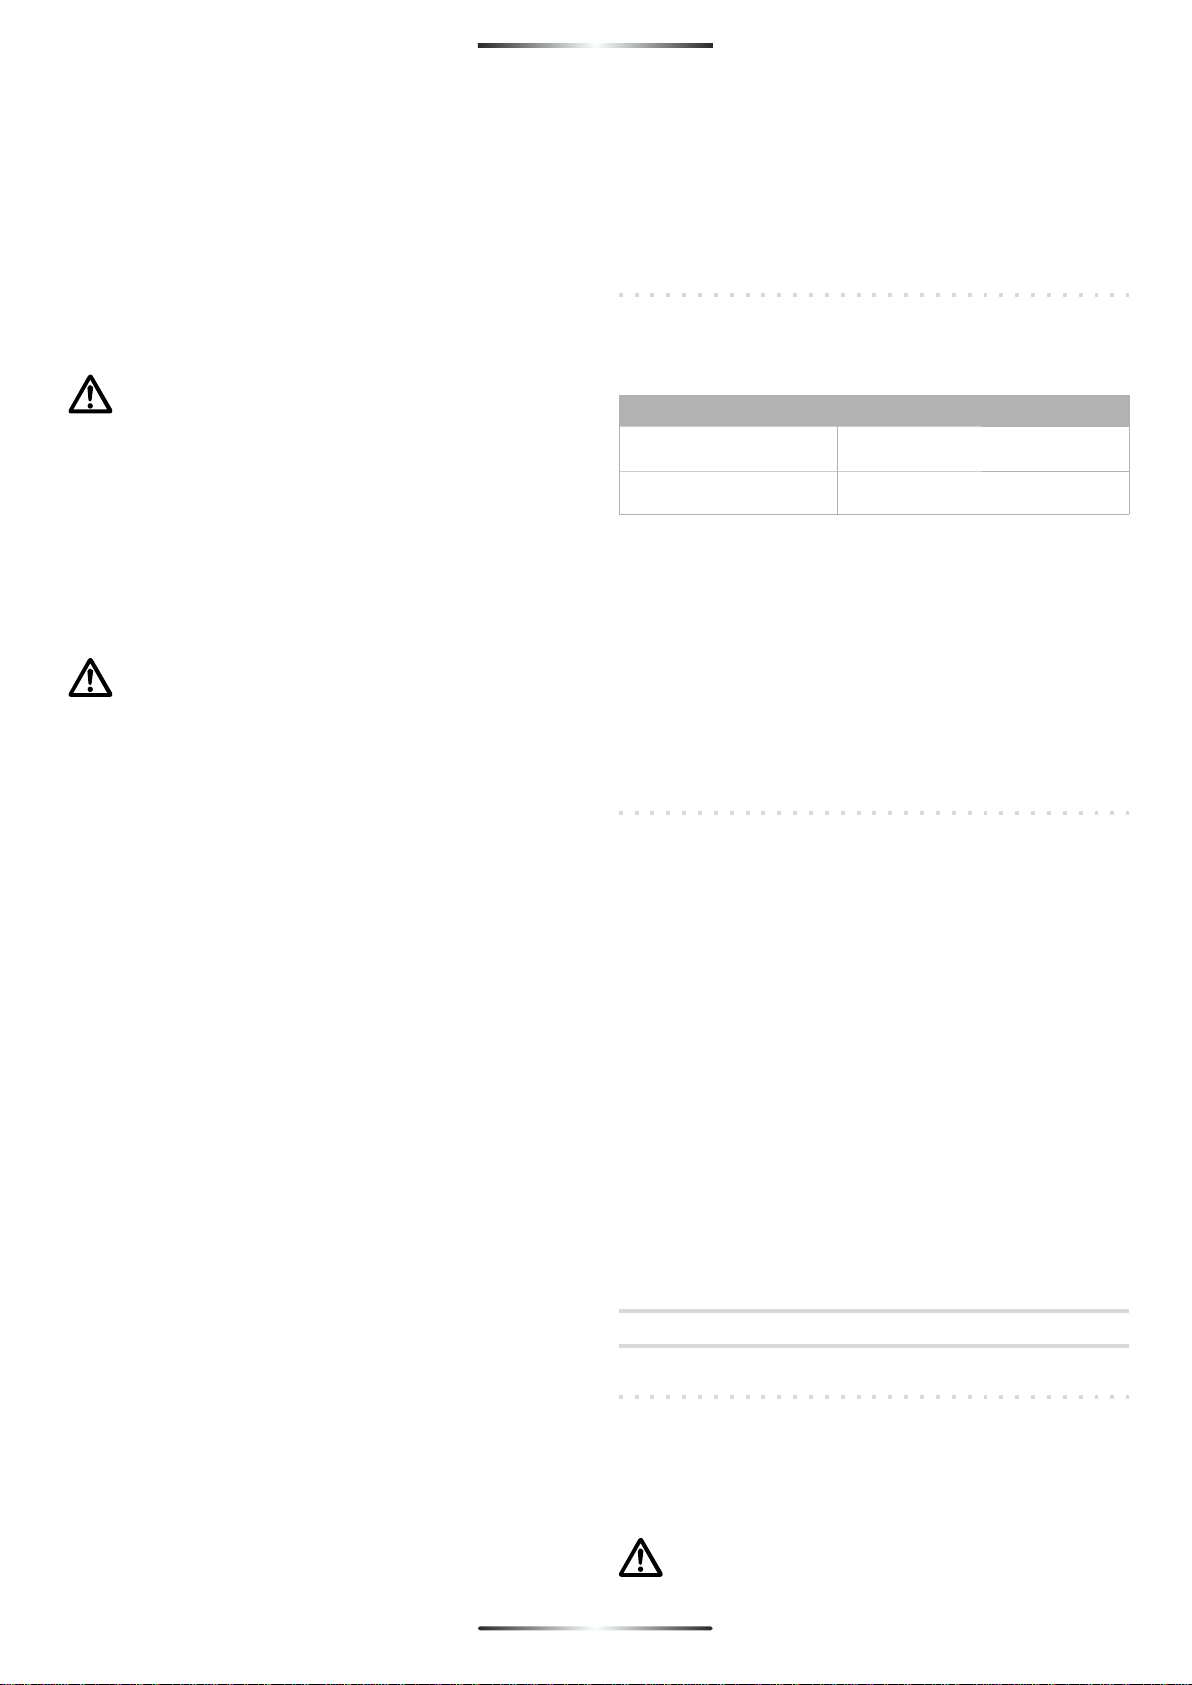
SafetyWarningsforbatterychargers
Keep the battery charger away from rain or
moisture.Penetrationofwaterinthebatterycharger
increasestheriskofanelectricshock.
Do not charge other batteries. The battery charger is
suitable only for charging STAYER lithium ion batteries
withinthelisted voltagerange. Otherwise thereisdanger of
fireandexplosion.
Keep the battery charger clean. Contamination can lead
todangerofanelectricshock.
Before each use, check the battery charger, cable and
plug. If damage is detected, do not use the battery
charger. Never open the battery charger yourself. Have
repairs performed only by a qualified technician and
only using original spare parts. Damaged battery
chargers, cables and plugs increase the risk of an electric
shock.
Do not operate the battery charger on easily
inflammable surfaces (e. g., paper, textiles, etc.) or
surroundings. The heating of the battery charger during
thechargingprocesscanposeafirehazard.
Children should be supervised to ensure that they do
notplaywiththebatterycharger.
Before any work on the machine (e. g., maintenance,
tool change, etc.) as well as during transport and
storage,settherotationaldirectionswitchto thecentre
position.
Unintentional actuation of the On/Off switch can lead to
injuries.
3.Instructionsforuse
3.1PlacementTool
Read all safety warnings and all instructions.
Failure to follow the warnings and instructions may
resultinelectricshock,fireand/orseriousinjury.
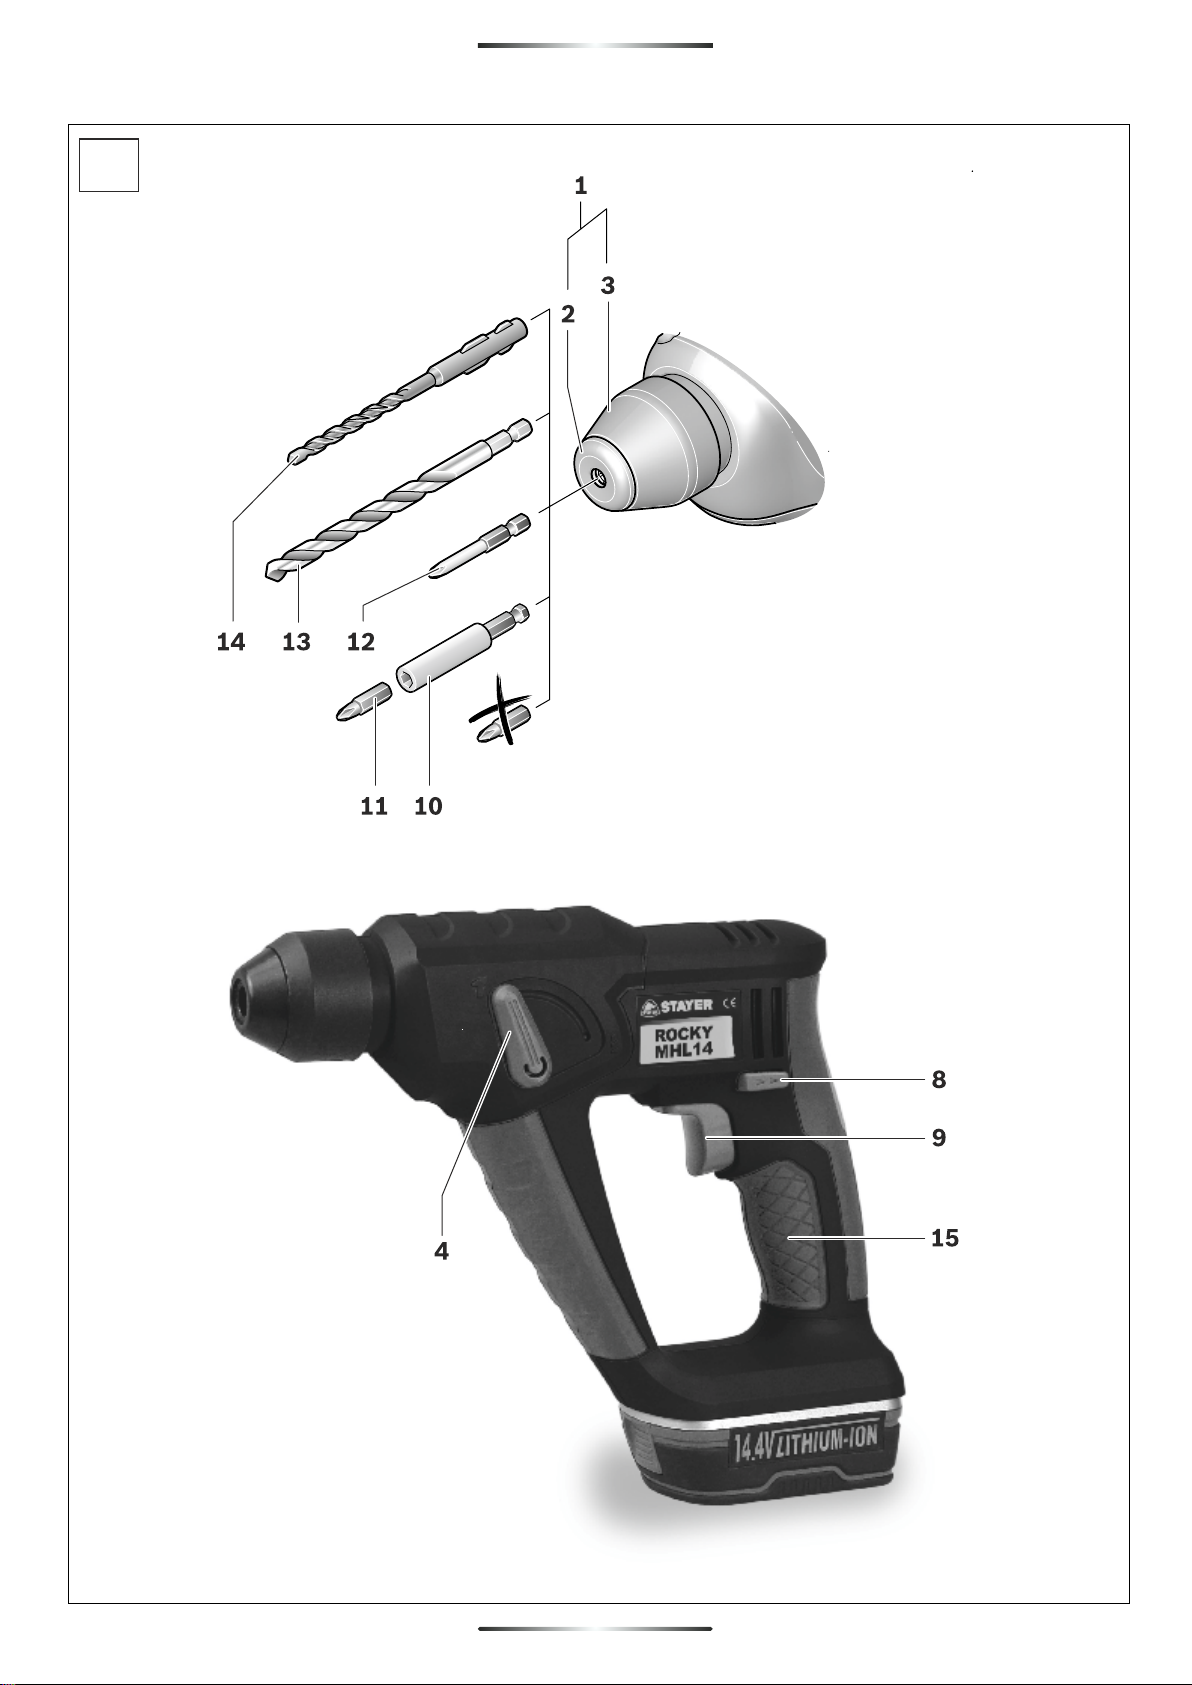
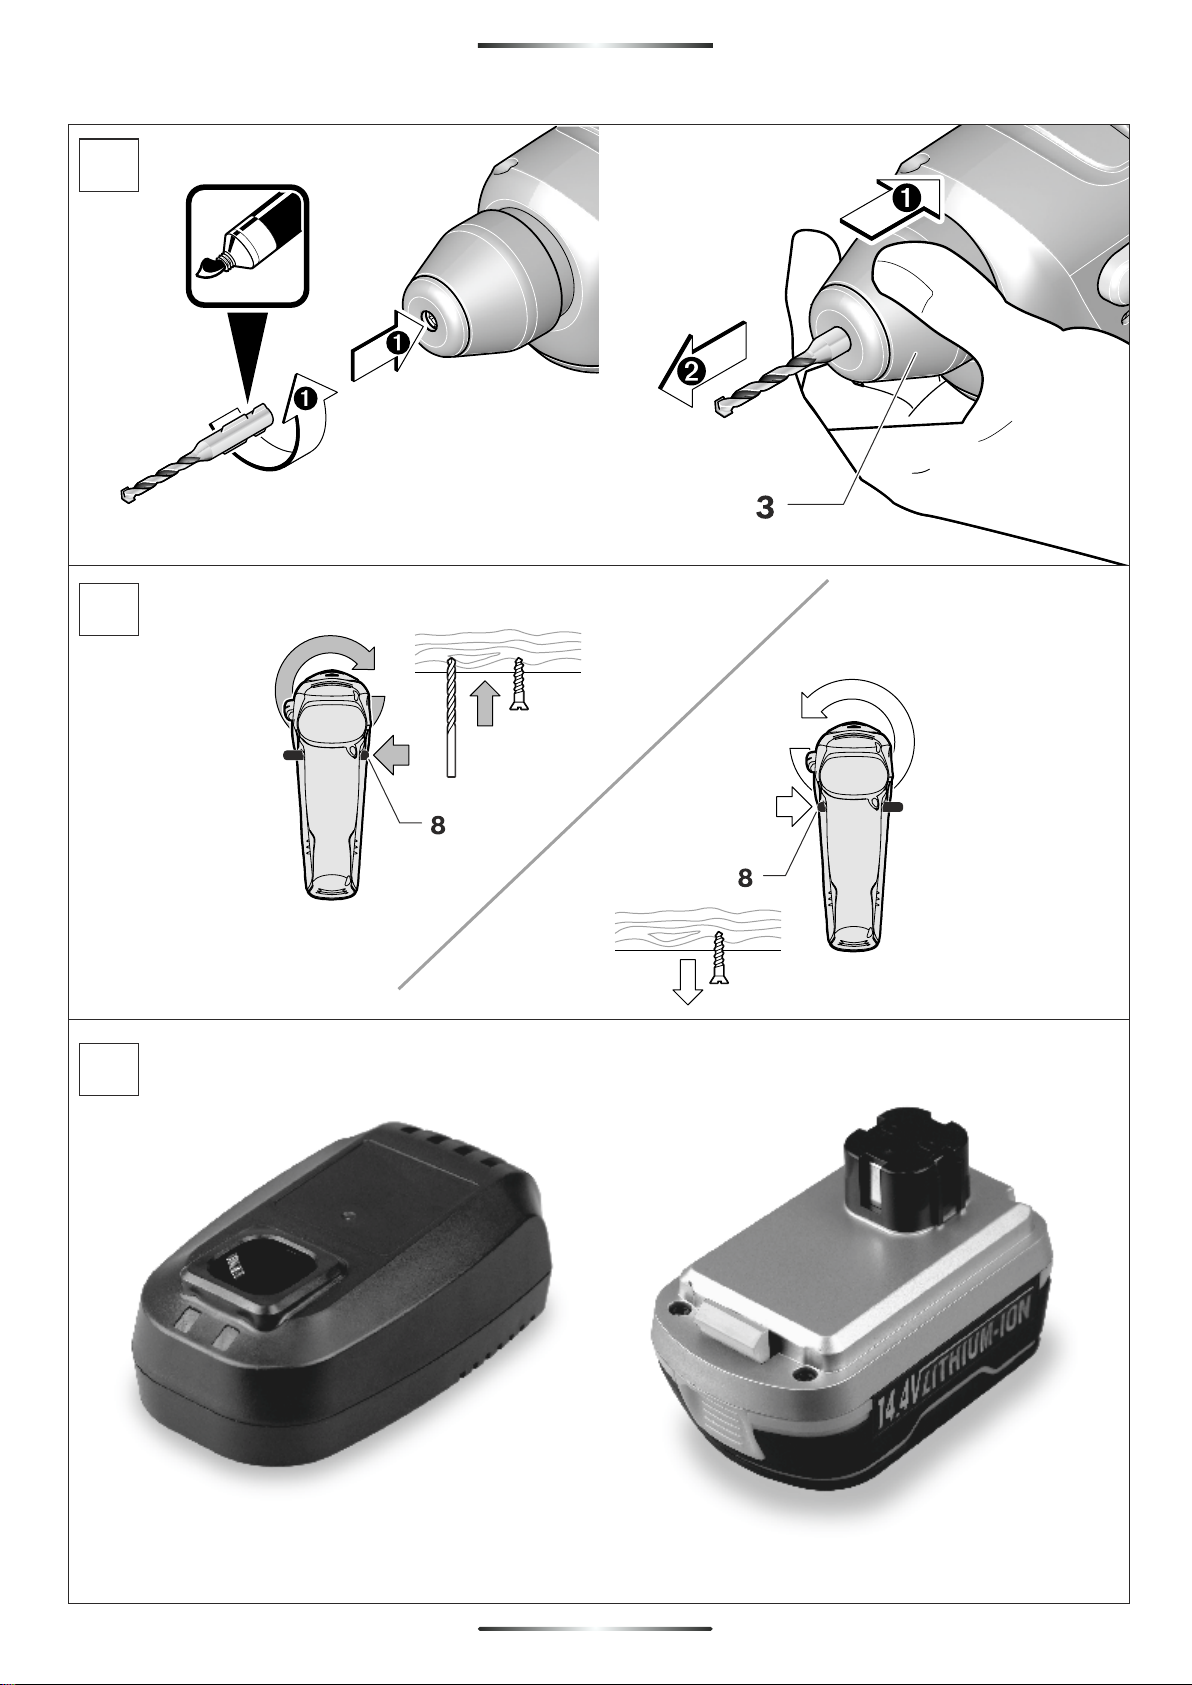
3.2Assembly(Fig.B)
The machine is intended for hammer drilling in concrete,
brick and stone. It is also suitable for drilling without impact
in wood, metal, ceramic and plastic. Machines with
electronic control and right/left rotation are also suitable for
screwdriving.
Usethebatterychargeronlywhenyoufullyunderstandand
can perform all functions without limitation, or have
receivedappropriateinstructions.
Wear hearing protection. Exposure to noise can cause
hearingloss.
Hold power tool by insulated gripping surfaces, when
performing an operation where the cutting accessory
or fastener may contact hidden wiring. Cutting
accessory and fasteners contacting a “live” wire may make
exposed metal parts of the power tool “live” and could give
theoperatoranelectricshock.
Use appropriate detectors to determine if utility lines
are hidden in the work area or call the local utility
company for assistance. Contact with electric lines can
leadtofireandelectricshock.Damagingagaslinecanlead
to explosion. Penetrating a water line causes property
damageormaycauseanelectricshock.
Switch off the power tool immediately when the tool
insert jams. Be prepared for high reaction torque that
cancausekickback.Thetoolinsertjamswhen:
—thepowertoolissubjecttooverloador
—itbecomeswedgedintheworkpiece.
Secure the workpiece. A workpiece clamped with
clamping devices or in a vice is held more secure than by
hand.
Keep your workplace clean. Blends of materials are
particularly dangerous. Dust from light alloys can burn or
explode.
1. Contents page
2.Specific safety instructions......................................15
3.Instructionsfor use....................................................15
3.1 Placement Tool.............................................................15
3.2 Assembly......................................................................15
3.3Electricalconnection.............................................16
3.4Illustrateddescription............................................16
4.Operating instructions..............................................16
4.1Placement and testing..........................................16
4.2General instructions for use..................................17
4.3Tool change..........................................................17
5.Maintenance and service instructions.....................17
5.1Cleaning...............................................................17
5.2Repairservice.......................................................18
5.3 Warranty...............................................................18
5.4 Disposal and recycling..........................................18
6.Regulations................................................................18
6.1Technical Data......................................................18
6.2 EU declaration of conformity.................................19
2.Specificsafetyinstructions
ENGLISH
5
5

BatteryCharging
Do not use other battery chargers. The supplied battery
charger is designed for the Lithium- Ion battery in your
machine.
Observe the mains voltage! The voltage of the power
supply must correspond with the data given on the
nameplate of the battery charger. Battery chargers marked
with230Vcanalsobeoperatedwith220V.
The battery is supplied partially charged. To
ensure full capacity of the battery, completely
charge the battery in the battery charger before
usingyourpowertoolforthefirsttime.
The lithium-ion battery can be charged at any time without
reducingitsservicelife.Interruptingthechargingprocedure
doesnotdamagethebattery.
When the battery is empty, the machine is switched off by
means of a protective circuit: The inserted tool no longer
rotates.
Do not continue to press the On/Off switch after
the machine has been automatically switched
off.Thebatterycanbedamaged.
The battery is equipped with a NTC temperature control
which allows charging only within a temperature range of
between 0 °C and 45 °C. A long battery service life is
achievedinthismanner.
The charging procedure begins as soon as the mains plug
ofthebatterychargerispluggedintoasocketoutletandthe
charge connector 17 is plugged into the socket 16 on the
bottomofthehandle.
The battery charge-control indicator 5indicates the
charging progress. During the charging process, the
indicator flashes green. When the battery charge-control
indicator 5lights up green continuously, the battery is fully
charged.
During the charging procedure, the handle of the machine
warms up. This is normal. Disconnect the battery charger
fromthemainssupplywhennotusingitforlongerperiods.
The power tool cannot be used during the charge
procedure; it is not defective when inoperative during the
chargingprocedure.
Protectthebatterychargeragainstmoisture!
Observethenotesfordisposal.
Dust/ChipExtraction
Dusts from materials such as lead-containing coatings,
some wood types, minerals and metal can be harmful to
one’s health. Touching or breathing-in the dusts can cause
allergicreactionsand/or lead torespiratory infections ofthe
userorbystanders.
Certaindusts,suchasoakorbeechdust,areconsideredas
carcinogenic,especially inconnectionwithwood-treatment
additives(chromate,woodpreservative).
Materials containing asbestos may only be worked by
specialists.
–Provideforgoodventilationoftheworkingplace.
–ItisrecommendedtowearaP2filterclassrespirator.
Observe the relevant regulations in your country for the
materialstobeworked.
Thestatusindicatoroncharger,consistsoftwoLEDs:
1SDS-PLUStoolholder
2Dustprotectioncap
3Lockingsleeve
4Selectorswitchfordrilling/hammerdrilling
5Batterycharge-controlindicator
6Indicatorforrightrotation*
7Indicatorforleftrotation*
8Rotationaldirectionswitch
9On/Offswitch
10 Universalbitholder*
11 Screwdriverbit*
12 Screwdriverbitwithballcatch*
13 Drillbitwithhexagonshank*
14 DrillbitwithSDS-PLUStoolholder*
15 Handle(insulatedgrippingsurface)
16 Socketforchargeconnector
17 Chargeconnector
*Accessoriesshownordescribedarenotpartof the standard
delivery scope of the product. A complete overview of
accessoriescanbefoundinouraccessoriesprogram.
3.3Electricalconnection (Fig.D)
BatteryCharge-controlIndication
TemperatureDependentOverloadProtection
When using as intended for, the power tool cannot be
subject to overload. When the load is too high or the
allowable battery temperature of 70 °C is exceeded, the
electronic control switches off the power tool until the
temperatureisintheoptimumtemperaturerangeagain.
Additionally, the battery charge-control indicator 5flashes
green and red at the same time until the On/Off switch 9is
released.
3.4Illustrateddescription
4.Operatinginstructions
4.1Placementandtesting
SettingtheOperatingMode
With the selector switch for drilling/hammer drilling 4, the
operatingmodeofthemachineisselected.
Change the operating mode only when the
machine is switched off! Otherwise, the machine
canbedamaged.
ENGLISH
LED Capacity
Continuous lighting, green Displayed when the battery is
charged.
Displayed when the battery is being
charged.
Continuous lighting, red
6
6

4.3Toolchange
The SDS-PLUS tool holder allows for simple and
convenient changing of drilling tools without the use
ofadditionaltools.
Due to their working principle, SDS-PLUS drilling tools
move freely. This results in radial runout at no-load.
However,this has no effect on the accuracyof the drill hole,
asthedrillbitcentresitselfduringdrilling.
TheSDS-PLUStoolholdercanalsoaccommodatedifferent
drill-bit types with hexagon shank. For more information,
see the accessories page at the end of these operating
instructions.
The dust protection cap 2largely prevents the entry of
drilling dust into the tool holder during operation. When
inserting the tool, take care that the dust protection cap 2is
notdamaged.
A damaged dust protection cap should be
changed immediately. We recommend having
thiscarriedoutbyanafter-salesservice.
InsertingSDS-PLUSDrillingTools
Cleanandlightlygreasetheshankendofthetool.
Insertthetoolinatwistingmannerinto the tool holder untilit
latchesitself.
Checkthelatchingbypullingthetool.
RemovingSDS-PLUSDrillingTools
Pushbackthelockingsleeve3andremovethetool.
5.Maintenanceandserviceinstructions
For safe and proper working, always keep the
machineandventilationslotsclean.
Before any work on the machine (e. g.,
maintenance, tool change, etc.) as well as during
transportandstorage,set the rotational direction
switch to the centre position. Unintentional actuation of
theOn/Offswitchcanleadtoinjuries.
A damaged dust protection cap should be
changed immediately. We recommend having
thiscarriedoutbyanafter-salesservice.
5.1Cleaning
When the battery is no longer operative, please refer to an
authorised after-sales service agent for STAYER power
tools.
If the machine should fail despite the care taken in
manufacturing and testing procedures, repair should be
carried out by an after-sales service centre for STAYER
powertools.
In all correspondence and spare parts order, please always
includethe10-digitarticlenumbergivenon the type plate of
themachine.
To change the operating mode, turn the selector switch for
“drilling/hammerdrilling”4totherequestedposition.
Positionforhammerdrillinginconcreteorstone
Position for drilling without impact in wood,
metal, ceramic and plastic as well as for
screwdriving
ReversingtheRotationalDirection(seefigureC)
Actuate the rotational direction switch 8 only when the
machineisatastandstill.
The rotational direction switch 8is used to reverse the
rotational direction of the machine. However, this is not
possiblewiththeOn/Offswitch9actuated.
Right Rotation: Fordrilling anddriving inscrews, pushthe
rotationaldirectionswitch8lefttothestop.
Left Rotation: For loosening and unscrewing screws and
nuts, press the rotational direction switch 8through to the
rightstop.
SwitchingOnandOff
To start the machine, press the On/Off switch 9and keep it
pressed.
Toswitchoffthemachine,releasetheOn/Offswitch9.
For low temperatures, the power tool reaches the full
hammer/impactcapacityonlyafteracertaintime.
SettingtheSpeed/ImpactRate
Thespeed/impactrateoftheswitchedonpowertoolcanbe
variablyadjusted,dependingonhowfartheOn/Offswitch9
ispressed.
Light pressure on the On/Off switch 9results in low
speed/impact rate. Further pressure on the switch
increasesthespeed/impactrate.
4.2Generalinstructionsforuse
Forhammerdrilling,SDS-PLUStoolsarerequired.
For drilling without impact in wood, metal, ceramic and
plastic,asuitableSDS-PLUStooloranapplicationtoolwith
hexagonshankcanbeused.
For screwdriving, use only screwdriver bits with ball catch
12.Otherscrewdriverbits11canbeinsertedviaauniversal
bitholderwithballcatch10.
Aselection of suitable application tools can be found in the
AccessoriesOverviewattheendoftheseinstructions.
Apply the power tool to the screw/nut only when
itisswitchedoff.Rotatingtoolinsertscanslipoff.
ENGLISH
SDS
PLUS
7
7

5.2Repairservice
Our after-sales service responds to your questions
concerning maintenance and repair of your product as well
as spare parts. Exploded views and information on spare
partscanalsobefoundunder:info@grupostayer.com
Our customer consultants answer your questions
concerning best buy, application and adjustment of
productsandaccessories.
5.3Warranty
Warrantycard
Included in the documentation that accompanies this
equipment, you should find the warranty card. You should
fill out the card completely and return to vendor with a copy
of purchasing receipt or invoice and you should receive a
receipt.
Note: If you cannot find the warranty card within the
documentation,youmustaskforitthroughyoursupplier.
The warranty is limited only to manufacturing defects and
expire if pieces have been removed or manipulated or
repairedotherthanthemanufacturer.
5.4Disposalandrecycling
Themachine,accessories and packagingshouldbe sorted
forenvironmental-friendlyrecycling.
OnlyforECcountries:
Donotdisposeofpowertoolsintohouseholdwaste!
According the European Guideline 2002/96/EC
for Waste Electrical and Electronic Equipment
and its implementation into national right, power
toolsthatarenolongerusablemustbe collected
separately and disposed of in an
environmentallycorrectmanner.
Subjecttochangewithoutnotice.
Batterypacks/batteries:
Do not dispose of battery packs/batteries
into household waste, fire or water. Battery
packs/batteries should, if possible, be
discharged, collected, recycled or disposed
ofinanenvironmental-friendlymanner.
OnlyforECcountries:
Defective or dead out battery packs/batteries must be
recycledaccordingtheguideline2006/66/EC.
Batteriesno longer suitable for use can bedirectly returned
atSTAYER
When removing the battery from the machine, actuate the
On/Off switch 9until the battery is completely discharged.
Unscrew the screw in the casing and take off the casing
shell. Disconnect the connections on the battery and
removethebattery.
ENGLISH
8
rpm
ipm
kg
V
6.Regulations
6.1 Technical Data
= Rated power input
= Load speed
= Percussion
=
= Maximum drilling, steel
= Maximum drilling, stone
= Maximum drilling, wood
=Weight
=BatteryCapacity
=
L =Soundpowerlevel
WA
A
L =Soundpressurelevel
P
=Vibration
Percussive energy
Batterychargingtime
Thevaluesgivenarevalidfornominalvoltages[U]230/240V~50/60Hz -
110/120 V ~ 60Hz. For lower voltage and models for specific countries,
thesevaluescanvary.Pleaseobservethe articlenumber onthetypeplate
ofyourmachine.Thetradenamesoftheindividualmachinesmayvary.
Noise/VibrationInformation
MeasuredsoundvaluesdeterminedaccordingtoEN60745.
Typically the A-weighted noise levels of the product are: Sound
pressurelevel 78dB(A); Soundpower level89 dB(A).Uncertainty
K=3dB.
Wearhearingprotection!
Vibration total values (triax vector sum) determined according to
EN60745:
Hammer drilling into concrete: Vibration emission value a =20
h
2 2
m/s ,UncertaintyK=1.5m/s , 2
Drilling into metal: Vibration emission value a =4.0 m/s ,
h
2
UncertaintyK=1.5m/s , 2
Screwdriving: Vibration emission value a =2.5 m/s , Uncertainty
h
2
K=1.5m/s .
The vibration emission level given in this information sheet has
been measured in accordance with a standardised test given in
EN 60745 and may be used to compare one tool with another. It
maybeusedforapreliminaryassessmentofexposure.
The declared vibration emission level represents the main
applications of the tool. However if the tool is used for different
applications, with different accessories or poorly maintained, the
vibration emission may differ. This may significantly increase the
exposureleveloverthetotalworkingperiod.
Anestimationofthelevelofexposure tovibrationshouldalsotake
into account the times when the tool is switched off or when it is
running but not actually doing the job. This may significantly
reducetheexposureleveloverthetotalworkingperiod.
8

Identify additional safety measures to protect the operator from
the effects of vibration such as: maintain the tool and the
accessories,keepthehandswarm,organisationofworkpatterns.
CORDLESS ROTARY HAMMER
6.2EUdeclarationofconformity
The undersigned:
STAYERIBERICA,S.A.
With address at:
Calle Sierra de Cazorla, 7
Área Empresarial Andalucía - Sector 1
28320 PINTO (MADRID)
Tel.: +34 902 91 86 81 / Fax: +34 91 691 91 72
CERTIFIES
Thatthemachine:
Type:
Models:ROCKYMHL14K
Wedeclare under our sole responsibilitythat thisproduct is
in conformity with the following standards or standardized
documents: EN 60745 according to EU Regulations
2004/108/CE,2006/95/CE,2006/42/CE
ENGLISH
Ramiro de la Fuente
Managing Director
9
9

Other manuals for ROCKY MHL14K
1
Table of contents
Other stayer Rotary Hammer manuals