Stealth 13V2S12 User manual

Doc-rev 20230425
SAVE THESE INSTRUCTIONS. This manual contains important safety precautions which should be read and understood before operating the product. Failure to do so could result in
serious injury. Specifications, descriptions and images in this manual are as accurate as known at the time of publication, but are subject to change without notice.
ENGLISH
WINCH MODELS
WINCH
OWNERS MANUAL
VS, VA, VS, VAE

WINCH MANUAL INTRODUCTION
INTRODUCTION
Congratulations on your purchase of a winch. We design and build
winches to strict specifications and with proper use and maintenance your
winch should bring you years of satisfying service.
Every eort has been made to ensure the accuracy and completeness of
the information in this manual at the time of publication, and we reserve
the right to change, alter and/or improve the product and this document
at any time without prior notice.
SAFETY DEFINITIONS
Your winch can develop tremendous pulling forces and if used unsafely
or improperly could result in property damage, serious injury or death.
Throughout this manual, you will find the following symbols for caution,
warning and danger. Pay particular attention to the notes preceded
by these symbols as they are written for your safety. Ultimately, safe
operation of this device rests with you, the operator.
DANGER
DANGER indicates a hazardous situation which,if not avoided, will
result in death or serious injury.
WARNING
WARNING indicates a hazardous situation which, if not avoided, could
result in death or serious injury.
CAUTION
CAUTION indicates a hazardous situation which, if not avoided, could
result in minor or moderate injury.
NOTICE
NOTICE indicates information considered important, but not hazard-
related (e.g., messages relating to property damage).
GETTING TO KNOW YOUR WINCH
Your winch is a powerful piece of machinery. It is important that you
understand the basics of its operation and specifications so that
when you need to use it, you can use it with confidence and safety.
Below is a list of the components of your winch and their uses.
1. This winch is engineered for maximum line pull with only one layer of
cable spooled onto the winch drum (the first layer).
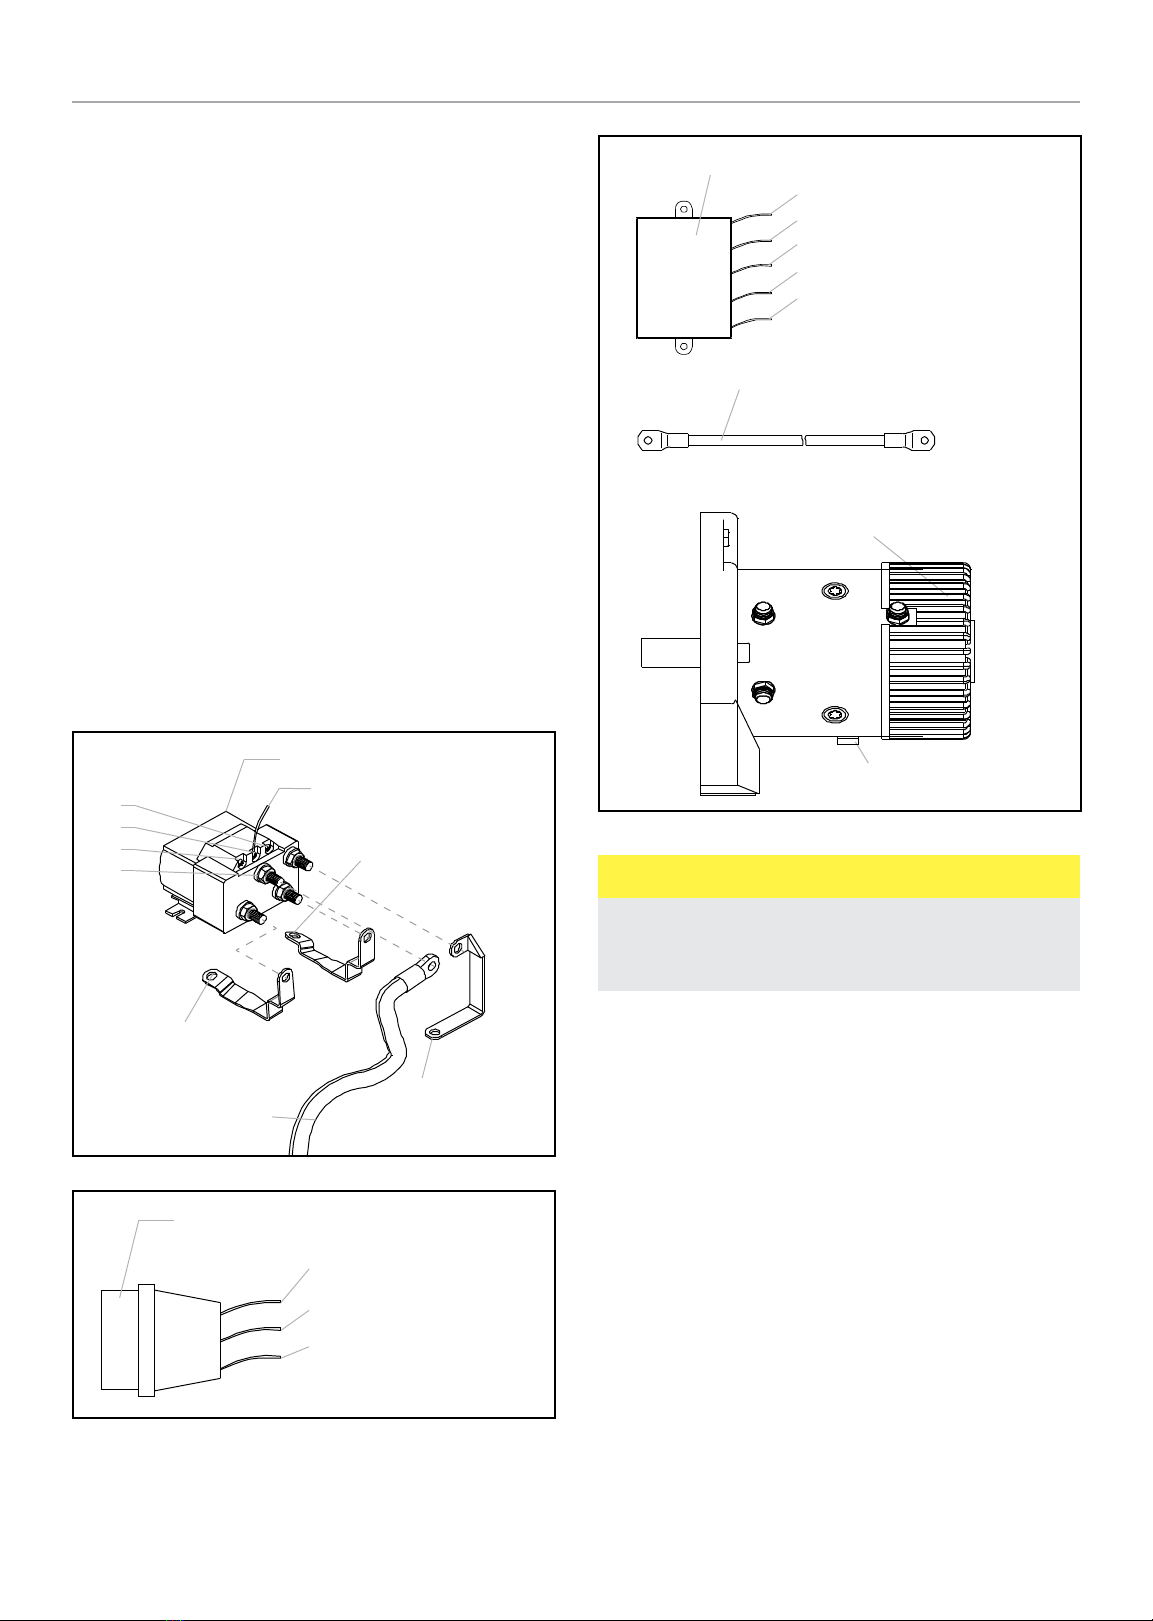
2. Motor: The motor is powered by a 12/24-volt battery and provides
power to the gear assembly which turns the drum and winds the wire
rope in a direction.
3. Winch Drum: The winch drum is the cylinder on which the wire rope is
stored. It can be spooled In or Out by use of the remote lead switch.
4. Winch Rope: Your winch been supplied with galvanized aircraft
steel cable or synthetic rope and is designed specifically for load
capacity of the rated line pull of this winch. The cable feeds on from
underneath the drum position, it is looped at one end to accept the
hook.
5. Fairlead (Supplied with selective models): For when using the winch
at an angle the roller fairlead acts to guide the rope onto the drum
evenly and minimizes damage to the rope or winch from abrasion.
6. Gear Assembly System: The reduction gears convert the winch
motor power into extreme pulling forces.
7. Braking System: Braking action is automatically applied to the winch
when the winch motor is stopped or there is a load on the wire rope.
This is achieved by a separate external mechanical brake which
applies the braking action. (Brakes are NOT designed as securing
devices and the winch cables should never be left attached when
vehicle / equipment is in transport).
8. Free Spooling Clutch: The clutch allows the operator to manually
disengage (“CLUTCH OUT”) the spooling drum from the gear train.
This is called free spool. Engaging the clutch (“CLUTCH IN”) locks
the winch into the gear system.
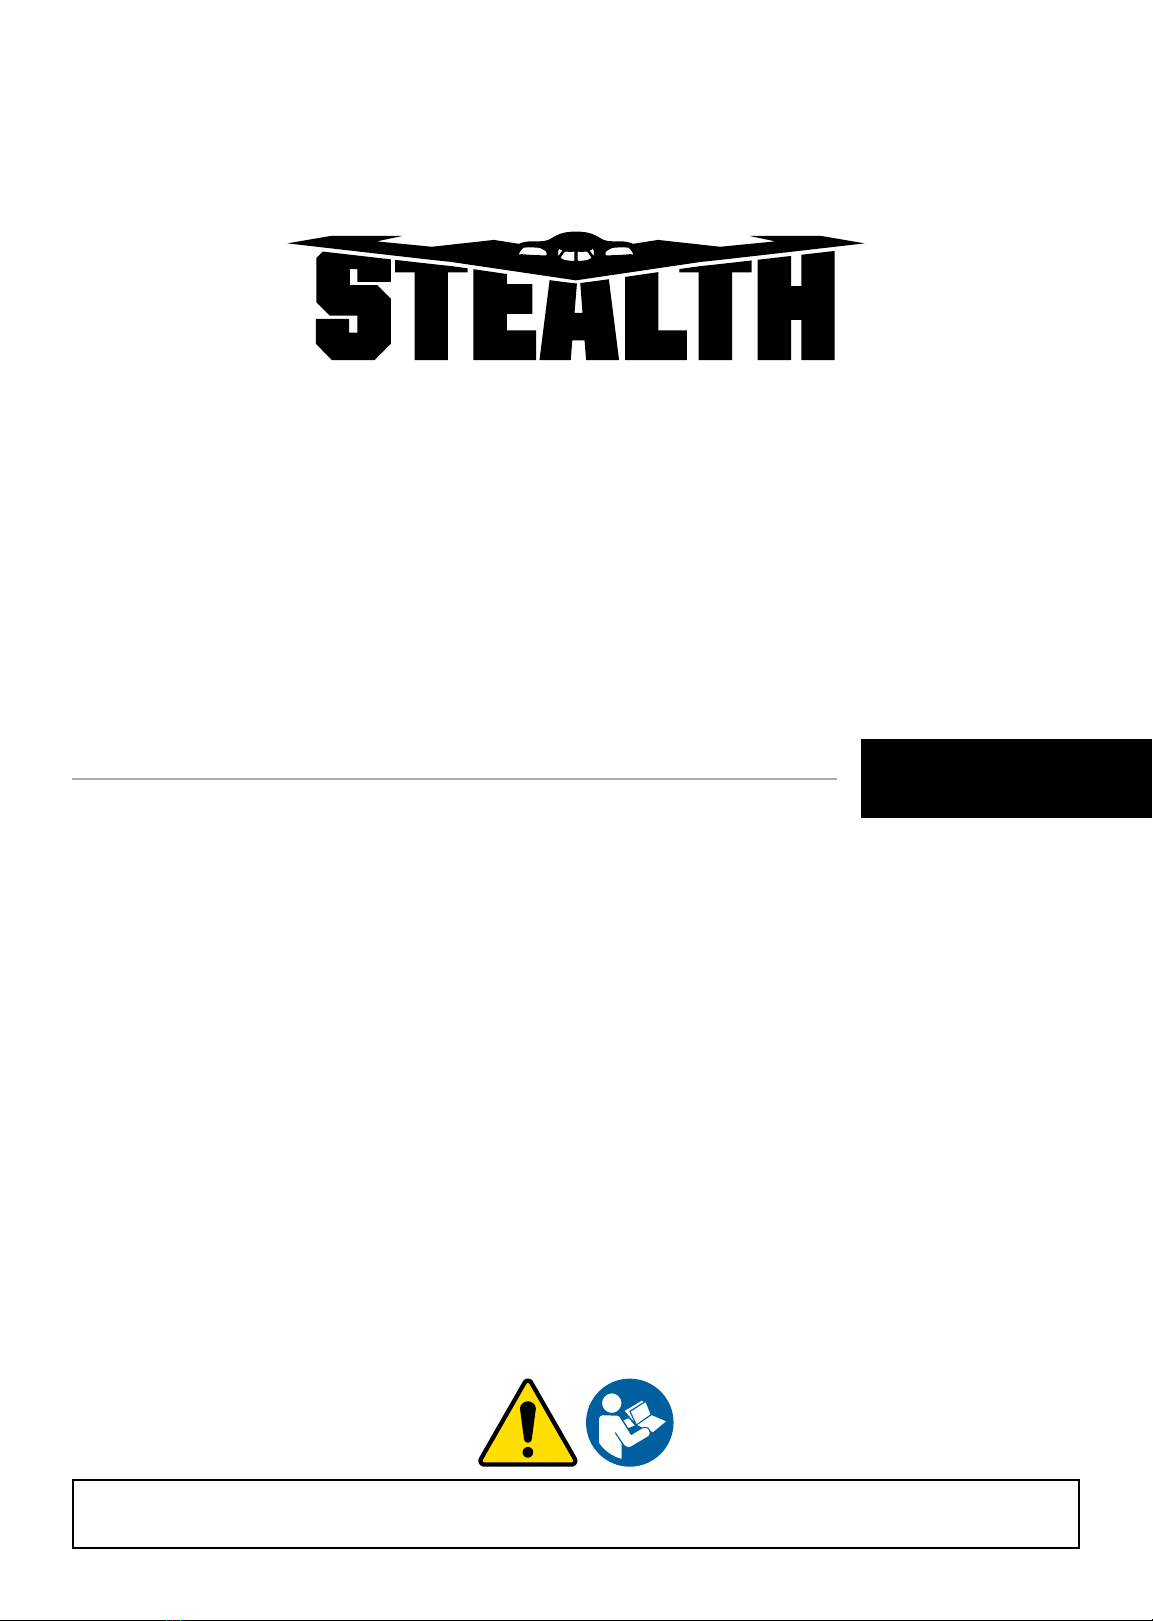
9. Solenoid: Power from the vehicle battery flows through the
weatherproof switch before being directed to the winch motor.
10. Wired Remote lead Switch: The remote switch leads have a dual
switch for powering in or powering out your winch drum. The remote
control allows you to stand clear of the wire rope when the winch is
under load.
11. Wireless remote (Supplied on selective models): This is designed
and oered for ‘Oroad’ or ‘None Commercial’ use only and is not
included in any warranty oered, This allows the operator to always
control the winch from up to 50 Ft away.
12. Universal Flat Bed Mounting Channel: (Optional) Your winch could
have been optionally supplied with a flat bed mounting channel that
can be mounted to most flat surfaces such as trailers, truck beds
and structures etc. The mounting channel also has a number of
mounting holes and holes to accept your roller fairlead.
13. Pulley/Snatch Block: (Optional) If your winch is supplied with a
pulley/snatch block which can double the pulling power of the winch,
or change the pulling direction without damaging the wire rope. We
recommend you to use a double line and snatch block for pulling over
70% of the rated line pull.

WINCH MANUAL IMPORTANT SAFETY INSTRUCTIONS
IMPORTANT SAFETY INSTRUCTIONS
DANGER
DO NOT EXCEED RATED CAPACITY.
INTERMITTENT USE ONLY COOL BETWEEN USES.
DO NOT use winch for lifting/moving people or live animals.
A minimum of five wraps of cable around the drum barrel is necessary
for pulling and holding the rated load. The cable clamp is not designed
to hold the load without the 5 wraps of cable around the drum.
(usually marked red on the drum end of the cable)
DANGER
Keep yourself and others a SAFE DISTANCE to the side of the cable
when under tension.
NEVER stand or step over a cable, or near a cable under load using a
winch blanket or sail is strongly recommended.
DON’T move the vehicle to pull a load (towing) on the winch cable.
This could result in cable breakage.
Disconnect the remote control and isolate when not in use.
DANGER
DO NOT exceed maximum pull rating. Avoid “shock loading” by using
the remote lead switch intermittently to take up the slack in the wire
rope. “Shock loading” can far exceed the rated capacity for the wire
rope and drum and will result in damaging winch and brake. By doing
so will void any warranty.
DANGER
DO NOT use you winch as securing device it is not designed for this
and will result in damaging winch and brake and will void any warranty.
DO NOT exceed maximum line pull ratings shown on the tables.
DO NOT use as a hoist. Do not use for overhead lifting.
DANGER
NEVER cut, weld, or modify any part of the winch or cable. By doing
so will void any warranty
DANGER
When re-spooling the cable Ensure that the cable spools in the
under-wind position with the cable entering the drum from the
bottom, not the top. To re-spool correctly, and while wearing gloves,
keep a slight tension on the cable while pushing the remote control
button to draw in the cable. Walk toward the winch NEVER allowing
the winch cable to slide through your fingers or hands.
DO NOT let your hands get within 12”(30cm) of the winch while re-
spooling. Turn o the winch and repeat the procedure until a few feet
of cable is left. Disconnect the remote control and finish spooling by
hand by rotating the drum manually with the clutch disengaged. Keep
hands clear of the fairlead and drum while the winch is under power.
DANGER
Failure to read and understand these warnings may result in personal
injury and/or property damage.
Always use gloves to protect hands when handling any type or cable/
rope. Never let the cable slide through your hands.
NEVER connect the cable back to itself.
Always apply blocks/chocks/straps to the wheels of the vehicle/
equipment when on an incline and in transportation.
No modifications, alterations, or deviation to the winch are authorized
by the manufacturer and MUST NOT be made. By doing so will void
any warranty.
Duration of winching pulls should be kept as short as possible. If
the motor becomes uncomfortably hot to the touch, stop winching
immediately and let it cool down for approx 8 mins minutes. Do not
winch for more than two minutes at or near the maximum rated load
without resting for 8 minutes.
DANGER
If the motor stalls DO NOT maintain winching. Winches are designed
and made for intermittent use and should be used in conjunction with
their duty cycles.
NEVER release the free-spool clutch when there is a load on the
winch as the load will roll backwards.
Use hand saver hook when handling the hook for spooling or un-
spooling the wire rope.
NOTICE
The winch and its all-derivative types are rated at rated capacity when
spooling the first rope layer on the drum. Overloading can damage
the winch / motor / or wire rope.
For loads over 70% of rated line pull, we recommend the use of the
pulley block / snatch block to double the wire rope line and reduce the
strain. This will aid in two ways:
It will reduce the number of rope layers on the drum and reduce the
load on the wire rope by as much as 50%. When doubling the lineback
to the vehicle, always attach to the frame or another load bearing
point..

WINCH MANUAL IMPORTANT SAFETY INSTRUCTIONS
NOTICE
The vehicle engine should always be kept running during winching
operation to minimize battery drain and maximize power and speed
of the winch. If the winch is used for a considerable amount of time
with the engine switched o the battery will drain and be too weak to
restart the vehicle engine. If this happens stop winching immediately,
jump start the vehicle and charge the battery up before resuming
winching operation.
NOTICE
Get to know your winch before you need to use it. We recommend
that you set up a few test runs to familiarize yourself with rigging
techniques; the sounds your winch makes under various loads and the
way the cable spools on the drum, etc.
INSPECT the wire rope and equipment before each use. A
frayed or damaged rope must be replaced immediately. Use
only manufacturer’s identical replacement rope with the exact
specifications. (Ropes are not covered by any warranty oered)
INSPECT the winch installation and bolts to ensure that all bolts are
tight before each operation or periodcally.
NOTICE
Store the remote control lead inside your vehicle or in a safe place.
Never connect the winch cable back to itself. This will cause cable to
damage. Always use a pulley, snatch block, sling or chain of suitable
strength as shown in the illustrations.
NOTICE
Any winch that appears to be faulty, damaged, worn, or operates
abnormally MUST BE REMOVED FROM SERVICE UNTIL REPAIRED,
REPLACED OR OVERHAULED. It is recommended that the necessary
repairs ARE made by a manufacturer’s authorized repair facility ONLY.
NOTICE
Pull only on areas of the vehicle as specified by the vehicle
manufacturer.
– Only accessories, attachments and/or adapters supplied by the
manufacturer shall be used.
CAUTION
When using the tool, basic safety precautions should always be
followed to reduce the risk of personal injury and damage to the
equipment. Read all these instructions before using this tool!
WARNING
Keep children away. Children must never be allowed in the work area,
Do not let them handle machines, tools, extension cords or operate
this tool.
WARNING
Store idle equipment. When not in use, tools must be stored in a dry
location to inhibit rust. Always lock up tools and keep out of reach of
children.
CAUTION
Dress properly. Do not wear loose clothing or jewelry as they can
be caught in moving parts. Protective, electrically non-conductive
clothes and non-skid footwear are recommended when working.
Wear restrictive hair covering to contain long hair.
WARNING
Use eye and ear protection. Always wear impact safety goggles. Wear
a full-face shield if you are producing metal filings or wood chips.
Wear a dust mask or respirator when working around metal, wood,
and chemical dusts, and mists.
CAUTION
Maintain this winch with care. Keep this tool dry and clean for
better and safer performance. Follow instructions for lubricating
and changing accessories. Inspect winch rope periodically and,
if damaged, have them replaced immediately by an authorized
technician. The handles must be kept clean, dry, and free from oil and
grease always.
Disconnect or unplug remote switch when not in use.
DANGER
Stay alert, watch what you are doing, use common sense. Do not
operate any tool when you are tired.
WARNING
Check for damaged parts. Before using this winch, any parts that
appear worn or damaged should be carefully checked to determine
that it will operate properly and perform to its intended function.
Check for damage including alignments, binding of moving parts;
mounting fixtures. Any part that is damaged should be properly
repaired or replaced by a qualified person. Do not use the tool if any
switch does not turn “On” and “O” properly.
WARNING
Replacement parts and accessories. When repairing or servicing,
only use identical replacement parts. The use of any other parts will
void the warranty.

WINCH MANUAL IMPORTANT SAFETY INSTRUCTIONS
WARNING
Do not operate tool if under the influence of alcohol or drugs.
Read warning labels on prescription to determine if your judgment or
reflexes are impaired while taking drugs. If there is any doubt, do not
operate the tool.
DANGER
Keep hands and body away from Fairlead (cable intake slot) when
operating.
Always secure vehicle in position before using winch.
WARNING
Be certain the winch is properly bolted to a structure (or vehicle) that
can hold the winches maximum rated load.
Do not use inappropriate attachments to extend the length of the
winch cable.
DANGER
Never lift people or hoist loads over people or lift live animals.
Never come in between the winch and the load when operating.
WARNING
Do not apply any loads to the winch when cable is fully extended
past the safety mark. Keep at least 5 full wraps of cable on the spool,
(Usually marked red on the winch cable at the drum end.)
After moving any piece of equipment with the winch, secure the the
equipment in place. Do not rely on the winch to hold for an extended
period of time nor whilst in transport, winches are not securing
device, By doing so will void any warranty
CAUTION
Examine winch before using. Components may be aected by
exposure to chemicals, salts, and rust.
Do not cross over or go underneath winch cable when under load.
Use gloves while handling cable.
WARNING
Never operate winch if cable shows any signs of weakening, such as
knotting or kinking. If it does you must replace immediately.
DANGER
Do not move your vehicle with the cable extended and attached to the
load. You could easily exceed the winch rating and snap the cable.
When the vehicle is parked on an incline you should use wheel chocks.
CAUTION
Always re-spool cable neatly after any operation this will avoid any
winch cable misalignment for the next use
CAUTION
The winch cable must be wound onto the drum under a load of at least
10% of the rated line pull or the outer wraps will draw into inner wraps
and damage winch cable.
Before operating the winch under load you should check proper
function of the winch by engaging and disengaging the clutch, by
operating the directional controls, and operating the speed controls.
This will ensure that the winch is working properly and will help
prevent unintended damage and injury. Cycling the winch prior to
loading will also ensure the gears are properly aligned.
CAUTION
Batteries contain gases which are flammable and explosive. Wear eye
protection during installation and remove all jewelry. Do not lean over
battery while making connections.
WARNING
It is strongly recommended a battery isolator is installed to protect
vehicle, equipment and user from hazardous situations, if one isn’t
supplied it is recommended one is purchased and installed before
operation of the winch.
Failure to install a battery isolator or safety cut o could result in
damage to the vehicle, equipment and(or) operator and will result in
voiding any warranty oered.
WINCH ASSEMBLY AND MOUNTING
Red Battery +
Black Battery -
Remote Control
Wireless Remote Control
1. Your winch is designed with a bolt pattern that is standard in
this class of winch. Many winch mounting kits are available that
utilize this bolt pattern for the most popular vehicle and mounting

WINCH MANUAL RIGGING TECHNIQUES
channels. If you cannot find a kit locally, contact us and we will
provide you with the name of a dealer near you. If you utilize the
mounting channel, you must ensure that it is mounted on a flat
surface so that the three major sections (motor, drum and gear
housing) are properly aligned. Proper alignment of the winch will
allow even distribution of the full rated load and reduce the chance
of damaging winch or equipment. Poor installation contributes to
approx 90% equipment or winch damage.
2. Start by connecting the Roller Fairlead to the Mounting Channel
using 2 each of the Cap Bolt M10 X 35, Flat Washer, Lock Washer
and securing with M10 Nut (Make sure the bolt is placed through the
mounting channel and roller fairlead from inside the channel. This
will allow enough clearance for the winch to be placed in the channel
without obstruction.)
3. Assemble the winch to the (optional) Mounting Channel by first
pulling and releasing the clutch knob to “Out” position (Free
Spooling). Pull out a few inches of cable from the drum and feed the
wire loop through the opening in the front of the mounting channel
and roller fairlead. Now, using the remaining M10 x 35 Cap Bolts, Flat
Washer, Lock Washer, and M10 Nut secure the winch to the mounting
channel.
4. Connect the battery and motor leads as the drawing above.
Remember every type of winch is dierent.
5. Connect the winch motor as detailed below:
Relay
J3
J2
J1
J(+)
Black long wire assembly (connect the earth
terminal on the motor)
Connect to motor F2
Connect to Motor F1
Red long wire assembly. Connect to
battery positive +
Connect to Motor A
Outlet
Double colour wire - connect to relay J3
Blue wire - connect to relay J(+)
Brown wire - connect to relay J1
WIRELESS SWITCH RECEIVER
White wire - connect to relay J3
Yellow wire - connect to relay J1
Red wire - connect to relay J(+)
Black wire - connect to relay J2
Red (F2)
Blue (A)
Yellow (F1)
Black wire assembly - connect to motor’s earthing terminal
and battery negative -
Motor’s earthing terminal
MOTOR
Blue wire - antenna
CAUTION
Batteries contain gases which are flammable and explosive. Wear eye
protection during installation and remove all jewelry. Do not lean over
battery while making connections.
6. Assemble the Clevis Hook to the cable. Take o the pin from the
Clevis Hook, connect the Clevis Hook to the cable and mount the pin
back to the Clevis Hook.
7. Always use the Hand Saver (Optional) when free-spooling and re-
spooling the wire rope. Using the Hand Saver keeps your hands and
fingers away from the rotating drum.
8. Check for proper drum rotation. Pull or turn the clutch knob to the
“OUT” “Disengage” position (Free-spooling). Pull out some cable
from the drum, and then turn the clutch knob to the “IN” “Engage”
position to engage the gears. Press the cable out button on the
remote lead switch. If the drum is turning and releasing cable, then
your connections are accurate. If the drum is turning and collecting
more cable, then reverse the leads on the motor. Repeat and check
rotation.
RIGGING TECHNIQUES
Locate a suitable anchor such as a strong tree trunk or boulder.
ALWAYS use a sling or strap as an anchor point on a object, Never use the
cable or hook as a anchor point attached to an object.

WINCH MANUAL WINCHING TECHNIQUES AZ
CAUTION
NEVER attach the clevis hook back onto the winch cable as this could
cause damage to the cable.
CAUTION
Do not winch from an acute angle as the wire rope will bind up on
one side of the drum causing damage to wire rope (Bird Nesting) and
cause major damage to winch and possible equipment.
NOTICE
Short pulls from an angle can be used to straighten the vehicle/
equipment. Long pulls should be done with the wire rope in a straight
line to winch/vehicle, see above illustration.
CAUTION
When pulling a heavy load, place a blanket or jacket over the wire rope
five or six feet from the hook because in the event of a broken cable it
will dampen the force.
For additional protection open the hood/bonnet of the vehicle as
shown.
NOTICE
For pulls over 70% rated line pull, we recommend the use of the snatch/
pulley block to double line the wire rope. This reduces the load on the
winch and the strain on the rope.
Single Line Double Line
DANGER
Never use your winch for overhead hoisting, lifting of people, moving
people or moving of live animals.
WINCHING TECHNIQUES AZ
a. Take time to asses your situation and plan your pull.
b. Put on gloves to protect your hands.
c. Disengage the clutch where possible to allow free-spooling and also
save battery power.
d. (If supplied) Attach the hand saver hook to the clevis hook.
e. Pull out the wire rope to your desired anchor point safely.
f. Secure the clevis hook to the anchor point: Sling, chain or snatch block.
Do not attach the hook back onto the wire rope.
g. Engage the clutch.
h. Connect the remote control lead to the winch.

WINCH MANUAL MAINTENANCE
i. Start your engine to ensure power is being replenished to the vehicle
battery.
j. Power in the wire rope guiding the wire under tension to draw up the
slack in the wire. Once the wire is under tension stand well clear. Never
stand or step over the wire rope under tension.
k. Double check your anchors and make sure all connections are secure.
l. Inspect the wire rope. Make sure there are at least 5 wraps of wire rope
around the winch drum.(usually marked with red)
m. Drape a blanket or sail (Sold separately) over the wire rope
approximately 5 to 6 feet from the hook. Open the hood/bonnet for
added protection.
n. Clear the area. Make sure all people, spectators are well back and that
no one is directly in front or behind the vehicle or anchor point.
o. Begin winching. Be sure that the wire rope is winding evenly and tightly
around the drum. If needed, the vehicle that is being winched can be
slowly driven to add assistance to the winching process. Avoid shock
loading; keep the wire rope under tension.
p. The vehicle to be winched should be placed in neutral and the
emergency brake released. Only release the brake pedal when under full
tension. Avoid shock loading to the winch. This can damage the winch,
rope and vehicle.
q. The winch is meant for intermittent use. Under full load with a single
line rig do not power in for more than 8 minutes without letting the motor
cool down for a few minutes and then resume the winching operation.
r. The winching operation is complete once the vehicle is on stable ground
and or can drive under its own power.
s. Secure the vehicle. Be sure to set the brakes and place the vehicle in
park.
t. Release the tension on the wire rope. The winch is NOT designed
as securing device and should NEVER hold a load or secure whilst in
transport, winch cable MUST be released when equipment or vehicle is
secure. Not doing so will possibly damage the brake and winch and void
any warranty.
u. Disconnect the wire rope from the anchor and NEVER leave connected.
v. Rewind the wire rope. Make sure that any wire already on the drum has
spooled tightly and neatly. If not, draw out the wire and re-spool from the
point where the rope is tight.
w. Keep your hands clear of the winch drum and fairlead as the wire rope is
being drawn in.
x. Secure the hook and hook strap.
y. Disconnect the remote control lead and store in a clean, dry place.
z. Clean and inspect connections and mounting hardware for next
winching operation.
MAINTENANCE
1. Periodically check the tightness of mounting bolts and electrical
connections. Remove all dirt or corrosion and always keep clean.
2. Do not attempt to disassemble the gear box. Repairs should be
done by the manufacturer or an authorized repair center.
3. The gear box has been lubricated using a high temperature lithium
grease and is sealed at the factory. No internal lubrication is
required.
REPLACING THE WIRE ROPE
If the wire rope has become worn or is beginning to show signs of fraying,
it must be replaced before being used again.
1. Turn the clutch to the “CLUTCH OUT” position.
2. Extend cable to its full length. Note how the existing cable is
connected to the drum.
3. Remove old cable assembly and attach new one as the old cable
connected to the drum. Insert the end of the new rope and secure
the screw M8x10.
4. Ensure that the new cable wraps in the same rotation direction as
the old one. The cable should exit the drum from the bottom, under
the drum. (Underwind).
5. Turn the clutch to the “CLUTCH IN” position.
6. Winch cable onto drum, first five wraps being careful not to allow
kinking, then winch cable must be wound onto the drum under a load
of at least 10% rated line pull.
WARNING
Only replace the wire rope with the identical replacement part
recommended by the manufacturer. Steel or synthetic ropes are NOT
covered by any warranty oer and are sole responsibility of the owner
or user to maintain and replace if necessary.

WINCH MANUAL TROUBLESHOOTING
Problem Cause Solution
Motor does not turn on
Remote assembly not connected properly Check remote lead and connections.
Loose battery cable connections Check battery and connections.
Defective remote assembly Replace remote lead assembly.
Defective motor Check for voltage at armature port with Switch
pressed. If no voltage is present, replace motor.
Water has entered motor Allow to drain and dry. Run winch until completely
dry.
Motor runs but drum does not turn Clutch not engaged Turn clutch to the “In” position. If problem persists,
ask a technician to check and repair.
Motor runs slowly or without normal power Insucient current or voltage Operate winch while vehicle motor running
Motor overheating Winch running for too long Allow winch to cool down periodically.
Motor runs in one direction only Loose or corroded battery cable or motor cable
connections.
- Clean and tighten.
-Repair or replace switch assembly.
Winch braking malfunction
Cable runs in wrong direction Adjust the cable working direction
Brake slice worn or breakdown Adjust braking angle or replaces with new brake
slice
TROUBLESHOOTING
WARNING
Brake angle adjustment method: Tighten the spring in the direction of
rotation for two rotations, then adjust the angle of spline gear sleeve
by 20°±5° (see below section view).

WINCH MANUAL SPECIFICATIONS
SPECIFICATIONS
Rated line pulls 13500 lbs (6123 kgs)
Gear reduction ratio 265:1
Motor 12V:Input: 4.6kW / 6.1hp; Output: 2.1kW / 2.8hp
24V:Input: 6.5kW / 8.7hp; Output: 2.8kW / 3.8hp
Overall dimensions 542 mm ×160mm ×245mm (21.3”×6.3”×9.65”)
Drum size Ø63mm×223 mm (Ø2.48 “×8.8 “)
Cable
Synthetic rope Wire rope
Ø10mm×20m (Ø0.39”×65.6 ‘)
Ø9mm×30m (Ø0.35”×98.4 ‘) Ø10.2mm×20m (Ø0.4”×65.6 ‘)
Net Weight Synthetic rope Wire rope
28kg (61.7 lbs) 35kg (77.2 lbs)
Pull, Speed, Amperes, Volts (First layer):
Line Pull Line Speed ft/min (m/min) Current A
Ibs (kgs) 12V DC 24V DC 12V DC 24V DC
019.7 (6.0) 20.6 (6.3) 72 50
4000(1814) 10.5 (3.2) 11.5(3.5) 180 120
8000(3629) 7.5 (2.3) 8.9 (2.7) 265 180
12000(5443) 5.2 (1.6) 6.9 (2.1) 360 240
13500(6123) 3.9 (1.2) 5.2(1.6) 390 270
Line Pull And Rope Capacity In Layer
Layer Rated line pull lbs (kgs) Total rope on the drum ft (m)
113500(6123) 16.1(4.9)
210596(4806) 36.4(11.1)
38720(3955) 60.0(18.3)
47408(3360) 65.6(20.0)
13V2S12, 13V2A12, 13V2S24, 13VAE12

WINCH MANUAL WARRANTY*
WARRANTY*
BPE Limited are the sole distributors of these WINCHES and
associated brands/equipment.
BPE Limited (“seller” or BPE) warrants to the original retail buyer
only (“Buyer”) that any mechanical component of this genuine winch
(“product(s)”) are free of defects in material and workmanship for one (1)
year from date of purchase.
Any product BPE Limited determines to be defective will be repaired or
replaced at our (BPE Limited) sole discretion without charge to the Buyer
upon Buyer’s compliance with this procedure. Seller or its Authorized
Agent may make reasonable charges for parts and(or) labour for repairs
not covered by this Lifetime Limited Warranty. None warrantable returns
will be charged at BPE Limited standard rates. The warranties set forth
herein are exclusive and in lieu of all other warranties, whether oral or
written, express or implied. All product(s) are be covered by the standard
One (1) year warranty.
If in the event your product becomes faulty
within your warranty period
To obtain service or repair under this warranty, the Buyer shall mail, ship
or otherwise deliver to the manufacturers address, at the Buyers expense;
(1) the Product, (2) a written description of the problem, (3) Buyers name,
address and contact number, (4) copy of the original purchase receipt or
BPE Limited can arrange a suitable collection method (Charges apply).
Warranty Exclusions
The Warranty does not cover the cost of labour or transportation/shipping
charges for the replacement or installation of defective part(s).
This warranty does not apply to defects of the Product caused by;
(1) normal wear and tear, (2) failure to comply with any installation,
maintenance or subjecting the product to loads in excess of the loads
written/listed in the owners manual or as detailed upon the Sellers
website, (3) alteration or modification by any parties other than the
manufacturer, (4) misuse, abuse, neglect, accidents, Acts of God,
terrorism or (5) failure to correctly use the item according to the owners
manual (7) other causes beyond the control of the Seller after delivery of
the Product to the Sellers Authorized Agent.
Other Exclusions
This Warranty does not cover steel cables, synthetic ropes, fairleads,
wireless remotes or any exterior finishes outside thirty (30) Days from
purchase.
BPE Limited shall not be responsible or liable for any indirect or
consequential damages. These consequential damages may include, but
are not limited to, lost profits or loss of use, down time or damage to other
person(s) equipment.
BPE Limited reserves the right to change the Product design without
notice. BPE Limited reserves the right to replace any part or whole unit
with a newer design of the same function.

WINCH MANUAL SPECIFICATIONS
WINCH ASSEMBLY DRAWING
37
28
15
13
12
11
9
8
7
10
12
13
OUT
IN
34
36
22
16
8
10
32
4
18
17
3
4
33
5
30
6
5
3
19
20
21
24
23
25
29
26
27
4
1
2
3
5
6
38
14
31
35
13V2S12, 13V2A12, 13V2S24, 13VAE12

WINCH MANUAL SPECIFICATIONS
#sku Qty Description
11350001 3Terminal Protect
213500100 1Motor Assembly
31350002 6Cap Screw M10 x 35
41350003 6Lock Washer Φ10
51350004 6Think Flat Washer Φ10
61350005 4Hex Nut M10
713500200 1Break / Shaft Assembly
81350006 2Bushing—Drum
91350007 1Six Angle Bar
10 1350008 2Ring Seals
11 1350009 1Screw M8 x 10
12 1350010 4Lock Washer Φ8
13 1350011 4Cap Screw M8 x 30
14 1350012 2Tie Bar
15 13500300 1Drum Assembly
16 1350013 8Screw M5 x 18
17 1350014 8Lock Washer Φ5
18 1350015 1End Bearing
19 1350016 1Gasket
20 1350017 1Gear-Ring
21 13500400 1Gear Carrier
Assembly(Output)
22 13500500 1GearCarrier Assembly
(intermediate)
23 13500600 1Gear Carrier Assembly
(Input)
24 1350018 1Gear—Input Sun
25 1350019 1Trust Washer
26 1350020 1Gear—Housing
27 1350021 1Clutch Screw
28 1350022 1Ring Seals
29 1350023 1Clutch Handle
30 1350024 2Locknut M10
31 1350025 1Aluminium Fairlead (For
synthenic rope)
32 13500700 1Roller Fairlead
(For steel rope)
#sku Qty Description
33 1350026 1Mounting Channel
(Optional)
34 13500800 1Switch(RC3)
35 13500900 1Remote Controller
36 135001000 1Cable Assembly
37 1350027 1Strap
38 135001100 1Control Section
WINCH PARTS LIST 13V2S12, 13V2A12, 13V2S24, 13VAE12

Zertifikatnr. / Certificat nr / Certificate No. MD-TCF220621-39334 -V5-BPE
Lieferant und Emittent / Fournisseur et émetteur / Supplier and Issuer:
BPE Solutions Deutschland GmbH, Altrottstrasse 31, 69190 Walldorf, Deutschland
Gerät(e) / Dispositif (s) / Equipment
12V / 24V Stealth Electric Winch
Modell / Modéle / Model
35STS12, 35STS24, 35STA12,
35STA24, 45STS12, 45STS24,
45STA12, 45STA24, 13V2S12,
13V2S24, 13V2A12, 13V2A24, 13VAE12
Seriennummer / numéro de série / Serial Number
Gemäß den folgenden Richtlinien / Conformément aux directives suivantes
In accordance with the following directives :
Machinery Directive 2006/42/EC
Electromagnetic Compatibility Directive 2014/30/EU
RoHs Directive 2011/65/EU
Gemäß den folgenden Normen / Selon les normes suivantes /
In accordance with the following Standards:
BS EN 14492-1:2006+A1:2009
BS EN 60204-1:2018
BS EN IEC 61000-6-2:2019
BS EN IEC 61000-6-4:2019
BS EN ISO 12100:2010
BS EN ISO 3744:1995
Hiermit erkläre ich, dass das/die obengenannte(n) Gerät(e) gemäß den relevanten Abschnitten der obigen Anforderungen
entworfen und hergestellt wurde(n). Die Produkte entsprechen den Grundanforderungen der relevanten Richtlinien und
Normen. Dieses Zertifikat ist nur bei den obengenannten Produkten und Konfigurationen im Zusammenhang mit detaillierten
Testdaten sowie mit allen zutreffenden rechtlichen Vorschriften des Produktes gültig.
Je déclare par la présente que le(s) dispositif(s) ci –dessus ont été concus et fabriqués conformément aux sections pertinentes
des exigences ci-dessus. Les produits satisfont aux exigences de base des directives et normes applicables. Ce certificat n’est
valable que pour les produits et configurations ci-dessus en relation avec des données de test détaillées ainsi qu’avec toutes
les réglementations légales applicables du produit.
I hereby declare that the equipment named above has been designed and manufactured to comply with relevant sections of the
above referenced specifications. The products comply with the essential requirements of the relevant directives and standards.
This certificate is only valid for the product(s) and configuration described in conjunction with details test data and with all
applicable legal requirements of this product.
This declaration of conformity is issued under the exclusive responsibility of the manufacturer.
Datum / Date:
01.06.2022 09:52
Land / Pays / Issuing Country:
Deutschland

Certificate No.ϴϵϮϱϬϰϬϳϮϮͲsϭ
Supplier and Issuer:
W,ŽůĚŝŶŐƐ>ƚĚhŶŝƚϭϳϭϴƌĂĚůĞLJ,ĂůůdƌĂĚƐƚƌĂĚůĞLJ>ĂŶĞtŝŐĂŶtEϲϬyYh<
Equipment
12V, 24V Stealth Electric Winches
Model
35STS12, 35STS24, 35STA12,
35STA24, 45STS12, 45STS24,
45STA12, 45STA24, 13V2S12,
13V2S24, 13V2A12, 13V2A24, 13VAE12
Serial Number
In accordance with the following directives :
Machinery Directive 2006/42/EC
Electromagnetic Compatibility Directive 2014/30/EU
RoHs Directive 2011/65/EU
In accordance with the following Standards:
^EϭϰϰϵϮͲϭϮϬϬϲнϭϮϬϬϵ
^EϲϬϮϬϰͲϭϮϬϭϴ
^E/ϲϭϬϬϬͲϲͲϮϮϬϭϵ
^E/ϲϭϬϬϬͲϲͲϰϮϬϭϵ
^E/^KϭϮϭϬϬϮϬϭϬ
^E/^Kϯϳϰϰϭϵϵϱ
I hereby declare that the equipment named above has been designed and manufactured to comply with relevant sections of the
above referenced specifications. The products comply with the essential requirements of the relevant directives and standards.
This certificate is only valid for the product(s) and configuration described in conjunction with details test data and with all
applicable legal requirements of this product.
This declaration of conformity is issued under the exclusive responsibility of the manufacturer.
Date:
28.06.2022 11:52
Issuing Country:
United Kingdom

Service & Technical Contacts
United Kingdom:
BPE Holdings
Unit 17-18
Bradley Hall Trading Estate
Bradley Lane, Standish
Wigan, WN6 0XQ, UK
service@bpeholdings.co.uk
Germany:
BPE Solutions Deutschland GmbH
Altrottstraße 31
D-69190 Walldorf
Germany
support@bpeholdings.de
France:
BPE Solutions France SAS
3 Boulevard de Belfort
59000 Lille
France
sav@bpeholdings.fr
For warranty and repair enquiries, please
contact the retailer where you purchased
your winch product.
This manual suits for next models
3
Table of contents
Other Stealth Winch manuals
Popular Winch manuals by other brands

Portable Winch
Portable Winch PCW3000 user guide

Bushranger
Bushranger COVERT RWC100S owner's manual

TRAC
TRAC Lite Cruiser Salt Water Series operating instructions

Quick
Quick AL3 ALEPH Series user manual

GÜDE
GÜDE GSZ 125/250 Translation of original operating instructions

Runva
Runva EWB25000 Assembly & operating instructions

Badland Winches
Badland Winches 61876 Owner's manual & safety instructions

HES
HES OzWinch Signature II Series owner's manual

Kings Adventure
Kings Adventure Grande MKIII Series instructions

Dover
Dover TWG Tulsa RUFNEK Series Service manual

Warrior Winches
Warrior Winches 6000EN Assembly & operating instructions

Huchez
Huchez TIREX 150 Kg instruction manual