SteamandGo SAG399 User manual
All in One System
Ironing Board with Pressurized
Steam Iron
Model SAG399
INSTRUCTIONS
Please Read These Instructions Before Use.
IMPORTANT SAFETY INSTRUCTIONS
Please Read These Instructions Before Use:
When using electrical appliances, always follow basic safety precautions,
including the following:
1. This appliance is only used indoors.
2. Use this product for its intended purpose only.
3. To protect against risk of electrical shock, do not submerge the appliance
in water or other liquids.
4. THIS APPLIANCE IS NOT A TOY. Close supervision is necessary
when any appliance is used by or near children. Children should be
supervised to ensure that they do not play with the appliance
5. Unplug from electrical outlet when not in use, before putting on or taking off
parts, and before filling with water, emptying, or cleaning.
6. Avoid contact with hot parts. Keep hands, hair, and clothing away from hot
parts to prevent burns. Burns can occur by touching hot parts, hot water, or
steam
7. Don't operate any appliance with a damaged power cord or plug, after it
malfunctions, or is dripped or damaged in any manner. A damaged power
cord, plug or unit may result in fire, electrical shock, or injury. Please
replace the power cord through manufacturer, authorized agent or a
qualified electrician. Do not leave the appliance unattended while in
operation.
Caution: To reduce the risk of electric shock, don't disassemble or
attempt to repair the appliance, take it to a qualified service person
for examination and repair, incorrect reassembly or repair could
cause a risk of fire, electric shock or injury to person when the
appliance is used.

IMPORTANT SAFETY INSTRUCTIONS
8. Allow the unit to cool before storage.
9. Accessories not recommended or sold for this appliance may cause fire,
electrical shock, or injury.
10. Always turn the switch to the “Off” position before plugging in or
unplugging the unit.
11. Do not let the power cord touch hot surfaces or water. The power cord
should not be kinked or obstructed in any way.
12. Care should be taken when using the appliance due to the emission of
steam.
13. Do not operate steamer without properly filling the water container. Unplug
the appliance during filling and cleaning.
14. This appliance has a grounded plug. As a safety feature, this plug will fit in
a three-prong outlet only one way. If the plug does not fit in the outlet, do
not attempt to defeat this safety feature.
15. Never pull the power cord to disconnect it from an outlet. Instead, grasp
the plug to remove it from the outlet.
16. To reduce the likelihood of a circuit overload, do not operate another
high-wattage appliance on the same circuit as your steamer.
17. This marking indicates that this product should not be disposed with
other household wastes throughout the EU. To prevent possible harm to
the environment or human health from uncontrolled waste disposal,
recycle it responsibly to promote the sustainable reuse of material
resources. To return your used device, please use the return and collection
systems or contact the retailer where the product was purchased. They
can take this product for environmental safe recycling.
IMPORTANT SAFETY INSTRUCTIONS
18. To reduce the risk of contact with hot water and steam, always check the
appliance for steam leaks. Operate the base, hose, handle, and nozzle for
steam leaks.
19. If an extension cord is absolutely necessary, a 3-pronged cord rated for at
least 20 amperes should be used. Cords rated for less amperage may
overheat. Care should be taken to arrange the cord so that it cannot be
inadvertently pulled or tripped
20. This appliance can be used by children aged from 8 years and above and
persons with reduced physical, sensory or mental capabilities or lack of
experience and knowledge if they have been given supervision or
instruction concerning use of the appliance in a safe way and understand
the hazards involved.
21. Cleaning and user maintenance shall not be made by children without
supervision.

PRODUCT INFORMATIONS
1. Hanger hook
2. Connecting rod
3. Clothes-hanger
4. Clips
5. Telescopic pole
6. Iron holder
7. Iron
8. Steam button
9. Temperature adjust knob
10. Hose
11. Hand screw
12. Safety cap
13. Unit body
14. Drain plug
15. Ironing board
16. Support pole
17. Power switch
18. Power cord
19. Supporting foot
20. Fabric brush
21. Funnel
22. Measure Cup
Model No.: SAG399
Rating: AC120V 60Hz, 1600W
Water Tank Capacity: 1000ML
Assembly your Pressurized Garment Steamer
1. Take the unit and all the other parts out of the
package, then check and be sure all the parts are
available reference the Figure 1 show.
2. Fully extend the telescopic pole by open the clips
and loosen the poles, then fully extend the pole, at
last close the clips on the pole and to lock the poles.
As (figure 2) shows. Make sure that the pole is
securely locked into place and cannot be pushed
down.
NOTE: The Telescopic Pole must be fully
extending (3 sections) during steamer operation
to insure enough height for steam clothes.
3. Insert the bottom of the telescopic poles into the
pole base (see Figure 3), and make sure the pole
not move.
4. Fix the Iron holder on the telescopic pole (see
Figure 4), and attach the steam nozzle on its holder
like the figure 5 shows.
Caution: Do not upside down the nozzle like the
(figure 6) show, it is very dangerous due to the
Nozzle easy fall off.
Figure 1
Figure 2
Figure 3
Figure 4
Figure 5
Figure 6

5. Attach the connecting rod to the poles as Figure 7
shows. To attach the hanger attachment, align the
hole of hanger with pole top and push down, (Figure
8).
6. Attached the clothes hanger to the pole top hanger,
you should align the clothes hanger hole with pole
hanger tab and push down let it hold in place, like
figure 9 shows.
7. Refer to ironing board installation instruction for how
to install the ironing board.
8. Take out the ironing board, and align the ironing
board to the fixing holes of two side’s poles, screw
the M8 screws by hand. (see figure 10)
9. Fit the two supported poles onto the hook of the
extension poles. (see figure 11)
10. Put the cloth cover on the ironing board, and tighten
it.
Using Your Pressurized Garment Steamer
1. Filling with water, unscrew the safety cap from unit, reference to figure 12 filling
water into boiler.
Caution: Only filling water, no any other cleaning detergent allowed.
NOTE: To prolong the lifetime of your steamer, we recommend using
distilled or de-mineralized water.
2. Screw back the safety cap like the figure 13 shows, be sure the cap screw
tighten with boiler, otherwise there is steam leakage from there.
3. Plug the unit into a properly grounded three-pronged outlet. Make sure the
electric voltage is same as the unit spec required.
4. Step the pedal switch on light, the switch is illuminated in RED light, pre-heating
8-10 minutes; the light will turn to Blue once the steam is ready. See figure 14.
.
CAUTION: Close the power switch or pull the plug in time if there is no
steam out. Dry boiler will affect the service life or damage it.
Figure 7
Figure 10
Figure 11
Figure 12
Figure 13
3
Figure 14
Figure 8
Figure 9
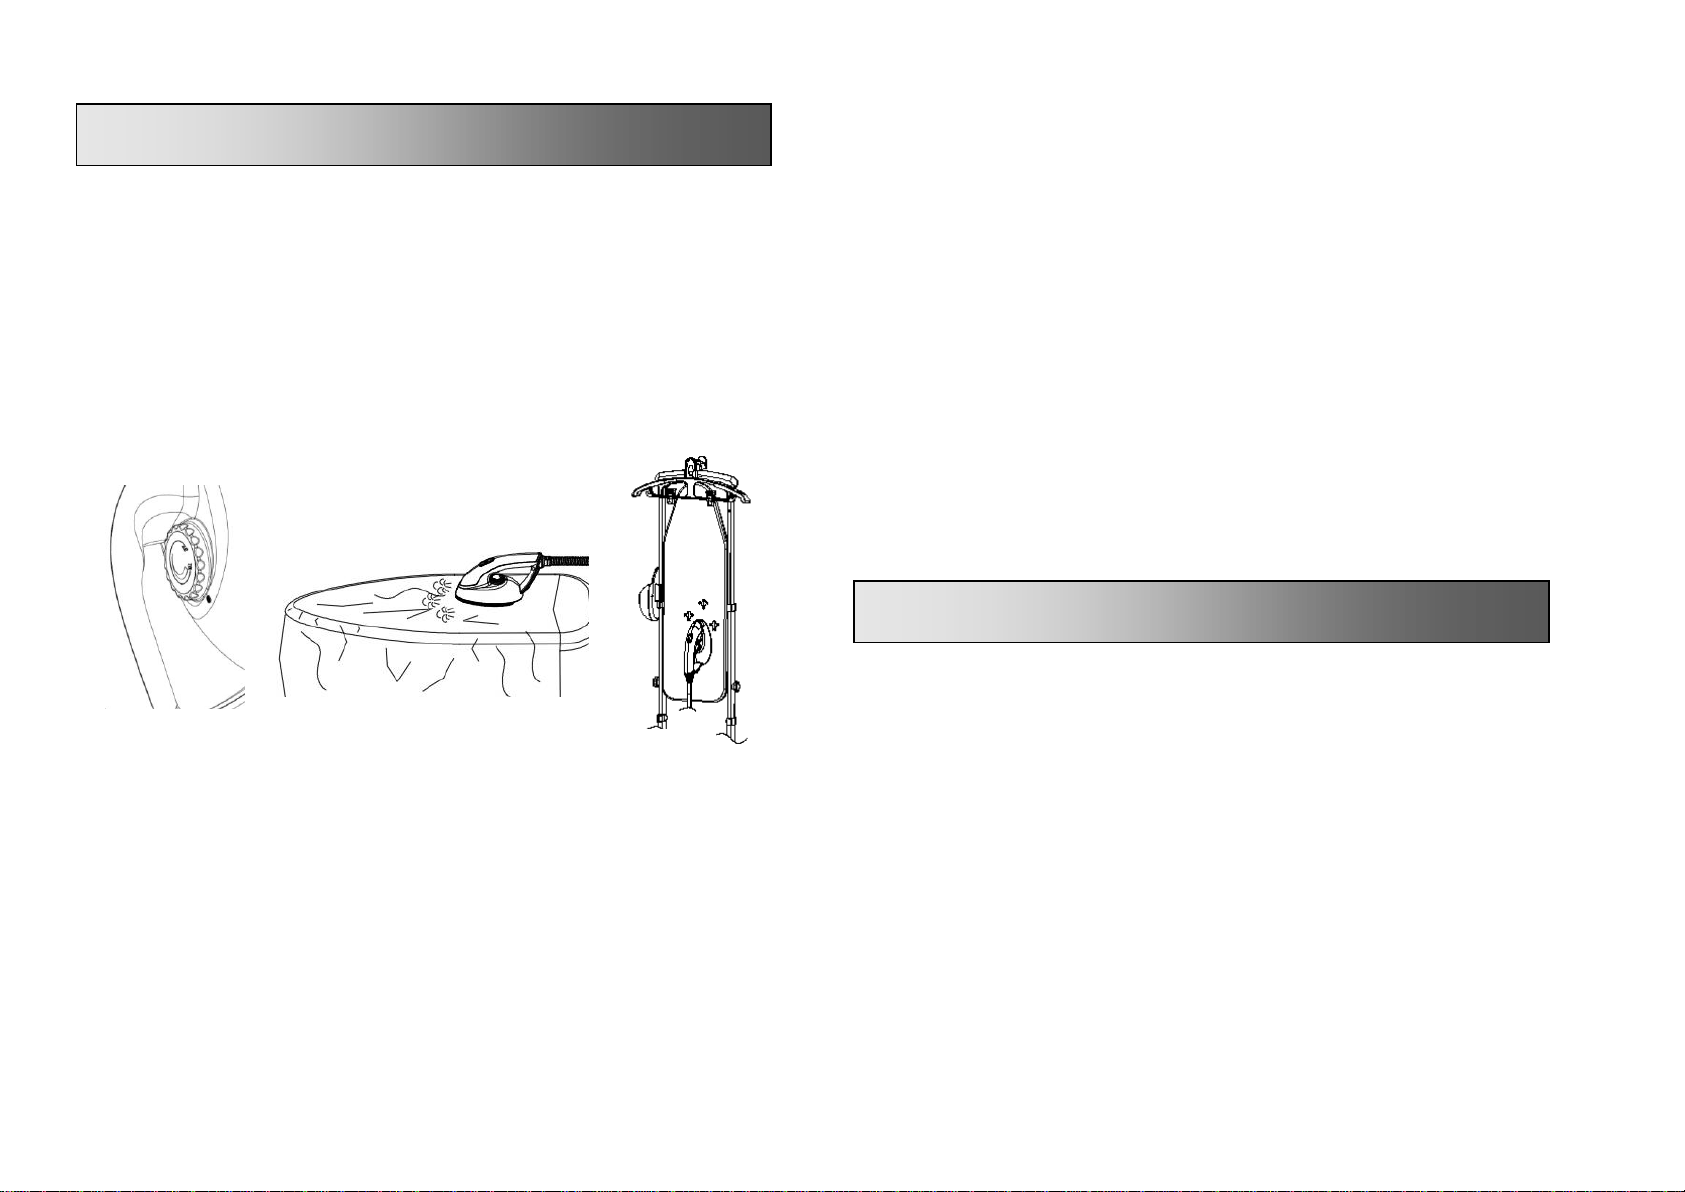
Pressing With Steam
1. Vertical ironing
Place garment on clothes hanger, and place the hanger on Hanger Hook, fold
the ironing board, and start ironing garment.
CAUTION: Before ironing, please set temperature to MAX, references the
figure 15.
Note: Please iron cloth once the power light turn to Blue color, which
means steam is ready. If you iron in the Red light, the iron may spray
water since the steam is not ready,
Temperature setting: Dial the knob as the clothes material required to align with
the black dot. Clockwise direction is rising the temperature, counterclockwise
direction is lower the temperature.
Try iron: After sets temperature, it’s better to try on clothes, to check if the
temperature is too high or not. If the temperature is too high that will burn the
clothes.
CAUTION: Do not press steam button when setting the temperature,
otherwise the Hot Steam may escape from the nozzle to burn.
Vertical ironing board could be used as a support for ironing. Fold the ironing
board, and lock it. Hang your cloth on the cloth hanger, and then press the steam
button, the pressurized Steam will come out from the soleplate of Steam iron head,
slide the iron head from the bottom to the top of the garment until remove all the
wrinkles and refresh the clothes as figure 16 shows.
2. Horizontal ironing
Lay down the ironing board, and adjust to a proper height. Put your cloth on the
ironing board, and then press the steam button, the pressurized Steam will
come out from the soleplate of Steam iron head, Slow slide the iron head, from
the bottom to the top of the garment until remove all the wrinkles and refresh
the clothes. As figure 17 shows.
WARNING! Never unscrew the fill cap during use, only can unscrew it until all
pressure has been released.
Refill water
When the water used up, no steam will spray out even pressing the Steam Button.
Now the water needs to be refilled if you still want to use the garment steamer.
To refill the water, please do as following:
a) Unplug from the electrical outlet.
b) Unscrew the Safety Cap slowly. Before unscrewing it completely, wait for the
hissing noise created by residual steam to stop.
c) Keep the unit cool after 30min at least
d) Unscrew the Safety Cap completely and use the measuring cup and funnel to
fill water into the boiler, Be carefully not to let the water leak out.
e) Screw the Safety Cap back on.
f) Plug in the electrical outlet and continue to use it.
Note: This unit with high pressure and high temperature, if filling the water
when the unit still hot, the water may sprays out.
Figure 15
Figure 17
Figure 16
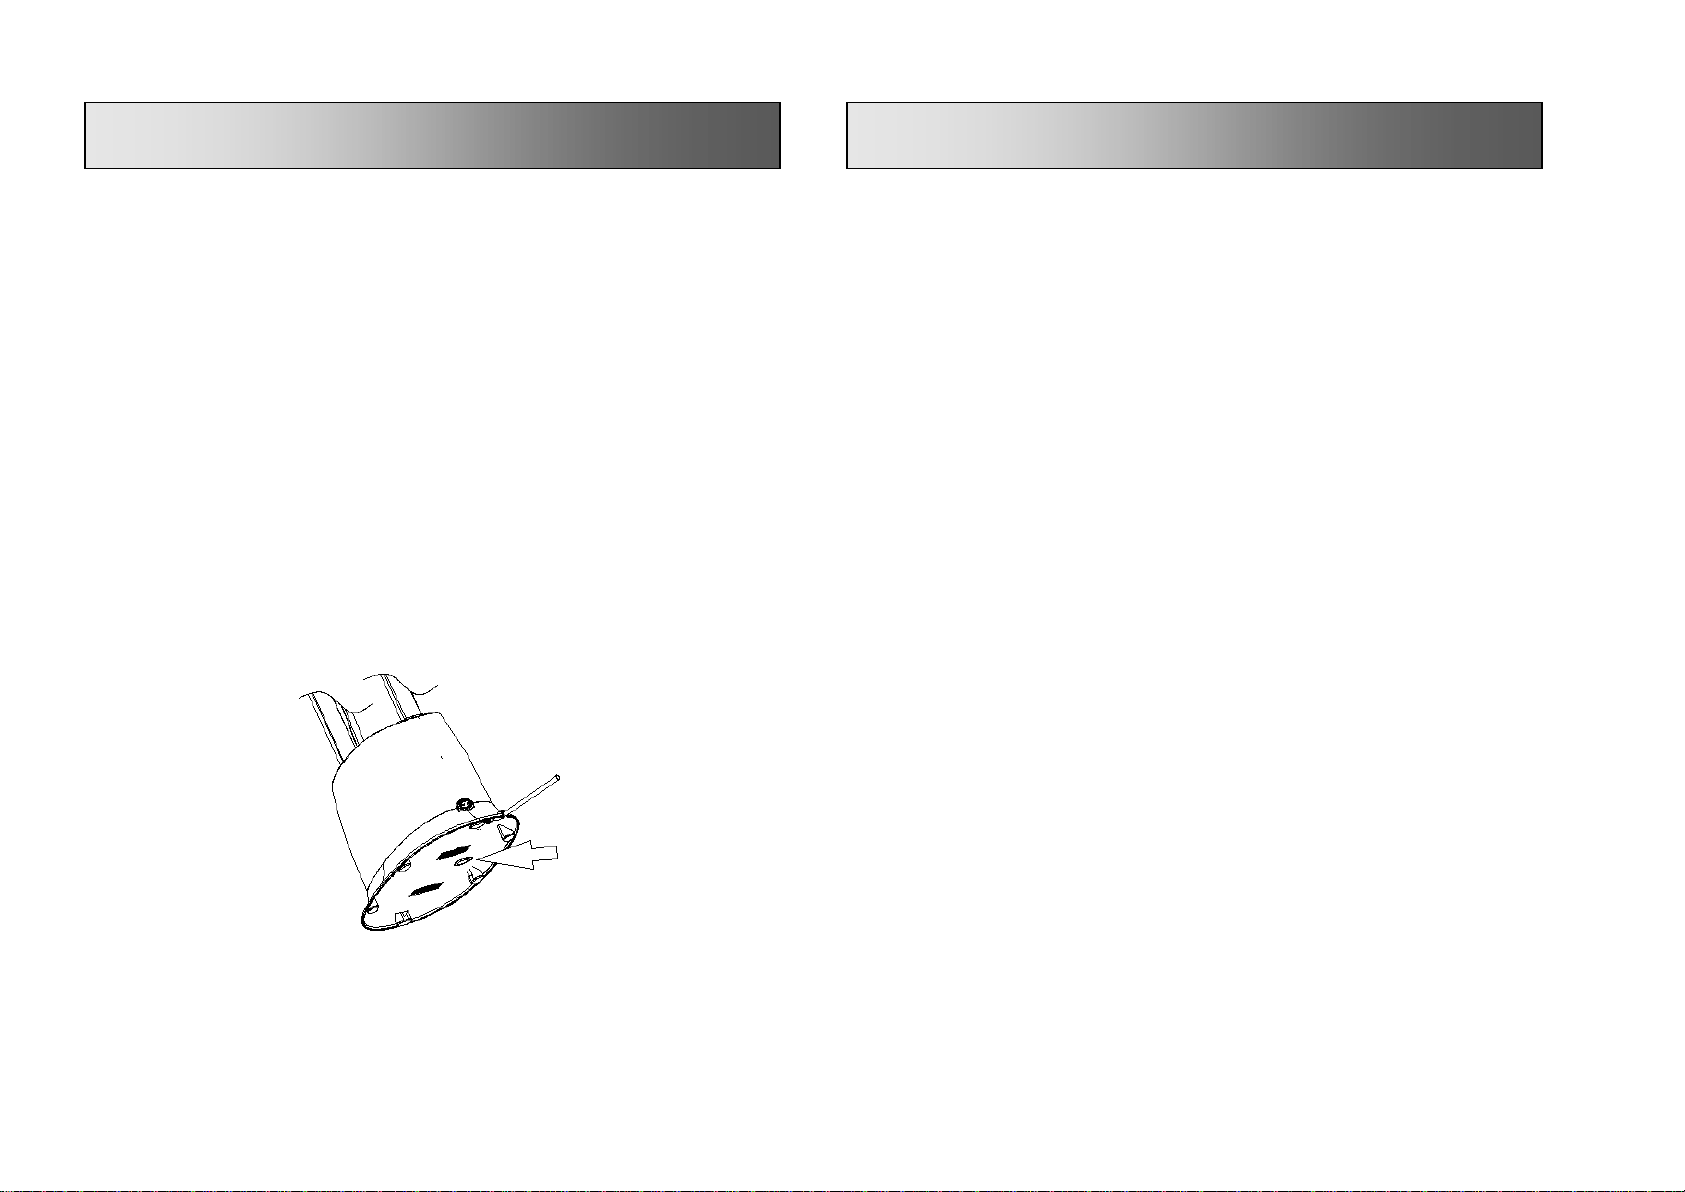
Quick Storage
1. Step the pedal switch to off the power.
2. Unplug the Power Cord.
3. Make the unit cool for 40 minutes.
4. Remove the clothes hanger and hanger hook from pole, and remove the ironing
board and the telescopic pole.
5. Tilt the unit or invert it, unscrew the bottom drain plug to drain away the
remaining water. As figure 28 shows. It’s better to loosen the safety cap before
unscrew drain device, which is easy way to drain water fully clean. Screw the
safety cap and the drain plug before storage.
CAUTION: DON'T SCREW THE SAFETY CAP WHEN BOILER IS HOT,
THERE IS HOT STEAM AND HOT WATER REMAINS IN BOILER, WILL
BURNS WITH HOT STEAM.
6. Put the unit to a convenient storage location.
Cleaning and Long Term Storage
We recommend you follow this procedure at least once a month. Use of distilled or
de-mineralized water reduces cleaning and prolongs the life of your pressurized
steamer.
1. Step the pedal switch to off the power.
2. Unplug the unit from the power outlet.
3. Wait for the unit to cool completely (at least 40 minutes).
4. Remove the Telescopic Pole and others from the unit, and put them aside.
5. Mix a solution of 50% vinegar and 50% water. In most cases, 1000ml of this
solution will be sufficient,
6. Unscrew the safety cap, and filling the water-vinegar solution 1000ml to the
boiler wait for 30 minutes. Then Carry the unit to a sink or tub.
7. Unscrew the bottom drain plug and drain out remaining water in the boiler, and
then Rinse the boiler with fresh water. Tilt or upside downs the unit to remove of
the water.
8. Flush the boiler with fresh water until no vinegar smell.
9. Re-screw safety cap and drain plug, Reattach the Telescopic Pole and hook
hanger and nozzle.Wipe the outside of the appliance with a wet cloth
10. If the unit surface is dirty, we recommend to use a dry cotton cloth or with some
30% alcohol solution to cleaning.
TO PROLONG SERVIE LIFE OF THE STEAMER, WE SUGGEST YOU TO
CLEAN THE UNIT FREQUENTLY.
Figure 18

Problem Solving Guide
PROBLEM
CAUSE
SOLUTION
The unit fails to
steam. The light on
the Pedal Switch
does not illuminate.
Steamer is not plugged
in.
Plug into electrical outlet.
Household Circuit
Breaker/Ground Fault
Interrupter is tripped or
Fuse is blown.
Reset the Circuit Breaker/Ground
Fault Interrupter, or replace the
fuse.
If you need assistance, contact a
qualified electrician.
The unit fails to
steam. The light on
the Pedal Switch
does illuminate.
Mineral buildup in the
unit.
Follow the cleaning ways
Procedure in this manual.
The Water Tank is
empty.
Refill the Water Fill Tank using the
procedures in this manual.
Water drips from
nozzle
Temperature setting is
too low.
Follow the temperature setting
procedure in this manual re-setting
the temperature.
Burn the clothes
Temperature setting is
too high.
Follow the temperature setting
procedure in this manual re-setting
the temperature.
Ironing board Installation Instructions
1. All parts for ironing board are as followings:
Big Board*1 Joint plate*1 Instructions*1
Cloth Cover *1 M8Screw*2
2. Insert the joint plate to the hole of the big board as picture 1 shows.
Note: let the plate feet aiming at the holes of the big board, which will be easier
to install.
3. Pull the stand foot of the ironing board to 90 degree, and fixed; Loosen clip and
extend the pole, then lock the clip. Refer to picture 2.
4. Fix the ironing board to the telescopic poles, aim at the holes and screw the M8
screws by hand as picture 3 shows.
5. Put the two supported poles of the ironing board onto the extension poles like
picture 4 shows.
Picture 1 Picutre2 Picture3 Picture 4
Table of contents


