Oster PRESSXPRESS GCSTPX4060 User manual

Manual de Instrucciones
PLANCHA DE VAPOR PRESSXPRESS
LEA TODAS LAS INSTRUCCIONES ANTES DE USAR ESTE APARATO
Instruction Manual
PRESSXPRESS STEAM IRON
PLEASE READ ALL INSTRUCTIONS BEFORE USING THIS APPLIANCE
Manual de Instruções
FERRO DE PASSAR A VAPOR PRESSXPRESS
LEIA TODAS AS INSTRUÇÕES ANTES DE USAR ESTE APARELHO
MODELOS
MODELS
GCSTPX4060 &
GCSTPX4070

Español-1
PRECAUCIONES IMPORTANTES
Cuando use algún aparato eléctrico siempre deben seguirse
precauciones básicas de seguridad incluyendo las siguientes:
Lea todas las instrucciones.
1. LEA TODAS LAS INSTRUCCIONES ANTES DE USAR.
2. Utiliceelaparatosolamenteconelnparaelquehasido
diseñado.
3. Paraprotegersecontraelriesgodeunchoqueeléctrico,no
sumerjaelaparatoenaguanienningúnotrolíquido.
4. Siempreapagueelaparato(OFF)antesdeenchufaro
desenchufardeltomacorriente.Nuncatiredelcablepara
desenchufarelaparatodeltomacorriente,envezdetirar,sujete
elenchufeyjáleloparadesconectarelaparato.
5. Nopermitaqueelcabletoquelassuperciescalientes.Deje
enfriarelaparatoporcompletoantesdeguardarlo.Envuelva
elcablealrededordelaparatodeformaholgadacuandolo
almacene.
6. Desconecte siempre el aparto del tomacorriente eléctrico
cuandoestéllenándoloconagua,limpiándoloovaciándoloy
cuando no lo esté usando.
7. Nohagafuncionarelaparatosielcableestádañadoosiel
aparatosehacaídoodañadoopresentefuga.Paraevitarel
riesgodechoqueeléctrico,nodesarmeelaparato.Lléveloaun
centrodeservicioautorizadoparaqueloexamineny/oreparen.
Elrearmadoincorrectopuedeprovocarelriesgodeunchoque
eléctrico,incendioolesionesalusarelaparato.
8. Mantengalaplanchaysucablefueradelalcancedelosniños
menoresde8añoscuandoestéconectadaoenfriando.
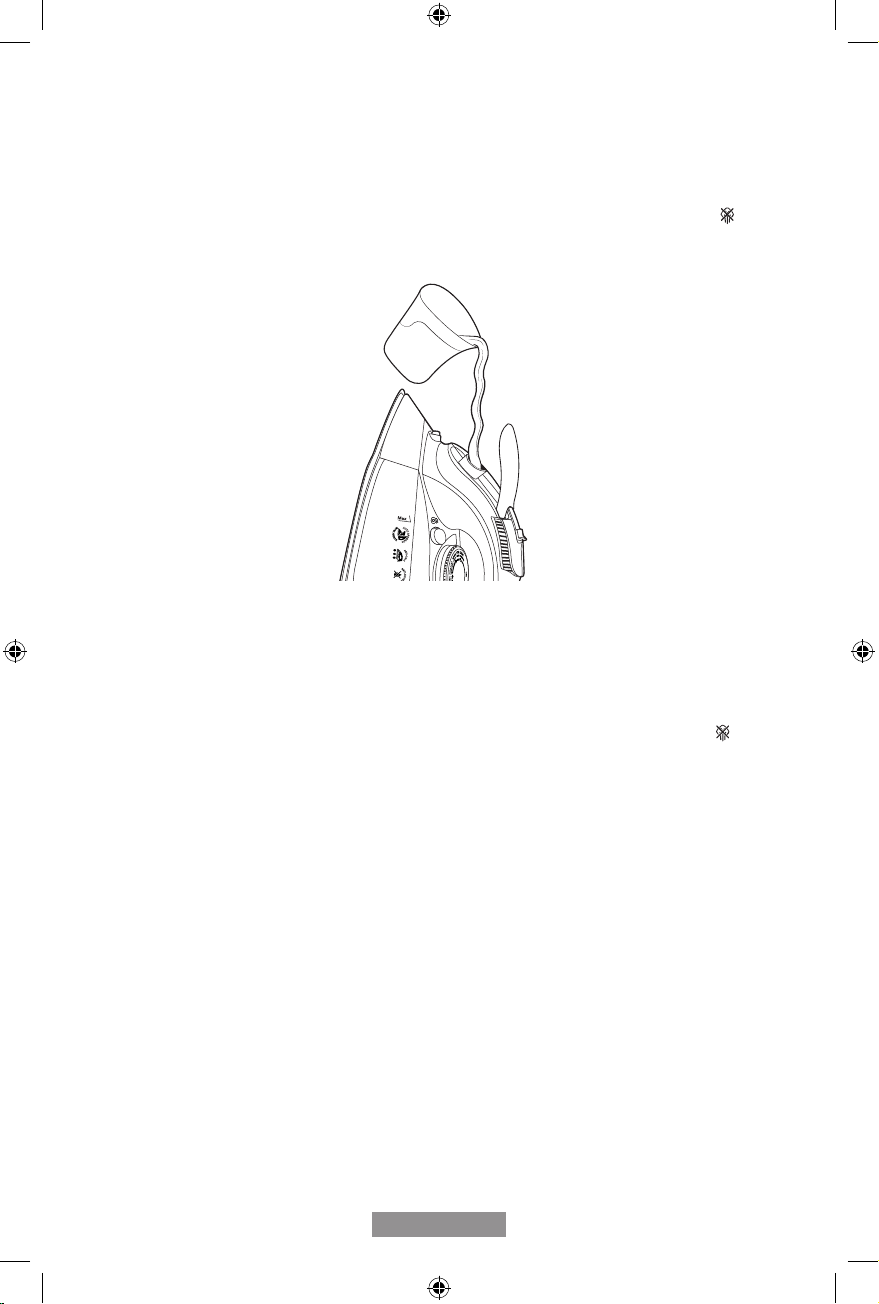
9. Cuandocoloquelaplanchaensubasedesoporte,asegúrese
dequelasuperciesobrelaquesecolocalabasedesoporte
sea estable.
10. Los niños no deben jugar con el aparato.
11.Losniñosdeberánestarbajosupervisiónparacerciorarsede
queNOjueguenconelartefactoeléctrico.

Español-2
12.Lalimpiezaymantenimientonodebenserrealizadosporniños
sinsupervisión.
13.Sepuedenproducirquemadurasporcontactoconlaspartesde
metalcalientes,elaguacalienteoelvapor.Tengacuidadoal
invertirelaparatodevaporyaquepuedequedaraguacaliente
eneltanque.
14.Paraevitarunasobrecargadelcircuitonohagafuncionarotro
aparatodealtovoltajeenelmismocircuito.
15.Siesabsolutamentenecesariouncabledeextensión,sedebe
usaruncableconunaclasicacióndeamperiosigualomayor
quelacapacidadmáximadelaplancha.Loscablesconmenor
amperajepuedenprovocarunincendioounadescargaeléctrica
debido al sobrecalentamiento. Se debe cuidar de poner el
cabledeextensióndemodotalquenopuedaserarrancadoo
provocartropiezos.
16.Latapadeltanquedeaguanodebeabrirseduranteeluso.Se
daráninstruccionesparaelllenadosegurodeltanquedeagua.
17.Elaparatonosedebeusarsisehacaído,sihaydañosvisibles
dehaberseaveriadoosigotea.
18.Nocoloquelaplanchasobreunasuperciedesprotegida,
inclusosiestásobreeltalóndedescanso.
19.Elenchufedeberetirarsedeltomacorrienteantesdequeel
tanquedeaguasellenedeagua.
20.Silaplanchanofuncionaconnormalidad,desconécteladel
tomacorrienteycontacteunagentedeservicioautorizadopara
quelarepare.
21.Paraevitarelriesgodequemaduras,mantengasucuerpo
alejadodeláreaquedeestavaporizando.
22.Novaporicelasprendasmientraslasllevapuestas;estopodría
causar lesiones corporales.
23.Lafuncióndeapagadoautomáticoesunafuncióndeseguridad.
Noeslaformarecomendadaparaapagarlaplancha.
SOLO PARA USO DOMÉSTICO
CONSERVE ESTAS INSTRUCCIONES

Español-3
DESCRIPCIÓN DE LA UNIDAD
1.
Tapadeltanquedeagua
2.
Selectordevapor
3.
Botónderocíofino
4.
Vapor de doble uso
5.
Disco selector de temperatura
6.
Luzindicadoradelatemperatura
7.
Luzindicadoradeencendido
8.
Cordóngiratoriode360º
9.
Cordóneléctrico
10.
Amplia base de soporte
11.
Botóndelimpiezaautomática
12.
Ventanavisoradeltanquedeagua
13.
Suela de cerámica de doble capa
14.
TazaMedidoradeAgua
14
1
2
345
6
78
9
10
131211

Español-4
Antes de usar por primera vez
• Cuandouselaplanchadevaporporprimeravez,pruébelaconunpedazodetela
inservibleparacontrolarquelabaseyeltanquedeaguaesténbienlimpios.
• Posiblementeobserveunpocodehumoopercibaunolorleveprovenientedela
planchaalusarlaporprimeravez.Estosedebealcalentamientoinicialdelosmateriales
utilizados.Esalgocompletamentenormalydesapareceráenseguida.
• Cuandonoestéplanchandosiemprecoloqueelselectordevaporenlaposición
de cerrado .
Instrucciones para uso
USANDO LA PLANCHA A VAPOR
1.
Coloquelaplanchaenposiciónverticalyenchufeeneltomacorriente.Laluz
indicadora de encendido se iluminará.
2.
Seleccionelatemperaturadeseadasegúnlapiezaquedeseaplanchar.
3.
Cuandolaplanchalleguealatemperaturaseleccionadalaluzindicadoradela
temperaturaseencenderáindicandoquelaplanchaestálistaparaplanchar.La
luzindicadoradelatemperaturaseencenderáyapagaráalternadamentemientras
estéplanchandodebidoaqueeltermostatomantienelabaseenlatemperatura
seleccionada.
4.
Otracaracterísticaimportantedesuplanchadevaporeselcordóngiratoriode360º
queevitaqueelcordónestorbeyfacilitaelusotantoparazurdoscomoparaderechos.
SELECCIÓN DEL AGUA CORRECTA
• Estaplanchadevaporpuedeusarseconaguanormaldelgrifo.Sinembargo,siel
aguaenlaregióndondeustedviveestáespecialmentecargadademinerales,se
recomiendaelusodeaguadestiladaparaprolongarlavidadesuplancha.
• Nouseaguaalaqueselehayaextraídolasalconquímicos.

Español-5
Llenando con agua
1.
Apaguelaplanchaydesconectelaclavijadeltomacorrienteantesdellenarla
planchaconagua.
2.
Asegúresedequeelselectordevaporseencuentreenlaposicióndecerrado .
3.
Pongalaplanchaenlaposiciónindicada(figura2)yllénelaconaguaconcuidado
paraquenopasedelnivelmáximoenlaventanavisoradeltanquedeagua.
(gura2)
Planchado en seco
1.
Enchufelaplanchaeneltomacorriente.
2.
Asegúresedequeelselectordevaporseencuentreenlaposicióndecerrado .
3.
Elijalaposicióndeldiscoselectordetemperaturamásapropiadaparalatelaque
deseaplanchar.
4.
Unavezqueseenciendalaluzindicadoradetemperatura,puedeempezara
planchar.
Planchado a vapor
Elplancharavaporessóloposibleenaltastemperaturas(seda,lana,algodónylino),
comoseindicaeneldiscoselector(gura3).
1.
Asegúresedequehaysuficienteaguaeneltanque.
2.
Coloquelaplanchaenposiciónvertical.
3.
Enchufelaplanchaeneltomacorriente.
4.
Gireeldiscoselectordetemperaturaalaposicióndeseadadentrodelrangode
temperaturasparaplancharavapordeldiscoselector.

Español-6
5.
Esperehastaquelaluzindicadoradelatemperaturaseencienda.
6.
Ajusteelselectordevaporalniveldevapordeseado.Ahoralaplanchaestarálistapara
queustedempieceaplancharavapor.Elvaporseráliberadodeformauniformepor
losorificioslocalizadosenlabasedelaplanchaparaunplanchadomásfácil.
(gura3)
Rocío fino
Lafunciónderociadornoesunpoderosospraydeaguaquehumedecelatelapara
ayudar a eliminar las arrugas de las telas gruesas y para marcar los dobleces.
1.
Presionefirmementeelbotónderociadofinoparaactivarestafunción.
Función de vapor doble uso
Estafunciónlepermiteutilizarvaporalplancharhorizontaloverticalmente,talcomo
se describe en las dos secciones siguientes.
Golpe de vapor
Lafuncióndegolpedevaporproveeunadescargaextradevaporparaunapenetración
másprofundaenlasarrugasdifíciles.Lafuncióndegolpedevaporpuedeusarseconel
planchadoensecooconelplanchadoavaporsiemprequeeltanqueestéllenodeagua
al menos a ¼ de su capacidad y el disco selector de temperatura esté colocado en la
posicióndelabandadevapor.
1.
Permitaquelaplanchasecalienteporaproximadamentedosminutos.
2.
Presioneelbotóndelafuncióngolpedevaporvariasvecesparaprepararlabomba
de agua.
3.
Bombeeelbotóndegolpedevaporotrastresocuatrovecesparalimpiarlaunidad.
4.
Lafuncióndegolpedevaporestáahoralistaparausarse.Lafunciónpuedeusarse
continuamenteconsólounacortapausaentracadadescarga.Lafunciónesmás
efectivaconlaplanchasostenidaenposiciónhorizontalelevadaligeramentepor
arribadelaprendaqueestáplanchando.
5.
Sieltanquequedasinagua,desenchufelaplanchayrellenedeagua.Laplancha
debe de ser llenada con agua mientras está caliente. Nota: Puede ser necesario
prepararotravezlabombadeaguaantesdeusarlafuncióndegolpedevapor
nuevamente.

Español-7
Golpe de vapor vertical
Lafuncióndevaporverticalpermitequesuplanchafuncionecomovaporizador
para prendas.
CONSEJO:Cuandouseelvaporverticalsobrelasprendas,cuélguelasdeunaperchapara
obtener mejores resultados. También se puede usar en cortinas y cortinados colgados.
PARA USAR EL VAPOR VERTICAL
1.
Asegúresedequelaplanchasehayacalentado(2minutos).
2.
Sostengalaplanchaenposiciónvertical,conlaplanchacercadelatelaquedesea
vaporizarperosintocarla.
3.
Conlaotramano,mantengatensalatela.
4.
Presioneelbotóndegolpedevaporaintervalosdeaproximadamente3segundosa
medidaquemuevelaplanchaporlazonaarrugada.
ADVERTENCIA:Paraprevenirelriesgodequemaduras,mantengalasmanosalejadas
delazonaqueestávaporizando.
ADVERTENCIA: NOvaporicelasprendasmientraslastengapuestasyaqueestopuede
provocarlesiones.
Temperatura de planchado
• Reviselasinstruccionesparaelplanchadoenlaetiquetadelartículoquedesea
planchar.Reviselasinstruccionesdelatablaparamayoresdetalles.
• Silasinstruccionesespecícasnoaparecenenlaetiqueta,sigalasinstruccionesde
éstatabla.Estatablaesválidasóloparalostejidosenellaindicadosynoseaplicaa
ciertostejidosconacabadosespeciales(comobarniz,relieves,etc.)seplanchanmejor
enbajastemperaturas.Sieltejidoconsistedediferentestiposdebra,seleccione
siemprelatemperaturamásbajacorrespondientealabracomponentemásdelicada
(porejemplo:siconsistede60%poliéstery40%algodón,debeplancharconla
temperatura correspondiente al poliéster).
Seleccionando la temperatura
1.
Coloquelaplanchaenlaposiciónvertical.
2.
Conectelaplancha.
3.
ColoqueelDiscoSelectordeTemperatura(figura4)enlatemperaturacorrecta
segúnloindicadoenlaetiquetaoenlatablaquesigue.
(gura4)

Español-8
Tabla guía de temperaturas
Temperatura Tipo de tejido Material de la bra
S E C O
sintético
sintético
sintético
acrílico,modacril,
polipropileno,
poliuretano
acetato,triacetato
metalizado,cupro,
poliamide(nylon),
poliéster,modal,
viscosa,rayón
VAPOR
seda
lana
algodón
seda
lana
algodón
lino lino
enlaetiquetasignicaqueestaprendanopuedeplancharse(porejemplo:
clorobra,elastodieno)
Anti-calc/antisarro
Lafuncióndeantisarroprevienelaacumulacióndedepósitosmineralesensuplancha.
Estoprolongalavidadelaplanchaymejorasudesempeño.
Sistema antigoteo
Producevaporsingoteosniderramesatravésdelasuperficiedelaplancha,aúnen
baja temperatura.

Español-9
Función de apagado automático en 3posiciones
Cuandolaplanchaestáenchufada,elindicadordeencendidoquedaráprendidotodoel
tiempoparaseñalarqueleestállegandoenergíaeléctricaalaplancha.
SI DEJA LA PLANCHA
• Enposiciónhorizontalsinmoverla,olavolteaaccidentalmente,
automáticamentedejarádecalentaralcabode30segundos.Laluz
indicadoradeencendidoparpadearávariasvecesparahacerlesaber
quelaplanchahadejadodecalentar.
• Enlaposiciónvertical(sobresutalóndeapoyo)sinmoverla,la
planchaseapagaráautomáticamentealcabode15minutos.Laluz
indicadora de encendidoparpadearávariasvecesparahacerlesaber
quelaplanchahadejadodecalentar.
PARA REINICIAR LA PLANCHA
Muevalaplanchahaciaatrásyhaciadelantepermitiéndolaquesecalientepor2
minutos.Elindicadordeencendidodejarádetitilarylaplanchacomenzaráacalentar
denuevo.
Mantenimiento y limpieza
Antesdelimpiarlaplancha,asegúresesiempredequeestédesconectadadel
tomacorrienteydequeestécompletamentefría.
BASE
• Losresiduosqueseacumulenenlaplacapuedenretirarseconunpañomojadoenuna
solucióndeaguayvinagre.
• Nousebrasoesponjas,limpiadoresabrasivososolventesquímicos,yaquepueden
dañar el acabado de la Base.
CASCO
• ElcascodelaPlanchapuedelimpiarseconunpañohúmedoysecarseluego.
• LaPlanchanonecesitaningúnotromantenimientoquenoseaelrecomendadoen
lasinstruccionesdeestemanual.Siporcualquierrazónsuplanchadevaporrequiere
reparación,nointenterepararla.LlévelaaunCentrodeServicioAutorizado.

Español-10
Uso de la función de autolimpieza
Debeutilizarlafuncióndeautolimpiezaparamantenerelrendimientoóptimodesu
plancha.Lafuncióndeautolimpiezavaalimpiareltanquedeaguaylaacumulaciónde
minerales,polvoopelusasdelosorificiosdevapor.
PARA UTILIZAR LA FUNCIÓN DE AUTOLIMPIEZA
1.
Muevavariasveceselbotóndevapordeunladohaciaelotroparaeliminarlos
residuosdemineralesdelaválvuladevapor.Estopermitequeelaguafluyaenel
compartimientodevapor.
2.
Lleneeltanquedeaguahastaelniveldeindicadormáximo.
3.
Enchufelaplanchaygireelselectordetemperaturahastallegaralaposicióndelino
ypermitaquelaplanchasecalientepordosminutos.
4.
Desenchufelaplancha.
5.
Coloquelaplanchasobreunfregaderoenposiciónhorizontal.
ADVERTENCIA:Tengacuidadodenotocarlaspartescalientesdelaplancha.
6.
Presioneelbotóndeautolimpiezaydéjelopresionado.Elaguacomenzaráa
goteardesdelosorificiosdevapor.Lentamentemuevalaplanchadeunladoa
otroydeatráshaciadelantepor30segundos.Alhacerestoinclinelapuntadela
planchaligeramenteinclinadahaciaabajo,paraasegurarsedequeelaguacircula
completamente.
7.
Volteelaplanchaypermitaqueelrestodelaguafluyaatravésdelorificiopara
cargar agua.
8.
Sequelabaseconunpaño.
9.
Enchufelaplanchaygireelselectordetemperaturahastallegaralaposiciónde
linoypermitaquelaplanchasecalientepordosminutosyquelaplanchaseseque
ompletamente.
10.
Gireelselectordetemperaturaalaposición“Apagado”.Laluzseapagaráindicando
quelaplanchasehaapagado.Desenchufelaplanchaypermitaqueseenfríeantes
de guardarla.
Guardando la plancha
1.
Apaguelaplanchadevaporydesenchufedeltomacorriente.
2.
Coloquelaplanchaenlaposiciónverticalypermitaqueseenfríecomplemente.
3.
Pongaelselectordevaporenlaposicióndecerrado.
4.
Vacíeelaguarestanteeneltanquedeaguaabriendolatapadeltanqueeinvirtiendo
laplanchasobreelfregadero/lavamanos.
5.
Elcordóneléctricopuedeserenrolladoenelareaparaenrollarelcordónpara
unalmacenamientomasordenado.Laplanchaseguardasiempreenlaposición
vertical.

English-1
IMPORTANT SAFEGUARDS
Whenusingelectricalappliances,basicsafetyprecautionsshould
alwaysbefollowedincludingthefollowing:
Read all instructions
1. READ ALL INSTRUCTIONS BEFORE USING.
2. Onlyuseanironforitsintendeduse.
3. Toavoidtheriskofelectricshock,donotimmersetheironin
waterorotherliquids.
4. AlwaysturntheironOFFbeforepluggingorunpluggingtheiron
fromtheelectricaloutlet.Neverpullonthecordtodisconnectthe
ironfromtheelectricaloutlet;instead,grasptheplugandpullon
theplugtodisconnecttheiron.
5. Donotletthecordtouchhotsurfaces.Lettheironcool
completelybeforeputtingtheironaway.Coilthecordloosely
aroundtheironwhenstoring.
6. Alwaysdisconnecttheironfromtheelectricaloutletbeforelling
theironwithwater,emptyingthewaterfromtheiron,andwhen
theironisnotinuse.
7. Donotoperatetheironwithadamagedcordorintheevent
theironhasbeendroppedordamaged.Toavoidtheriskof
electricshock,donotdisassembletheiron.Takeittoaqualied
servicemanforexaminationandrepair.Incorrectassembly
mightresultinariskofelectricshockwhentheironisusedafter
reassembly.
8. Keeptheironanditscordoutofreachofchildrenlessthan8
yearsofagewhenitisenergizedorcoolingdown.
9. Whenplacingtheirononitsstand,ensurethatthesurfaceon
whichthestandisplacedisstable.
10.Childrenshallnotplaywiththeappliance.
11.Childrenshouldbesupervisedtoensurethattheydonotplay
withtheappliance.
12.Cleaningandusermaintenanceshallnotbemadebychildren
withoutsupervision.
13.Burnscanoccurfromtouchinghotmetalparts,hotwater,or
steam.UsecautionwhenyouturnaSTEAMIRONupsidedown
–theremightbehotwaterinthereservoir.
14.Toavoidacircuitoverload,donotoperateanirononthesame
circuitwithanotherhighwattageappliance.

English-2
15.Ifanextensioncordisabsolutelynecessary,acordwithan
ampereratingequaltoorgreaterthanthemaximumratingofthe
ironshallbeused.Acordratedforlessamperagecanresultin
ariskofreorelectricshockduetooverheating.Careshallbe
takentoarrangethecordsothatitcannotbepulledorbetripped
over.
16.Thellingaperturemustnotbeopenedduringuse.Instructions
forthesaferellingofthewaterreservoirshallbegiven.
17.Theironisnottobeusedifithasbeendropped,ifthereare
visiblesignsofdamageorifitisleaking.
18.Donotsettheirononanunprotectedsurface,evenifitisonthe
heelrest.
19.Theplugmustberemovedfromthesocket-outletbeforethe
waterreservoirislledwithwater.
20.Iftheironisnotoperatingnormally,disconnectfrompower
supplyandhavetheironservicedbyanauthorizedservice
center.
21.Topreventtheriskofburns,bodypartsshouldbekeptaway
fromtheareabeingsteamed.
22.Donotsteamgarmentswhilewearingthem;thismayresultin
injuries.
23.Auto-Offisasafetyfeature.Thisisnotarecommendedmeans
forturningyourironoff.
SAVE THESE INSTRUCTIONS
HOUSEHOLD USE ONLY

English-3
DESCRIPTION OF THE APPLIANCE
1.
WaterReservoirLid
2.
SteamSelectSwitch
3.
Spray Mist Button
4.
DualShotofSteamButton
5.
Temperature Control Dial
6.
TemperatureIndicatorLight
7.
ON/OFFIndicatorLight
8.
360ºSwivelCord
9.
Power Cord
10.
Wide Heel Rest
11.
SelfCleanButton
12.
SeeThroughWaterWindow
13.
Dual-LayerCeramicSoleplate
14.
Water cup
14
1
2
345
6
78
9
10
131211

English-4
Before First Use
• WhenusingtheIronforthersttime,testitonapieceofoldclothtobesurethatthe
SoleplateandtheWaterReservoirareclean.
• ItispossiblethattheIronwilldischargesomesmokeorgiveoffaslightodorduringits
rstusage.Thisisduetotheinitialheatingofthematerialsused.Thisiscompletely
normalandwillstopshortlyafterwards.
• Whennotironing,alwayshavetheSteamSelectSwitchturnedtotheclosed
position .
Instructions For Use
USING THE STEAM IRON
1.
SettheSteamIroninanuprightpositionandinserttheplugintothewallelectrical
outlet.ThePowerOnIndicatorLightwillturnon.
2.
SelectthedesiredtemperatureontheTemperatureControlDial.
3.
TheTemperatureIndicatorLightwillturnononcetheselectedtemperatureisreached
andyoucanbegintoiron.TheTemperatureIndicatorLightwillturnonandofffrom
timetotimewhileyouareironingsincethethermostatautomaticallymaintainsthe
Soleplateatthesametemperature.
4.
AnotherimportantfeatureofyourSteamIronisthe360ºSwivelCord,whichprevents
tanglingandallowsforeasyusebybothrightandlefthandedpeople.
CHOOSING THE RIGHT WATER
• ThisSteamIronmaybeusedwithnormaltapwater.However,ifthewateroftheregion
inwhichyouliveisespeciallyhard,itisrecommendedtousedistilledwatertoprolong
thelifeofyourIron.
• Donotusewaterthathasbeendesalinatedwithchemicals.

English-5
Filling With Water
1.
TurnofftheIronanddisconnecttheplugfromtheelectricalwalloutletbeforefilling
theIronwithwater.
2.
TurntheSteamSelectSwitchtotheclosedposition .
3.
SettheIroninthepositionindicatedbelow(figure2)andfillitwithwater,nohigher
thantheMaxfilllevelshownontheSeeThroughWaterWindow.
(gure2)
Dry Ironing
1.
Inserttheplugintheelectricalwallsocket.
2.
MakesurethattheSteamSelectSwitchisintheclosedposition .
3.
SelectthedesiredtemperatureontheTemperatureControlDial.
4.
WhentheTemperatureIndicatorLightturnson,youmaystarttoiron.
Steam Ironing
Steamironingisonlypossibleathightemperatures(silk,wool,cotton,linen),asindicated
ontheTemperatureControlDial.
1.
BesurethatthereisenoughwaterintheReservoir.
2.
Settheironinanuprightposition.
3.
PlugthesteamIronintothewallelectricaloutlet.
4.
TurntheTemperatureControlDialtothedesiredpositionwithintherangeof
temperaturesincludedinthesteamareaofthedial.

English-6
5.
WaituntiltheTemperatureIndicatorLightturnson.
6.
SettheSteamSelectSwitchtothedesiredsteamlevelposition(figure3).Youare
nowreadytostartsteamironing.Thesteamwillbereleasedevenlythroughvents
locatedinthesoleplateforeasierironing.
(gure3)
Spray Mist
TheSprayMistfeatureisapowerfulwaterspraymistthatdampensthefabrictohelp
removewrinklesfromheavyfabricsandtosetcreases.
1.
PresstheSprayMistbuttonfirmlytostartthespray.
Dual Shot of Steam
Thisfeatureallowsyoutouseshotofsteamwhileironinghorizontallyorvertically,asthe
nexttwosectionsdescribe.
Shot of Steam
TheShotofSteamfeatureprovidesanextraburstofsteamfordeeppenetrationof
stubbornwrinkles.TheShotofSteamfeaturecanbeusedwithdryorsteamironing
providedithasatleasta¼tankofwaterandtheTemperatureControlDialissetwithin
thesteamband.
1.
Allowtheirontoheatforapproximatelytwominutes.
2.
PresstheShotofSteamButtonseveraltimestoprimethepump.
3.
PresstheShotofSteamButtonanotherthreetofourtimesinordertocleantheunit.
4.
TheShotofSteamfeatureisnowreadyforuse.TheShotofSteamfeaturecanbe
usedcontinuouslywithjustashortpausebetweenshots.TheShotofSteamfeature
ismosteffectivewiththeIronheldinahorizontalpositionjustabovethefabricbeing
ironed.
5.
IftheWaterReservoirrunsdry,unplugtheIronandrefillwithwater.TheIronmaybe
filledwithwaterwhileitishot.Note:Itmaybenecessarytore-primethepumpbefore
usingtheShotofSteamfeatureagain.

English-7
Vertical Shot of Steam
Theverticalshotsteamfeatureallowsyourirontofunctionasagarmentsteamer.
TIP: Whenusingtheverticalshotofsteamonclothing,hangtheclothingonaclothes
hangerforbestresults.Hangingcurtainsanddrapesmayalsobesteamed.
HOW TO USE VERTICAL STEAM
1. Allow iron to warm up (2 minutes).
2. Holdtheironinaverticalposition,withtheironclosetobutnottouchingthefabric
you want to steam.
3. Withyourotherhand,pullthefabrictight.
4. PresstheShotofSteambuttoninapproximately3-secondintervalsasyoumovethe
ironacrossthewrinkledarea.
WARNING: Topreventtheriskofburns,keepyourhandawayfromtheareabeingsteamed.
WARNING: DO NOTsteamgarmentswhilewearingthem;thismayresultininjuries.
Ironing Temperature
• Checktheironinginstructionsonthelabeloftheitemthatyouwishtoiron.Checkthe
temperaturesettingstableforfurtherinstructions.
• Shouldthespecicironinginstructionsnotappearonthelabel,followinstructionson
thetemperaturesettingstable.Thistableisonlyvalidforthefabricsindicatedand
doesnotapplytospecialtextileswithaglossnish,etc.Textileswithspecialcoatings
(suchasgloss,reliefwrinkles,etc.)arebestironedatverylowtemperatures.Ifthe
textileconsistsofseveraldifferenttypesofbers,alwaysselectthelowesttemperature,
i.e.thetemperaturerecommendedforthemostdelicateberinthecomposition(for
example,ifthecompositionconsistsof60%polyesterand40%cotton,youshouldiron
atthetemperatureindicatedforpolyester).
Setting The Temperature
1.
SettheIroninanuprightposition.
2.
ConnecttheIrontoanelectricalwallsocket.
3.
SettheTemperatureControlDial(figure4)tothecorrectironingtemperatureas
indicatedonthelabelorthetemperaturesettingstable.
(gura4)

English-8
Temperature Settings Table
Temperature Control Dial Kind of Textile Fiber Material
DRY
synthetic
synthetic
synthetic
acrílico,modacril,
polipropileno,
poliuretano
acetato,triacetato
metalizado,cupro,
poliamide(nylon),
poliéster,modal,
viscosa,rayón
STEAM
silk
wool
cotton
silk
wool
cotton
linen linen
onthelabelmeans:Thisarticlecannotbeironed(e.g.chlorober,elastodiene)
Anti-Calc
Theanti-calcfeaturehelpspreventthebuildupofmineraldepositsinyouriron.This
prolongsitslifeandimprovestheiron’sperformance.
Anti-Drip
Producessteamwithoutdripping,spitting,orleakingthroughthesoleplate,evenat
low temperatures.

English-9
3Way Auto-Off Feature
Whentheironispluggedin,thePowerIndicatorwilllightsteadily,indicatingthatthereis
powertotheiron.
IF YOU LEAVE THE IRON
• Inahorizontalpositionwithoutmovingit,oraccidentallytiptheiron
over,itwillautomaticallystopheatingafter30seconds.TheON/OFF
indicatorlightwillblinkrepeatedlytoletyouknowthattheironhas
stoppedheating.
• Inaverticalposition(onitsheelrest)withoutmovingit,theironwill
automaticallyturnoffafter15minutes.TheON/OFFindicatorlightwill
blinkrepeatedlytoletyouknowthattheironhasstoppedheating.
TO RESET THE IRON
• Movetheironbackandforthandallowittoreheatfor2minutes.Theindicatorwillstop
blinkingandtheironwillstartheatingagain.
WARNING:The3WayAuto-Offisasafetyfeature,notarecommendedmeansfor
turningyourironoff.
Maintenance and Cleaning
BeforecleaningtheIron,alwaysmakesurethatitisdisconnectedfromtheelectricalwall
socketandiscompletelycool.
SOLEPLATE
• ResidueontheSoleplatecanbewipedoffwithaclothsoakedinasolutionofwaterand
vinegar.
• Donotusescouringpads,abrasivesorchemicalcleaningsolventsastheymay
damagethenish.
HOUSING
• Thehousingcanbecleanedwithamoistclothandthenwipeddry.
• Otherthantherecommendedcleaning,nofurtherusermaintenanceshouldbe
necessary.IfforanyreasonyourSteamIronshouldrequirerepairs,donottrytoxit
yourself.SendittoanAuthorizedServiceCenter.
This manual suits for next models
1
Table of contents
Languages:
Other Oster Iron manuals

Oster
Oster GCSTCM2002P User manual

Oster
Oster GCSTBS5001 User manual

Oster
Oster GCSTCS-401 User manual

Oster
Oster GCSTBS5802 User manual

Oster
Oster GCSTPM7201 User manual

Oster
Oster GCSTAC6901 User manual

Oster
Oster 5104 User manual

Oster
Oster GCSTUP8201 User manual

Oster
Oster GCSTEP2501 User manual

Oster
Oster GCSTBS5802 User manual

Oster
Oster GCSTCM2001P User manual

Oster
Oster 5002 User manual

Oster
Oster GCSTBS6001 User manual

Oster
Oster GCSTPM7001 User manual

Oster
Oster GCSTSP6212 User manual

Oster
Oster GCSTBV4119 User manual

Oster
Oster GCSTCW-317-013 User manual

Oster
Oster GCSTBS5902 User manual

Oster
Oster GCSTCC3000 User manual

Oster
Oster GCSTCM2001 User manual