Steamfast SF-760 User manual
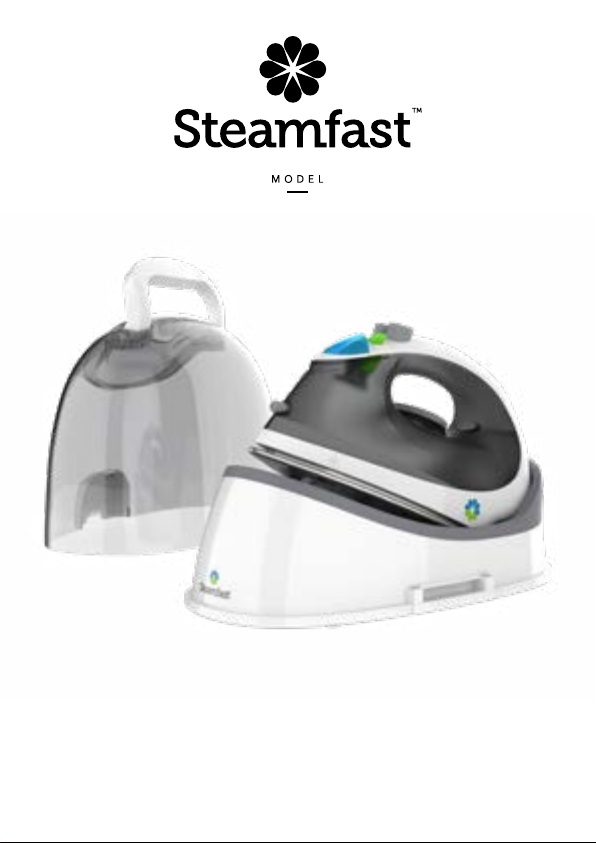
CORDLESS STEAM IRON
OWNER’S GUIDE
SF-760

2 |ENGLISH
READ ALL INSTRUCTIONS BEFORE USING
IMPORTANT SAFETY INSTRUCTIONS
This owner’s guide and any additional inserts are considered
part of the product. They contain important information about
safety and use. Before using the product, please familiarize
yourself with all operating and safety instructions. Please keep
all documents for future reference and pass these documents
on, together with the product, to any future owner. See
steamfast.com to view, download and print the most current
version of these instructions.
INTENDED USE: This product is intended to be used indoors
for ironing and garment steaming in the United States. This
product is not intended for commercial or industrial use. The
manufacturer assumes no responsibility for damage or injury due
to unauthorized use or product modication. Failure to follow
these directions will void the product warranty.
WARNING: Risk to Children and Impaired Persons
- Supervision is required during the installation, operation,
cleaning and maintenance of this product by children age
12 and younger and anyone with reduced physical, sensory
or mental capabilities. Children should be supervised to
ensure that they do not play with the appliance, its parts and
packaging material.
Directions to reduce risk of re, electrical shock, and injury:
When using your appliance, basic precautions should always be
followed, including the following:
- Read all instructions before use.
- Use caution when handling this steam iron. Burns could
occur from touching hot metal parts, hot water, or steam. Use

ENGLISH |3
special care to avoid contact with hot water when turning the
product upside down to empty the reservoir.
- To reduce the risk of contact with hot water, test whether
steam is ready before each use while carefully holding the
product away from your body. If no steam appears, wait a few
more minutes and test again. Do not look into the appliance
or use your hands or other objects to check for steam.
- Do not leave appliance unattended while connected.
- To reduce the risk of electric shock, do not immerse the
appliance in water or other liquids.
- Unit is only meant to be used with recomended accessories.
Using other types of attachments may cause damage to unit
or injury.
- Always disconnect appliance from electrical outlet when lling
with water or emptying, and when not in use.
- Do not allow cord to touch hot surfaces. Let appliance
cool completely before putting away. Securely store cord in
provided storage on base.
- Never yank cord to disconnect from outlet. Instead, grasp just
the plug and pull todisconnect.
- Do not operate appliance with a damaged cord, or if the
appliance has been dropped or damaged. To reduce the risk
of electric shock, do not disassemble or attempt to repair the
appliance. All repairs must be performed by a qualied service
professional. Incorrect reassembly or repair could cause a risk
of re, electric shock, or injury when the appliance isused.
- If Heating Indicator Light does not illuminate when
Temperature Control Dial is turned to a selected heat setting,
unit is not operating normally. Immediately unplug and have
unit serviced by qualied service personnel.

4 |ENGLISH
- When lling Water Tank, only water should be used in unit
- other cleaning agents could damage unit or cause injury.
Distilled or de-mineralized water is highly recommended, in
order to minimize potential build-up of mineral deposits. Do
not overll unit.
- Do not remove water tank cap during use. Allow unit to cool
completely before relling.
- Do not attempt to use steam function without properly lling
Water Tank.
- To reduce risk of contact with hot water emitting from steam
vents, check appliance before each use by positioning it away
from body and pressing Steam Burst Button. Do not operate
unit if steam vents are blocked.
- Do not allow power cord to touch hot surfaces (such as
Ironing Plate) during use. Store cord inside base.
- Always allow unit to cool completely (at least 30 minutes)
before storing. Place unit on base when cooling, to avoid heat
damage to surfaces.
- The iron must be used on a stable surface and rested on the
base when not in use.
- A loose t between wall outlet (receptacle) and plug may
cause overheating and distortion of the plug. Discontinue use
of the product in this outlet. Contact a qualied electrician to
replace loose or worn outlets.
- To reduce the likelihood of circuit overload, do not operate
another high wattage appliance on the same circuit.
- If an extension cord is absolutely necessary, a 15 amp rated
cord should be used. Cords rated for less amperage may
overheat. Care should be taken to arrange the cord so that
the cord cannot be pulled or tripped over.
- This appliance has a polarized plug (one blade is wider than

ENGLISH |5
the other.) To reduce the risk of electrical shock, this plug is
intended to t in a polarized outlet only one way. If the plug
does not t fully in the outlet, reverse the plug. If it still does
not t, contact a qualied electrician. Do not attempt to
defeat this safety feature.
- Use appliance only for its intended use.
- The iron must only be used with the BASE provided.
WARNING: Changes or modications not expressly approved
by the party responsible for compliance could void the user’s
authority to operate the equipment.
Please refer to our website for the most current version of our
owner’s guide.
READ AND SAVE THESE INSTRUCTIONS
6 |ENGLISH
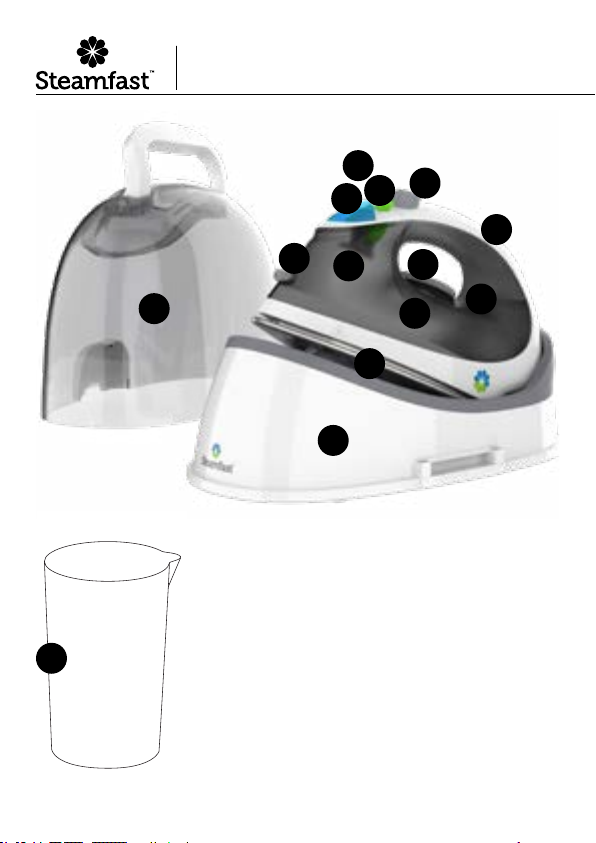
Product Information
2
45
6
7
89
10
12
11
1
3
14
13

ENGLISH |7
1. The Ironing Plate is the heated, non-stick surface that is used to press
fabrics, remove wrinkles and create creases.
2. The Main Body contains the unit’s internal heating components
3. The Base works as a docking and reheating station.
4. The Carry Case provides a convenient, portable option for moving
and storing the Cordless Steam Iron.
5. The Heating Indicator Light will turn off when the Ironing Plate’s set
temperature is reached.
6. The Water Tank Cap covers the Water Tank ll hole. The Cap will
“click” when completely shut.
7. The Water Tank is designed to hold a maximum of 6.09 oz (180 ml) of
water.
8. The Continuous Steam Switch controls the unit’s continuous steam
feature. When Switch is in the position, continuous steam is
inactivated. When Switch is in the position, continuous steam is
activated
9. When pressed, the Steam Burst Button provides a quick, powerful
burst of steam for tough wrinkles.
10. The Spray Mist Button provides a mist of water for quick wrinkle
remover.
11. The Spray Mist Outlet is where the water exits for the Spray Mist
feature.
12. The Handle is designed for easy control and navigation of the unit.
13. The Temperature Control Dial is turned to select the various Ironing
Plate heat settings based on your fabric and to turn the unit OFF.
14. The Fill Cup is designed to help you easily and consistently ll the
Water Tank.
15. When nished with your ironing and steaming tasks, conveniently
store the power cord in the Power Cord Storage located in the base
(not shown).

8 |ENGLISH
FILLING WATER TANK (FOR STEAM IRONING)
1. Turn off iron and unplug Base.
2. Place unit on a at surface and hold the iron upright.
3. Use provided ll cup to ll Cordless Iron with water to MAX ll line on
Water Tank. Do not overll unit.
NOTE: In order to extend the life of your unit and keep it
functioning at it’s maximum potential, it is highly recommended
that distilled or de-mineralized water be used in Water Tank.
4. When nished lling Water Tank, close Water Tank Cap. Cap will
“click” when completely shut.
When the water level becomes low:
1. Turn off iron and unplug base. Allow to cool for at least 5 minutes.
2. Follow STEPS 2-4 above.
3. Plug power cord back in and resume ironing as usual.
Using the
Cordless Steam Iron

ENGLISH |9
OPERATING UNIT
Your SF-760 Cordless Iron comes with a built-in Auto-Off Feature. When
the Cordless Iron is placed on the Base and powered on, the iron will
automatically shut off if not removed from Base after 8 minutes.
Always place Iron securely on the Base when not in use. Do not rest
Iron on other surfaces or attempt to stand Iron upright.
Burn Hazard. Do NOT touch the Ironing Plate or surrounding area.
Discontinue use if iron has been dropped and shows visible
damage. If visible damage occurs, do not return iron to base while
base is powered on.
STEAM IRONING
1. Follow Filling Water Tank procedure on pg 8.
2. Plug power cord into a convenient electrical outlet.
3. Set the Cordless Iron on the Base, ensuring back of Iron sits ush
against base.
4. When Heating Indicator Light turns off, the sole plate has reached it’s
set temperature.
NOTE: It is recommended to start with lower temperature rst, as high
settings designed for heavy material can damage delicate fabrics.
FABRIC TEMPERATURE
CONTROL
TEMPERATURE REQUIREMENT
Silk Low Temperature
Wool Medium Temperature
Cotton, Linen High Temperature

10 |ENGLISH
5. To Produce Steam
• For Continuous Steam: Once the Heating Indicator Light has
turned off (indicating selected Ironing Plate temperature has been
reached), remove the Cordless Iron from the base and move the
Continuous Steam Switch to the position. After a few seconds,
the unit will automatically begin to emit steam from the Ironing
Plate.
• For Steam Burst: Once the Heating Indicator Light has turned off
(indicating selected Ironing Plate temperature has been reached,
remove the Cordless Iron from the base, leave the Continuous
Steam Switch in the position, and press the Steam Burst
button.
NOTE: Steam can only be produced when the Ironing Plate temperature
is set at or . Steam cannot be produced at the lowest
temperature setting.
6. Continue with steam ironing tasks.
IMPORTANT: The Ironing Plate will maintain its set temperature
for an approximate 30 seconds. After 30 seconds, set the Cordless
Iron back on the Base to reheat the Ironing Plate. This will take
approximately 7 seconds. The Heating Indicator Light will turn on
when the Cordless Iron is set on the base and after approximately
7 seconds, the light will turn off indicating the Cordless Iron is
reheated and ready for use again.

ENGLISH |11
DRY IRONING
1. Plug power cord into a convenient electrical outlet.
2. Set the Cordless Iron on the Base, ensuring back of Iron sits ush
against base.
3. When Heating Indicator Light turns off, the Ironing Plate has reached
its set temperature. Be sure to set Continuous Steam Switch to
position to avoid water leakage.
NOTE: Follow the fabric guidance chart on pg 9 to select the
appropriate Sole Plate temperature for your fabric.
4. Continue with steam ironing tasks.
IMPORTANT: The Ironing Plate will maintain it’s set temperature
for an approximate 30 seconds. After 30 seconds, set the Cordless
Iron back on the Base to reheat the Ironing Plate. This will take
approximately 7 seconds. The Heating Indicator Light will turn on
when the Cordless Iron is set on the base and after approximately
7 seconds, the light will turn off indicating the Cordless Iron is
reheated and ready for use again.

12 |ENGLISH
CLEANING & STORAGE
1. Turn Temperature Control Dial to OFF position. To eliminate the
potential for water leakage, move Continuous Steam Switch to OFF
position. Place unit securely on the Base.
2. Unplug the power cord. Allow unit to cool for at least 30 minutes.
3. Once cooled, open Water Tank Cap and drain any remaining water
into a sink or tub. Close Cap when nished.
4. Wipe Main Body and Ironing Plate with a soft cloth lightly moistened
with water.
• DO NOT clean Ironing Plate with detergents or descalers.
• DO NOT clean Ironing Plate with abrasive or corrosiveproducts.
• DO NOT submerge unit or hold unit under running water.
5. If desired for storage or moving Cordless Iron, place unit on the base
and securely connect the Carry Case to Base. The clips will “click” into
place when securely fastened.
6. Place unit in cool, dry location.
MINERAL BUILD-UP
1. Follow STEPS 1-3 under CLEANING & STORAGE section above;
however, leave Water Tank Cap open.
2. Make a mixture of 0.5 oz. distilled water and 0.5 oz. vinegar.
3. Using included Measuring Cup, pour water-vinegar solution into
Water Tank. Close Water Tank Cap.
4. Follow normal steam ironing procedure, as outlined on Page 9-10.
Allow unit to steam out full contents of Water Tank. When nished,
turn Continuous Steam Switch to OFF position and place unit
securely on the Base.
5. Allow to cool for 5 minutes, then rell Water Tank with fresh distilled
water. Repeat STEP 4 until vinegar odor dissipates.
6. Store unit as normal.
Storage & Care
ENGLISH |13
Troubleshooting
CONSUMER SERVICES
For problems with your Cordless Steam Iron, please refer to the troubleshooting guide located
above. Additional inquiries should be directed to our consumer support services through our
Web site, steamfast.com.
If you do not have internet access, you may also contact our Consumer Service Department by
telephone, at 1-800-711-6617.
NOTE: In order for our Consumer Service representatives to help you as quickly and
efciently as possible, please have the following information ready before calling:
• Purchase information (where and when you purchased this product)
• Copy of purchase receipt / proof of purchase
• Product serial number (located on electrical specication label on bottom of unit)
For information regarding your 2 Year Limited Warranty, refer to Page 14 of this manual.
PROBLEM POSSIBLE CAUSE & SOLUTION
Unit fails to heat up. Base is not plugged in. Plug power cord into electrical outlet.
Household circuit breaker / ground fault interrupter has tripped or
blown a fuse. Reset circuit breaker / ground fault circuit interrupter,
or replace fuse. For assistance, contact a licensed electrician.
Temperature Control Dial has not been turned to a heat setting.
Unit is leaking water. The Continuous Steam Switch is in this position, but Tempera-
ture Control Dial is not set to high enough heat setting. Refer to
Steam Ironing section for further instructions.
Water tank is overlled. Do not ll past MAX line.
There is mineral build-up. Refer to MINERAL BUILD-UP section for
further instructions.
Unit is not producing
continuous steam
The Continuous Steam Switch is not set in the correct position.
Ensure it is set to position.
The Temperature Control Dial is not set to high enough heat. Refer
to Steam Ironing section for further instructions.
The Cordless Iron has been left off the base for more than 30 sec-
onds. Place iron back on the base and wait for 7 seconds for reheat.
See pg 10 for further instructions.

14 |ENGLISH
Warranty Information
2-YEAR LIMITED WARRANTY
What is covered
Steamfast, a division of Vornado Air, LLC (“Steamfast”). Subject to the terms and conditions of
this 2-Year Limited Warranty (“Warranty”) as set forth below, Steamfast warrants to the original
consumer or purchaser (“Buyer”) that this Steamfast®-branded steam product, excluding
all accessories and attachments, (the “Product”) is to be free from defects in material and
workmanship for a period of two (2) years from the date of purchase when used and maintained in
accordance with the Owner’s Guide (the “Warranty Period”).
In the event Buyer noties Steamfast of a defect in the Product within the Warranty Period,
Steamfast will replace the Product and/or defective component parts, as applicable and necessary.
Any such replacement will be made at no charge to Buyer for parts or labor, provided that Buyer
shall be responsible for all shipping and transportation costs associated with returning the Product
to Steamfast for inspection and covered replacement.
What is not covered
This Warranty shall not be applicable to damage or loss caused in whole or in part by:
• Repairs, modications or alterations to the Product by anyone other than Steamfast.
• Use or operation of the Product outside the permitted or intended uses described by Steamfast
in the Owner’s Guide, or other careless operation, handling, misuse, or abuse of theProduct.
• Lack of proper maintenance or timely cleaning of the Product as specied in the Owner’sGuide.
• Use of the Product other than for normal household purposes.
• Normal wear and tear.
• Used consumable parts, accessories and attachments, including, but not limited to, brushes,
hangers, scrub pads and mop pads.
• Use of parts and accessories other than those produced or recommended by Steamfast.
• Cosmetic damage, such as scratches, nicks and dents.
• Damage caused by accident, water, ood, re or other acts of nature or external causes.
Warranty limitations and exclusions
• NO OTHER EXPRESS WARRANTY IS GIVEN BY STEAMFAST TO BUYER AND NO
REPRESENTATIVE HAS THE AUTHORITY TO MAKE REPRESENTATIONS OTHER THAN THOSE
PROVIDED HEREIN.
• THERE ARE NO WARRANTIES WHICH EXTEND BEYOND THE DESCRIPTION ON THE FACE
HEREOF AND ALL IMPLIED WARRANTIES, SPECIFICALLY THE IMPLIED WARRANTIES OF
MERCHANTABILITY AND FITNESS FOR A PARTICULAR PURPOSE, ARE HEREBY EXPRESSLY
LIMITED TO THE DURATION OF THE WARRANTY PERIOD, UNLESS A SHORTER PERIOD IS
PERMITTED BY LAW.
• STEAMFAST’S REPLACEMENT OF THE PRODUCT IS THE EXCLUSIVE REMEDY. UNDER NO
CIRCUMSTANCES SHALL STEAMFAST BE LIABLE TO BUYER OR ANY OTHER PERSON FOR
ANY INCIDENTAL, SPECIAL, CONSEQUENTIAL, OR OTHER DAMAGES, EVEN IF STEAMFAST
HAS BEEN ADVISED OF OR COULD REASONABLY FORESEE THE POSSIBILITY OF SUCH
DAMAGES, INCLUDING, BUT NOT LIMITED TO, LOSS OF PROFITS OR DAMAGE, WHETHER
RISING OUT OF BREACH OF WARRANTY, BREACH OF CONTRACT OR UNDER ANY OTHER
THEORY OFLAW.

ENGLISH |15
• THIS WARRANTY GIVES BUYER SPECIFIC LEGAL RIGHTS. BUYER MAY ALSO HAVE OTHER
RIGHTS WHICH VARY FROM STATE-TO-STATE. SOME STATES DO NOT ALLOW THE
EXCLUSION OR LIMITATION OF INCIDENTAL OR CONSEQUENTIAL DAMAGES, AND SOME
STATES DO NOT ALLOW LIMITATIONS ON HOW LONG AN IMPLIED WARRANTY LASTS, SO
THE ABOVE LIMITATION OR EXCLUSION MAY NOT APPLY TO BUYER.
How do you register the Warranty
Buyer must complete an application to register this Warranty within sixty (60) days following date
of purchase. Buyer may either visit Steamfast’s website at www.steamfast.com and complete an
online application or mail a completed application to Steamfast. Failure to register this Warranty
within sixty (60) days following date of purchase will render this Warranty null and void.
Warranty service
Return Authorization (“RA”) form. Include the Product model number and serial number, as well
as Buyer’s name, address, city, state, zip code and phone number when contacting Steamfast
for warranty service. Buyer may be required to provide the original sales receipt for purposes of
verifying date of purchase. After receiving the RA form, the Product must be shipped, postage
prepaid by Buyer, to:
Steamfast
Attn: Warranty & Repair
415 E. 13th Street
Andover, KS 67002
To assure proper handling, packages must be clearly marked with the RA number. Packages not
clearly marked with the RA number may be refused at the receiving dock.
Important: After receiving return authorization, carefully pack the Product to avoid damage in
shipping. Damage in shipping is not covered by the Warranty and shall be the sole responsibility of
Buyer. Damage or loss not covered by this Warranty or occurring outside the Warranty Period will
require a fee to cover the cost of handling and shipping. All such fees and costs shall be the sole
responsibility of Buyer.
Please allow at least 1-2 weeks for return of the Product after it is received by Steamfast. For
ease of recordkeeping, it is recommended that Buyer staple or attach the original sales receipt to
this Owner’s Guide and record the Product serial number (located on the Product specications
decal)here:
________________________________________________
© 2021 Vornado Air, LLC • Andover, KS 67002
Specications subject to change without notice. Steamfast® is a trademark owned by
Vornado Air, LLC. Patented. US Pat. No. 7,062,870 B1
Manufactured in China.
Steamfast Consumer Service

Steamfast
415 East 13th Street, Andover, KS 67002
T760-003 R-, V00
Table of contents
Other Steamfast Iron manuals

Steamfast
Steamfast SF-623 User manual

Steamfast
Steamfast SF-717 User manual

Steamfast
Steamfast SF-750 User manual

Steamfast
Steamfast SF-680 User manual

Steamfast
Steamfast SF-717 User manual

Steamfast
Steamfast SF-680 User manual

Steamfast
Steamfast SF-717 User manual

Steamfast
Steamfast SF-710 User manual

Steamfast
Steamfast SF-432 User manual

Steamfast
Steamfast SF-707 User manual

Steamfast
Steamfast SF-623 User manual

Steamfast
Steamfast SF-622 User manual

Steamfast
Steamfast SF-767 User manual

Steamfast
Steamfast SteamJet SF-777 Installation guide

Steamfast
Steamfast SF-707 User manual

Steamfast
Steamfast SF-717 User manual

Steamfast
Steamfast SF-727 User manual

Steamfast
Steamfast SF-580 User manual


