Steelcase Eno User manual

ēno product guide
AT-A-GLANCE

AT-A-GLANCE ēno PRODUCT GUIDE
Quick How-to Documents
•ēno App 3.2 (driver)
•ēno interactive whiteboard
•ēno play sound system
•ēno icon strip (new after August 2013)
•ēno icon strip (before August 2013)
•ēno USB Bluetooth receiver
•Steelcase PJ930 projector
Self-help Technical Assistance Documents
•ēno troubleshooting checklist
•ēno in a PowerPoint slideshow the ēno stylus loses control
•ēno stylus fails to pair using new ēno receiver and ēno App
•ēno stylus fails to switch to open mode after the initial calibration using Windows 8
•ēno stylus not connecting after initial pairing with Windows 7 (32 or 64 bit)
•ēno stylus not interactive with Mac OS X Keynote
•ēno stylus not working after pairing – 3rd party BT stack
•ēno stylus not working after pairing and rebooting – power options enabled
•ēno troubleshooting tips
•How to use ēno board as an extended desktop
•How to change Bluetooth services log on account
•How to edit group policy for ēno
•Driver – how to open the package after download
•Using Windows 7 or Vista compatibility mode
At-a-Glance Documents
NEED MORE HELP?
Contact Steelcase Technical Support for
further assistance at 800-334-4922 or at
To find the documents listed below, please use this link:
http://bringlearningtolife.ning.com/page/tips-and-tricks

AT-A-GLANCE ēno PRODUCT GUIDE
How do I get started?
Connect your computer to any projector. The ēno stylus easily pairs to and communicates
with your computer via the ēno USB Bluetooth receiver, and the ēno App provides simple
annotation and capture tools. The ēno board’s design means you can utilize the included
lesson planning programs or any software or application.
How can I use the ēno IWB?
1Write and draw with dry-erase and permanent markers as you would on a traditional
whiteboard. Have students manipulate magnetic letters, display student work with
magnetic clips, and mark spots on projected images of maps with magnetic dots.
2Annotate images and content on favorite websites with “digital ink.” Use the screen capture
tool to print or save your work. Email saved images to colleagues or absent students.
3Utilize any software or application you can run on your computer and control with
a mouse on the ēno board with the ēno stylus.
4Navigate virtual field trips to countries, science museums, art galleries and landmarks
near and far. Explore informative, interesting and interactive content through simulations
and videos to help you meet local, state and Common Core learning standards.
5Pass along the stylus to transform the ēno board from a teacher-directed tool to
a student-led small group learning and research center.
Where can I get more ideas, support, training and technical assistance to help me
make the most of my ēno IWB?
•Connect with other ēno users and training support at professionallearning@steelcase.com.
•Learn about educator training and professional development opportunities on our website
at SteelcaseEducation.com.
•Contact Steelcase Technical Support at 800-334-4922 or techsupport@steelcase.com.
ēno Interactive Whiteboard
ēno Stylus

AT-A-GLANCE ēno PRODUCT GUIDE
ēno Receiver
Frequently Asked Questions for the Steelcase ēno Receiver
What is the ēno receiver?
The ēno receiver is a USB device that permits the ēno stylus (pen) to communicate with
your computer. There is a Bluetooth “stack” on the receiver, which allows a user to pair
(connect) the stylus to this device and not the computer. The receiver is not reliant on the
computer operating system’s Bluetooth, making pairing easier and improving connectivity.
The ēno stylus will operate with a computer’s internal Bluetooth stack, but Steelcase
Education highly recommends using the ēno receiver to avoid issues.
How does the ēno receiver work?
Plug the ēno receiver into an available USB port on the computer. The receiver may be
unplugged when the ēno stylus is not in use (e.g., overnight storage for security, school
holidays/vacations) but must be reinserted to use the stylus again.
May the ēno receiver be used on more than one computer?
Yes. The ēno receiver and any paired stylus/styli maintain pairing in any computer unless
and until they are unpaired (see below). Plug the receiver into any computer, turn on the
stylus and use as normal. (NOTE: The ēno App must be installed on the computer for the
stylus to interact with the ēno board.)
ēno Receiver

AT-A-GLANCE ēno PRODUCT GUIDE
ēno Receiver
Frequently Asked Questions for the Steelcase ēno Receiver
ēno Receiver
NEED MORE HELP?
If you need help or more information
about the ēno receiver, contact Steelcase
Technical Support at 800-334-4922 or
To pair (connect) an ēno stylus
1 Ensure ēno receiver is plugged into USB port—initial insertion causes LED light to cycle
red, blue, then green.
2 Turn on the stylus.
3 Press the button on the receiver.
4 LED flashes green for 30 seconds while receiver searches for stylus.
5 LED turns green or red to indicate result. Consider the following LED light indicators:
•Flashes green quickly 5 times = pairing successful.
•Flashes red quickly 5 times = pairing failed (remove receiver from USB port, wait 5
seconds, then repeat operation steps listed above).
•Flashes green 3 times when stylus is turned on = connection successful.
•
Flashes red 3 times once stylus is turned on after successfully pairing =
connection failed.
6 Up to 4 ēno styli may be paired at one time.
To unpair (disconnect) an ēno stylus
1 To unpair ALL connected styli—push and hold the button on the receiver for ten seconds.
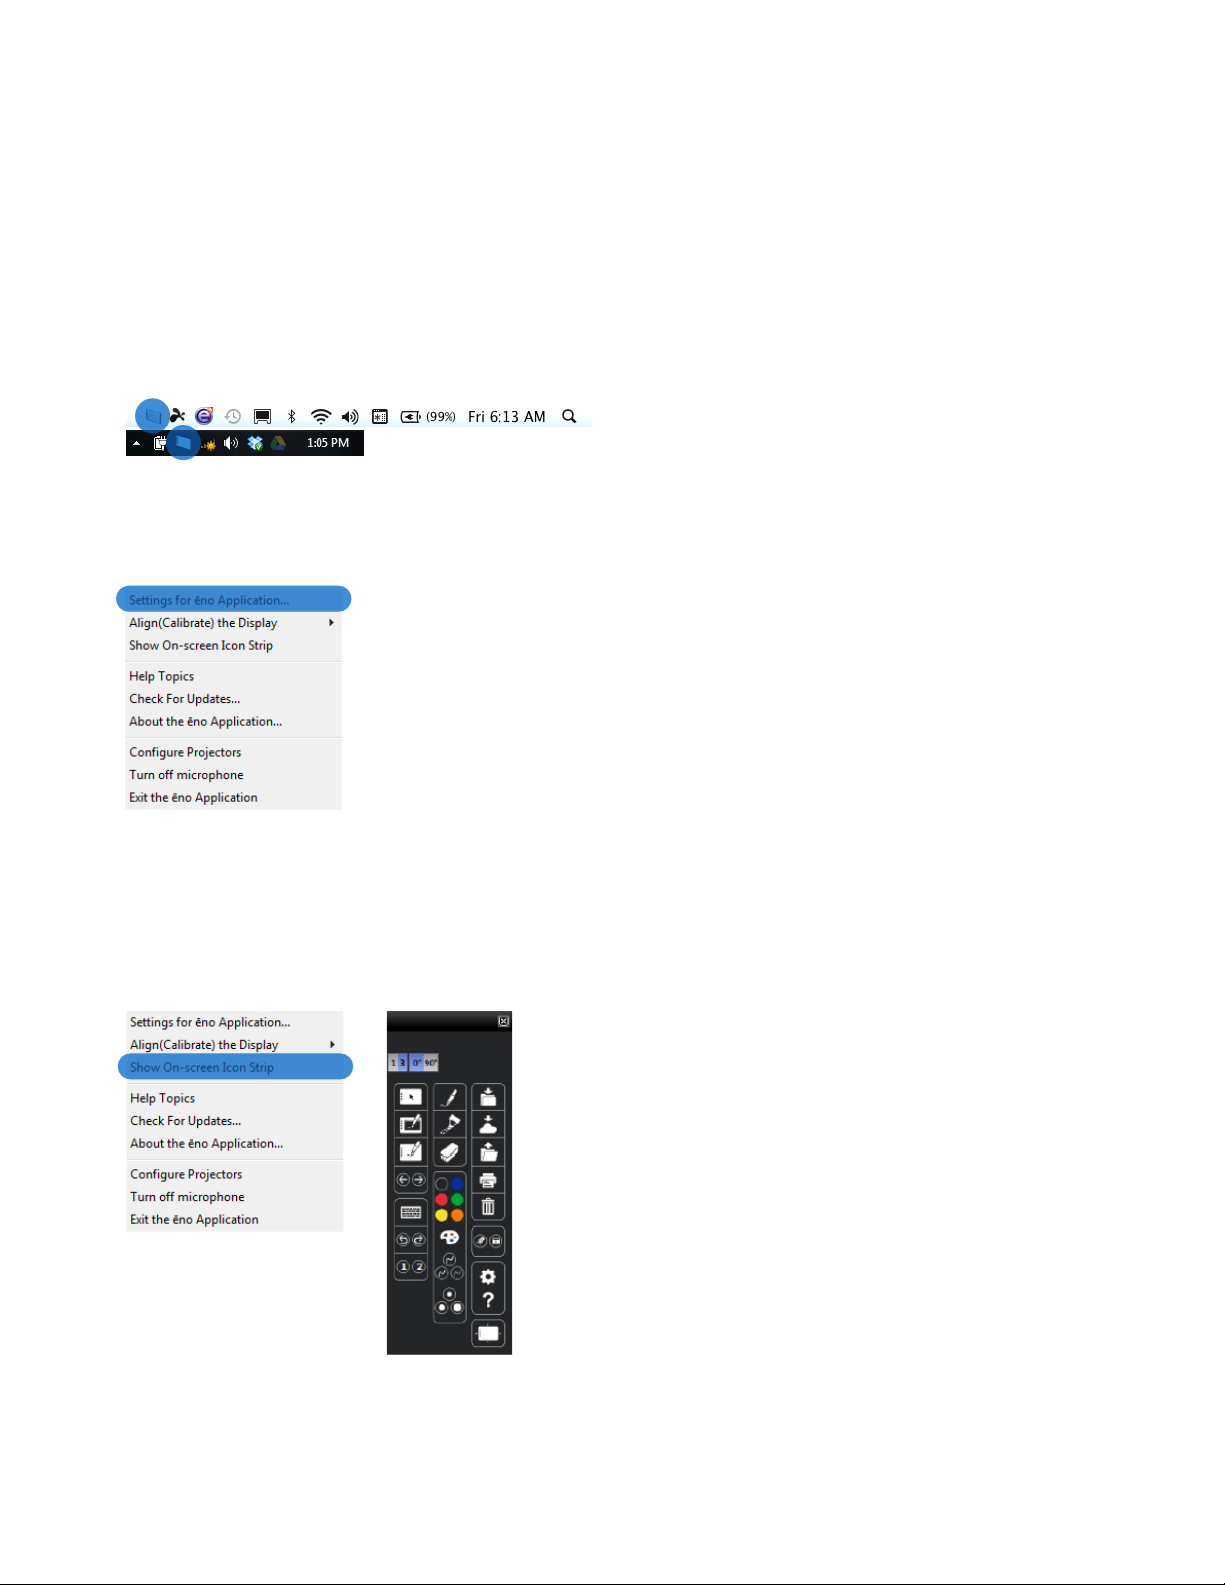
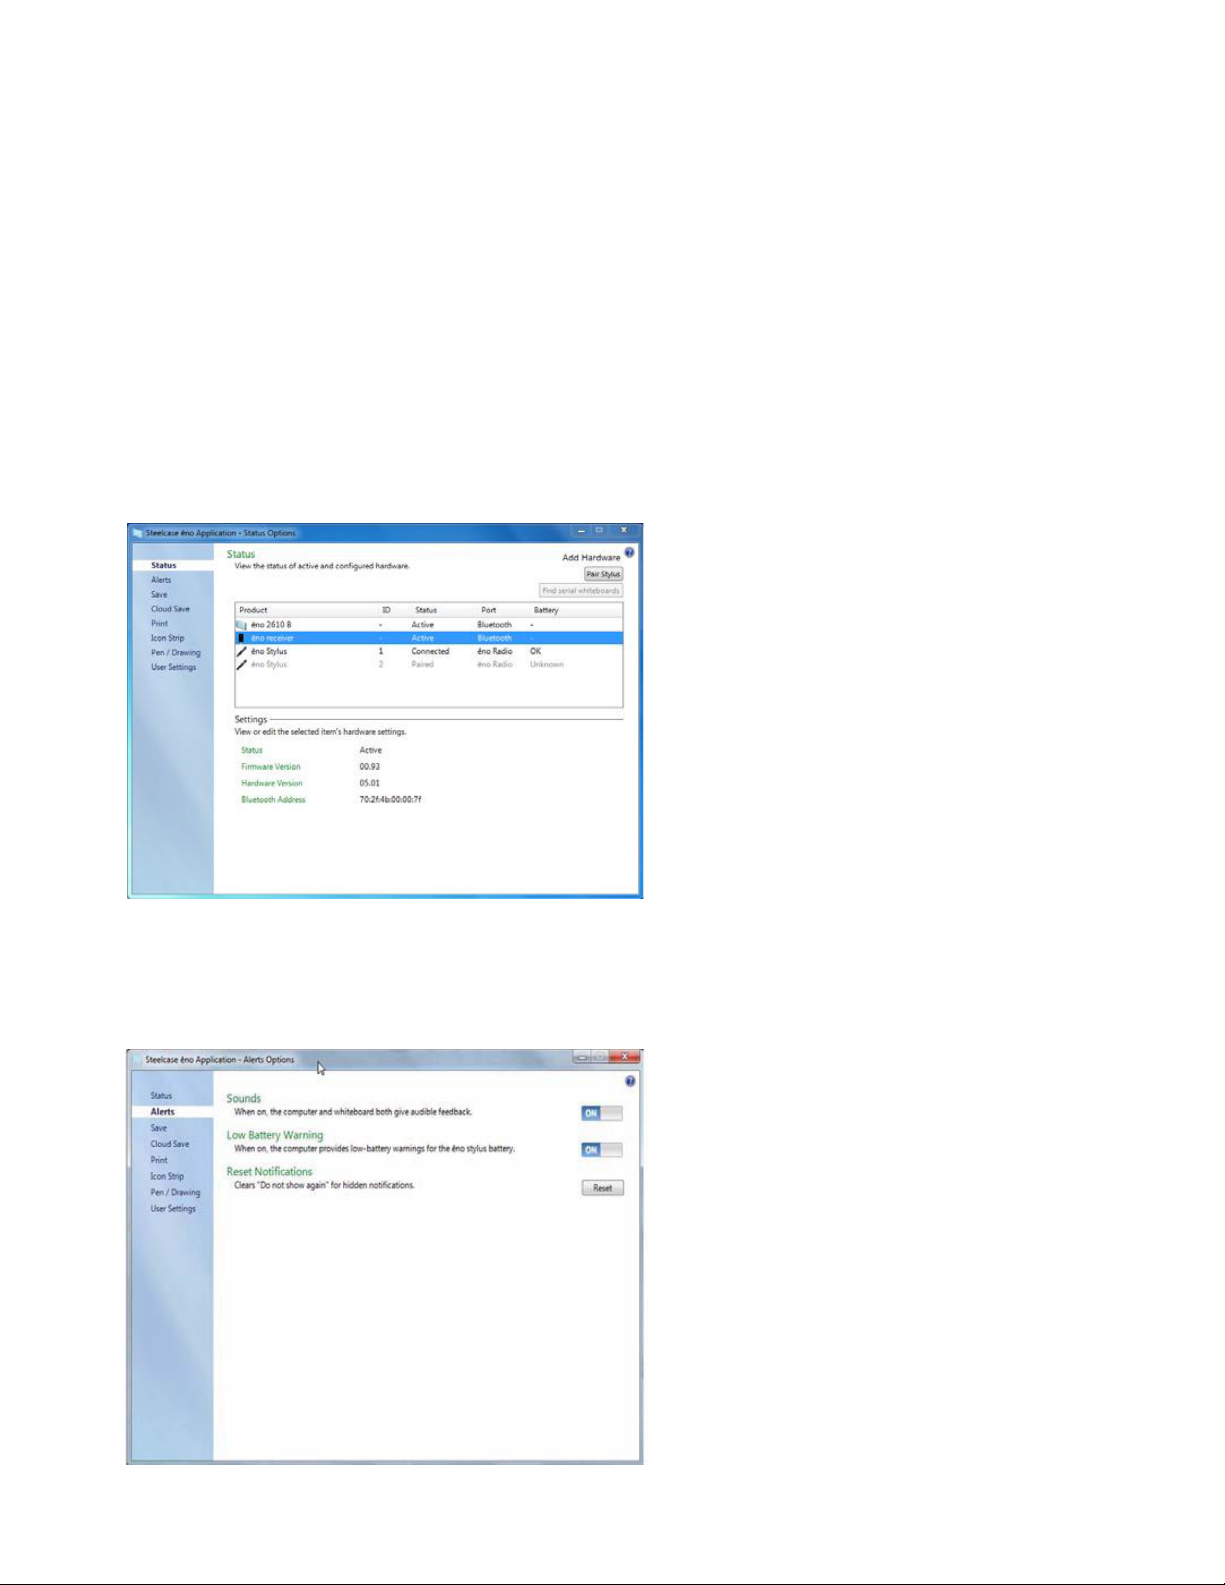
2 To unpair a particular stylus (when multiple styli are connected)—turn on the ēno stylus
to unpair, open the ēno App, select “Settings for ēno application.” On the Status tab,
click to select stylus, then click “remove stylus.”
LED light indicators during use
•LED solid BLUE = normal status; ēno App is running and ēno receiver is plugged in
•LED flashes BLUE = normal; data is streaming successfully to the ēno receiver
•LED flashes GREEN 3xs after ēno stylus is turned on = connection successful
•LED flashes GREEN 5xs (quickly) = pairing successful
•LED solid RED = ēno App is not running (Action: launch or restart the ēno App)
•LED flashes RED 2xs = no ēno stylus or ēno stylus has timed out (Action: turn off ēno
stylus and turn back on to reset the connection)
•LED flashes RED 3xs after ēno stylus is turned on = connection failed (Action: turn off ēno
stylus and turn back on to reset the connection. If this does not work, unpair then repair
the ēno stylus using the pairing instructions above)
•LED flashes RED 5xs (quickly) = pairing unsuccessful/failed (Action: remove ēno receiver
from USB port, wait 5 seconds, then repeat pairing instructions above)

AT-A-GLANCE ēno PRODUCT GUIDE
The ēno App version 3.0 or later must be installed on your computer to use all the features on the new ēno
icon strip. The ēno App is backward compatible, so it also supports the old ēno icon strip. Download the most
recent version of the ēno App from the Steelcase Tech Support website at http://techsupport.steelcase.com.
View recorded demonstrations of how to use the new and old ēno icon strip at www.bringlearningtolife.ning.com.
1 2
ABC
2003338-001
Cursor Mode
Pen Mode (for Digital Ink)
Whiteboard Pages
Forward / Backward Navigation (for navigating whiteboard pages, PowerPoint, etc.)
Virtual Keyboard (cursor mode only)
Undo / Redo
Customizable Icons 1 & 2 (configured in Settings Menu)
Digital Ink Pen
Digital Ink Highlighter
Digital Ink Eraser
Digital Ink Color Selector
Color Palette (select a unique color on your device)
Digital Ink Line Style Selector
Digital Ink Line Thickness Selector
Quick Save (location configurable in Settings Menu) (long press for Save As)
Cloud Save (location configurable in Settings Menu) (long press for Save As)
Open Recent Documents
Print (location configurable in Settings Menu) (long press for Print Dialogue Box)
Erase All (Pen Mode only)
Spotlight / Reveal Tools
Settings Menu
Help (open User Guide)
Calibrate Projected Image
ēno Icon Strip Legend

AT-A-GLANCE ēno PRODUCT GUIDE
Installing the ēno App
Follow the instructions below to install the ēno App on your computer. Then use a paired
ēno receiver and ēno stylus to interact with ēno in collaborative spaces.
1Visit the “Downloads” page at http://techsupport.steelcase.com/
and download the ēno App file to your desktop using the following filters:
ēno classic
Driver
Windows*
English*
*Select the operating system (OS) and language that best suit your needs.
Download the latest drivers, release
notes, user manuals and installation
guides for Steelcase tech products.
2Plug the ēno receiver into your computer.
3Launch the ēno App from your desktop and follow the on-screen prompts to
successfully install the ēno App to your computer.
4After installing the ēno App, pair the ēno stylus to the ēno receiver by uncapping the
stylus and pressing the button on the ēno receiver.
5Reboot your computer after successful installation and pairing (if prompted).
6Connect your computer to the ēno.
7Turn on the ēno stylus and touch the ēno to calibrate the projected image and begin
using the ēno interactive whiteboard.
ēno Receiver
NEED MORE HELP?
For troubleshooting, please refer to the
complete ēno User Guide or contact
Steelcase Tech Support (contact information
at http://techsupport.steelcase.com).

AT-A-GLANCE ēno PRODUCT GUIDE
Navigating the ēno App Driver
Version 3.2.0 (Page 1 of 5)
Step 1
Click the “ēno App” icon
Step 2
Click “Settings for ēno App” on menu
View On-Screen Icon Strip (optional)
The on-screen icon strip provides the functions of the magnetic icon strip in an interactive
window. You can drag a strip to a convenient location on the whiteboard or scale to size
dynamically. If you updated to ēno App 3.2 but still use the older magnetic icon strip, the
on-screen icons match the older icon strip.

AT-A-GLANCE ēno PRODUCT GUIDE
Version 3.2.0 (Page 2 of 5)
Alerts
“Sounds” refers to the alert sound a computer makes when stylus touches icon strip.
Turn OFF to disable. You should keep Low Battery Warning ON.
Navigating the ēno App Driver
Status
Lists “products” known to computer via touch by stylus. Click on “Stylus” to see info on
battery status and serial number. To pair additional styli, most users will use the push
button on the USB ēno receiver and follow on-screen instructions. However, you may use
the “Pair Stylus” button on this window if desired. To remove an individual stylus, turn stylus
on, select it from the Products menu and click “Remove Stylus” button. To remove all styli
paired to an ēno receiver, hold down the receiver button for 10 seconds.

AT-A-GLANCE ēno PRODUCT GUIDE
Version 3.2.0 (Page 3 of 5)
Cloud Save
Create and designate a secondary save location—in the “cloud” (see drop-
down list) or on your network. Other settings are the same as in SAVE.
CLOUD SAVE icon on ēno strip.
Touch and hold to open Cloud
Save As dialogue box.
Navigating the ēno App Driver
SAVE icon on ēno strip. Touch and
hold to open save dialogue box.
Save
Create and designate a “drop folder” on your computer to store any images you save
by tapping the save icon. JPEG and PDF are the most popular file types. Select date/time
or sequential number as NAME MODIFIER. You will want to visit this folder to rename and
relocate saved files.

AT-A-GLANCE ēno PRODUCT GUIDE
Version 3.2.0 (Page 4 of 5)
Icon Strip
You may assign the 1 and 2 icons to open a web page, open a program, open a
document, activate a custom pen color or activate the Slide Sorter view for whiteboard
pages. The “Red Pen Color Button” setting allows users of the older ēno strip to set
the choice for this button—red pen color, spotlight, reveal screen.
Slide Sorter view
1/2 icons on ēno strip
1 2
Navigating the ēno App Driver
PRINT icon on ēno strip. Touch and
hold to open print dialogue box.
Print
Select the printer you want to use to print screens when you tap the PRINT
icon. If no printer is designated, the computer will use the default printer.

AT-A-GLANCE ēno PRODUCT GUIDE
Version 3.2.0 (Page 5 of 5)
User Settings
After completing the initial calibration process, turn ON Fixed Projector, and you will not
need to recalibrate again. Most teachers prefer to turn OFF automatic update check,
leaving driver updates to their IT department. If two or more teachers share and log in to a
computer, turn Per User Settings feature ON to allow each user to establish their own driver
settings. Most users will turn OFF the Search COM Ports setting.
NEED MORE HELP?
Contact the Steelcase Education Help
or call 800-334-4922.
Navigating the ēno App Driver
Pen/Drawing
The default start-up pen style is medium-thick, solid and black. Most people will leave this
setting, as it is easy to switch between different styles. However, you may select another
default setting if desired. When ON, Replay Strokes re-draws all pen marks made on a
screen when you toggle between cursor and pen modes—you may find limited uses for
this feature. It is recommended that you turn OFF left-handed cursor and hover pen
support (unless you use the now discontinued ēno mini slate).

AT-A-GLANCE ēno PRODUCT GUIDE
ēno Play Sound System
What is ēno Play?
ēno Play transforms an ēno board into an integrated and convenient speaker. The ēno Play
system consists of two exciters, one amplifier and a power cord with an extendsion cable
and 3.5mm audio cable that mount to the back of an ēno Classic or ēno Flex board. ēno
Play is currently not available for ēno Click magnetic interactive whiteboards.
How do I get ēno Play up and running?
Mount the exciters and amplifier to the back of your ēno board using the placement
diagram included with the system. Plug the audio cable and power cord into the
appropriate ports in the back of the amplifier. Next, plug the power cord into an AC outlet
and the audio cable to your computer’s audio out/headset port. A second audio port is
located on the front of the amplifier and will be accessible on the side of your board—plug
in a portable device to share music and other audio files and feeds. Control volume and
other sound settings from you audio device—there are no separate dials or settings on the
ēno Play amplifier.
How may I use ēno Play?
ēno Play allows video clips from websites, online textbooks, and videos created by
students and/or instructors to come alive. Transform your ēno board into an audio/visual
student “work and learn” center, where students listen to audiobooks and create and edit
their own audiovisual projects. Use a tabletop or lapel microphone connected to your
computer to ensure everyone hears students’ speeches and verbal reports.
May I use ēno Play on other interactive whiteboards?
No. The ēno Play sound system is designed specifically for use on the ēno Classic and ēno
Flex interactive whiteboards.
ēno Play Interactive
Whiteboard
MORE QUESTIONS ABOUT ĒNO PLAY?
Contact Technical Support at 800-334-4922 or

AT-A-GLANCE ēno PRODUCT GUIDE
What is the Steelcase PJ930 Projector?
This ultra-short-throw projector frequently is sold along with the ēno interactive whiteboard
(IWB) as a complete IWB package. It offers WXGA 1280 x 800 native resolution, two 10-
watt speakers and a three-year warranty (six months on the lamp). Note that the projector
mount depicted here may differ from your solution and may be sold separately.
What are the PJ930 best practices and precautions recommended for teachers?
The projector is installed by your school or a professional AV company, so teachers generally
will not see or need to tend to any installation matters. When used in conjunction with the
ēno IWB, you must connect your computer to the projector, most often via a VGA cable.
Other connection options exist, so consult your school’s IT Help Desk or Staff for details and
assistance as required. Key features, best practices and precautions include the following:
1Be sure two AA batteries (alkaline is recommended) are installed in the remote.
2Turn the projector “on” with a single touch of the “Power” button on the projector or
remote. Turn the projector “off” with a double-touch of either “Power” button.
3Turn the projector “off” when you will not use it for 20 minutes or more—this preserves
bulb life (the bulb is expensive). Expected bulb life is 5,000 (standard mode) to 8,000
(economy mode) hours.
4The “Source” button on the remote allows you to select which connected device will
display through the projector. In most cases, “Computer” should be selected when
using the projector with your ēno IWB.
5Press the “Blank” button on the remote to black out the projection, which is useful
when you want to redirect student attention to something else. Click this button to
restore the projection. Note that this option does not turn off the projector lamp.
6The “Freeze” button on the remote captures and displays the current projection image,
thereby allowing you to complete other tasks on your computer. This is especially useful
when you wish to complete tasks such as attendance, grade book, email and other
private administrative duties.
7Press and hold the “Laser” button on the remote to activate a red pinpoint laser that
you can use to direct attention to the board or any surface. Avoid contact with eyes.
Steelcase PJ930 Projector
QUESTIONS ABOUT YOUR PJ930 PROJECTOR?
Contact Technical Support at 800-334-4922 or
Steelcase PJ930 Projector
Steelcase PJ930
Projector Remote
Quick Hints for the Steelcase PJ930 Projector
Table of contents
Other Steelcase Interactive Whiteboard manuals
Popular Interactive Whiteboard manuals by other brands

Panasonic
Panasonic UB-5325 operating instructions

SMART Board
SMART Board Board 600iv Configuration and user's guide

SMART Board
SMART Board SB685ix2 user guide

SMART Board
SMART Board 400 series Overlay panel guide

3M
3M Digital Walldisplay 9200IW Plus Operator's guide

StarBoard
StarBoard Link EZ2-Pen user guide