Steepletone SMC1033 User manual
MODEL: SMC1033
MUSIC SYSTEM
WITH TWIN CD PLAYER & RECORDER,
MP3 TO USB/SD ENCODING,
3-SPEED TURNTABLE, RADIO,
CASSETTE AND AUX-IN PLAYBACK
INSTRUCTION MANUAL
PLEASE READ BEFORE USE

LOCATION OF CONTROLS
1. Dust Cover
2. LCD Display
3. Remote Sensor
4. FM Stereo LED Indicator
5. Power LED Indicator
6. BAND Selector
7. Off/Source/Tuner Selector
8. CD I/USB/SD button
9. CD I –Open/Close Button
10. CD I –CD Play/Pause/Stop / Button
11. USB Socket
12. CD I –CD Skip Up /Down Button
13. SD Card Slot
14. CD I –Folder up Button
15. CD I –CD Door
16. CD I/USB/SD –Record button
17. CD I –Play mode Button
18. Tape Function Button
19. Aux/Phono Function Button
20. Volume Up/Down Button
21. CD IFunction Button
22. CD II Function Button
23. Tuning Knob
24. Finalize Button
25. CD II –Open/Close Button
26. CD II –CD Play/Pause Button
27. CD II –CD Door
28. X-BASS On/Off Button
29. CD II –CD Stop Button
30. 3.5mm dia. Headphone Jack
31. 3.5mm dia. Aux-In Jack
32. CD II –CD Skip Up /Down Button
33. CD II Record Button
34. Erase Button
35. LED Dial Pointer
36. Tape Forward / Eject Button
37. Cassette Door Cover
38. 45rpm Spindle Adaptor
39. Turntable Speed Selector
40. Tone Arm Rest and securing clip
41. FM Wire Antenna
42. Speaker Sockets (L + R)
43. Line-Out Socket (RCA/L + R)
44. Auto Stop Switch
45. AC Mains Cord
46. Subwoofer out Jack
CAUTION:
USAGE OF CONTROLS ORADJUSTMENTS OR PERFORMANCE OF PROCEDURES OTHER THAN THOSE SPECIFIED
HEREIN MAY RESULT IN HAZARDOUS RADIATION EXPOSURE. THEREFORE, THIS UNIT SHOULD NOT BE
ADJUSTED OR REPAIRED BYANYONE EXCEPT QUALIFIED SERVICE PERSONNEL.
E-1
Connection
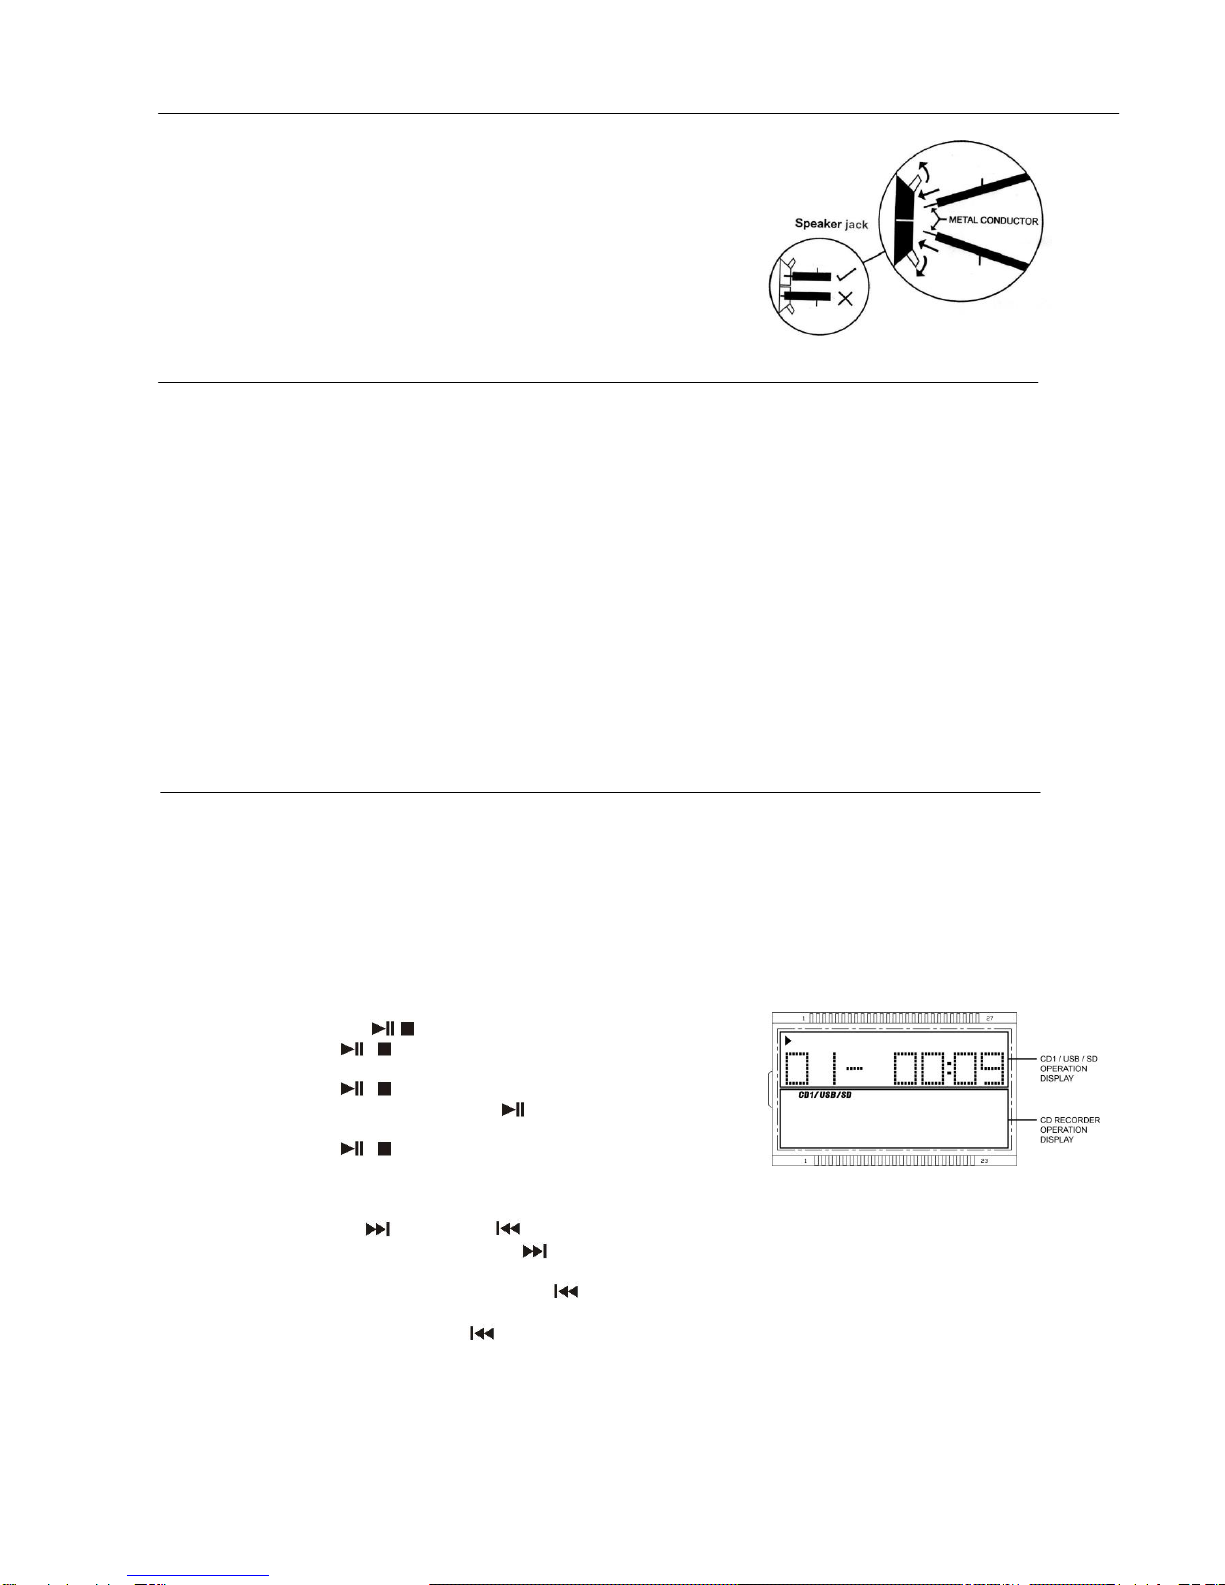
1. Connect the speaker wires to the speaker terminals (R + L) (42) located on the rear of the unit. Push the red right hand
side socket switch upwards to expose the hole in which to insert the red
speaker cable –insert the wire and release the switch. Push down the
right hand side black socket switch and insert the black cable wire.
Repeat this process for the other speaker, ensuring only the metal part of
the wire is inserted.
2. Connect the power cord (45) to a 230V AC Mains outlet.
3. Switch the Off/Source/Tuner selector (7) to the Radio position, if the red
power LED indicator (5) lights up and sound is coming out of the
speakers, this indicates the unit is correctly connected to the power
supply. Your system is now ready to play your music.
Listening to Radio
Manual tuning
1. Switch the Off/Source/Tuner selector (7) to Tuner position.
2. Select the desired band by sliding the Band switch (6) to AM or FM or FM-Stereo.
3. Tune into the required station by turning the Tuning knob (23) –the yellow LED Dial pointer light (35) on the Radio Dial
Scale will indicate the station reached.
4. Adjust the volume by pressing the VOLUME “+” / “-“ buttons (20) until the desired volume level has been reached.
FM & FM-stereo reception
Set the Band selector (6) to the “ FM ” position. Programmes are received in Mono sound. When a Stereo signal is
particularly weak, it is preferable to receive the broadcast in Mono.
Set the Band selector (6) to the “FM-ST” position to receive programmes broadcast in Stereo. The red FM-stereo LED
indicator (4) will light up to show when an FM stereo programme is received.
Hints for best reception:
- AM (=MW): The receiver has a built-in AM bar antenna. If AM reception is weak, slightly rotating or re-positioning of the
unit will usually improve the AM (Medium Wave) reception.
- FM: The receiver has a built-in FM wire antenna (41) hanging at the rear of the cabinet. This wire should be totally
unravelled and extended for best reception.
Playing compact disc at CD I
The system equipped with 2 CD player, here below describe the function for CD I :-
GETTING START
1. Switch the Off/Source/Tuner selector (7) to “Source’position LCD display (2) will appear “PLS SELECT FUNCTION“then
press the CD Ibutton (21) to “CD I“ mode the display will mention “---BUSY”, “ENCODE”it means the CDR and
encoding system in booting mode and it takes few seconds, then display will show “NO DISC”.
2. Press “CD IOpen/Close” button (9) to open the CD Idoor (15).
3. Place a CD with the printed side facing up inside the tray & then close the CD door.
4. Focus search is performing, the LCD display (2) will show the total number of tracks on CD I/USB/SD operation display
area .
PLAY / PAUSE MODE /
1. If Play/Pause/Stop / button (10) is pressed during stop mode, the
first track will be played.(Figure 1)
2. If Play/Pause/Stop / button (10) is pressed during playback, system
go to pause mode and the play indicator “ “will start flashing at the LCD
display (2). Press again to resume normal playback.
3. If Play/Pause/Stop / button (10) is pressed and hold a second during
playback, it will go to stop mode and display total number of track on the
LCD display (2). (Figure 1)
SKIP MODE (SKIP UP /SKIP DOWN )
1. During play or pause mode, if CD ISkip Up button (12) is pressed it will go to next track and display the track no.
and then continuous the play or pause mode.
2. During play or pause mode, if CD ISkip Down button (12) is pressed, it will go back to the beginning of the track,
same track no. is display and continuous the play or pause mode.
3. After step 2, press CD ISkip Down button (12) again, it will go to the previous track and continuous the play or
pause mode.
FOR MP3 DISC
1. Press “ Folder up “ button (14), the folder no. Will goes up
2. Press “ Skip up “ or skip down (12) button, the track no. change.
3. When the desired track is being selected, press the CD I“Play/Pause/Stop ” button (10) to start playback.

ID3 (track/album title) function (by remote handset)
Press the “ Info/Delete “ button during playback of MP3 file, the song title is being displayed. Press the “ Info/Delete ” button
again to disable the function.
Song title/folder name search function (by remote handset)
You can search the track by the title/folder name in disc during stop mode:-
E-2
1. Press the “ Find “ button once, then press the “CD ISkip up” (or skip down) button, you can search the title of each song
one by one under alphabet order on USB/SD operation display area , then press “ USB/SD Play/Pause to start the
playback of the selected track.
2. Press again “ Find ” button, the folder name is being displayed. then press the “CD ISkip up” (or skip down) button to
select the desired folder, and press the “CD IPlay/Pause/Stop ” button to start the playback of all tracks inside that
selected folder.
Remark:-
- In that case of no name had been assigned for the track, “ none “ or “ unknown “ is being displayed” on display (2).
- The LCD display support English language only.
MP3 track format requirement:-
- MP3 bit rate : 32 kbps~256 kbps.
- The performance of playing MP3 files is various from the quality of recording disc and the method of recording.
Repeat/Intro/Random mode (on remote control only)
Press the Play mode button before or during playback, a file, folder(MP3 disc only) or all the files repeat and ransom, intro can
be played in difference mode as follow:-
FOR CD
(1) repeat 1 (2) repeat all track (3) intro (4) random (5) off mode
Indicator
Play mode on lcd display
Repeat track
Repeat all
Intro INTRO
Random RAN
Off mode --------------
FOR MP3
(1) repeat 1 (2) repeat all (3) repeat 1 folder
(6) off mode (5) random (4) intro play
Indicator on USB/SD
play mode operation display
repeat single track
repeat all tracks
repeat single folder
intro play mode INTRO
random mode RAN
off mode -----------------
Repeat play
You can listen the desired file or folder repeatedly by this function.
Intro play (by remote control)
you can listen the beginning (10 seconds) of each file & saving your time to search the desire song
Random play
You can listen all the file in random order by this function
CD/MP3 programming (by remote control)
Up to 32 tacks can be programmed for CD/MP3 file and play in any order. before use, be sure the system is at stop mode

before programming:-
1. Set in CD Imode & stop the playback.
2. Press the “Program” button, “ PROG “ will appear on USB/SD operation display area (2). Moreover, it will indicate
program no. and digits for track no. to be programmed.
3. Select a desired track by pressing USB/SD skip or buttons.
E-3
4. Press the “ Program ” button to store the trace into memory.
5. Repeat steps 3 and 4 to enter additional files into the memory if necessary.
6. When all the desired files have been programmed, press CD IPlay/Pause/Stop button (10) to play the files in
assigned order.
7. To cancel the programmed file, press “CD IPlay/Pause/Stop ” button (10) until “ PROG “ is disappear on
USB/SD operation display area (2).
Remark
- The system can detect and read the file under MP3 format only though the CD I/USB/SD port.
- If connect the system to MP3 player via the USB socket, due to variances in MP3 encoding format, some MP3 player
may not be able to play via the USB socket. this is not a malfunction of the system.
Playing compact disc at CDII
Getting start
1. Select the Off/Source/Tuner switch (7) to “SOURCE” position. The LCD display (2) will show “PLS SELECT FUNCTION“.
Then press the CD Ifunction button (22).
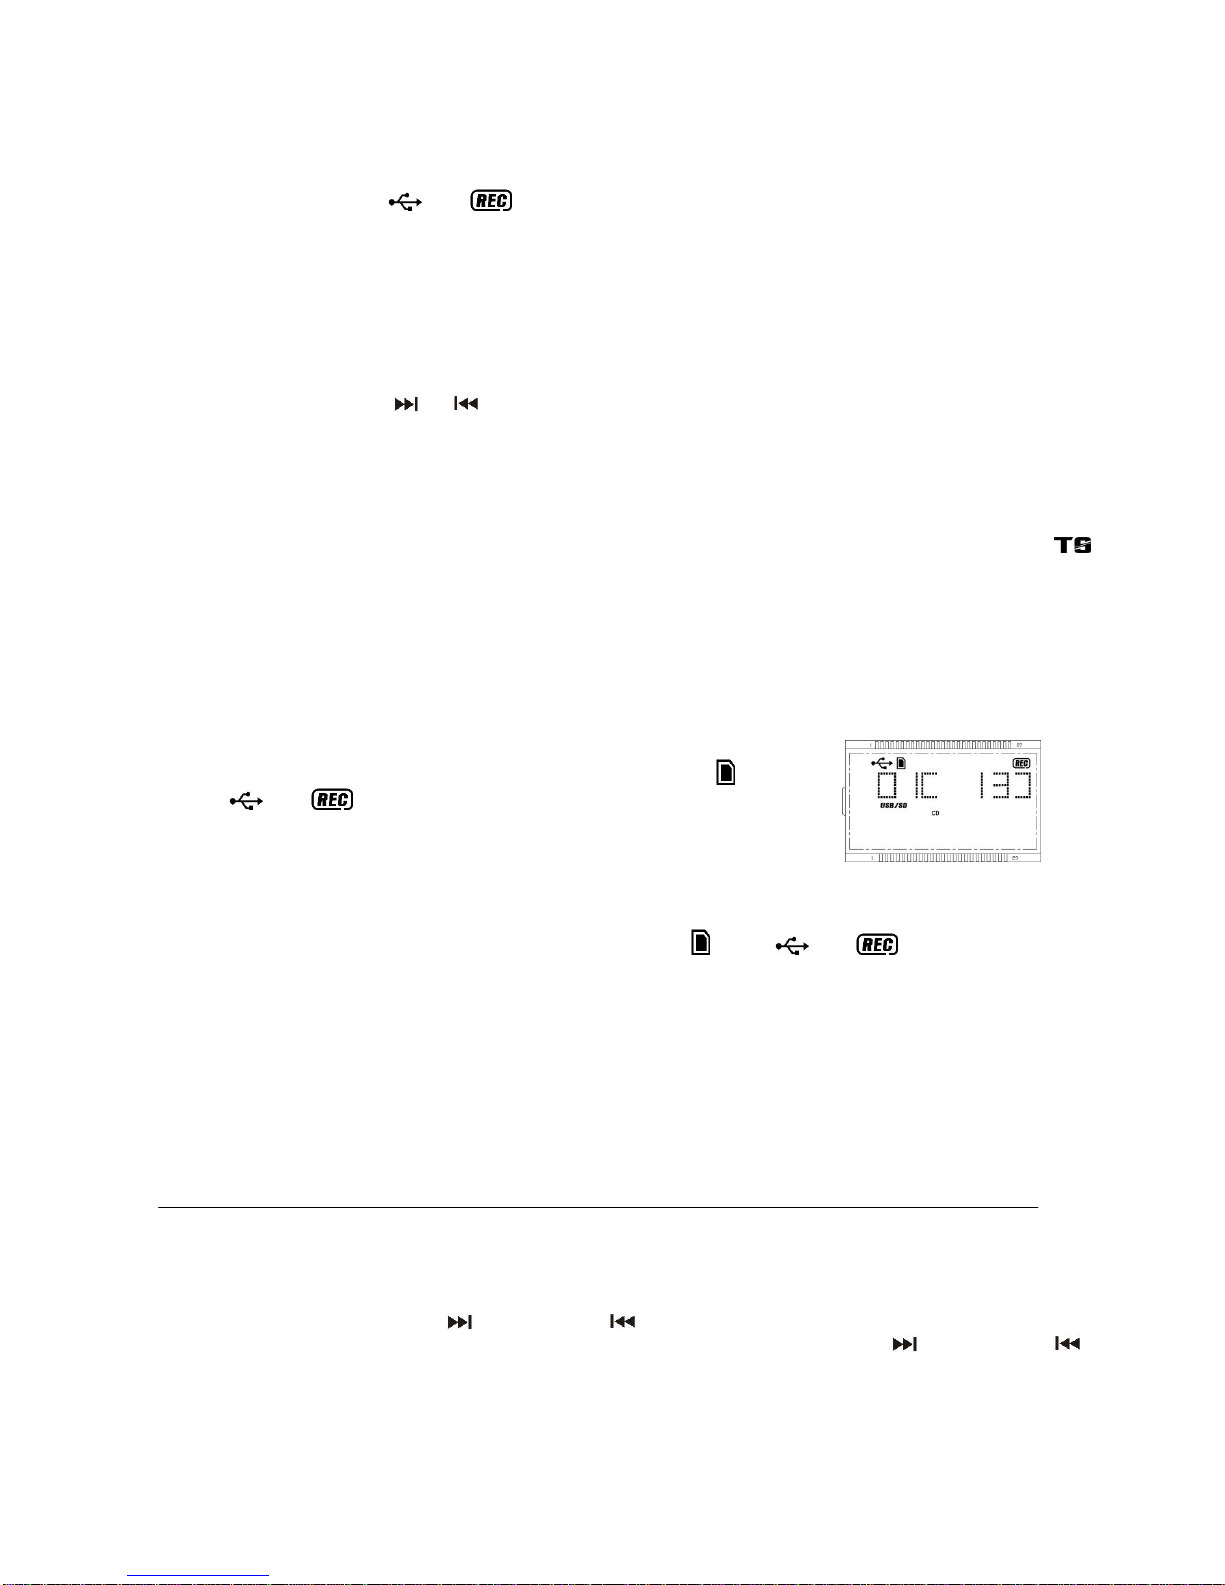
2. The LCD display will show “--- busy “ on the CD/CD Recorder operation display area few second and then “no disc “ if
the CD compartment is empty and “ENCODE ”will show on CD I/USB/SD operation display as well. (Figure 2)
3. Then press “CDII Open/Close”button (25) to open the CDII tray (27).
4. Place a audio CD with the printed side facing up inside the tray & then close the CD tray.
5. Focus search is performing and CD Recorder operation display area LCD area (2) will show “BUSY “ and then display
the total number of tracks & total playing time. (Figure 3)
(Figure2) (Figure 3)
Play / Pause mode
6. Press the CDII “Play/Pause ” button (26) to start playback, the first track will start playback.
7. To interrupt, press the CDII “Play/Pause ” button (26) once, the playing time will be freeze on the LCD display (2).
Press again to resume normal playback.
Stop mode
8. If “CDII Stop “button (29) is pressed during play or pause mode. CDII will go to stop mode and display total number of
track on the CD Recorder operation display area (2).
Skip mode (skip up / skip down )
9. During play or pause mode, if “CDII Skip up ” button (32) is pressed. It will go to next track and display the track no.
and then remain the play or pause mode.
10. During play or pause mode, if “CDII Skip down ” button (32) is pressed. It will go back to the previous track and play
the track.
Remark:-
Before pressing the “CDII Open/Close ”button (25) for changing disc. Press the “CDII Stop ”button (29)
every time and resume the CD Recorder operation display area to the original information.
- The reaction time of the CD Recorder is longer than normal CD player due to the complicacy system.
- Keep pressing with all difference function within a short time may cause mal-function of the system. Please re-start the
unit if this is happen.
- The reading and playback time of CD-R(W) disc is various from brand to brand. It depends on the compatibility of the
used disc.
- This device only design for normal compact disc format. Is not support any MP3 format.
Repeat/Random mode (by remote control)
Repeat play (by remote control)
Press the repeat/random button before or during playback, a single track or all the tracks can be played in difference mode as
follow:-

(1) repeat all track (2) repeat 1 (3) off mode
E-4
Indicator on CD/CD Recorder
Play mode operation display area
Repeat all
Repeat 1
Off mode --------------
Random play mode (by remote control)
Press the Random button at remote control will active the shuffle play function and the random indicator “RAN “will show on
CD Recorder operation display area (2). Press the stop button to stop the unit and cancel the random play function.
CD disc programming (by remote control)
Up to 32 tacks can be programmed for CDII playing. Before use, be sure the system is at stop mode before programming :-
1. Set in CDII mode & stop the disc playback.
2. Press the “Program” button of CDII by the remote control, “ PROG “ indicator will appear. Moreover, it will indicate
program no. (P-01) and digits for track no. to be programmed on CD/CD Recorder operation display area.
3. Select a desired track by pressing skip up or down buttons.
4. Press the “Program ” button to store the trace into memory.
5. Repeat steps 3 and 4 to enter additional tracks into the memory if necessary.
6. When all the desired tracks have been programmed, press CDII “ play/pause ” button to play the disc in assigned
order.
7. To cancel the programmed file, press CDII “Stop” button on remote handset until “ PROG “indicator is disappear on
LCD display (2).
Remark:-
- After program play and you can delete the programmed track in the order from the last one to the 1st one after the
programmed track start to played. Press stop button to set the unit in stop mode first, press “Clear “button at remote
control once by once. The programmed track will delete one by one from the memory
Recording function
Apart from the CD playback function, it can perform the CD recording function either from Phono/Aux/Tape/CD/USB/SD mode
respectively. All the recording track will be stored at “audio-CD “format:-
Before start, place a CD-R or CD-RW disc in the CDII tray (27). The disc is able to record only if the LCD display show “NO
TOC “indicator.
Important notices:-
- CD-R disc can be recorded once only and not support erase or re-record function. The playback quality of either CD-R(W)
disc is various from differences kind of audio CD player device.
- The revolving speed of CD burner is higher than normal CD mechanism. Thus, some mechanical noise and vibration of
unit cabinet may occur during operation. This is not the malfunction of the system.
- Due to the variety on the quality and the compatibility of CD-R(W) disc from the market. Please change other brand if you
found the used one is not able to record or the performance is not so stable.
A) Recording mode
i) Phono/Aux recoding
1. Select the Function switch (7) to “ SOURCE ” position, then press the “Phono/Aux “function button (19). Place the
recorded vinyl & get ready for playback.
2. For Aux in recording, connect the headphone output at the audio device (such as MP3 player, CD player etc) to the
3.5mm Aux-in jack (31) via a 3.5 mm connecting cable (not provided). The audio channel will change to Aux in
automatically and the turntable was not able to turn.
2. Press “CDII Rec “ button (33) and then the “ CD Play/Pause ”
button (26) to confirm start recording until the play indicator “ “ and “REC
“indicator show on CD Recorder operation display area. (Figure 4)
3. After few seconds, the CD Recorder operation display area (2) will show
the time counter and now the system is start recording process. (Figure 4)
Now start the playback of the vinyl at Phono or Aux in device.
4. After completing of recording, Press the “CD Stop ” button (7) and
then stop the playback of vinyl or Aux in device.
(Figure 4)
ii) Cassette recording
1. Select the Function switch (7) to “ SOURCE ” position, then press the “ Tape “function button (18). Place the recorded
cassette tape to the cassette slot (27) to get ready for playback.

2. Press “CDII Rec “ button (33) and then the “ CD Play/Pause ” button (26) until the play indicator “ “ show on
CD Recorder operation display area (2).
3. After few seconds, the CD Recorder operation display area (2) will show the time counter and now the system is start
recording process. Now push the cassette tape to the cassette compartment to start playback of which the track you
prepare to record.
E-5
4. After completing of recording, press the “CDII Stop ” button (29)and then stop the playback of the cassette tape.
iii) CD I recording
1. Select the Function switch (7) to “ SOURCE ” position, then press the “CD I “ function button (21) to select CD I mode
and place the audio CD to the CD I compartment.
2. Press “CDII Rec “ button (33) and then the “ CD Play/Pause ” button (10) until the play indicator “ “ show on
CD/CD Recorder operation display area (2).
3. After few seconds, the CD Recorder operation display area (2) will
show the time counter and now the system is start recording process.
Now press “CD I Skip Up button“(12) to choose the track you
prefer to record then press “CD I Play/Pause ” button (10) to
start playback the track to record. (Figure 5)
4. After completing of recording, press the “CD I Stop / ” button
(10) and then stop the playback the CD I/USB/SD media and press
the “CDII Stop ” button (29) to stop the recording. (Figure 5)
vi) USB/SD recording
1. Insert the USB/SD media device refer to “Playback of MP3 song via USB storage media or memory card”section in
below of this manual. Select the Function switch (7) to “ SOURCE ” position, then press the “CD I “ function button (21)
and CD I/USB/SD button (8) to select USB or SD mode, press and hold the “CD I/USB/SD Play/Stop / “button
(10) to set the USB/SD function at stop mode. The rest recording procedure were same as CD I recording.
Remark:-
- The recording speed is 1:1 and according to the actual plying time of the playing source
- To suspend the recording process, press the “CDII Play/Pause ” button (26),“BUSY “will flash a second on CD
Recorder operation display area (2) then will change to show the current recording track nr. and the recording is in pause.
To re-start, press again the “CDII Play/Pause ” button (26) until the play indicator “ “show on CD/CD Recorder
operation display area (2).
B) Recording setting
i) Recording level
The preset recording level of the system is lower than original music source in order to avoid distortion during recording
except Aux-in recording mode.
ii) Track separation(on remote control only)
You can divide the recording music track by track during recording :
1. Anytime when press the “CD Track separate ““button on remote
control once during recording at any mode, the system will generate a new
track and continuous the recording. The word “busy “will briefly show on
CD Recorder operation display area (2).(Figure 6),
it mean the unit is creating a new track successfully.
(Figure 6)
iii) Finalize a CD-R(W) disc
You must convert the CD-R(W) disc into standard CD before playing at other audio CD player. This process is knows as
finalizing and a table of contents (TOC) will written to the CD on the same time:-
1. Select CDII function mode and place the CD-R(W) disc you are going to finalize.
2. Press the finalize button (24) CD stop mode. “Fin-d “appears on CD Recorder operation display area (2). (press the
“CDII stop ” button to quite finalize mode if necessary)
3. Press the “CDII Play/Pause ” button (26) to start finalizing and CD Recorder operation display area (2) will show
“BUSY“during the process.
4. After completion, the CD tray will open automatically and “OPEN “will disappear from CD Recorder operation display
area (2).
Remark:-
- The time for finalizing is subject to the contents of recorded and it may take up to 15 minutes in some cases.
- No button is working during finalize process.
- Never turn off the power or un-plug the power cord during finalize process.
- The CD-R disc cannot be recorded again after finalizing.

- Although finalized CD-R disc may be played on ordinary CD players, remember that finalized CD-RW disc may not play
on ordinary CD players.
- Owing to the variance of the compatibility of CD-R or CD-RW disc from the market. Please change to other one if you find
the recording performance of existing one is not up to satisfaction. This is not the malfunction of the system.
E-6
v) Erase or un-finalize a CD-RW disc
It is possible to erase the last recorded track or erase a whole record disc.
If erase the last track of the finalized cd-rw, must un-finalized the CD-RW first
A) un finalize a CD-RW disc
1. set at CDII function mode and place the CD-RW disc you would like to un-finalize.
2. Press the “ Erase “button (34) at CDII stop mode & display will show “UNFin-d”then press the “CDII Play/Pause ”
button (26) to start erasing and “BUSY “appear on the CD Recorder operation display area (2).
3. After finish the un-finalized, display will show total track nr. and total playing time of the disc and “NO TOC ”indicator will
appear.
B) Erase one track
1. set at CDII function mode and place the un finalized CD-RW disc you would like to delete the track.
2. Press the “ Erase “button (34) at CD stop mode & “Er “and the last track nr. appear on the CD Recorder operation
display area (2).
3. Press the “CDII Play/Pause ” button (26) to start erasing the last track and “BUSY “disappear on CD Recorder
operation display area (2).
4. After finish the track erasing display will show total track nr. and total playing time of the disc and “NO TOC ”indicator will
appear.
5. Repeat step 2 to 4 to continue the erasing.
C) Erase all track
1. Set at CDII function mode and place the un finalized CD-RW disc you would like to
erase all the tracks.
2. Press the “ CD Erase “ button twice (34) at CD stop mode & “Er ALL “will appear on
the CD Recorder operation display area (2).
3. Press the “CD Play/Pause ” button (26) to start erasing and display appear
“BUSY”during erasing. Once erasing was finish, the CD Recorder operation display
area (2) will show “0000000 “to confirm the erase process is completed. (Figure 7) (Figure 7)
Remark :
- This operation cannot be undo.
- The copy CD-RW disc from other system cannot be erased one by one in this unit but may be erase all is possible.
Listing to tape
General operation
Select the function switch (7) to “ SOURCE ” position. The LCD display (2) will show “PLS SELECT FUNCTION “. Then press
the Tape button (18)
Cassette playback : The system will start the playback automatically after inserting
of cassette tape
Stop and ejection : Press the “ Cassette forward/eject “ button completely inwards
and the cassette tape will be ejected though the cassette door cover. The “ cassette forward /
eject “ button will keeping at lowest height position.
Fast forward : Press the “ tape forward / eject “ button half inwards during
Playback mode, the tape winding forward direction. The “ tape forward / eject “ button will
keeping at middle height position.
Slightly press the “ tape forward / eject “ button again to resume normal playback. The “ tape
forward / eject “ button will resume to the highest position.
Remark
- Make sure the direction is correct when inserting the tape into the system.
- There is some searching noise can be heard and the system cannot perform normal playback function during fast
forward mode.

- This is recommended to take out the cassette tape from the system every times after listening and don’t leave the
cassette tape inside the system when not under playback mode.
E-7
Phono
operation
-Remove the stylus protector.
-Be sure that the tone arm is being detached from the tone arm rest before operating
and re-secured again afterwards.
1. Select the function switch (7) to “ SOURCE ” position. The LCD display (2) will show
“PLS SELECT FUNCTION “. Then press the Phono/Aux button (19).
2. Set the speed selector (39) to the proper position depending on the record to be played.
3. Place the record on the platter (use the spindle adaptor (38) if required.
4. Lift the tone arm from the rest and slowly move it to the record side. The platter will start to rotate.
5. Place the tone arm to the desired position of the record.
6. At the end of record, the platter will automatically stop rotating. Lift the tone arm from the record and return it to the rest.
7. To stop manually, lift the tone arm from the record and return it to the rest.
Remark : As some kind of record the auto-stop area was out of the unit setting, so it will stop before the last track finish. In this
case, select the Auto-stop switch (44) to “ Off “ position, then it will run to the end of the record but will not stop automatically
(turn off the unit by Power button or switch back the auto-stop switch to “ on “ position to stop the platter rotate). Then put back
the tone arm to the rest position.
Remark : due to Aux and Phono were designed at the same position of this system. When Aux in jack (31) plugged by 3.5mm
stereo plug. The channel will change to Aux automatically and turntable will stop to rotate. Please ensure the Aux in jack (31)
without plugged by anything before playing Phono.
Aux-in connection
Connect the unit to any auxiliary device (i.e. MP3 player, or iPod® (not included) by connecting the aux in jack(31) at the rear
cabinet with one end of 3.5mm stereo cable(not provided)and the other end connect to the auxiliary device to perform the
music or computer encoding.
1. Select the function switch (7) to “ SOURCE ” position. The LCD display (2) will show “ PLS SELECT FUNCTION “. Then
press the Phono/Aux button (19).
2. Plugged the Aux in jack. The channel with switch to Aux automatically.
3. Start to playback your device and adjust Volume knob (20) to the desire volume level. If the distortion was too high, reduce
the volume level of your auxiliary device.
Playback of MP3 song via USB storage media or memory card
Connecting
the system is able to decode and playback all MP3 file which stored in the memory
media with USB connecting port or SD/MMC memory card.
1. Set function selector (7) at CD I function button (21) and then press CD I/USB/SD
alternative button (8) to select “ USB or Card” mode.
2. Plug-in the USB plug with the face up & make sure it going into completely or insert
the memory card in the direction of the arrow as shown in the label on the
underside of the memory card slot cover. insert straight without bending.
Connecting the USB upside down or backwards could damage the audio
system or the storage media (USB thumb drive / SD/MMC card). check to be
sure the direction is correct before connection.
3. The system will start reading the storage media automatically after connecting, and
USB/SD operation display area (2) will show the total number of MP3 files and total
number of folder being detected and the system will start to playback the MP3 file automatically
Play / Pause / Stop mode
1. To interrupt, press the “CD I Play/Pause/Stop ” button (26) once, the playing time will be freeze & flashing on
the USB/SD operation display area (2). Press again to resume normal playback.
2. If press and hold the “Play/Pause/Stop “ button (26) for over 2 seconds during playback mode. The system will
go to stop mode.
Skip/search mode (skip/search up / skip/search down )
1. During play or pause mode, if “CD I Skip up” button (12) is pressed. It will go to next track and display the track no. and
then remain the play or pause mode.
2. During play or pause mode, if “CD I Skip down” button (12) is pressed. It will go back to the beginning of the track,
original track no. is display and remain the play or pause mode.

3. After step 2, press “CD I Skip down” button (12) again will go to the previous track and remain the play or pause mode.
4. If press and hold the “CD I Skip up/down button “ (12) during playback, the playing track will go fast forward or backward
until the button being released.
5. Press “CD I folder up “ button (14) to select your desire folder.
E-8
Encoding to MP3 file
The system is able to encode normal CD/Turntable/Aux in/Tape to MP3 format and recording at memory media with USB
connecting port or SD/MMC card. (Below explanation was perform USB encoding)
CD I encoding was recommended
Whole disc encoding
1. Insert the USB media into the unit and made sure it had enough memory to perform encoding.
2. Set the unit in CD I mode by press “CD I “button (21) and get ready to playback. CD I/USB/SD operation display area
(2 ) will show the TOC of CD I. Then press “CD I /USB/SD Record “ button (16) start encoding, CD I /USB/SD
operation display area (2) will flash “CHECKING “few seconds (Figure 8), then CD I will start playback automatically
and the ““ & “ “ icon will flashing(Figure 9). CD I encoding was performing now.
(Figure 8) (Figure 9)
3. After completed encoding, CD I and encoding system go to stop mode.
Encoding 1 track
1. Perform normal playback of the CD track you want to encode & record,
2. Press “CDI/USB/SD Record “ button (16) during the playback of the desire track, CD I /USB/SD operation display area
(2) will flash “CHECKING “few seconds (Figure 8), then CD I will start playback automatically and the “ “ &
“ “ icon will flashing(Figure 9). CD I encoding was performing now.
3. After completed encoding, unit will stop playback automatically.
Encoding by program
1. Select the desire tracks by following “ CD/MP3 programming “ procedures. Then press “CD I Play/Pause/Stop
“ button (10) to start playback.
2. During CD playback, press and hold the “CD I Play/Pause/Stop “ button (10) for 2 seconds to enter the stop
mode.
3. Press “CD I/USB/SD Record “ button (16) during the playback of the desire track, CD I /USB/SD operation display area
(2) will flash “CHECKING “few seconds (Figure 8), then CD I will start playback automatically and the “ “ &
“ “ icon will flashing(Figure 9). CD I encoding was performing now.
4. After completed encoding, unit will stop playback automatically.
Remark:-
- The recording speed is 1:1 and according to the actual plying time of the CD track
- The system will create a “ audio “ folder and then store the encoding track in it.
- The recording format is preset at –MP3 bit rate : 128 kbps, sampling rate : 44.1kHz.
- No song title will be recorded during encoding mode.
- To interrupt the recording, press the “ USB/SD Record “ button (25) again during record mode.
- Recording will be completed only entire song being encoded, if terminate the encoding process intermediately, there is
no track being recorded nor stored to the USB or SD/MMC card.
Phono/Aux encoding
1. Set the unit in Phono/Aux mode by press the “ Phono/Aux “function button (19) and CD I /USB/SD operation display
area (2) will show “ENCODE”. Place the recorded vinyl & get ready for playback.
2. For Aux in encoding, connect the headphone output at the audio device (such as MP3 player, CD player etc) to the
3.5mm Aux-in jack (31) via a 3.5 mm connecting cable (not provided). The audio channel will change to Aux in
automatically and the turntable was not able to turn.
3. Press “CD I /USB/SD Record “ button (16) once, USB/SD operation display area (2 ) will show “USB”then press “CD I
/USB/SD Record “ button (16) again to confirm encoding, CD I /USB/SD operation display area (2) will change to
“ENCODE “again and “ “ & “ “ icon will flashing, encoding is performing now.
4. Start the playback of the vinyl at Phono orAux in device.
5. After completing of encoding, press “CD I /USB/SD Record “ button (16) again to stop the encoding and then stop the
Phono/Aux in playback.
Cassette encoding
1. Set the unit in cassette mode by press the “ Tape “function button (19). Place the cassette tape to the cassette slot to
get ready playback.
2. Press “ USB/SD Record “ button (16) once, USB/SD operation display area (2 ) will show “USB”then press “CD I
/USB/SD Record “ button (16) again to confirm encoding, CD I /USB/SD operation display area (2) will change to
“ENCODE “again, and “ “ & “ “ icon will flashing on later on, encoding is performing now.
E-9
3. Start the playback of the cassette tape.
4. After completing of encoding, press “CD I /USB/SD Record “ button (16) again to stop the encoding and then stop the
cassette playback.
Encoding bit rate (by remote handset)
You can select the desired bit rate for USD/SD encoding, the selectable range from 32 / 64 /96 /128 / 192 / 256 kbps.
Set in “ Phono “ or “Cassette “function & remain stop mode.
1. Press the “ Info “ function and the USB/SD operation display area (2) will show the default bit rate (128 kbps).
2. Press skip CD I/USB/SD or buttons to select the desired bit rate for encoding.
3. Press again the “ Info “ to confirm the setting and the LCD display (2) resume to “ Phono “ or “Cassette “mode.
Remark : Due to this unit was complicate design, thus, CD recording and USB/SD encoding from Phono/Aux or Tape
together at the same time was not recommend. Please perform it separately.
Track separation (by remote handset)
You can divide the recording music from track by trace during encoding. Every time when press the “CD I /USB/SD
“ (track separation) button once at remote handset during encoding from Phono/Aux in, Cassette the system will generate a
new track and continuous the encoding. The text “ ENCODE “at CD I /USB/SD operation display area (2) will flashing one
time, it mean the unit is creating a new track successfully.
Copying of MP3 file
The system allow to copy the file from CD I MP3 disc to USB or SD as well as SD to USB alternative by 1 files or all files.
Below explanation was from SD card copy to USB media.
i) Copy 1 track
1. Press “CD I /USB/SD Record “ button (16) during the playback SD card of the
copying track, the USB/SD operation display area (2) will display ““and
“ “ & “ “ and flashing. Copying is performing now.(Figure 10)
2. After completing of copy, unit will go to stop mode automatically.
(Figure 10)
ii) Copy all track
1. Insert the USB storage media and SD card and set the unit at SD card “ stop “ mode after unit reading.
2. Press “CD I /USB/SD Record “ button (16) and unit will display ““and ““& “ “ are flashing. Copying is
performing now.
3. After completing of copy, unit will stop playback automatically.
Remark:
- If press “CD I /USB/SD Record “ button (16) during playback of USB or SD source, the file will copy from USB to SD or
SD to USB.
- The system will create a “ fcopy “ folder and store the copy track inside.
- If putting a MP3 disc instead of a CD-disc, the system will copy the files to the USB or SD card once press the “CD I
/USB/SD Record “ button (16). The operation procedures is same as CD encoding as stipulate on above, and the system
will switch to copying mode only if MP3 file being read.
File delete at USB / SD card (by remote control)
This system is able to erase the file stored inside the USB pen drive or SD card by following:-
Single file delete
1.Set at “ USB “ or “ SD “ mode.
2.Press and hold the “ Info/Delete “ button for 3 seconds and the USB/SD operation display area (2) will show (del ---001).
3.Press “CD I /USB/SD skip forward or skip backward “button to select the file going to delete
4.Press the “CD I /USB/SD REC “ button to enter “ Yes / No “ mode and then press skip forward or skip backward
to select “ yes “ or “ no “.
5.Press the “CD I /USB/SD REC “button again to confirm the deleting.
All files delete
1. Set at “ USB “ or “ SD “ mode.
2. Press and hold the “ Info/Delete “ button for 3 seconds and USB/SD operation display area (2) will show (del ---001)
3. Press and hold the “ Info/Delete “ button for 3 seconds again, the USB/SD operation display area (2) will show “FORMAT
7N”
4. Then press “CD I /USB/SD skip forward or skip backward “button to select “ Y “.
5. Press the “CD I /USB/SD REC “button again to confirm the format.
E-10
Remark :
- All the files inside the USB storage media or SD card will be deleted completely after confirming to “ Yes “ mode.
Removing of USB / memory card
To remove the USB / memory card, turn off the power or switch the function mode to either Tape or Phono first. For USB
port –un-plug it by pulling out the USB socket directly, for memory card –pull out the SD/MMC card straightly without bending.
Line out connection
You can connect the system to your whole hi-fi system by connecting the line out socket (43) to the auxiliary input socket with
a RCA cable (not included).
Subwoofer jack
Connect a powered or active Subwoofer (not supplied) to the Subwoofer Jack (46) on the rear of this unit to add
extra BASS sound. The sound of the Subwoofer can only be adjusted by its own controls.
Earphone connection
Connect your earphone(not included) to the earphone jack to get your private listening and adjust the volume to comfortable
level.
Remark :
- Avoid extended play at very high volume as it may impair your hearing.
- If you experience ringing in your ears, reduce the volume or shut off your unit.
- Keep the volume at a reasonable level even if your headset is an open-air type designed to allow you to hear outside sounds.
Please note that excessively high volume may still block outside sounds.
X-bass sound effect
Press the x-bass button (28) to active x-bass function and enhance the bass effect at “on “position.
Remote control transmitter
Battery installation (battery not provided)
The infra-red transmitter requires 2 pc AAAsize battery for operation
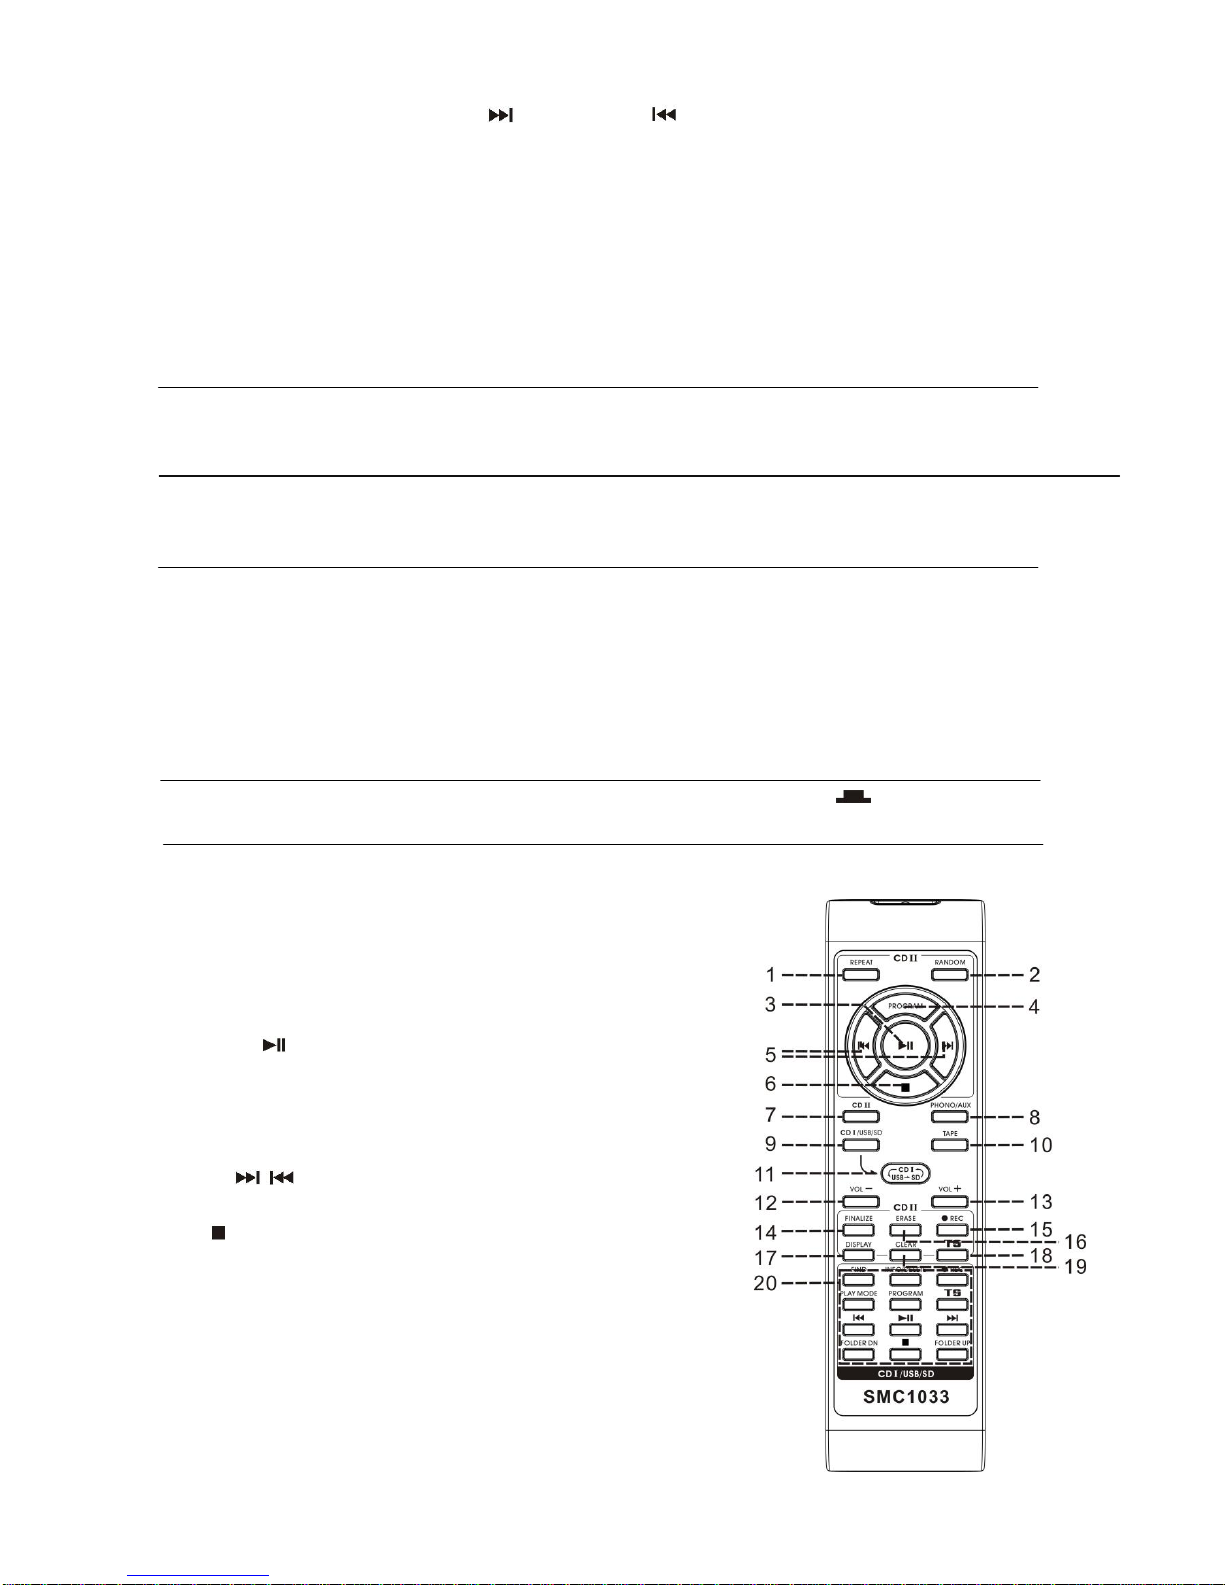
Button description
1) Repeat In CDII mode, press to active repeat
play function
2) Random In CDII mode, press to active random
play function
3) Play/pause In CDII mode, press once to start
playback. Press again to enter pause
mode
4) Program In CDII mode, press to active
programming function
5) Skip up / down In CDII mode press to select previous /
next tracks
6) stop In CD mode, press to stop playback
7) CDII Press to select CDII function
8) Phono/Aux Press to select Phono/Aux function
9) CD I Press to select CD I function
10) Tape Press to select tape function
11) CD I /USB/SD alternative Press to exchange the function between
CD I/USB/SD
12) Volume +/- Press to adjust the volume level

13) CDII recording Press to perform the CDII recording
operation button
14) CD I /USB/SD Press to operate the CD I /USB/SD playback/encode
operation button
E-11
RE-ATTACHING THE TURNTABLE DRIVE BELT
STEP 1
Use a screwdriver to remove the black iron ‘C’-clip (iron binder) and lift the turntable off the
Turntable mechanism.
STEP 2
Retrieve the dropped black rubber band (drive belt) and replace it around the column on the
bottom of the turntable, then pull it out gently without overstretching and hook the band
around the small column point at the edge of the turntable, as shown in the diagram.
STEP 3
To fix the turntable back onto the phonograph mechanism, make
sure the column point is positioned over the correct place on the
phonograph mechanism, while placing the axis of the turntable in
the hole on the phonograph mechanism, as shown in the diagram.
STEP 4
Gently turn the turntable until a ‘plop’-sound is heard,
which indicates the repositioning of the rubber band.
Replace the ‘C’-clip to secure the turntable.
SPECIFICATIONS
Frequency Range : AM 540 –1600 kHz / FM 88 –108 MHz
Antenna : External FM Wire Antenna
Speaker Max Rating Power : 8W
Speaker Ohms : 4 Ω
Output Power : 4W per Channel RMS / 20W p.m.p.o.
Power Source : 230V AC Mains ~ 50Hz
: Batteries for Remote Transmitter - 2 x 'AAA’ /1.5V (not supplied)
Line-out : R + L (RCA)
Aux-in Jack : 3.5mm dia. Jack
Subwoofer Jack : 3.5mm dia. Jack
Accessory supplied : Remote Control Handset; 45rpm Spindle Adaptor
Recommended Brands of recordable CD’s : 80min / CD-R or CD-RW: Sony, Maxell, TDK, Phillips, Fuji
INSTRUCTIONS ON ENVIRONMENT PROTECTION
DO NOT DISPOSE OF THIS PRODUCT IN THE USUAL HOUSEHOLD WASTE AT THE END OF ITS LIFECYCLE, HAND IT OVER AT A
COLLECTION POINT FOR THE RECYCLING OF ELECTRICALAND ELECTRONICAPPLIANCES. THE SYMBOL ON THE PRODUCT,
THE INSTRUCTIONS FOR USE OR THE PACKING WILLINFORM THEMABOUT THE METHODS FOR DISPOSAL. THE
MATERIALS ARE RECYCLABLE AS INDICATED BY THE SYMBOL ON THE LEFT. BY RECYCLING, MATERIAL RECYCLING OR
OTHER FORMS OF RE-UTILIZATION OF OLD APPLIANCES, YOUARE MAKING AN IMPORTANT CONTRIBUTION TO PROTECT
OUR ENVIRONMENT. PLEASE CONTACT YOUR LOCAL COUNCIL FOR THE AUTHORIZED DISPOSAL LOCATION AND
RECYCLING FACILITIES.

E-12
Other manuals for SMC1033
1
Table of contents
Other Steepletone Media Converter manuals


 user guide")


