STEINWAY LYNGDORF SP-1 User manual

[Skriv tekst]
MODEL SP-1 STEREO PROCESSOR
INSTALLATION MANUAL
April 21, 2021

2
Compliance .......................................................................................................... 3
Pre-Installation ..................................................................................................... 4
Cable Connections ............................................................................................... 8
Home Automation System Integration ................................................................. 9
Installation ............................................................................................................ 9
How to Set Up RoomPerfect™ .......................................................................... 14
Troubleshooting ................................................................................................. 19
Speaker Routing ................................................................................................ 20
Voicing Curves ................................................................................................... 24
Specifications ..................................................................................................... 26
Serial Control Manual ........................................................................................ 27
Pin Out Diagram for RS232 CABLE ............................................................... 27
Command and Request Formatting ................................................................... 28
Requests ............................................................................................................ 29
Commands ......................................................................................................... 33
Input Source Numbering .................................................................................... 37
Voicing Numbering ............................................................................................. 38
IR Code Overview .............................................................................................. 39
Trademarks ........................................................................................................ 49
Service Information ............................................................................................ 50

3
Compliance
WEEE
The European Parliament and the Council of the European Union have issued the Waste Electrical
and Electronic Equipment Directive. The purpose of the Directive is to prevent waste of electrical and
electronic equipment and to promote reuse, recycling, and other forms of waste recovery. Steinway
Lyngdorf products and the accessories packed with them are subject to the WEEE Directive. Please
dispose of any waste materials in accordance with your local recycling regulations. Products and
equipment which must be collected for reuse, recycling, and other forms of recovery are marked with
the icon of the crossed-out waste receptacle.
FCC
Steinway Lyngdorf products and accessories comply with parts 15 and 68 of the FCC rules.
Operation is subject to the following two conditions: (1) this device may not cause harmful
interference; and (2) this device must accept any interference received, including any interference
that may cause undesired operation. Model A1/A2 amplifier and Model P200 processor contain TX
FCC ID: TYOJN5139M0.
Changes or modifications not expressly approved by the party responsible for compliance could void
the user’s authority to operate the equipment. Equipment marketed to a consumer must be capable
of complying with the necessary regulations in the configuration in which the equipment is marketed.

4
Pre-Installation
Please read all material carefully prior to installation. If you need additional assistance, contact your
Steinway Lyngdorf representative or email [email protected].
Unpacking the Product
Carefully remove the unit and accessory kit from the carton and visually check for shipping
damage. Contact both the shipper and your Steinway Lyngdorf representative immediately if
the unit bears any sign of damage from mishandling. Note: Keep shipping carton and
packing material for future use or in the unlikely event that the unit needs servicing. If this
unit is shipped without the original packing, damage could occur and void the warranty.
Inventory
Check the list below to ensure that all necessary product components have been delivered.
Report all discrepancies to your Steinway Lyngdorf representative immediately.
SP-1
Installation Manual
Power Cord
Link Cable
Standard Operating
Remote
Rack Mounts (Optional
Accessory)
USB Key

5
Installer Kit
An Installer Kit is available for setting up the SP-1 Stereo Processor. The Installer Kit is
identical for all Steinway Lyngdorf systems and should be ordered individually as needed.
RoomPerfect™ Calibration
Microphone
Microphone Cable
Microphone Stand
Model SP-1 Rear Socket Panel
1. Analog audio inputs
2. Microphone input for RoomPerfect™ calibration
3. Digital audio inputs (6 x Optical & 4 x Coaxial)
4. USB streaming audio input
5. Steinway Link outputs
6. USB service connection (SW updates)
7. Input connector for infrared communications
Trigger input connector
8. RS232 control interface
9. Mains input and on/off switch

6
Model SP-1 Front Panel
1. Power - Switches the system on and off
2. Left knob
a. Rotate left and right to toggle between audio sources and browse while in the
menu.
b. Press and hold to access the menu, press to select a menu item, press and
hold to cancel.
3. Display
4. Right knob
a. Rotate left and right to adjust the volume.
b. Press to mute and restore the sound.
5. LED indicator
a. Red: Stand By
b. Orange: Loading
c. Green: On / Ready
Note: The volume is displayed with 0.0dB to indicate full gain on an input with maximum
level. You can turn the volume to +12dB, which allows full gain on inputs with lower levels.

7
Changing the Batteries
The remote is shipped with two AAA batteries. If the SP-1
Stereo Processor does not respond to remote control
commands, it may be because the remote control batteries
need to be replaced. To change the batteries, use a Phillips
Head screwdriver (PH1) to remove the locking screw from the
battery compartment.
The locking screw is at the base of the remote control. When
you have removed the locking screw, the battery compartment
is automatically ejected from the bottom of the remote control.
Remove the used batteries and replace them with two AAA-size
alkaline batteries. Insert the battery compartment and tighten
the locking screw.

8
Cable Connections
Cables and Plugs
Use only the power cables included with the product. Using other cable and/or plug types will
void the warranty and may cause damage to the system.
Cable Connections
This cable carries both the digital audio signal as well as the control signals. For cabling
between the processor and amplifiers, please use cables with standard RJ45 to RJ45 B
connectors. All RJ45 connectors should be shielded. For cable lengths less than 1 meter,
use CAT5E/shielded or CAT6 cable. For cable lengths in excess of 1 meter, use double-
shielded CAT5E cables. Poor quality cables and plugs may violate safety and EMC
regulations, as well as cause significant noise and interference. Only use cables and
connectors approved by Steinway Lyngdorf.
The Standard Remote
The SP-1 comes with a standard remote control, which can operate all daily functions using the following
buttons:
Toggles through RoomPerfectTM options and browses the menu
Toggles through voicing options and browses the menu
OK Selects a menu item
Adjusts the volume
Switches the system on and off
Mutes and restores the sound
MENU Accesses the menu system
SRC+/SRC Toggles between audio sources

9
Home Automation System Integration
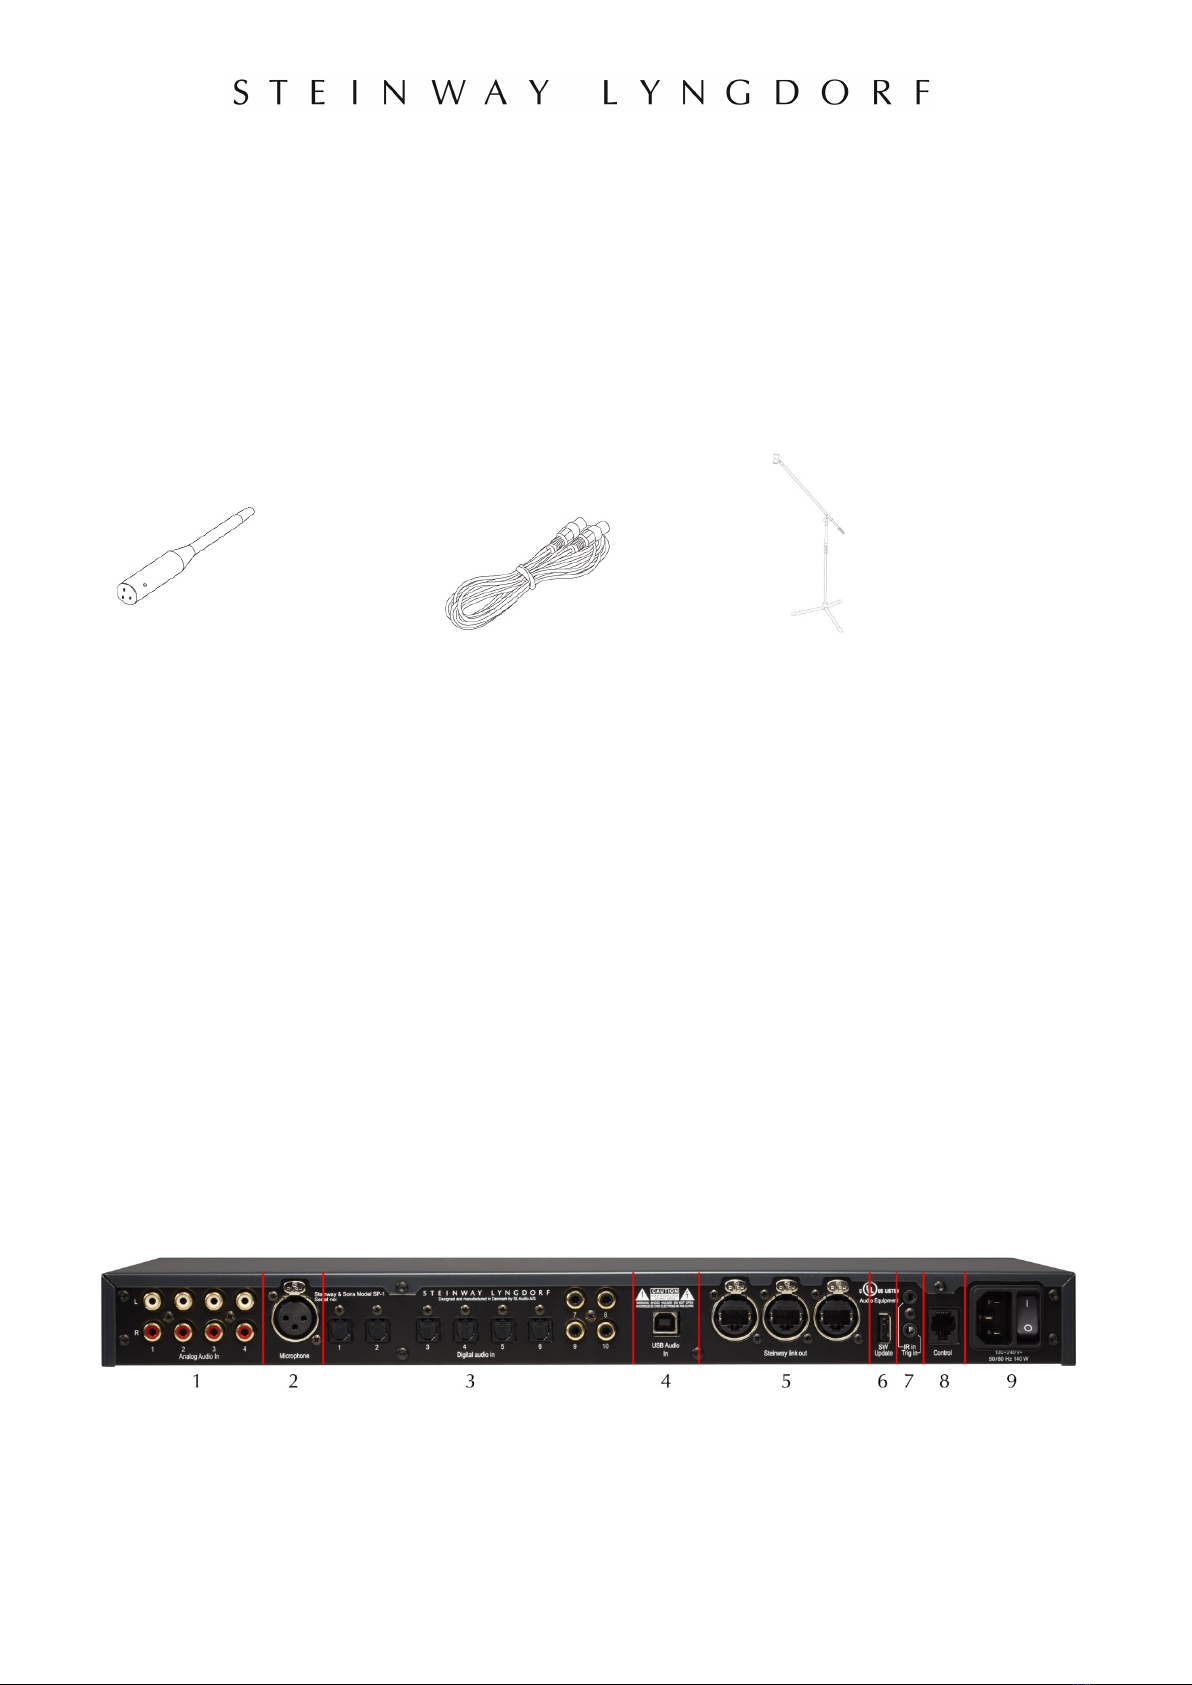
The SP-1 Stereo Processor is compatible with home automation systems via the RS232
connector on the rear socket panel.
Installation
Using a Rack System
The SP-1 Stereo Processor is, depending on the order, shipped with foot rails for free-
standing placement or rack mounts. To install the rack mounts, turn the SP-1 Stereo
Processor upside down and place it on a stable, even surface. Take care to place it on a soft
surface to avoid scratches. Using a TORX 10 screwdriver, fasten the rack brackets in the
designated holes.
Reminder: The SP-1 Stereo Processor should be installed with at least one inch of free
space on all sides, and it should be placed in an environment free of excessive heat. When
placed in a rack system, the SP-1 Stereo Processor should be placed at the bottom of the
rack, with the Steinway Lyngdorf amplifiers above it. This allows for proper dissipation of the
heat generated by the amplifiers without adverse effects on the SP-1 Stereo Processor.
Installing the USB Streaming Audio Driver on a Computer
To stream audio from a PC or Mac to the SP-1, you need to install the driver for the SP-1 on
your computer. The driver can be found on the USB key from the accessory kit.
Mac users:
Go to the “Drivers USB for SP-1” folder
Select the Mac folder and double-click the SL-AUDIO file.
Windows users:
Go to the “Drivers USB for SP-1” folder
Select the Windows XP or Windows 7 folder, depending on your Windows installation.
Double-click “Setup32” if you have a 32 bit systems and “Setup64” for 64 bit systems.
Using the USB Streaming Audio Input
To stream music to the SP-1, connect your computer and SP-1 with a USB cable, select
“USB” as input on the SP-1, and start playing music / video* files on your computer.
*To stream audio and video with the SP-1 Stereo Processor, the video must be streamed to
the video display and the audio streamed to the SP-1 through the “USB Streaming audio
input.” In the instance that the streaming audio and video are not synchronized correctly,

10
delays need to be corrected in the video display or on the computer. Delays for video cannot
be set in the SP-1.
Set Up
Set up your Steinway Lyngdorf system in the following order:
• ID-assign the Steinway Lyngdorf amplifier(s) via dip-switches on socket panels. See
Speaker Routing on page 19 for how to set this up.
• Connect speakers to the Steinway Lyngdorf amplifier(s).
• Connect Steinway Lyngdorf amplifier(s) to SP-1 Stereo Processor and to each other
as shown in Speaker Routing on page 19.
• Connect audio sources to the SP-1 Stereo Processor.
• Connect power to the SP-1 Stereo Processor, the amplifiers, and all connected audio
and video sources. The SP-1 Stereo Processor will automatically detect the voltage
and does not have a mains voltage switch.
• Switch on the SP-1 Stereo Processor.
• Access Setup menu.
• Set up your speakers as explained in SETUP in this document.
• Run RoomPerfect™ Guided Setup.
• Set up inputs.
These steps complete the basic SP-1 Stereo Processor setup.

11
Menu Hierarchy
RoomPerfect™
Select Focus or Global settings
Voicing
Select between enabled voicings
Setup
Speaker
Distance
Distance unit
RoomPerfect™
Guided setup
Add focus position
Add room measurements
RoomPerfect™ status
Bypass enabled
Input
Input name
Input enable
Input sensitivity
Voicing setup
Default voicing
Voicing enable
Volume
Maximum volume
Default volume
Advanced
Software info
Lock setup
Factory reset
Software update
NOTE: Some menus will appear only when relevant. For example, “Add Focus Position”
depends on a guided setup being performed.
Setup / Speaker
The Speaker menu allows you to select a configuration from a stored list of speakers. You
initially select front speakers then bass speakers. Select NONE for bass speakers if you are
running a pair of Model D speakers only.
Setup / Distance Unit
Select the unit of measure and subsequently enter the distances to the front speakers (and, if
connected, for the woofers). The best results are obtained by using a laser-equipped

12
measuring device. Before starting, place the RoomPerfect™ microphone at listening height
in the main listening position. For each channel, measure the straight-line distance through
the air from the tip of the RoomPerfect™ microphone to the center of the tweeter unit in the
loudspeaker in question. When measuring distances to boundary woofers, measure the
distance to the top back edge of the woofer. If in doubt, contact your Steinway Lyngdorf
representative for guidance.
Do not measure distances at floor level, as these measurements will not give acoustically
accurate results.
Setup / RoomPerfect™
Enter the Guided Setup for doing a RoomPerfect™ calibration. See RoomPerfect™ section
on next page for a guide to setting up RoomPerfect™.
Setup / Input Name
Enter a unique reference for the source connected to the input selected. To select the letters,
use the buttons on the remote to scroll through the alphabet. Press enter to select the letter.
After completing the name, select the END character at the bottom of list. Press OK to store
the name.
Setup / Input Enable
Select DISABLE for all the inputs not connected to sources and the sources will be removed
from the selectable list.
Setup / Input Sensitivity
Adjust the sensitivity from 0 to +24dB for the selected source to be at uniform level. Note:
This is not volume-gain, it is volume-offset. For example, if an input is set to +12dB then the
maximum volume for that input will be 87.9 on the SP-1 display. Going beyond 87.9 will
increase the number on the display but not the volume.
Setup / Voicing
Select one voicing to be a default when the unit is turned on or select “Store Previous
Voicing” to have the same voicing when powered on as when the SP-1 Stereo Processor is
powered off. See page 23 for an overview of the voicing curves.
Setup / Volume / Maximum Volume
Set the maximum volume for daily volume control.
Setup / Volume / Default Volume
Set the default volume when you power on.

13
Setup / Advanced / Software info
Find the release versions of the software for the operating system and RoomPerfect™.
Setup / Advanced / Lock setup
Lock the menu system to avoid unintentional changes of advanced functions. Unlock the
menu system by entering the code 7800.
Setup / Advanced / Factory Reset
Return to factory defaults. Please note that all settings and RoomPerfect™ calibrations will
be erased.
Setup / Advanced / Software update
Save the new software on a USB stick and position the USB stick in the appropriate
connector on the back of the SP-1. Enter the menu and select YES for updating the software.
Do not remove the USB stick before the SP-1 has powered off, as this will cause the
software in the SP-1 to be corrupted. In case of corrupted software, restart the SP-1 while
the USB stick is still inserted. In case this doesn’t resolve the problem, press and hold the
standby button while turning on the power with the USB stick still inserted. In the unlikely
event that problems persist, contact your local Steinway Lyngdorf representative for further
assistance.

14
How to Set Up RoomPerfect™
RoomPerfect™ is designed to analyze and correct for the negative effects that the listening
room has on the speaker sound.
Global Listening
The global filter improves sound quality across the whole room. When you are moving
around a room, the global filter gives the best result.
Focus Listening
The focus filter improves the sound quality at a specific listening position. This makes the
focus filter the best solution for optimal sound quality at a single listening position.
Voicings
A voicing is an equalizer filter that can be activated to amplify or attenuate certain
frequencies according to your personal preferences. This equalization is an addition to the
RoomPerfect™ corrections. The equalizer settings of a given voicing can be seen on the
display of the amplifier.
To correct for the way the room acoustics affect sound reproduction, RoomPerfect™ must
map the acoustical properties of your listening room. For this purpose, a microphone with
stand is included in the Installer Kit. The Guided Setup menu allows you to initiate a new set
of RoomPerfect™ room measurements.
WARNING: The microphone is a very sensitive and finely calibrated device which must be
treated with utmost care. If the microphone has been dropped on the floor, it may be
damaged. If this is the case, obtain a new microphone from your Steinway Lyngdorf
representative before performing the system calibration.
Volume Setting
The system guides you through the selection of a proper calibration volume level. Follow the
instructions on the display to find the optimal volume setting for doing the calibration.
You can choose to use a volume setting other than the one requested by the system by
choosing “Use Current.” The calibration will not be inferior in quality, but the time required for
an exact measurement will be longer. If the volume setting is too high, the system will display
“Error – Clipping.” Reduce the volume and try again.
RoomPerfect™ Preparations
Place the RoomPerfectTM calibration microphone on the stand. Be sure to fasten the screws
properly so the microphone does not move during a measurement.

15
Plug the supplied microphone cable into the microphone.
Connect the microphone cable to the microphone terminal on the rear panel of your
processor.
Placing the Microphone in the Focus Position
When you are prompted to place the microphone in the focus position, connect the
microphone to the microphone input on the back panel and place the microphone, using the
microphone stand, in your primary listening position. The height and the orientation of the
microphone should correspond to your head’s height and direction.
Press enter and a test signal will start from the left speaker. The system will give an
estimated optimal volume for calibrating the system or will accept the current volume. Adjust
the volume if required and retry the measurement.
The calibration volume should not be so loud that it is inconvenient to you, or that it causes
damage to your loudspeakers. If this is the case, set it to a lower and more appropriate level.
A low volume can result in a longer calibration time or a measurement time out. A low
volume and long measurement will not affect the quality of the end result.

16
Measuring the Focus Position
When the calibration volume has been set, RoomPerfect™ will send a range of tones to
measure the focus position.
If there is noise in the room, the measurement may take longer. This will not affect the quality
of the end result.
See RoomPerfect™ troubleshooting if the measurement stops prematurely, and then retry
the measurement.
Measuring Random Room Positions
When the focus position has been measured, the next step is to measure the acoustical
properties of the room. It is important to perform well spaced measurements to get a
comprehensive image of the acoustical properties of the room. See RoomPerfect™
troubleshooting if the measurement stops prematurely.
Keep taking measurements until RoomKnowledge reaches 90%.
These are the rules of thumb when measuring the room:
• the microphone should be in random and varying positions, heights, and orientations.
Point it up/down/sideways, the more random positions the better.
• the measurements should cover the entire room, not only your listening area.
• do not take measurements behind plants, furniture, etc.
• the microphone should not be closer than 0.5m/1.5ft from the floor, ceiling and walls.
• the microphone should be at least 1m/3ft from the front of the loudspeakers.
• there should be at least 50cm/1.5ft between each measurement.
• do not take symmetrical measurements in the room.

17
Room Measurements Above 90% RoomKnowledge
When RoomKnowledge has reached 90%, you can decide to add room measurements or do
it at a later time. We recommend taking a couple of measurements within 50cm/.5ft of the
walls and ceiling when above 90% RoomKnowledge.
To fully optimize RoomPerfect™’s understanding of the room’s acoustical properties, we
recommend you keep doing measurements until the RoomKnowledge is above 95%. The
higher the RoomKnowledge, the more accurate the room correction filters will be.
Calculation of Focus and Global Filters
When room measurements are complete, the system will calculate the focus and global
filters automatically.
Advanced Setup
This menu is available only when Guided Setup has been completed.
RoomPerfect™ Information.
This menu shows how much the correction system knows about the room, and how much
correction has been employed. RoomKnowledge is an index showing how many of the
acoustical properties in a room have been mapped. The higher degree of knowledge in the
system, the greater the accuracy of the room correction filters. The RoomCorrection index is
a measure of how much processing is being employed in the room correction filters. To some
extent, the RoomCorrection index reflects how audible the correction is. For low values
(below 10%) of the room correction index, only subtle correction is needed to the original

18
sound in the room. With high room correction index values, more extensive processing is
employed.
Add Focus Position/Add Room Position.
You can add up to eight more Focus positions for the room, repeating the Focus 1
measurement procedure. You can also add room measurements to approach 100%
RoomKnowledge.

19
Troubleshooting
RoomPerfect™
The calibration microphone is very sensitive and may pick up unwanted noise, including
subsonic signals and background noise, which disturbs the measurements. If the signal is
disturbed, it will take longer for the system to make a correct measurement. A measurement
that has been disturbed by noise but completed will always be correct; it is not necessary to
redo the measurement.
Error - Microphone Not Found
No microphone is connected to the SP-1 or the microphone cable is not working. Check that
the microphone cable is connected to the microphone socket on the back panel. If the
problem continues, test the microphone cable by connecting the microphone directly to the
Microphone socket and select Retry. If the microphone is detected, replace the microphone
cable and retry the measurement.
Error – No signal
This error message can arise due to a signal classification of “no sound.” This happens if the
sound volume has been muted or a cable is disconnected.
Check the sound volume.
Check all cable connections.
Check the measuring signal volume.
If none of these measures solve the error, request a replacement microphone from Steinway
Lyngdorf.
Error – Signal Clipping
There are two possible causes of this error. Either the incoming signal has been classified as
too loud, resulting in clipping or distortion, or a loud noise in the immediate environment has
corrupted the measurement results. If a loud noise has in fact occurred, such as the sound of
a closing door, reduce noise levels inside and in the immediate vicinity of the room and
repeat the measurement. If no loud noise has occurred, reduce the volume of the signal and
repeat the measurement.
Error – Low Signal
This error message is displayed when the measurement has lasted more than 5 minutes for
the low-frequency signal or more than 2 minutes for the high-frequency signal. This happens
most often when using a low level measuring signal compared to the background noise in the
listening environment, which results in prolonged measuring times. Raise the measuring
signal volume or reduce the noise from the environment before continuing with the
measurement.

20
Speaker Routing
Assign ID Codes to the Steinway Lyngdorf Amplifier(s)
The DIP switchboard on the back of the amplifier must be encoded in order to make it
possible for the SP-1 Stereo Processor to identify the speaker. Each unit must have a
sequential ID in the network.
This is how daisy-chained amplifiers are setup correctly:
Amp. ID 0
Amp. ID 1
Amp. ID 2
Amp. ID 3
Amp. ID 4
Amp. ID 5
Link Termination or Daisy-Chaining
DIP 8 must be adjusted for either termination or transmission. Switch DIP 8 to lower position
if you want to connect more amplifiers to the Steinway Link output. Switch to upper ON
position if there are no further amplifiers in the chain.
ID 0 with termination
See the following pages for typical SP-1 speaker routing setups.
Other manuals for SP-1
1
Table of contents
Other STEINWAY LYNGDORF Computer Hardware manuals