Antes de utilizar su nuevo producto Steren, lea este instructivo para evitar
cualquier mal funcionamiento.
ADVERTENCIA
IMPORTANTE
• Cuando inserte una batería todos los símbolos de la pantalla se encenderán brevemente y oirá
un tono.
CARACTERÍSTICAS
El reloj de escritorio o pared tiene una pantalla con números grandes para una fácil lectura de la
hora, además de un calendario y medidor de temperatura congurable en grados centígrados o
Fahrenheit.
• Fechador.
• Termómetro interno.
• Pantalla de 127 x 81 mm.
La información que se muestra en este manual sirve únicamente como
referencia sobre el producto.
Debido a actualizaciones pueden existir diferencias. Por favor,
consulte nuestra página web (www.steren.com) para obtener la versión más
reciente del instructivo.
Alimentación: 1,5 V (1 x AA)
ESPECIFICACIONES
FUNCIÓN DE REPETICIÓN DE ALARMA
• Para activar la repetición de la alarma, presione el botón “SNZ” mientras
la alarma esté sonando.
El ícono aparecerá en la pantalla para indicar que la función de
repetición está activada.
• Esta función hace que la alarma vuelva a sonar a los 5 minutos.
• La función de Snooze se puede interrumpir presionando cualquier botón.
°C/°F VISUALIZACIÓN DE TEMPERATURA
La temperatura se muestra en °C o °F. Presione el botón “-” para cambiar de unidades.
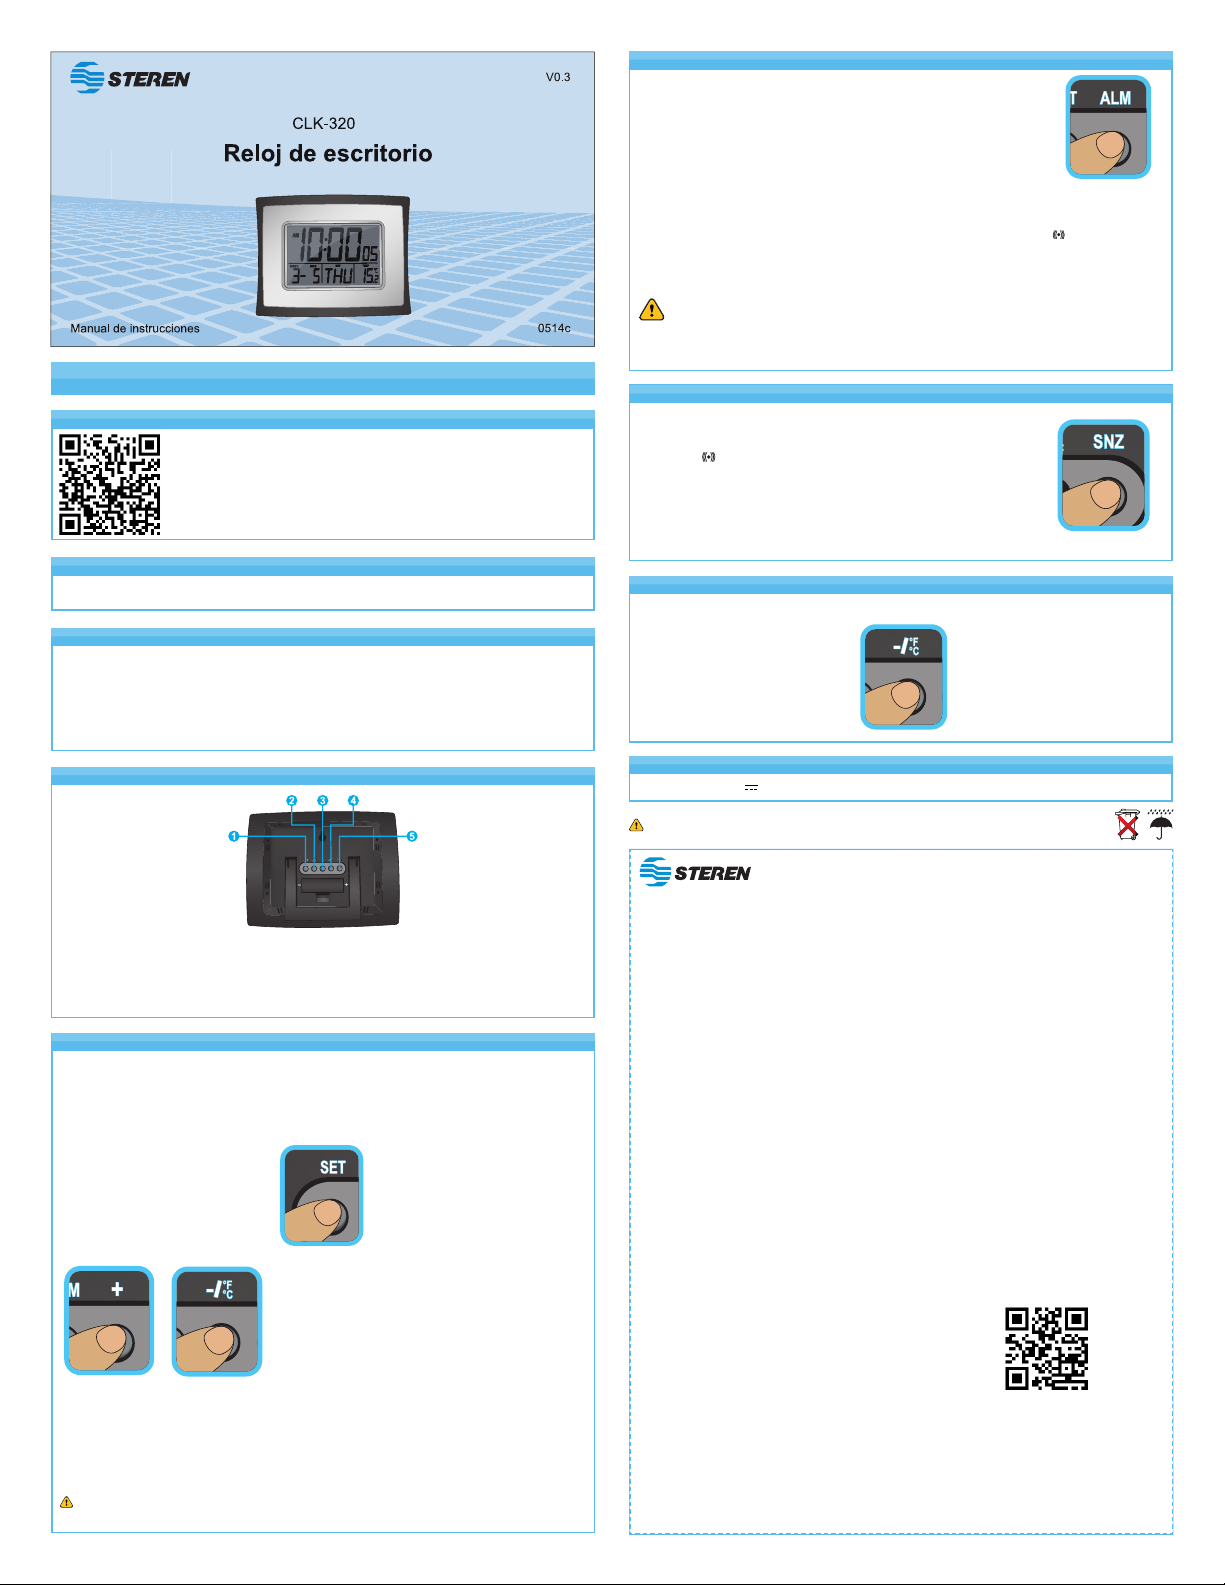
CONTROLES
1. SET. Presione para realizar el ajuste manual del tiempo.
2. ALM. Realice el ajuste de la alarma diaria.
3. +. Presione para realizar los ajustes de las opciones.
4. ºF/ºC. Seleccione para mostrar la temperatura en grados Centígrados o Fahrenheit
5. SNZ. Presione para activar la repetición de la alarma.
AJUSTE MANUAL DEL TIEMPO
Presione y mantenga oprimido el botón “SET” durante 2 segundos. El modo 12/24 horas
comenzará a parpadear en la pantalla. Use los botones “+” y “-” para seleccionar el modo de 12
o 24 horas. Presione de nuevo “SET” para conrmar su ajuste. La hora comenzará a parpadear.
Use los botones “+” y “-” para jar la hora correcta y conrme el ajuste con “SET”. Los minutos
comenzarán a parpadear. Use los botones “+” y “-” para jar los minutos y conrme con “SET”.
Presione “SET” para conrmar su ajuste. El año
comenzará a parpadear. Use los botones “+” y “-” para
jar el año.
Presione “SET” para conrmar su ajuste. El mes co-
menzará a parpadear. Use los botones “+” y “-” para jar
el mes.
Presione “SET” para conrmar su ajuste. El día comenzará a parpadear. Use los botones
“+” y “-” para jar el día.
Presione “SET” para conrmar su ajuste, el proceso habrá terminado y el reloj volverá al modo de
operación.
Después de 30 segundos sin presionar ningún botón, el reloj cambiará automáticamente del
modo de conguración al modo de tiempo normal.
AJUSTE DE LA ALARMA DIARIA
• Mantenga presionado el botón “ALM” hasta que escuche un tono y las
horas empiecen a parpadear. Use los botones “+” y “-” para seleccionar
la hora de alarma que necesite y presione el botón “ALM” para conrmar.
• Los minutos empezarán a parpadear. Use los botones “+” y “-” para ajustarlos. Presione el botón
“ALM” para conrmar su ajuste.
• Para activar o desactivar la alarma diaria, presione el botón “ALM”, el ícono aparecerá si está
activada la alarma.
La alarma sonará durante 2 minutos si no la desactiva presionando cualquier botón. En ese
caso, la alarma volverá a sonar automáticamente cada 24 horas.
El sonido ascendente de la alarma cambia de frecuencia 4 veces mientras se está
escuchando.
Después de 30 segundos sin presionar ningún botón, el reloj cambiará automáticamente al
modo de operación.
SNOOZE
Producto: Reloj de escritorio
Modelo: CLK-320
Marca: Steren
PÓLIZA DE GARANTÍA
Esta póliza garantiza el producto por el término de un año en todas sus partes y mano de obra, contra cualquier defecto de fabricación y
funcionamiento, a partir de la fecha de entrega.
CONDICIONES
1.- Para hacer efectiva la garantía, presente esta póliza y el producto, en donde fue adquirido o en Electrónica Steren S.A. de C.V.
2.- Electrónica Steren S.A de C.V. se compromete a reparar el producto en caso de estar defectuoso sin ningún cargo al consumidor. Los gastos de
transportación serán cubiertos por el proveedor.
3.- El tiempo de reparación en ningún caso será mayor a 30 días,contados a partir de la recepción del producto en cualquiera de los sitios donde
pueda hacerse efectiva la garantía.
4.- El lugar donde puede adquirir partes, componentes, consumibles y accesorios, así como hacer válida esta garantía es en cualquiera de las
direcciones mencionadas posteriormente.
ESTA PÓLIZA NO SE HARÁ EFECTIVA EN LOS SIGUIENTES CASOS:
1.- Cuando el producto ha sido utilizado en condiciones distintas a las normales.
2.- Cuando el producto no ha sido operado de acuerdo con el instructivo de uso.
3.- Cuando el producto ha sido alterado o reparado por personal no autorizado por Electrónica Steren S.A. de C.V.
El consumidor podrá solicitar que se haga efectiva la garantía ante la propia casa comercial donde adquirió el producto. Si la presente garantía se
extraviara, el consumidor puede recurrir a su proveedor para que le expida otra póliza, previa presentación de la nota de compra o factura respectiva.
DATOS DEL DISTRIBUIDOR
Nombre del Distribuidor _________________________________________
Domicilio _____________________________________________________
Producto _____________________________________________________
Marca _______________________________________________________
Modelo ______________________________________________________
Número de serie _______________________________________________
Fecha de entrega ______________________________________________
ELECTRÓNICA STEREN S.A. DE C.V.
Camarones 112, Obrero Popular, 02840, Del. Azcapotzalco, México, D.F.
RFC: EST850628-K51
STEREN PRODUCTO EMPACADO S.A. DE C.V.
Biólogo Maximino Martínez No. 3408 Int. 2, 3 y 4, San Salvador Xochimanca,
Del. Azcapotzalco, México, D.F. 02870, RFC: SPE941215H43
ELECTRÓNICA STEREN DEL CENTRO, S.A. DE C.V.
Rep. del Salvador 20 A y B, Centro, 06000, Del. Cuauhtémoc, México. D.F.
RFC: ESC9610259N4
ELECTRÓNICA STEREN DE GUADALAJARA, S.A.
López Cotilla No. 51, Centro, 44100, Guadalajara, Jal. RFC: ESG810511HT6
ELECTRÓNICA STEREN DE MONTERREY, S.A.
Colón 130 Pte., Centro, 64000, Monterrey, N.L. RFC: ESM830202MF8
ELECTRÓNICA STEREN DE TIJUANA, S.A. de C.V.
Calle 2a, Juárez 7636, Centro, 22000, Tijuana, B.C.N. RFC: EST980909NU5
En caso de que su producto presente alguna falla, acuda
al centro de distribución más cercano a su domicilio y
en caso de tener alguna duda o pregunta por favor llame
a nuestro Centro de Atención a Clientes, en donde con
gusto le atenderemos en todo lo relacionado con
su producto Steren.
Centro de Atención a Clientes
01 800 500 9000
El diseño del producto y las especicaciones pueden variar sin previo aviso.
P1319F12851C


