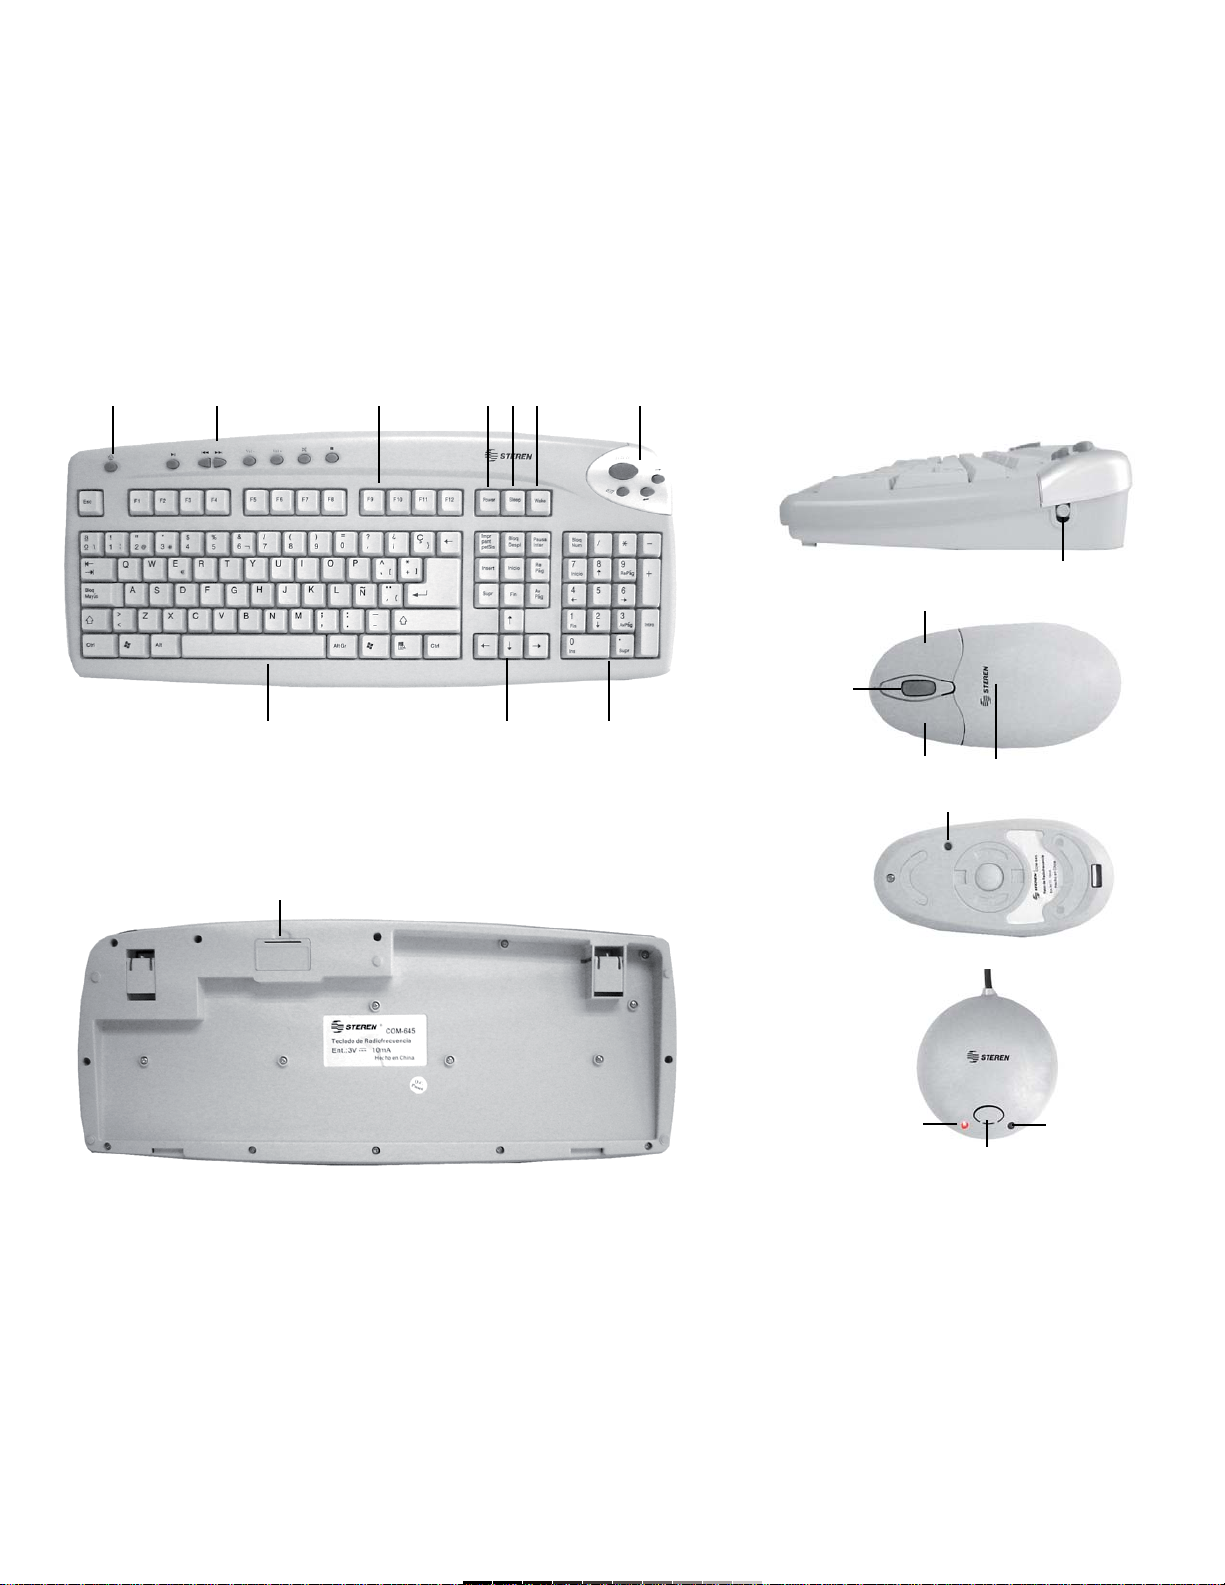
Steren COM-645 User manual

Product / Producto: WIRELESS
KEYBOARD AND MOUSE / SISTEMA
INALÁMBRICO PARA PC
Model / Modelo: COM-645
Brand / Marca: Steren
CONDICIONES
1. Para hacer efectiva esta garantía se requiere: La presentación de esta póliza y del producto, en el lugar en donde fue adquirido o en ELECTRONICA STEREN S.A. DE C.V.
2. ELECTRONICA STEREN S.A. DE C.V. se compromete a reparar el producto en caso de estar defectuoso sin ningún cargo al consumidor.
3. El tiempo de reparación en ningún caso será mayor a 30 días contados a partir de la recepción del producto en cualquiera de los sitios en donde pueda hacerse efectiva la
garantía.
4. El lugar donde puede adquirir partes, componentes, consumibles y accesorios, así como hacer válida esta garantía es: En cualquiera de las direcciones arriba mencionadas.
ESTA GARANTIA NO ES VALIDA EN LOS SIGUIENTES CASOS:
1. Cuando el producto ha sido utilizado en condiciones distintas a las normales.
2. Cuando el producto no ha sido operado de acuerdo con el instructivo de uso.
3. Cuando el producto ha sido alterado o reparado por personas no autorizadas por ELECTRONICA STEREN S.A. DE C.V.
Nota: El consumidor podrá solicitar que se haga efectiva la garantía ante la propia casa comercial, donde adquirió el producto. Si la presente garantía se extraviara, el
consumidor puede recurrir a su proovedor para que le expida otra póliza de garantía, previa presentación de la nota de compra o factura respectiva.
DATOS DEL DISTRIBUIDOR
DISTRIBUTION / NOMBRE / DISTRIBUIDOR:
ADDRESS / DOMICILIO:
PRODUCT / PRODUCTO: BRAND / MARCA:
MODEL / MODELO: SERIAL NUMBER / No. DE SERIE:
DATE OF DELIVERY / FECHA DE ENTREGA:
Call Center / Centro de Atención a Clientes
del Interior 01 800 500 9000
Mexico City / Cd. de México: 53 54 22 90
Warranty
CONDITIONS:
1. This warranty card with all the required information, the invoice or purchase ticket, the packing or package, must be presented with the product when warranty
service is required.
2. If product hasn’t exceed warranty period, the company will repair it free of charge including transportation charges.
3. The repairing time will not exceed 30 natural days, from the day the claim was received.
4. Steren sells parts, components, consumables and accessories to customer, as well as warranty service, at any of the following addresses:
THIS WARRANTY IS VOID ON THE NEXT CASES:
If the product has been damage by an accident, acts of God, mishandling, leaky batteries, failure to follow enclosed instructions, improper repair by unauthorized
personnel, improper safe keeping.
Notes:
a) The customer can also claim the warranty service on the purchase establishment.
b) If you lose the warranty card, we can reissue it just showing the invoice or purchase ticket.
Póliza de Garantía
This Steren product is guaranteed under
normal usage against defects in
workmanship and materials to the original
purchaser for one year from the date of
purchase.
Garantiza este producto por el término de
un año en todas sus partes y mano de obra
contra cualquier defecto de fabricación y
funcionamiento, a partir de la fecha de
entrega.

INSTRUCTIVO DE USO DE SISTEMA INALÁMBRICO PARA PC
Modelo: COM-645
Marca: Steren
Antes de utilizar su nuevo Sistema Inalámbrico lea este instructivo
para evitar cualquier mal funcionamiento. Guárdelo para futuras
referencias.
Gracias a la tecnología de radiofrecuencia de su nuevo equipo, ahora ya
puede trabajar sentado en un lugar más cómodo y poner el teclado sobre
las rodillas. Así mismo, la falta de cables en el ratón le permite trabajar
con la mano derecha o con la mano izquierda. De igual forma puede
trabajar en equipos portátiles solo conectando el receptor, teniendo
libertad de movimiento.
IMPORTANTE
Mantenga este producto fuera del alcance de los niños.
No golpee ni deje caer el teclado o el ratón, puede ocasionar
malfuncionamiento.
No utilice el equipo si se encuentra dañado el cable de alimentación.
No intente abrir el equipo, puede ocasionar malfuncionamiento y
anulación de la garantía.
No exponga el equipo a temperaturas extremas.
Siempre utilice un paño suave, limpio y seco para limpiar el equipo.
Se recomienda limpiar periódicamente la esfera de hule del ratón a fin de
que tenga un libre movimiento y una respuesta perfecta.
No use ni almacene este equipo en lugares donde existan goteras o
salpicaduras de agua. Puede causar un mal funcionamiento o un choque
eléctrico.
No conecte o desconecte cables, mientras la computadora esté
encendida, podría causarle daños.
Si observa que el tiempo de respuesta del teclado y el ratón cada vez son
más lentos, cambie las baterías.
Cuando no vaya a utilizar el equipo por un período de tiempo prolongado
retire las baterías.
CONTENIDO
Ratón inalámbrico
Teclado inalámbrico
Receptor
Disco de instalación
Manual
2 baterías AAAde prueba para el ratón y 2 para el teclado
CONTROLES
Teclado
1.- Teclado numérico
2.- Teclado alfanumérico
3.- Teclas de función (F1-F12) ............. Realizan acciones diferentes, de
acuerdo al software utilizado
4.- Flechas de movimiento
5.- Teclas multimedia ........................... Permiten controlar las funciones
básicas de un reproductor de
audio
6.- Localizador ..................................... Permite establecer comunicación
entre el teclado y el receptor
7.- Compartimiento de baterías
8.- Apagado (Power) ............................ Apaga la computadora
9.- Hibernar (Sleep) ............................ Cambia a modo de Hibernación
10.- Despertar (Wake) ......................... Regresa del modo de
Hibernación
11.- Teclas de Internet ......................... Permite acceder al navegador de
Internet y al correo electrónico
preestablecidos
12.- Reinicio ......................................... Regresa a las funciones
establecidas de fábrica
Ratón
13.- Botón derecho
14.- Botón izquierdo
15.- Rueda de desplazamiento
INSTRUCTION MANUAL FOR WIRELESS KEYBOARD AND MOUSE
Model: COM-645
Brand: Steren
Before using your new Wireless keyboard and mouse, please read
this instruction manual to prevent any damage. Put it away in a safe
place for future references.
Now you can leave the desk, and work in a comfortable chair putting your
keyboard over your knees, thanks to the RF technology from your new
devices. With the wireless mouse you can use your left hand or the right
hand, indistinctly. Now you can work with laptops just plugging the
receiver, having free on movements.
IMPORTANT
Keep this product away from children.
Do not drop or hit the devices, may cause malfunction.
Do not use the equipment if the power cord is broken.
Do not try to open the equipment, may cause malfunction and warranty
repeal.
Do not expose to extreme temperatures.
Clean only with a soft, dry cloth.
Recommend you to clean the mouse rubber sphere. You will always have
a free movement and a perfect and quick response.
Do not use or store the equipment near wet places. May cause
malfunction or shock hazard.
Do not plug or unplug cables if the computer is on, may cause damages.
If the time of response from the keyboard or the mouse are slower, change
the batteries with new ones. The keyboard has a indicator LED when the
battery energy is poor.
When the equipment is not to be used for a long time, remove the
batteries.
PACKAGE CONTENT
Wireless mouse
Wireless keyboard
Receiver
Installation Disk
User’s manual
2 tester batteries type AAA for the mouse and 2 tester batteries for the
keyboard
CONTROLS
Keyboard
1.- Numeric keys
2.- Alphanumeric keys
3.- Function keys (F1-F12) .................. In accord to the software, this
keys can have different
functions
4.- Arrows
5.- Multimedia keys ............................. Allows you to control al the basic
functions while reproduce a CD
6.- Finder ………………………………. Allows you to establish
communication between the
keyboard and the receiver
7.- Battery compartment
8.- Power ………………………………. Turns the computer off
9.- Sleep …………………………….…. Switches to Hibernate mode
10.- Wake ……………………………… Backs from Hibernate mode
11.- Internet keys ……………………… Allows you to open the
pre-established Internet Navigator
and E-mail software
12.- Restart ……………………………. Backs to the pre-established
functions
Mouse
13.- Right button
14.- Left button
15.- Scroll wheel

16.- Compartimiento de baterías
17.- Localizador .................................. Permite establecer comunicación
entre el ratón y el receptor
Receptor
18.- Indicador de encendido ............... Se enciende cuando el equipo es
conectado a la computadora y
ésta es encendida
19.- Indicador de uso del teclado ....... Se enciende cuando el teclado
y/o ratón y/o el ratón se encuentran en
uso
20.- Localizador (Connect) ................. Permite establecer comunicación
entre el receptor y el teclado y el
ratón
INSTALACIÓN DE BATERÍAS
Ratón
1.- Presione la tapa superior del ratón y empuje hacia fuera (Fig. 1).
2.- Inserte dos baterías nuevas o con suficiente carga en el
compartimiento, poniendo atención a la polaridad.
3.- Vuelva a colocar la tapa del compartimiento.
16.- Battery compartment
17.- Finder ………………………….. Allows you to establish
communication between the
keyboard and the receiver
Receiver
18.- In-use indicator .......................... Lights on when the equipment is
plugged into the computer and it’s
in use
19.- Keyboard / mouse In-use .....…. Lights on when the keyboard /
indicator mouse are in use
20.- Finder (Connect) ………………… Allows you to establish
communication between the
receiver and the keyboard and
mouse
BATTERY INSTALLATION
Mouse
1.- Press the mouse top cover and pull out (Fig. 1).
2.- Place two new batteries or with enough charge into the battery
compartment, paying attention to polarity.
3.- Replace the battery compartment’s cover.
6
7
1
2
3
4
58910
1112
13
14
15
16
17
18 19
20

Teclado
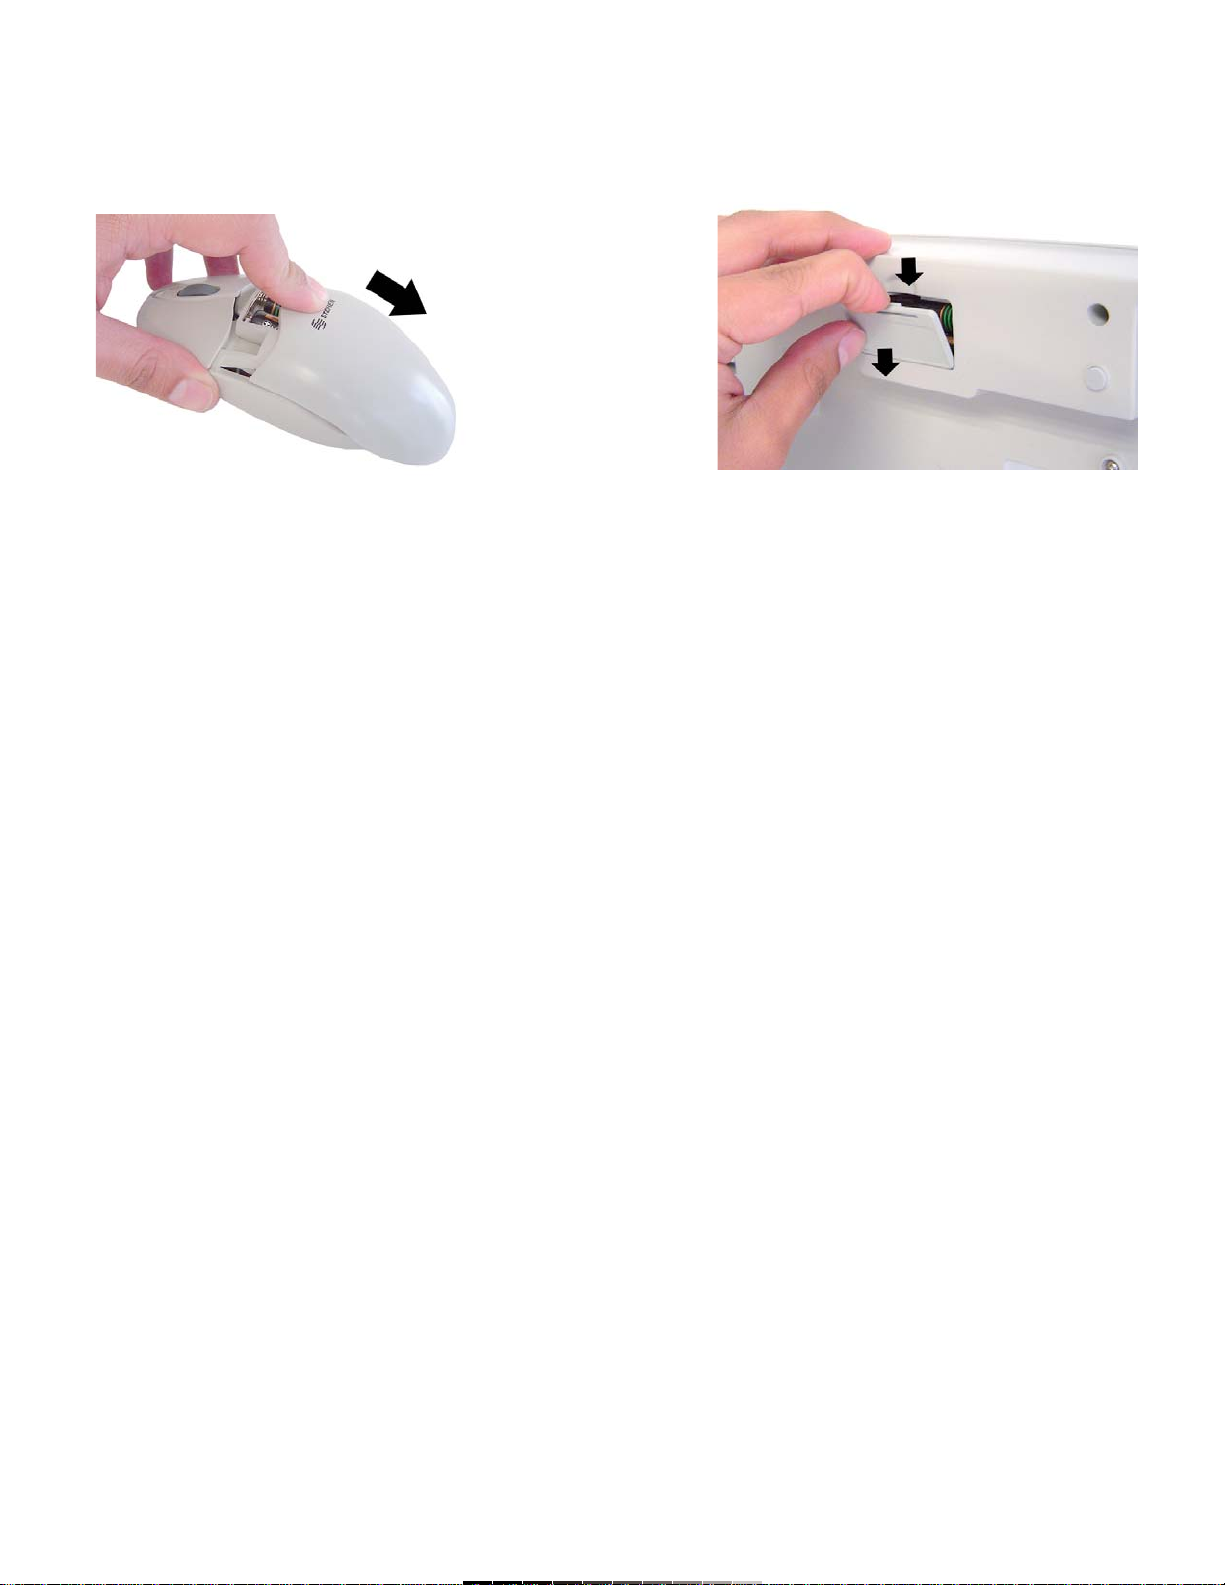
1.- Presione y jale la pestaña del compartimiento de baterías localizado en
la parte inferior del teclado y retírelo (Fig. 2).
2.- Inserte dos baterías nuevas o con suficiente carga en el
compartimiento, poniendo atención a la polaridad.
3.- Vuelva a colocar la tapa del compartimiento.
INSTALACIÓN EN WINDOWS ME, 2000 Y XP
Si usa Windows ME o superior en su computadora, no es necesario
instalar drivers.
1.- Apague su computadora.
2.- Verifique que cuenta con un puerto PS/2 disponible, así como una
tarjeta de sonido para las funciones multimedia.
3.- Inserte el conector PS/2 verde en el puerto PS/2 del ratón en la
computadora, el conector morado insértelo en el puerto PS/2 del teclado.
4.- Encienda la computadora. El receptor se encenderá.
5.- Para que el receptor reconozca el teclado necesita colocar el teclado
frente al receptor y presionar conjuntamente el botón localizador del
teclado y el botón de Connect en el receptor por 10 segundos. Cuando el
LED indicador derecho del receptor se encienda, quiere decir que el
teclado ha sido correctamente reconocido.
6.- De igual forma, coloque el ratón enfrente del receptor y presione al
mismo tiempo el botón localizador del ratón y el botón de Connect del
receptor por 10 segundos. El LED indicador derecho se encenderá si el
ratón ha sido configurado adecuadamente.
7.- Ahora estará listo para comenzar a utilizar su nuevo sistema
inalámbrico.
INSTALACIÓN EN VERSIONES DE WINDOWS ANTERIORES A
WINDOWS ME
Si su computadora cuenta con una versión de Windows anterior a
ME, requerirá de instalar los drivers antes de comenzar a utilizar su
sistema inalámbrico.
1.- Inserte el disco de instalación en la computadora.
2.- Ubique el archivo Setup.exe y siga las instrucciones
3.- Una vez que termine la instalación se le pedirá reiniciar la
computadora.
4.- Verifique que cuenta con un puerto PS/2 disponible, así como una
tarjeta de sonido para las funciones multimedia.
5.- Inserte el conector PS/2 verde en el puerto PS/2 del ratón en la
computadora, el conector morado insértelo en el puerto PS/2 del teclado.
6.- Encienda la computadora. El receptor se encenderá.
7.- Para que el receptor reconozca el teclado necesita colocar el teclado
frente al receptor y presionar conjuntamente el botón localizador del
teclado y el botón de Connect en el receptor por 10 segundos. Cuando el
LED indicador derecho del receptor se encienda, quiere decir que el
teclado ha sido correctamente reconocido.
8.- De igual forma, coloque el ratón enfrente del receptor y presione al
mismo tiempo el botón localizador del ratón y el botón de Connect del
receptor por 10 segundos. El LED indicador derecho se encenderá si el
ratón ha sido configurado adecuadamente.
9.- Ahora estará listo para comenzar a utilizar su nuevo sistema
inalámbrico.
Keyboard
1.- Press the eyelash from the battery compartment and pull out. The
battery compartment is located in the bottom of the keyboard (Fig. 2).
2.- Place two new batteries or with enough charge into the battery
compartment, paying attention to polarity.
3.- Replace the battery compartment cover.
INSTALLING FOR WINDOWS ME, 2000 AND XP
If you use Windows ME or higher, it is not necessary to install
drivers.
1.- Turn the computer off.
2.- Check that you have a PS/2 available port and a sound card for the
multimedia functions.
3.- Plug the green PS/2 connector into the PS/2 mouse port on the
computer, the purple connector plug into the PS/2 keyboard connector.
4.- Turn the computer on. The receiver lights on.
5.- By the first time, you need to synchronize the keyboard with the
receiver. To do that, you must place the keyboard in front of the receiver
and press, at the same time, the Finder button on the keyboard and the
Connect button on the receiver for 10 seconds. The right LED will light on
when both devices are synchronized.
6.- In he same way, you must synchronize the mouse and the receiver,
place the mouse in front of the receiver, and then, press the Finder button
on both devices for 10 seconds. The right LED will light on when both
devices are synchronized.
7.- Now you’ll be ready to start to use the new wireless system.
INSTALLING ON OLDER WINDOWS
You must install the drivers before to use the wireless system if you
use older versions than ME.
1.- Place the disc installation in the computer.
2.- Locates the file Setup.exe and follow the instructions.
3.- Once you have finished the installation, you need to reboot the
computer.
4.- Verify that you have a PS/2 available port, and a sound card for the
multimedia functions.
5.- Plug the green PS/2 connector into the PS/2 mouse port on the
computer, the purple connector plug into the PS/2 keyboard connector.
6.- Turn the computer on. The receiver lights on.
7.- By the first time, you need to synchronize the keyboard with the
receiver. To do that, you must place the keyboard in front of the receiver
and press, at the same time, the Finder button on the keyboard and the
Connect button on the receiver for 10 seconds. The right LED will light on
when both devices are synchronized.
8.- In he same way, you must synchronize the mouse and the receiver,
place the mouse in front of the receiver, and then, press the Finder button
on both devices for 10 seconds. The right LED will light on when both
devices are synchronized.
9.- Now you’ll be ready to start to use the new wireless system.
Fig. 1 Fig. 2

TECLAS MULTIMEDIA
Su teclado multimedia cuenta con 12 teclas multimedia, permitiéndole
acceder fácilmente a su correo electrónico, Internet o las funciones
básicas de reproducción de discos.
RATÓN
El ratón inalámbrico cuenta con 2 botones estándar superiores y una
rueda de desplazamiento que funciona como botón, se utiliza para
desplazarse a través de Word, o ampliar imágenes en determinados
programas.
ESPECIFICACIONES
Ratón
Entrada: 3V 100mA (2x1,5V ) / 2xAAA
Teclado
Entrada: 3V 50mA (2x1,5V ) / 2xAAA
Receptor
Entrada: 5V 50mA
Frecuencia de operación: 27MHz
Rango de operación: 1,8m
Vida del switch: 1,000,000 ciclos
Canal: 1 canal con 4 bits de seguridad ID
Teclas: 108 teclas, 12 multimedia, botón de
identificador
Nota:
El diseño del producto y las especificaciones pueden cambiar sin previo
aviso.
MULTIMEDIA KEYS
The keyboard have 12 multimedia keys, allowing you the easy access to
e-mail, Internet or CD player basic functions.
MOUSE
Your wireless mouse has 2 standard buttons on the top and one scroll
wheel and it function as a button, you can use this scroll wheel to move
across Word, or to amplify images in specific software.
SPECIFICATIONS
Mouse
Input: 3V 100mA (2x1,5V ) / 2xAAA
Keyboard
Input: 3V 50mA (2x1,5V ) / 2xAAA
Receiver
Input: 5V 50mA
Operational frequency: 27MHz
Operation range: 1,8m
Switch life: 1,000,000 cycles
Channel: 1 channel with 4 ID security bit
Keys: 108 standard, 12 multimedia, Finder
Note:
Product design and specifications are subject to change, without notice.
Reinicio
Restart
Reproducir / Pausa
Play / Pause
Anterior
Previous
Siguiente
Next
Volumen menos
Volume Down
Volume más
Volume Up
Silenciar
Mute
Detener
Stop
Internet
WWW
Correo Electrónico
E-mail
Adelante
Next
Atrás
Previous
Permite regresar a las opciones de fábrica
Allows you to back to factory settings
Reproduce o realiza una pausa al audio de un CD
Starts to play or make a pause in an Audio CD
Regresa a la pista anterior durante la reproducción de un CD
Backs to previous track while playing an Audio CD
Salta a la siguiente pista durante la reproducción de un CD
Jumps to next track while playing an Audio CD
Disminuye el volumen durante la reproducción de un CD
Decrease the volumen while playing an Audio CD
Incrementa el volumen durante la reproducción de un CD
Increase the volume level while playing an Audio CD
Deshabilita el sonido
Disable the sound
Detiene la reproducción actual
Stops the current playing
Ejecuta el Explorador de Internet predeterminado
Runs the predetermined Internet Explorer
Ejecuta el software de correo electrónico predeterminado
Runs the predetermined e-mail software
Regresa a la página anterior visualizada en el navegador de Internet
Backs to the previous visualized page in the Internet Explorer
Salta a la siguiente página visualizada en el navegador de Internet
Jumps to next visualized page in the Internet Explorer
Vol -
Vol -
WWW
Table of contents
Other Steren Computer Accessories manuals
Popular Computer Accessories manuals by other brands

Spectrum Industries
Spectrum Industries 38981 Assembly instructions

Garmin
Garmin USB Data Card Programmer user manual

SIIG
SIIG US2274 Quick installation guide

Individual Computers
Individual Computers Turbo Chameleon 64 user manual

HP
HP GM322AA - Wireless Multimedia Keyboard quick start guide

Premium
Premium Bitspower Premium Cuboid Reservoir 250 instruction manual