Steren CAM-030 User manual

Product / Producto: CREDIT CARD
DIGITAL CAMERA / CÁMARA
DIGITAL
Model / Modelo: CAM-030
Brand / Marca: Steren
CONDICIONES
1. Para hacer efectiva esta garantía se requiere: La presentación de esta póliza y del producto, en el lugar en donde fue adquirido o en ELECTRONICA STEREN S.A. DE C.V.
2. ELECTRONICA STEREN S.A. DE C.V. se compromete a reparar el producto en caso de estar defectuoso sin ningún cargo al consumidor.
3. El tiempo de reparación en ningún caso será mayor a 30 días contados a partir de la recepción del producto en cualquiera de los sitios en donde pueda hacerse efectiva la
garantía.
4. El lugar donde puede adquirir partes, componentes, consumibles y accesorios, así como hacer válida esta garantía es: En cualquiera de las direcciones arriba mencionadas.
ESTA GARANTIA NO ES VALIDA EN LOS SIGUIENTES CASOS:
1. Cuando el producto ha sido utilizado en condiciones distintas a las normales.
2. Cuando el producto no ha sido operado de acuerdo con el instructivo de uso.
3. Cuando el producto ha sido alterado o reparado por personas no autorizadas por ELECTRONICA STEREN S.A. DE C.V.
Nota: El consumidor podrá solicitar que se haga efectiva la garantía ante la propia casa comercial, donde adquirió el producto. Si la presente garantía se extraviara, el
consumidor puede recurrir a su proovedor para que le expida otra póliza de garantía, previa presentación de la nota de compra o factura respectiva.
DATOS DEL DISTRIBUIDOR
DISTRIBUTION / NOMBRE / DISTRIBUIDOR:
ADDRESS / DOMICILIO:
PRODUCT / PRODUCTO: BRAND / MARCA:
MODEL / MODELO: SERIAL NUMBER / No. DE SERIE:
DATE OF DELIVERY / FECHA DE ENTREGA:
Call Center / Centro de Atención a Clientes
del Interior 01 800 500 9000
Mexico City / Cd. de México: 53 54 22 90
Warranty
CONDITIONS:
1. This warranty card with all the required information, the invoice or purchase ticket, the product box or package, and the product, must be presented with the product
when warranty service is required.
2. If the product stills on the warranty time, the company will repair it free of charge even the transportation charges.
3. The repairing time will not exceed 30 natural days, from the day the claim was received.
4. Steren sells parts, components, consumables and accessories to customer, as well as warranty service, at any of the following addresses:
THIS WARRANTY IS VOID ON THE NEXT CASES:
If the product has been damage by an accident, acts of God, mishandling, leaky batteries, failure to follow enclosed instructions, improper repair by unauthorized
personal, improper safe keeping or otherwise.
Notes:
a) The customer can also claim the warranty service on the purchase establishment.
b) If you lose the warranty card, we can reissue it just showing the invoice or purchase ticket.
This Steren product is warranted under
normal usage against defects in
workmanship and materials to the original
purchaser for one year from the date of
purchase.
Garantiza este producto por el término de
un año en todas sus partes y mano de
obra contra cualquier defecto de fabricación
y funcionamiento, a partir de la fecha de
entrega.
Póliza de Garantía

INSTRUCTIVO DE USO DE CÁMARA DIGITAL
Modelo: CAM-030
Marca: Steren
Antes de utilizar su nueva Cámara Digital lea este instructivo para
evitar cualquier mal funcionamiento. Guárdelo para futuras
referencias.
Tome excelentes fotografías con esta pequeña cámara digital. La cámara
puede tomar fotografías de alta resolución a 640 x 480 pixeles y cuenta
con una memoria interna de 16MB y puede tomar hasta 209 fotografías
dependiendo de la resolución. Cuenta con balance automático de blancos,
grabación de vídeos de corta duración y puede utilizarla como cámara
web para videoconferencias o salas de plática.
IMPORTANTE
Siempre utilice un paño suave, limpio y seco para limpiar el equipo.
No intente abrir el equipo, puede ocasionar malfuncionamiento y
anulación de la garantía.
No use ni almacene este equipo en lugares donde existan goteras o
salpicaduras de agua.
CONTENIDO
1 cámara digital
1 CD de instalación
1 cable USB
1 manual de instrucciones
REQUERIMIENTOS DEL SISTEMA
125Mb libres de espacio en disco duro o superior
64Mb en memoria RAM o más
Monitor de color (se sugiere 800x600 a 24 bits o superior)
1 Puerto USB disponible
CD-ROM
Windows 98, ME, 2000 o XP
CONTROLES
1.- Disparador ............................... Presione para realizar tomar
fotográficas
2.- Pantalla de LCD ...................... Muestra información diversa
3.- Lente
4.- Visor ......................................... Visualice lo que desee fotografiar
5.- Conector USB
6.- Botón de inicio / función ........... Cambia entre diversas funciones
7.- LED indicador ........................... Enciende cuando la batería está
en carga
8.- Encendido / Apagado ............... Encienda / Apague el equipo
FUNCIONES EN DISPLAY
1.- Resolución ...................................... Muestra la resolución de la
imagen (Hi / Low)
2.- Borrado de todas las imágenes
3.- Borrado de la última imagen / vídeo
4.- Selección de calidad de imagen ..... Hi: Modo de resolución alta (300K
pixeles)
Low: Modo de resolución baja
(100K pixeles)
5.- Modo de vídeo
6.- Temporizador ................................... Auto disparador con un retraso de
10 segundos
INSTRUCTION MANUAL FOR CREDIT CARD DIGITAL CAMERA
Model: CAM-030
Brand: Steren
Before using your new Credit Card Digital Camera please read this
instruction manual to prevent any damage. Put them away in a safe
place for future references.
Take great pictures with this incredibly small digital camera. This camera
lets you take hi resolution photos at 640x480 pixels and has 16MB of built-
in memory, which holds up to 209 low-res pics, depending of the
resolution. It has automatic white balance, streaming video capabilities
and you can use it as Web Cam for your favorite chat room software,
instant messengers or videoconferences through the Internet.
IMPORTANT
Clean with a soft, dry cloth.
Do no try to open the equipment, may cause malfunction and warranty
repeal.
Do not use or store the equipment near wet places. May cause
malfunction or shock hazard.
PACKAGE CONTENT
1 digital camera
1 Installation CD
1 USB cable
1 User's manual
SYSTEM REQUIREMENTS
125MB hard disk free space or higher
64MB RAM memory or higher
Color monitor ( 800 x 600, 24 bits or higher)
1 USB available port
CD-ROM drive
Windows 98, ME, 2000 or XP
CONTROLS
1.- Shutter .................................... Press this button to take pictures
2.- LCD screen ............................ Display several information
3.- Lens
4.- Viewfinder ............................... Visualize what you want to take a
picture
5.- USB socket
6.- Start / function button ............. Switch between several functions
7.- LED indicator …………………. Lights on when charging the
battery
8.- On / Off switch ………………… Power on / Power off the device
LCD DISPLAY ICONS
1.- Resolution ...................................... Shows the image resolution (Hi /
Low)
2.- Delete all pictures
3.- Delete last picture / video
4.- Picture quality selection mode …… High-resolution mode (300K
pixels)
Low-resolution mode (100K
pixels)
5.- Video mode
6.- Self-timer ......................................... Self-timer provides a 10 seconds
delay
8
ON OFF
3
4
1
2
5
6
7

7.- Selección de luz interna ............. Seleccione la frecuencia de luz
/ compresión interna (50 Hz / 60Hz).
Seleccione la compresión de
fotografía: Hd: Alta compresión,
Ld: Baja compresión.
BATERÍAS
La cámara digital cuenta con una batería de litio integrada. Cargue
completamente la batería antes del uso inicial (aproximadamente 3
horas).
Para cargar la batería:
1.- Conecte el cable USB a su cámara y a la computadora.
2.- Deslice el interruptor de Encendido / Apagado (On / Off) a la posición
de ON. Una luz indicadora enciende (rojo cuando está cargando). Cuando
la luz cambie a color verde, la batería estará completamente cargada.
Ahorro de energía:
Para conservar la energía de la batería por más tiempo, la cámara entrará
en modo de descanso cuando no se utilice por 30 segundos. Presione el
botón de función para encender de nuevo la cámara.
Nota:
No deje por más de 3 horas cargando la batería, podría ocasionarle
daños.
INSTALACIÓN DE DRIVERS
1.- Inserte el CD de instalación en su CD-ROM. Automáticamente se
despliega una ventana.
2.- Seleccione Install DC driver en las dos ventanas que aparecen para
comenzar con la instalación de archivos.
3.- En la siguiente ventana, presione Next para continuar. La instalación
comienza.
4.- Al finalizar la transferencia de archivos a su computadora, deberá
reiniciarla. Seleccione Yes, I want to restart my computer now si desea
reiniciar en ese momento. En caso contrario seleccione No, I will restart
my computer later. Presione Finish.
5.- Una vez que haya reiniciado la computadora, conecte el cable USB
para cargar la batería (primera vez). La computadora detectará el nuevo
equipo y estará listo para comenzar a utilizarlo.
Nota:
Si no aparece la ventana principal de instalación, busque el archivo
setup.exe en la unidad E: (si la letra E corresponde a su unidad de CD-
ROM) y ejecútelo.
COMO TOMAR FOTOGRAFÍAS
1.- Deslice el interruptor de Encendido / Apagado (On / Off) a la posición
de ON y presione el botón de función. Aparecerá en pantalla el mensaje
"Hi". La cámara emitirá un bip indicando que está lista.
2.- Seleccione el modo deseado: alta resolución, baja resolución, alta
comprensión, baja comprensión. Consulte Compresión y Calidad de
Fotografías para más detalles.
3.- Sostenga la cámara y presione el botón disparador.
4.- Sonará un bip indicando que la fotografía se ha tomado y el contador
irá disminuyendo en la pantalla de LCD.
Nota:
Su cámara no cuenta con flash, tómelo en cuenta cuando desee realizar
fotografías en ambientes con poca luz.
Las fotografías realizadas serán borradas de la memoria cuando apague
la cámara (8). Se recomienda dejarla en modo de ahorro de energía, de
esta forma las fotografías no serán borradas.
7.- Internal light selection ................. Choose the internal light
/ compression frequency (50Hz or 60Hz).
Choose the picture compression:
Hd: High compression, Ld: Low
compression.
BATTERY
The digital camera has a built-in Lithium battery . Fully charge the battery
before first usage (approximately 3 hours).
To charge the battery:
1.- Using the provided USB cable, connect the camera to the computer.
2.- Slide the On / Off switch to On. An indicator light turns on (in red during
charge). When the light switch to green, the battery is fully charged.
Power save:
In order to prolong battery life, the camera switches to Power Save mode
after 30 seconds of inactivity. Press Function button to power on the
camera again.
Note:
Do not overcharge battery, may cause damages on it.
DRIVER INSTALLATION
1.- Place the installation CD on CD-ROM drive. Automatically appears a
window.
2.- Choose Install DC Driver on next two windows to start the files
transferring.
3.- On next window, press Next to continue. Installation begins.
4.- At the end of the files transferring to the computer, you must to restart
it. Choose Yes, I want to restart my computer now if you want to do it in
that moment. Otherwise, choose No, I will restart my computer later. Press
Finish.
5.- Once you have restarted the computer, plug the USB cable to charge
the battery (first time).. The computer automatically finds the new
hardware and then you will be ready to use it.
Note:
If the start screen does not appears, look for SETUP.EXE file on drive E: (if
the letter E correspond to the CD-ROM drive) and run it.
TAKING PICTURES
1.- Slide the On / Off switch to On and press the Function button. On
screen appears "Hi". The camera emits a beep indicating is ready to use.
2.- Choose the desired mode: High resolution, Low resolution, High
compression or Low compression. Refers to Pictures Quality and
Compression for details.
3.- Hold the camera and press the Shutter.
4.- A beep sound will confirm that a picture was taken and the Picture
Counter will be decreasing on LCD screen.
Note:
The camera don't have built-in flash light, bear in mind when take pictures
under poor light conditions.
Taken pictures will be deleted from memory when turn the camera off (8)
We recommend leave the camera in Power Save mode to avoid picture
deleting.
Lo
Hi 026
1
2
34
5
6
7

TEMPORIZADOR
1.- Presione el botón de Función hasta que el icono de Temporizador
aparezca en la pantalla de LCD.
2.- Presione el Disparador en un lapso de 5 segundos antes de que el
icono desaparezca.
3.- Una vez que haya presionado el disparador y esté activado el
temporizador, contará con 10 segundos antes de que realice la toma.
4.- Una vez transcurridos los 10 segundos, la cámara emitirá un bip
indicando que se ha realizado la toma.
COMPRESIÓN Y CALIDAD DE FOTOGRAFÍAS
Presione el botón de Función hasta encontrar el ícono de Modo. De esta
forma podrá seleccionar el modo de calidad de la imagen deseado. Una
vez que el ícono de Modo aparece en pantalla, presione el Disparador una
vez para cambiar los modos.
Hi (Alto) es el modo VGA a 640 x 480 pixeles, Lo (Bajo) equivale al modo
CIF de 320 x 240 pixeles.
Existen disponibles dos modos de compresión de datos. Hd (Compresión
alta), Ld (Compresión baja). Mientras más alta sea la compresión más
fotografías podrá realizar. Presione el botón de Función hasta que
aparezca en pantalla el tipo de compresión (Hd o Ld), cuando esto
suceda, presione el Disparador una vez para cambiar de modo.
Nota:
El elegir una baja resolución y una alta compresión degrada la calidad de
la imagen pero permite tomar más fotografías.
SELECCIÓN DE FRECUENCIA DE LUZ INTERNA
Coloque la frecuencia de la cámara de acuerdo al lugar donde piensa
utilizar el equipo. Normalmente en América y en la mayor parte de Asia, la
frecuencia de la lámpara utilizada es de 60Hz. En Japón y Europa, se
utilizan 50Hz. Si utiliza una selección errónea, las fotos o los vídeos puede
mostrarse en ángulo.
Presione el botón de Función hasta que aparezca en pantalla 50 ó 60, si
desea cambiar la frecuencia, presione el Disparador una vez.
GRABACIÓN DE VÍDEO
1.- Presione el botón de Función para seleccionar el ícono de Vídeo en la
pantalla de LCD.
2.- Presione el Disparador y no lo libere para comenzar a grabar.
3.- Una cuenta regresiva aparecerá en pantalla, cuando libere el
Disparador, la grabación terminará y la cuenta regresiva se detendrá.
Cuando la cuenta regresiva llegue a 000, significa que la memoria está
llena.
Notas:
En el modo de vídeo, la calidad de las fotografías es CIF y se almacenan
como un archivo con extensión AVI.
El disparador puede no funcionar en condiciones de luz pobres.
BORRADO DE FOTOGRAFÍAS / VÍDEO
Cuenta con dos opciones: borrado de la última imagen / vídeo o borrado
de todo.
Para borrar todas las imágenes o vídeos contenidos en la memoria de la
cámara:
1.- Presione el botón de Función hasta que el ícono de Borrar todo
aparezca en la pantalla de LCD.
2.- Presione el Disparador una vez.
SELF TIMER
1.- Press Function button until the Self Timer icon appears on LCD screen.
2.- You have 5 seconds to press Shutter before the icon disappears from
LCD screen.
3.- Once you have pressing Shutter and the Self Timer is activated, you
counts with 10 seconds before the camera take the picture.
4.- After 10 seconds, the camera emits a beep sound indicating that the
picture was taken.
PICTURE QUALITY AND COMPRESSION
Press Function button until the Mode icon appears. In this way you can
choose the desired quality for the picture. Once the Mode icon appears on
screen, press Shutter once to change between different quality options.
High-resolution mode is VGA mode (640 x 480 pixels), Low-resolution
mode is CIF mode (320 x 240 pixels).
There are two data compression options. Hd (High compression), Ld (Low
compression). Higher compression more pictures to store. Press Function
until the message Hd or Ld appears on screen, then press Shutter once to
change the type of compression.
Note:
When you choose the Low resolution and High compression, the picture
quality is not too good as if you take with high resolution or low
compression, but you can store more pictures.
INTERNAL LIGHT FREQUENCY
Put the camera frequency in accord to the place where you want to use
the device.
Usually, in America and Asia, the lamp frequency is 60Hz. In Japan and
Europe, they use 50Hz. If you use the incorrect frequency, pictures or
video may appears with angle.
Press Function until the frequency appears on screen, 50 or 60, if you
want to change the frequency, press Shutter once.
TAKING VIDEOS
1.- Press Function button until you see the Multi-Shot icon on screen.
2.- Press and hold Shutter to start to record.
3.- A countdown appears on screen, when release the Shutter button, the
record stop and the countdown stop, too. When the countdown came to
000, the memory is full.
Notes:
On video mode, the picture quality is CIF and they store with AVI
extension.
Shutter may not work with poor light conditions.
DELETING FILES
It counts with 2 options: Delete the last picture / video or Delete all
pictures.
To delete all the pictures and videos in the camera's memory:
1.- Press Function until you see the Delete All icon on screen.
2.- Press Shutter once.
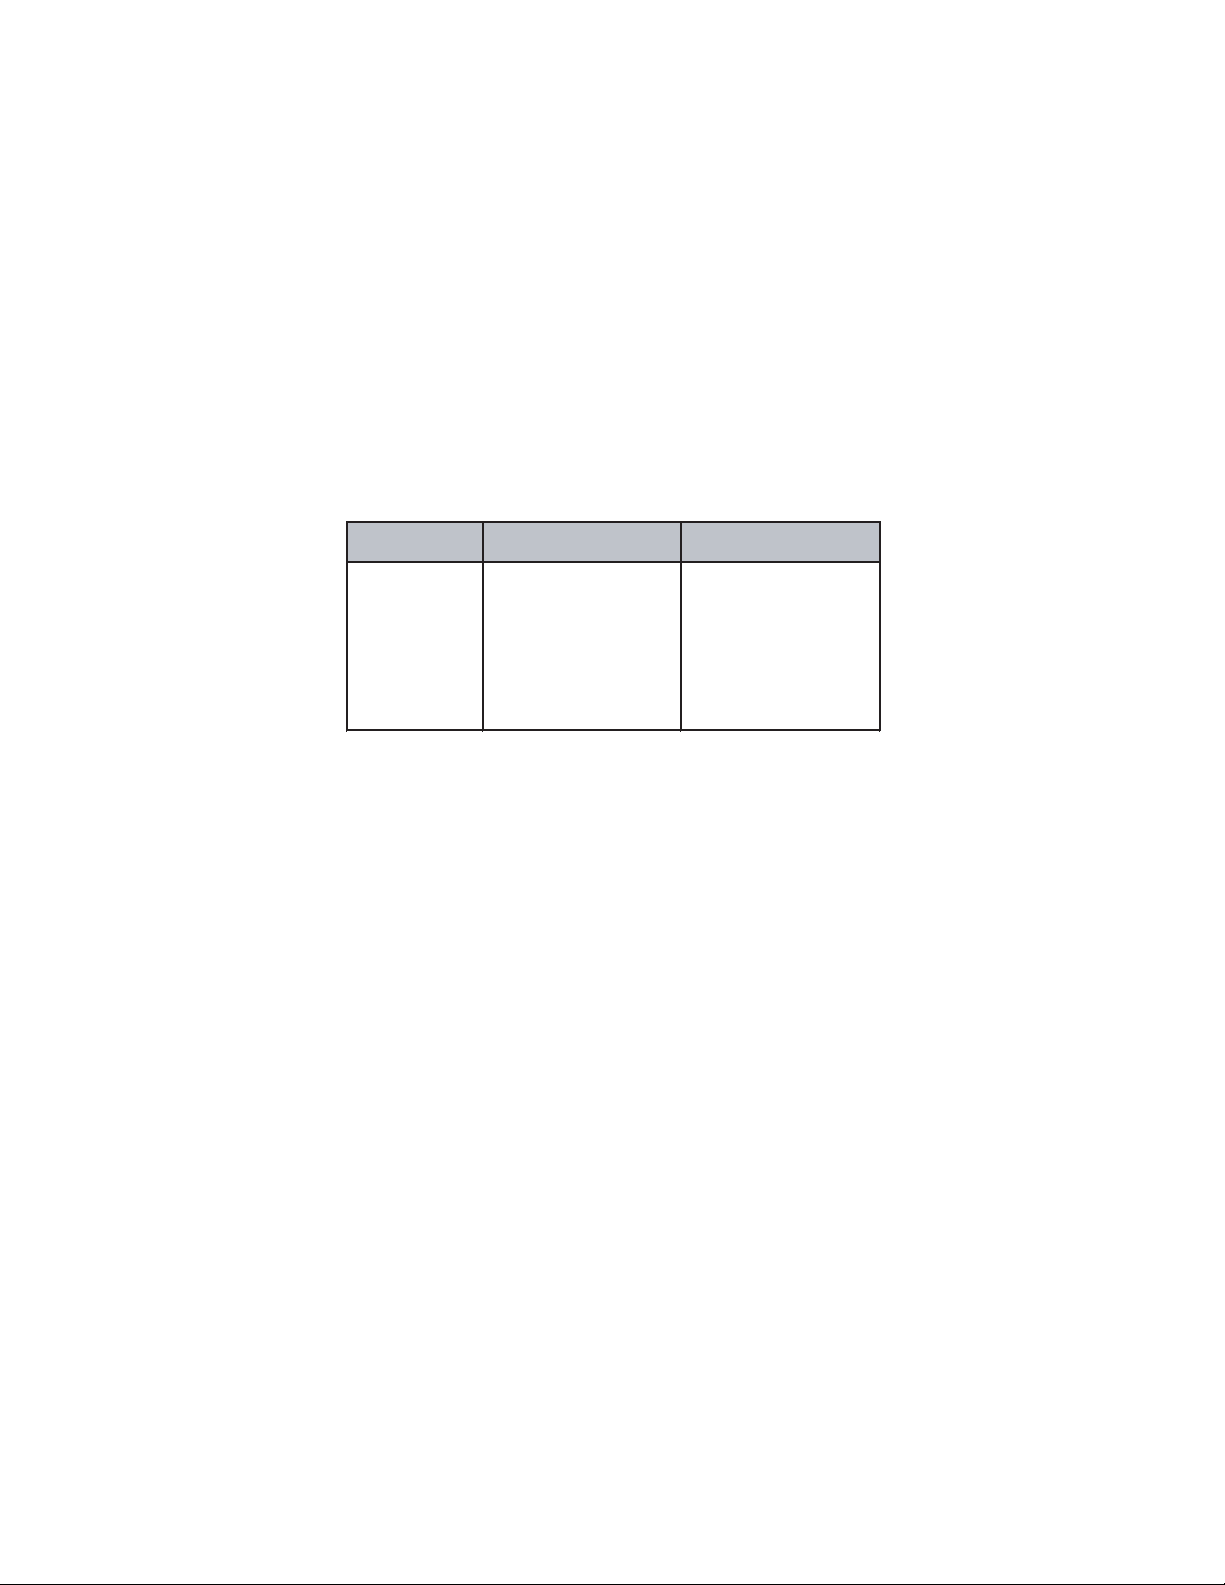
Fotografía Baja compresión Alta compresión
Picture Low compression High compression
Alta resolución
High resolution
640 x 480
Baja resolución
Low resolution
320 x 240
26
104
52
209

3.- Cuando el contador de imágenes comience a parpadear, presione una
vez más el Disparador. Todas las imágenes y vídeos serán borrados.
Para borrar la última imagen:
1.- Presione el botón de Función hasta encontrar el ícono de Borrar la
última imagen / vídeo.
2.- Presione el Disparador una vez y la última fotografía / vídeo será
borrado.
TRANSFERENCIA DE FOTOGRAFÍAS / VIDEOS A UNA
COMPUTADORA
1.- Conecte el cable USB (suministrado) a la cámara y el extremo
contrario a un puerto USB disponible en su computadora.
2.- Selección el programa My DSC en el escritorio de Windows o en el
Menú de Inicio.
3.- El programa My DSC aparece en pantalla.
4.- Presione el botón de Descarga de fotos.
5.- Seleccione las fotos que desee transferir a la computadora,
presionando sobre ellas, o seleccione Todo si desea transferir todos los
archivos.
6.- Presione Guardar. Elija el directorio donde desee guardar las
imágenes y el nombre con que desea guardarlas. Seleccione Guardar.
CÁMARA WEB
Ud. puede utilizar su cámara digital como cámara Web en los programas
de mensajería instantánea más populares del mercado.
Así mismo, mantenga video conferencias en línea, utilizando sus
programas habituales de video conferencia.
ESPECIFICACIONES
Entrada: 5V a través del puerto USB
Elemento acoplador electrónico: Sensor CMOS de 300K pixeles
Lente: f=3,6mm
Resolución de imágenes: 640 x 480 pixeles (VGA)
320 x 240 pixeles (CIF)
Memoria: SDRAM con 16Mb integrados
Temporizador: 10 segundos
Película AVI: 5-10 imágenes por seg. (VGA)
15-25 imágenes por seg. (CIF)
Velocidad de disparo: 1 - 1/10 000 segundos
Modo de disparo: Individual / disparo automático /
cámara web
Exposición / Balance de blancos: Automático
Temperatura de trabajo: 0 - 40°C
Sistemas operativos soportados: Windows 98 SE, 2000, ME, XP
Dimensiones: 80 x 51 x 0,70mm
Peso: 30,4g
Nota:
El diseño del producto y las especificaciones pueden cambiar sin previo
aviso.
3.- When the picture count starts to flash, press the Shutter button once
again. All the files will be deleted.
To delete one file at time:
1.- Press Function button until you find the Delete one icon.
2.- Press Shutter once and the last picture or video taken will be deleted.
TRANSFERRING FILES TO COMPUTER
1.- Connect the camera to the computer with the provided USB cable into
an available USB port.
2.- Double click the My DSC on your desktop or in the Start Menu.
3.- The program My DSC appears on screen.
4.- Press Download Photos option.
5.- Select the pictures that you want to transfer to the computer, clicking on
it, or click on Select All if you want to copy all files.
6.- Press Save and choose the place where you want to save the pictures.
Put the name that you want to identify the pictures. Choose Save.
WEB CAM
You can use the digital camera as Web Cam with the most popular instant
messengers on the market.
Likewise, realize on line videoconferences, using your favorite
videoconference software.
SPECIFICATIONS
Input: 5V through USB port
Image sensor: 300K pixels CMOS sensor
Lens: f=3,6mm
Resolution: 640 x 480 pixels (VGA)
320 x 240 pixels (CIF)
Memory: 16MB (SDRAM)
Self-timer: 10 seconds delay
AVI movie: 5 - 10 fps (VGA)
15-25 fps (CIF)
Shutter speed: 1 - 1/10 000 second
Shutter type: Individual / automatic shutter /
web cam
Exposition / White balance: Automatic
Operating temperature: 0 - 40°C
OS supported: Windows 98 SE, 2000, ME, XP
Dimensions: 3,1 x 2 x 0,02in
Weight: 0,07 pounds
Note:
Product design and specifications are subject to change, without notice.
Table of contents
Other Steren Digital Camera manuals

Steren
Steren Smart Home CCTV-218 User manual

Steren
Steren CAM-130 User manual

Steren
Steren CCTV-160 User manual

Steren
Steren CCTV-117 User manual

Steren
Steren CAM-170 User manual

Steren
Steren CAM-150 User manual

Steren
Steren CCTV-972 User manual

Steren
Steren CCTV-1060 User manual

Steren
Steren CAM-050 User manual

Steren
Steren CCTV-136 User manual