manuals.online logo
Brands
  1. Home
  2. •
  3. Brands
  4. •
  5. Steren
  6. •
  7. Motorized Toy Car
  8. •
  9. Steren CCR-110 User manual

Steren CCR-110 User manual

Product / Producto: RADIO
CONTROL RACING CAR / AUTO DE
CARRERAS DE RADIO CONTROL
Model / Modelo: CCR-110
Brand / Marca: Steren
CONDICIONES
1. Para hacer efectiva esta garantía se requiere: La presentación de esta póliza y del producto, en el lugar en donde fue adquirido o en ELECTRONICA STEREN S.A. DE C.V.
2. ELECTRONICA STEREN S.A. DE C.V. se compromete a reparar el producto en caso de estar defectuoso sin ningún cargo al consumidor.
3. El tiempo de reparación en ningún caso será mayor a 30 días contados a partir de la recepción del producto en cualquiera de los sitios en donde pueda hacerse efectiva la
garantía.
4. El lugar donde puede adquirir partes, componentes, consumibles y accesorios, así como hacer válida esta garantía es: En cualquiera de las direcciones arriba mencionadas.
ESTA GARANTIA NO ES VALIDA EN LOS SIGUIENTES CASOS:
1. Cuando el producto ha sido utilizado en condiciones distintas a las normales.
2. Cuando el producto no ha sido operado de acuerdo con el instructivo de uso.
3. Cuando el producto ha sido alterado o reparado por personas no autorizadas por ELECTRONICA STEREN S.A. DE C.V.
Nota: El consumidor podrá solicitar que se haga efectiva la garantía ante la propia casa comercial, donde adquirió el producto. Si la presente garantía se extraviara, el
consumidor puede recurrir a su proovedor para que le expida otra póliza de garantía, previa presentación de la nota de compra o factura respectiva.
DATOS DEL DISTRIBUIDOR
DISTRIBUTION / NOMBRE / DISTRIBUIDOR:
ADDRESS / DOMICILIO:
PRODUCT / PRODUCTO: BRAND / MARCA:
MODEL / MODELO: SERIAL NUMBER / No. DE SERIE:
DATE OF DELIVERY / FECHA DE ENTREGA:
Call Center / Centro de Atención a Clientes
del Interior 01 800 500 9000
Mexico City / Cd. de México: 53 54 22 90
Warranty
CONDITIONS:
1. This warranty card with all the required information, the invoice or purchase ticket, the packing or package, must be presented with the product when warranty
service is required.
2. If product hasn’t exceed warranty period, the company will repair it free of charge including transportation charges.
3. The repairing time will not exceed 30 natural days, from the day the claim was received.
4. Steren sells parts, components, consumables and accessories to customer, as well as warranty service, at any of the following addresses:
THIS WARRANTY IS VOID ON THE NEXT CASES:
If the product has been damage by an accident, acts of God, mishandling, leaky batteries, failure to follow enclosed instructions, improper repair by unauthorized
personnel, improper safe keeping.
Notes:
a) The customer can also claim the warranty service on the purchase establishment.
b) If you lose the warranty card, we can reissue it just showing the invoice or purchase ticket.
Póliza de Garantía
This Steren product is guaranteed under
normal usage against defects in
workmanship and materials to the original
purchaser for one year from the date of
purchase.
Garantiza este producto por el término de
un año en todas sus partes y mano de obra
contra cualquier defecto de fabricación y
funcionamiento, a partir de la fecha de
entrega.
V1106
INSTRUCTIVO DE USO DE AUTO DE CARRERAS DE RADIO
CONTROL
Modelo: CCR-110
Marca: Steren
Antes de utilizar su nuevo Auto de carreras de radio control, lea este
instructivo para evitar cualquier mal funcionamiento. Guárdelo para
futuras referencias.
Su nuevo auto de carreras es controlado mediante radio control, cuenta
con dirección en llantas delanteras y tracción en llantas traseras.
Fácil de controlar a través de su control remoto tipo pistola.
IMPORTANTE
No intente abrir el equipo, puede ocasionar malfuncionamiento y
anulación de la garantía.
No use ni almacene este equipo en lugares donde existan goteras o
salpicaduras de agua.
Siempre utilice un paño suave, limpio y seco para limpiar el equipo.
El equipo cuenta con piezas pequeñas, no lo deje al alcance de niños
menores de 3 años.
En caso de que exista interferencia al momento de utilizar el equipo,
cámbielo de lugar.
Retire las baterías del automóvil y del control remoto, en caso de que no
vaya a utilizarlos por un período de tiempo prolongado.
No mezcle diferentes tipos de baterías.
No doble la antena.
Para comenzar a utilizar su nuevo equipo, siga estas instrucciones:
1.- Abra la caja y extraiga el auto con cuidado, así como los accesorios
(Control remoto, antena, batería y cargador de batería).
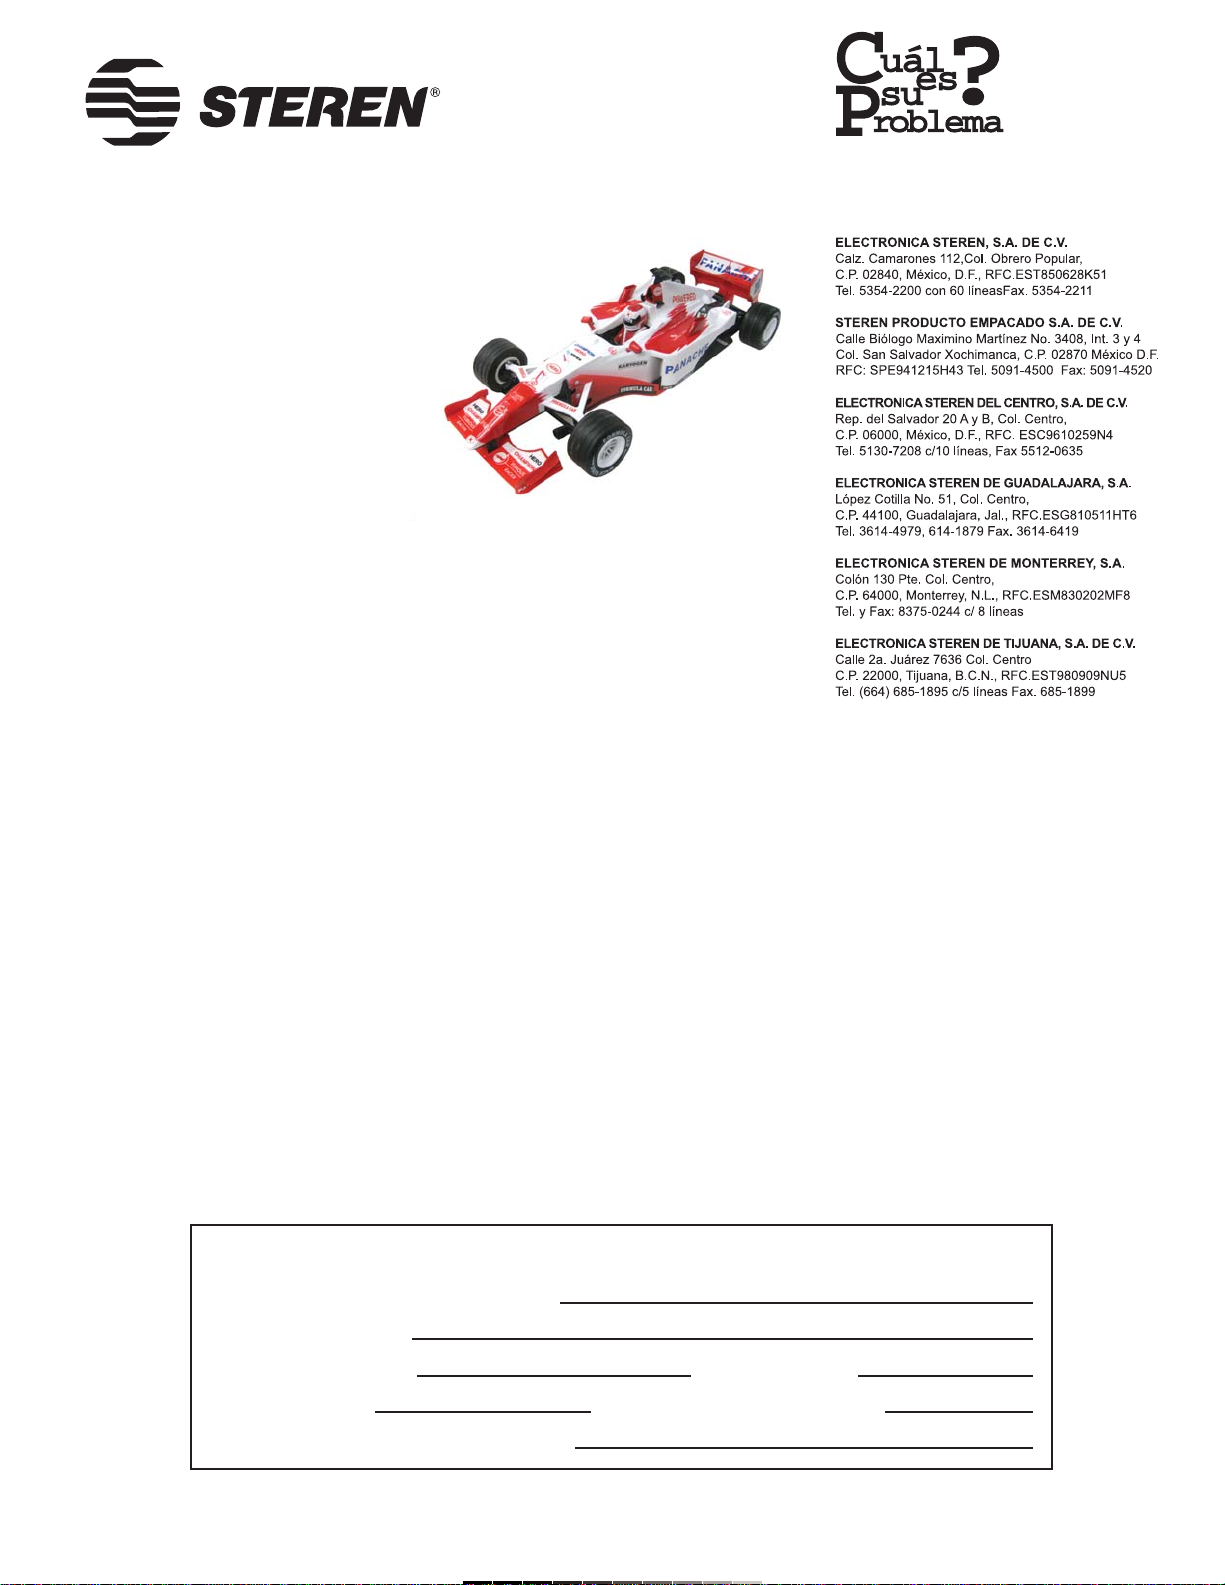
2.- Remueva los tornillos de la tapa del compartimiento de baterías del
automóvil, mueva el seguro y levántela (Fig. 1, 2 y 3).
3.- Inserte la batería recargable poniendo atención a la polaridad (Vea la
Nota) (Fig. 4).
4.- Vuelva a colocar la tapa, asegurándola con los tornillos.
5.- Para colocar las baterías en el control remoto, utilice un desarmador
para remover el tornillo y levantar la tapa localizada en la parte inferior
(Fig. 5 y 6).
6.- Inserte cuatro baterías AA, poniendo atención a la polaridad.
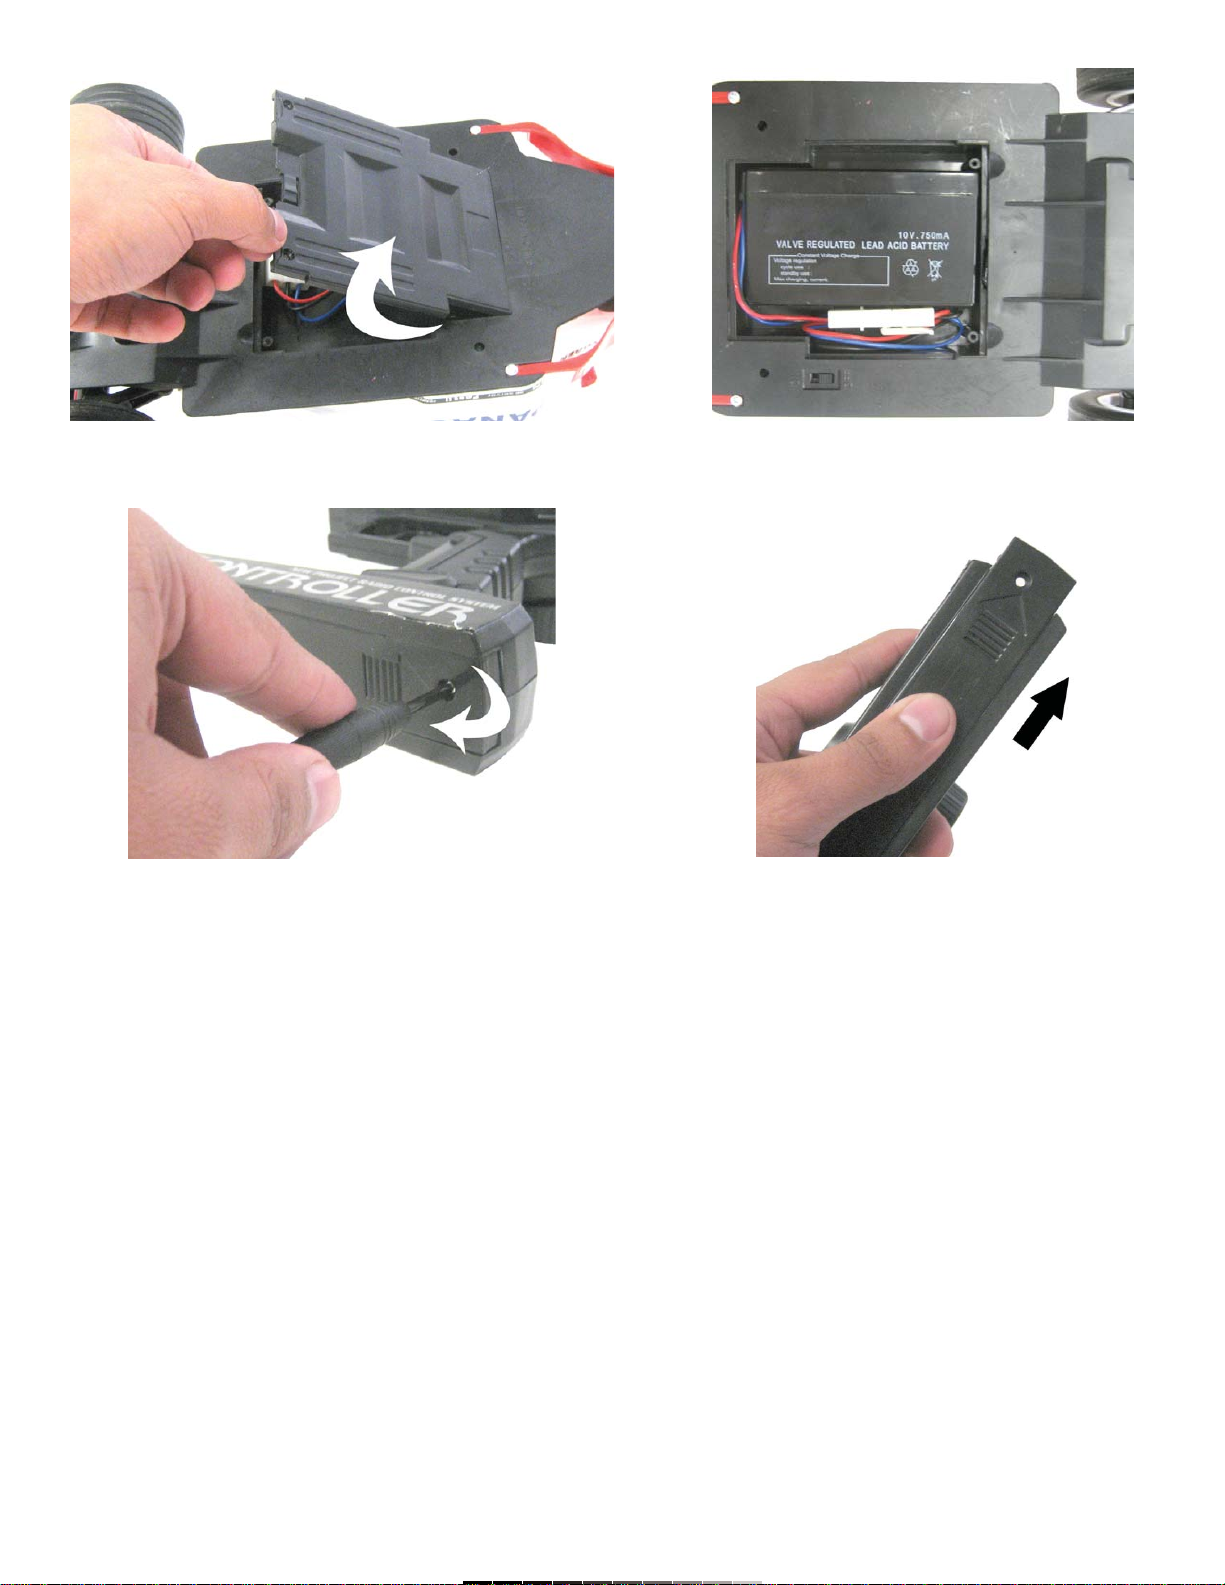
7.- Para colocar la tapa nuevamente, colóquela de arriba hacia abajo
sobre las baterías, una vez que haga contacto con la base, empuje, de tal
forma que los agujeros de la tapa y el control remoto coincidan.
8.- Asegúrela utilizando un tornillo.
9.- Atornille la antena del control remoto y extiéndala.
Nota:
Cuando saque el automóvil del empaque, deberá retirar los tornillos que
se encuentran debajo del empaque, de otra forma no podrá sacarlo.
Antes de colocar la batería dentro del compartimiento del carro, será
necesario cargarla, consulte la sección de Carga de Batería.
INSTRUCTION MANUAL FOR RADIO CONTROL RACING CAR
Model: CCR-110
Brand: Steren
Before using your new Radio Control Racing Car read this instruction
manual to prevent any damage. Put it away in a safe place for future
references.
Your new racing car it is controlled by radio control, includes direction on
front wheels and traction on rear wheels.
Easy to control it, using a gun-style remote control.
IMPORTANT
Do not try to open the equipment, may cause malfunction and warranty
repeal.
Do not use or store the equipment near wet places.
Clean with a soft, dry cloth.
This equipment includes small pieces, do not leave it near children under
three.
Replace the equipment, in case you note some interference.
Remove the batteries from the car and remote control when you don’t use
them for a long period of time.
Do not mix different type of batteries.
Do not bend the antenna.
To start to use your new device, follow these instructions:
1.- Open the box and release the car and the accessories (remote control,
antenna, battery and battery charger), carefully.
2.- Remove the screws from the car’s battery compartment, move the
secure and lift it up (Fig. 1,2 & 3).
3.- Place the rechargeable battery, paying attention to polarity (See Note)
(Fig. 4).
4.- Replace the cover, screw in tightly.
5.- To place the batteries into the remote control, use a screwdriver to
remove the screw located in the bottom cover (Fig. 5 & 6).
6.- Place 4 AA batteries, paying attention to polarity.
7.- To replace the cover, put it from up to down over the batteries, once it
touched the base, push it, in order to match both holes.
8.- Screw in tightly to fasten it.
9.- Insert the antenna into the remote control and extend it.
Note:
When you release the car from the package, you must remove the screws
placed in the bottom of the package, otherwise you cannot release it.
Before to place the battery inside of the car, you must charge it, please
refers to Charging the battery section.
Fig. 1 Fig. 2
CARGA DE BATERÍA
1.- Una vez que ha desempacado la batería y el cargador, es necesario
recargarla por aproximadamente 6 horas contínuas.
2.- Conecte primeramente la batería al cargador a través del conector.
3.- Posteriormente conecte el cargador a un tomacorriente casero.
4.- Después de 6 horas de carga, desconecte el cargador del
tomacorriente y retire la batería.
COMENZANDO A UTILIZAR EL EQUIPO
1.- Cambie el interruptor de encendido del auto (parte inferior) a la
posición ON (Fig. 7).
2.- Extienda la antena flexible del automóvil.
3.- Encienda el control remoto, deslizando el interruptor de encendido a la
posición ON, el LED indicador se encenderá (Fig. 8).
4.- Para dar vuelta, gire la perilla redonda. Si desea dar vuelta a la
derecha muévala en sentido de las manecillas del reloj. Si desea dar
vuelta a la izquierda, muévala en sentido contrario a las manecillas del
reloj (Fig. 9).
5.- Para avanzar o retroceder, jale el gatillo. Si desea avanzar, presiónelo,
entre más lo haga más velocidad obtendrá. Para retroceder, empuje hacia
delante el gatillo (Fig. 10).
CHARGING THE BATTERY
1.- After unpacked the battery and the charger, you must charge it for 6
continue hours approx.
2.- First, plug the battery to the charger.
3.- Then, plug the charger into an availableAC outlet.
4.- After 6 hours, unplug the charger from the outlet and remove the
battery.
HOW TO USE THE DEVICE
1.- Place the car’s power switch to ON position (located in the bottom of
the car) (Fig. 7).
2.- Extend the car’s flexible antenna.
3.- Turn the remote control on, slide the power switch to ON position, the
indicator LED will light (Fig. 8).
4.- If you want to turn the car to the right, move the rounded knob,
clockwise. If you want to turn it to the left, move the rounded knob
counterclockwise (Fig. 9).
5.- To move forward or backward, push the trigger. If you want to move the
car forward, press the trigger, press more to obtain more speed. To
backward the car, push the trigger up (Fig. 10).
Fig, 3 Fig. 4
Fig, 5 Fig. 6
ALINEACIÓN
Utilice esta perilla para alinear las llantas delanteras. (Fig. 11)
Si al momento de utilizar el automóvil, éste se desvía hacia la derecha o a
la izquierda, utilice esta perilla para ajustarla.
Para comprobar que está alineado, deberá colocar el automóvil en el piso
y hacerlo funcionar. Deberá ajustar la perilla las veces que sean
necesarias hasta que logre la alineación correcta.
ESPECIFICACIONES
Frecuencia: 49MHz o 27MHz
Alcance: 50m
Escala: 1:10
Control Remoto
Entrada: 6V (4xAA)
Automóvil
Entrada: 10V 750mA (Batería sellada)
Peso: 1023g
Cargador de baterías
Entrada: 110V~ 60Hz
Salida: 10V 250mA
Nota:
El diseño del producto y las especificaciones pueden cambiar sin previo
aviso.
ALIGNMENT
Use this control to align the front wheels (Fig. 11).
If you note that the car suffer a deviation to the left or right when you use it,
then use this knob.
Use the car to check the new alignment.
You must adjust the knob many times as you need, until you get the
correct alignment.
SPECIFICATIONS
Frequencie: 49MHz or 27MHz
Maximum range: 164ft
Scale: 1:10
Remote Control
Input: 6V (4xAA)
Racing Car
Input: 10V 750mA (Sealed Battery)
Weight: 2,7lb
Battery charger
Input: 110V~ 60Hz
Output: 10V 250mA
Note:
Product design and specifications are subject to change, without notice.
Fig. 7 Fig. 8
Fig. 9 Fig. 10 Fig. 11

Other Steren Motorized Toy Car manuals

Steren CCR-130 User manual

Steren

Steren CCR-130 User manual

Steren K-500 User manual

Steren

Steren K-500 User manual

Steren CCR-120 User manual

Steren

Steren CCR-120 User manual

Steren K-670 User manual

Steren

Steren K-670 User manual

Steren BAJA BEAST CAR-505 User manual

Steren

Steren BAJA BEAST CAR-505 User manual

Popular Motorized Toy Car manuals by other brands

Jr. Pro 206 owner's manual

Jr. Pro

Jr. Pro 206 owner's manual

Hunter Products PAW PATROL ZPV002 Operation manual

Hunter Products

Hunter Products PAW PATROL ZPV002 Operation manual

Bertoni DUCK instruction manual

Bertoni

Bertoni DUCK instruction manual

Reely ROAD LEOPARD PRO 36 RTR operating instructions

Reely ROAD

Reely ROAD LEOPARD PRO 36 RTR operating instructions

Reely Deathwatcher XL 6S operating instructions

Reely

Reely Deathwatcher XL 6S operating instructions

BMT BMT902 instruction manual

BMT

BMT BMT902 instruction manual

Fisher-Price Power Wheels X6656 owner's manual

Fisher-Price

Fisher-Price Power Wheels X6656 owner's manual

HPI Racing Trophy 4.6 truggy instruction manual

HPI Racing

HPI Racing Trophy 4.6 truggy instruction manual

Little Tikes Dino Dune Buggy user guide

Little Tikes

Little Tikes Dino Dune Buggy user guide

Yokomo Factory B-MAX4 owner's guide

Yokomo

Yokomo Factory B-MAX4 owner's guide

Arrma FURY owner's manual

Arrma

Arrma FURY owner's manual

Traxxas 3602 user guide

Traxxas

Traxxas 3602 user guide

Kyosho Integra Instruction booklet

Kyosho

Kyosho Integra Instruction booklet

ACME Air-Ace Ultra instruction manual

ACME

ACME Air-Ace Ultra instruction manual

Jamara VW Beetle Instruction

Jamara

Jamara VW Beetle Instruction

Traction Hobby FISO PRO instruction manual

Traction Hobby

Traction Hobby FISO PRO instruction manual

Gift in a Tin Camper Van Construction Kit instructions

Gift in a Tin

Gift in a Tin Camper Van Construction Kit instructions

Tamiya COMICAL HORNET quick start guide

Tamiya

Tamiya COMICAL HORNET quick start guide

manuals.online logo
manuals.online logoBrands
  • About & Mission
  • Contact us
  • Privacy Policy
  • Terms and Conditions

Copyright 2025 Manuals.Online. All Rights Reserved.