Steren TEL-205 User manual

Product / Producto: HEADSET
TELEPHONE SYSTEM / DIADEMA
TELEFÓNICA MANOS LIBRES
Model / Modelo: TEL-205
Brand / Marca: Steren
CONDICIONES
1. Para hacer efectiva esta garantía se requiere: La presentación de esta póliza y del producto, en el lugar en donde fue adquirido o en ELECTRONICA STEREN S.A. DE C.V.
2. ELECTRONICA STEREN S.A. DE C.V. se compromete a reparar el producto en caso de estar defectuoso sin ningún cargo al consumidor.
3. El tiempo de reparación en ningún caso será mayor a 30 días contados a partir de la recepción del producto en cualquiera de los sitios en donde pueda hacerse efectiva la
garantía.
4. El lugar donde puede adquirir partes, componentes, consumibles y accesorios, así como hacer válida esta garantía es: En cualquiera de las direcciones arriba mencionadas.
ESTA GARANTIA NO ES VALIDA EN LOS SIGUIENTES CASOS:
1. Cuando el producto ha sido utilizado en condiciones distintas a las normales.
2. Cuando el producto no ha sido operado de acuerdo con el instructivo de uso.
3. Cuando el producto ha sido alterado o reparado por personas no autorizadas por ELECTRONICA STEREN S.A. DE C.V.
Nota: El consumidor podrá solicitar que se haga efectiva la garantía ante la propia casa comercial, donde adquirió el producto. Si la presente garantía se extraviara, el
consumidor puede recurrir a su proovedor para que le expida otra póliza de garantía, previa presentación de la nota de compra o factura respectiva.
DATOS DEL DISTRIBUIDOR
DISTRIBUTION / NOMBRE / DISTRIBUIDOR:
ADDRESS / DOMICILIO:
PRODUCT / PRODUCTO: BRAND / MARCA:
MODEL / MODELO: SERIAL NUMBER / No. DE SERIE:
DATE OF DELIVERY / FECHA DE ENTREGA:
Call Center / Centro de Atención a Clientes
del Interior 01 800 500 9000
Mexico City / Cd. de México: 53 54 22 90
Warranty
CONDITIONS:
1. This warranty card with all the required information, the invoice or purchase ticket, the packing or package, must be presented with the product when warranty
service is required.
2. If product hasn’t exceed warranty period, the company will repair it free of charge including transportation charges.
3. The repairing time will not exceed 30 natural days, from the day the claim was received.
4. Steren sells parts, components, consumables and accessories to customer, as well as warranty service, at any of the following addresses:
THIS WARRANTY IS VOID ON THE NEXT CASES:
If the product has been damage by an accident, acts of God, mishandling, leaky batteries, failure to follow enclosed instructions, improper repair by unauthorized
personnel, improper safe keeping.
Notes:
a) The customer can also claim the warranty service on the purchase establishment.
b) If you lose the warranty card, we can reissue it just showing the invoice or purchase ticket.
Póliza de Garantía
This Steren product is guaranteed under
normal usage against defects in
workmanship and materials to the original
purchaser for one year from the date of
purchase.
Garantiza este producto por el término de
un año en todas sus partes y mano de obra
contra cualquier defecto de fabricación y
funcionamiento, a partir de la fecha de
entrega.
V0806

INSTRUCTIVO DE USO DE DIADEMA TELEFÓNICA MANOS LIBRES
Modelo: TEL-205
Marca: Steren
Antes de utilizar su nueva Diadema Telefónica Manos Libres lea este
instructivo para evitar cualquier mal funcionamiento. Guárdelo para
futuras referencias.
Su nueva diadema telefónica manos libres, le ofrece la libertad de poder
realizar otra actividad mientras habla por teléfono. Algunas de las
funciones principales son: modo silenciado, control de volumen de
micrófono y de voz e interruptor de encendido / apagado. Es cómoda y el
largo de su cable le permite moverse con libertad, incluye un gancho
autoadherible para colocar la diadema en su lugar preferido.
IMPORTANTE
Utilice sólo en líneas analógicas.
El equipo se debe colocar en un lugar ventilado y seco.
Limpie con un paño seco. No utilice solventes.
CONTROLES
1.- Encendido / Apagado (On / Off) ..... Enciende / Apaga el equipo
2.- Silenciar (Mute) ............................. Permite escuchar la
conversación, pero la otra
persona no podrá escucharlo
3.- Volumen de voz .............................. Permite amplificar o disminuir el
nivel de volumen de voz del
usuario de la otra línea
4.- Indicador de uso (Talk) ................... Enciende cuando el equipo está
en uso
5.- Conector 3,5mm ............................. Conector inhabilitado
6.- Conector de diadema ..................... Permite conectar una diadema
con conector telefónico
7.- Selector de sistema ...................... Permite programar la diadema
para que funcione con cualquier
sistema y equipo telefónico
8.- Compartimiento de baterías
9.- Adaptador de corriente ................... Permite conectar un adaptador de
corriente de 12V (adaptador no
incluido)
10.- Control de volumen de micrófono . Permite ajustar la sensibilidad del
micrófono
11.- Conector de auricular telefónico ... Permite conectar el auricular del
teléfono que desee utilizar
12.- Conector a teléfono ...................... Permite conectar la base de la
diadema al teléfono
INSTRUCTION MANUAL FOR HEADSET TELEPHONE SYSTEM
Model: TEL-205
Brand: Steren
Before using your new Headset telephone system, please read this
instruction manual to prevent any damage. Put it away in a safe place
for future references.
With your new headset telephone system you can answer the phone while
you are doing something else. Some of the main features are: mute,
microphone and voice volume level control and On / Off switch. The
headset is comfortable and you can move it freely thanks to the length of
the cable. A sticky holder is provided, use it to put the headset on it, while
is not in use.
IMPORTANT
Only for analogue phone lines.
Phone must be placed in a cool dry and ventilated place.
Clean only with a soft, dry cloth. Do not use solvents.
CONTROLS
1.- On / Off ........................................ Power on / off the equipment
2.- Mute ............................................ Allows one to hear the
conversation of the other person,
but the other party can’t hear you
3.- Voice volume control .................... Allows one to amplify or decrease
the voice volume level of the
other party in the line
4.- In-use indicator (Talk) ................... Lights on when the equipment is
in-use
5.- 3,5mm connector ………………… Disabled conenctor
6.- Headset connector ………………. Allows one to plug a headset with
phone connector
7.- System selector ………………….. Allows you to configure the
headset in order to work in every
phone system and phone
equipment
8.- Battery compartment
9.- AC power adaptor ........................ Allows one to plug an AC power
adaptor (12V) (AC adaptor not
included)
10.- Microphone volume control ……. Allows one to set the microphone
sensitivity
11.- Handset connector ……………… Allows one to plug the handset
from the telephone into the
headset base
12.- To Tel connector ………………… Allows one to plug the headset
base to the phone set
89
567
11 12
10

ENERGÍA
Su nuevo equipo le permite utilizar dos fuentes de energía, baterías o
adaptador de corriente (ninguno de los dos está incluido en el paquete).
Baterías:
1.- Abra el compartimiento de baterías (8) (Fig. 1).
2.- Instale dos baterías nuevas alcalinas poniendo atención a la polaridad
(Fig. 2).
3.- Coloque nuevamente la cubierta del compartimiento de baterías.
Adaptador de corriente:
1.- Utilice un adaptador de corriente de 12V (no incluido).
2.- Conéctelo en la entrada correspondiente (9).
Nota:
Si no va a utilizar el equipo por un período de tiempo prolongado, retire las
baterías y/ el adaptador de corriente para evitar daños al equipo.
POWER SUPPLY
You can use two different types of power supply in the equipment,
batteries or AC power adaptor (batteries and power adaptor are not
included on the package).
Batteries:
1.- Open the battery compartment (8) (Fig. 1).
2.- Place two new alkaline batteries, paying attention to polarity
(Fig. 2).
3.- Replace the battery cover.
AC power adaptor
1.- Use a 12V AC power adaptor (not included).
2.- Plug into the corresponding input (9).
Note:
If you don’t use the equipment for a long period of time, remove the
batteries and/or the AC power adaptor to avoid damages on the
equipment.
1
3
2
4
Fig. 1 Fig. 2

CONEXIONES
Antes de comenzar a utilizar su nuevo equipo, asegúrese de instalar dos
baterías nuevas Alcalinas o conecte unAdaptador de Corriente de 12V en
la entrada correspondiente (9). Para conocer la forma de colocar baterías
o adaptador de corriente, refiérase al capítulo anterior.
1.- Desconecte el auricular del teléfono que desee utilizar,
2.- Conecte el auricular en la base de la diadema, en la entrada
identificada con un ícono de auricular.
3.- Utilice el cable telefónico suministrado para conectar la base de la
diadema al teléfono. Un extremo insértelo en la entrada denominada TEL.
El otro extremo conéctelo a la entrada del auricular del teléfono.
4.- Conecte la diadema en la base (6).
SELECTOR DE SISTEMA
Utilice esta opción para configurar correctamente un equipo o sistema
telefónico.
1.- Una vez que ha realizado las conexiones necesarias y el equipo está
funcionando, coloque el selector de sistema en la posición inicial 1A.
2.- Levante el auricular y presione el botón de Encendido / Apagado (On /
Off), el LED indicador de uso se enciende en verde.
3.- Si escucha el tono de llamada en la diadema pase al punto 5.
4.- En caso de que no escuche el tono de llamada, cambie el interruptor
de números (1 2 3 4) a la siguiente posición, repita la operación hasta que
escuche el tono de llamada.
5.- Una vez que escuchó el tono, realice una llamada. Si la comunicación
es clara, el equipo estará correctamente configurado.
6.- Durante la conversación, si no escucha claramente, cambie el
interruptor de letras (A B C) a la posición en la que se escuche de forma
óptima.
Notas:
Si el LED indicador enciende en rojo, compruebe que el botón de Silenciar
(Mute) no esté activado, de ser así, presione una vez, el LED cambiará a
verde.
La posición de los interruptores pueden variar dependiendo del equipo y
sistema telefónico.
CONNECTIONS
Before to start to use the equipment, make sure to install two new Alkaline
batteries or plug a 12V AC power adaptor in the corresponding input (9).
To know the way to place batteries or AC power adaptor, check the
previous chapter.
1.- Unplug the handset from the telephone that you want to use.
2.- Plug the handset in the headset base, in the connector with a handset
icon.
3.- Use the supplied phone cable to connect the headset base with the
phone set. One of the terminals plug into the TEL connector. The other one
plug into the handset connector on the phone set.
4.- Plug the headset into the base (6).
SYSTEM SELECTOR
Use this option to configure the equipment in accord to a specific phone
system.
1.- Once you have made the connections, and the equipment is working
well, place the system selector in the initial position 1A.
2.- Pick the handset up and press the On / Off button on the headset base,
the in-use LED lite in green.
3.- If you hear the dial tone in the headset, jump to step 5.
4.- If you hear no dial tone, place the system selector switch (1 2 3 4) to
next position, repeat the operation until you hear the dial tone.
5.- Once you heard the dial tone, make a call. If the conversation is loud
and clear, the equipment is correctly configured.
6.- While you are in a conversation, if you don’t hear clearly, place the
system selector switch (A B C) to next position until you hear the
conversation in an optimal way.
Notes:
If the in-use LED lite in red, check the Mute button is not pressed,
otherwise, press once and the LED switch to green.
System selector position can be different, depending of the phone system.
A diadema
To headset
A conector de auricular
To handset connector
Del auricular
From handset

COMO REALIZAR UNA LLAMADA
1.- Colóquese la diadema en la cabeza, de tal forma que coincida el
audífono en el oído y el micrófono esté a una distancia de 5 centímetros
de su boca.
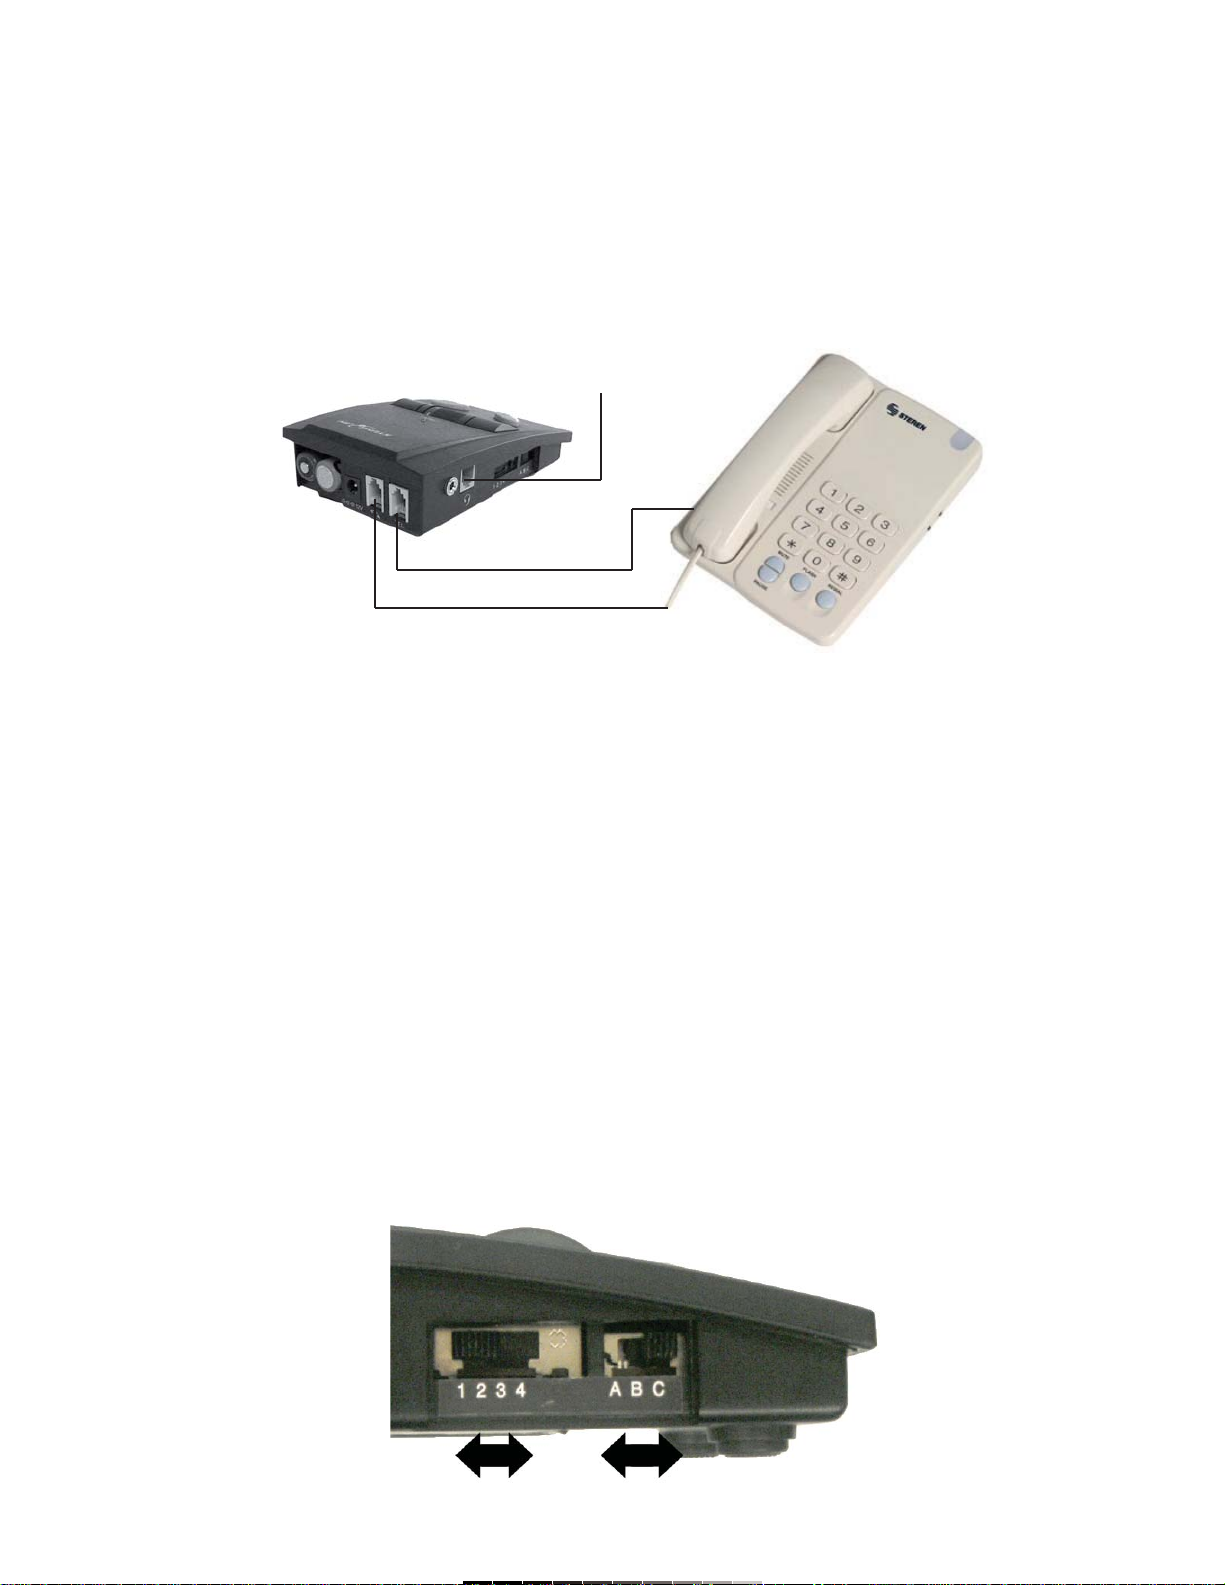
2.- Descuelgue el auricular del teléfono.
3.- Presione el botón de Encendido / Apagado (1) de la base de la
diadema. Escuchará el tono de marcado.
4.- Utilice el teclado numérico del teléfono para marcar el número
telefónico que desee.
5.- Durante la llamada, podrá ajustar el volumen de voz (3) para amplificar
la voz del otro usuario así como el volumen del micrófono (10) de la
diadema.
6.- Cuando haya concluido la conversación, cuelgue el auricular en la
base del teléfono, y presione el botón de Encendido / Apagado (1) de la
base de la diadema.
7.- Si no va a utilizar la diadema, colóquela en el soporte.
CÓMO CONTESTAR UNA LLAMADA
1.- Cuando hay una llamada entrante, el teléfono comenzará a timbrar.
2.- Presione el botón de Encendido / Apagado (1) y descuelgue el
auricular del teléfono.
3.- Durante la llamada, podrá ajustar el volumen de voz (3) para amplificar
la voz del otro usuario así como el volumen del micrófono (10) de la
diadema.
4.- Cuando haya concluido la conversación, cuelgue el auricular en la
base del teléfono, y presione el botón de Encendido / Apagado (1) de la
base de la diadema.
5.- Si no va a utilizar la diadema, colóquela en el soporte.
FUNCIÓN DE SILENCIAR (MUTE)
Mediante esta función usted podrá seguir escuchando al otro usuario
telefónico sin que a usted lo escuchen.
Durante una conversación, presione el botón de Silenciar (Mute) (2), la
llamada NO se cortará y usted podrá seguir escuchando a la otra persona,
sin embargo el otro usuario no podrá escucharlo a usted. Cuando desee
regresar al modo normal de conversación, presione nuevamente el botón
de Silenciar (Mute) (2).
ESPECIFICACIONES
Amplificador
Entrada: 12V con adaptador de corriente
(adaptador no incluido)
3V (2 x AA)
Dimensiones: 120 x 85 x 35mm
Peso: 204g
Nota:
El diseño del producto y las especificaciones pueden cambiar sin previo
aviso.
MAKING A CALL
1.- Place the headset on the head, the earphone must be placed on
the ear and the microphone must be in a distance of 5cm from your
mouth.
2.- Pick the handset up.
3.- Press On / Off button (1) on the headset base. You will hear the dial
tone.
4.- Use the numeric keyboard on the phone to dial the desired phone
number.
5.- You can set the voice volume level (3) while you are in a call, to amplify
the voice of the other party. Also you can set the microphone volume level
(10) for the headset.
6.- Once you have finished the conversation, press On / Off (1) button
once again and hang the headset up.
7.- If you don’t use the headset for a while, place it on the holder.
ANSWERING AN INCOMING CALL
1.- When a call is incoming, the phone set begins to ring.
2.- Press On / Off (1) button and pick the handset up.
3.- You can set the voice volume level (3) while you are in a call, to amplify
the voice of the other party. Also you can set the microphone volume level
(10) for the headset.
4.- Once you have finished the conversation, press On / Off (1) button
once again and hang the headset up.
5.- If you don’t use the headset for a while, place it on the holder.
MUTE FUNCTION
Use this function to hear the other party, but the other user cannot hear
you.
While you are in a conversation, press Mute (2) once, the call WON’T be
cut and you can still hearing the other person on the phone, however the
other user cannot hear you. If you want to back to normal conversation
mode, press Mute (2) again.
SPECIFICATIONS
Amplifier
Input: 12V with AC power adaptor
(Power adaptor is not included)
3 V (2 x AA)
Dimensions: 4,7 x 3,3 x 1,3in
Weight: 204g
Note:
Product design and specifications are subject to change, without notice.
Table of contents
Popular Telephone System manuals by other brands

Aastra
Aastra Venture IP Telephone System Specifications

Lucent Technologies
Lucent Technologies MERLIN 820 Service and maintenance manual

Comdial
Comdial DX-80 Installation & maintenance manual

Siedle
Siedle Scope Series Commissioning Instruction

PABX
PABX CDX-CP832 user manual

Toshiba
Toshiba Strata VI installation instructions