Stern HER-420 User manual


Before using your new High Temperature Infrared
Thermometer, please read this instruction manual to prevent
any damage. Put it away in a safe place for future
references.
SAFETY INSTRUCTIONS
Use extreme caution when the laser pointer beam is on.
Do not point the beam toward anyone’s eye or allow the
beam to strike the eye from a reflective surface.
Do not use the laser near explosive gases or in other
potentially explosive areas.
Always use a soft, dry cloth to clean the device.
Do not try to open the meter, may cause malfunction and
warranty repeal.
Do not try to open the device, may be exposed to dangerous
radiation.
Before measuring, be sure to clean surfaces that are
covered with frost, oil, grime, etc.
If an object’s surface is highly reflective, apply masking tape
or flat black paint to the surface before measuring. Allow
time for the paint or tape to adjust to the temperature of the
surface it is covering.
Measurements through transparent surfaces may not be
accurate.
Steam, dust, smoke, etc can obscure measurements
CONTROL DESCRIPTION
1. Laser pointer
2. Infrared sensor
3. Measurement trigger
4. Battery compartment
5. LCD screen
6. Laser beam on/off
7. Temperature unit switch
8. Backlight
9. Mode button
1- Tripod mount
•
•
•
•
•
•
•
•
•
•
ENGLISH
ENGLISH-2
Before usin
g
y
our new Hi
g
h Temperature Infrared
T
hermometer,
p
lease read this instruction manual to
p
reven
t
a
n
y
dama
g
e. Put it awa
y
in a safe place for future
references
.
1
2
3
4
5
6
7
8
9
10

BATTERY PLACEMENT
This meter uses a 9V battery, make sure to install before to use
it.
1.- Open the battery compartment.
1
2
3
4
5
67
8
9
10
ENGLISH
ENGLISH-3

2.- Place a 9V battery inside, and pay attention to polarity.
3.- Replace the cover of the compartment.
When the battery symbols appears, replace the meter’s battery.
OPERATING INSTRUCTIONS
Basic IR measures
1.- Hold the meter by its handle and point it toward the surface to
be measured.
2.- Pull and hold the trigger to turn the meter on and begin
testing. The temperature reading, the flashing “SCAN” icon, and
the emissivity will appear.
3.- Release the trigger and the reading will hold for
approximately 7 seconds (letter H will appear on the LCD). After
this time, the meter will automatically shut off.
4.- If you want to select a temperature unit (°F / °C) press the
Temperature button.
LASER POINTER
Use the laser pointer to know which area is measuring.
1.- While pulling the Trigger, press the laser button once to turn
the beam.
2.- When the laser is ON, the laser icon will appear in the
LCD.
3.- Pressing it again turns the laser off.
BACKLIGHT FUNCTION
In case you need to use the meter in poor light conditions, press
backlight button, the LCD screen will light on. To turn the light off,
press once again the button.
ENGLISH
ENGLISH-4

We recommend to use it only in certain situations, because the
battery will discharge faster than with normal use.
OVER-RANGE INDICATION
If the measured temperature exceed the maximum or minimum
temperature range, the meter will display dashes in place of a
temperature reading.
MODE BUTTON
This button allows you to choose between 4 different functions,
while testing.
You can choose between these options:
Average
In the AVG mode, all of the readings in the current
measurement session are averaged and the value is
displayed.
Max
In the MAX mode, only the highest reading encountered
in the current measurement session is displayed
Min
In the MIN mode, only the lowest reading is displayed
Max-Min
In the DIF mode, the MAX less the MIN is displayed.
FIELD OF VIEW
The meter’s field of view is 12:1. For example, if the meter is 12
inches from the target, the diameter of the target must be at least
1 inch. Other distances are shown in the field of view diagram.
Note that measurements should normally be made as close as
possible to the device under test. The meter can measure from
moderate distances but the measurement may be affected by
external sources of light.
ENGLISH
ENGLISH-5

SPECIFICATIONS
Input: 9V (1 x 9V)
Range: -20 a 537°C
Emissivity: 0.95
Accuracy of reading: +1%
Time of response : 520ms
Laser power: +1mW
Wave length: 630-670nm
Weight: 258,6g
Dimensions: 20x13x5,5cm
Product design and specifications are subject to change,
without notice.
P
roduct desi
g
n and specifications are sub
j
ect to chan
g
e,
without notice
.
ENGLISH
ENGLISH-6
Unit: mm Distance (D): Spot size (S)


Antes de utilizar su nuevo Termómetro infrarrojo
profesional lea este instructivo para evitar cualquier mal
funcionamiento. Guárdelo para futuras referencias.
INSTRUCCIONES DE SEGURIDAD
Extreme las precauciones cuando el haz de luz láser está
encendido.
No apunte el rayo láser directa o indirectamente a los ojos
de las personas.
No utilice el láser cerca de lugares que estén expuestos a
gases explosivos o áreas potencialmente explosivas.
Siempre utilice un paño suave, limpio y seco para limpiar el
equipo.
No intente abrir el equipo, puede ocasionar
malfuncionamiento y anulación de la garantía
No intente abrir el equipo, podría estar expuesto a
radiaciones peligrosas.
Antes de realizar mediciones, asegúrese de limpiar las
superficies que estén cubiertas por hielo, aceite, suciedad,
etc.
Si la superficie de un objeto, tiene alta reflexión, aplique
masking tape o una capa de pintura negra antes de
realizar una medición. Deje pasar un tiempo razonable para
que la cinta o la pintura se ajusten a la temperatura del
objeto cubierto.
Las mediciones realizadas a objetos o superficies
transparentes podrían no ser lo suficientemente precisas.
Polvo, humo o vapor pueden provocar mediciones erróneas.
DESCRIPCIÓN DE CONTROLES
1. Apuntador laser
2. Sensor infrarrojo
3. Interruptor de medición
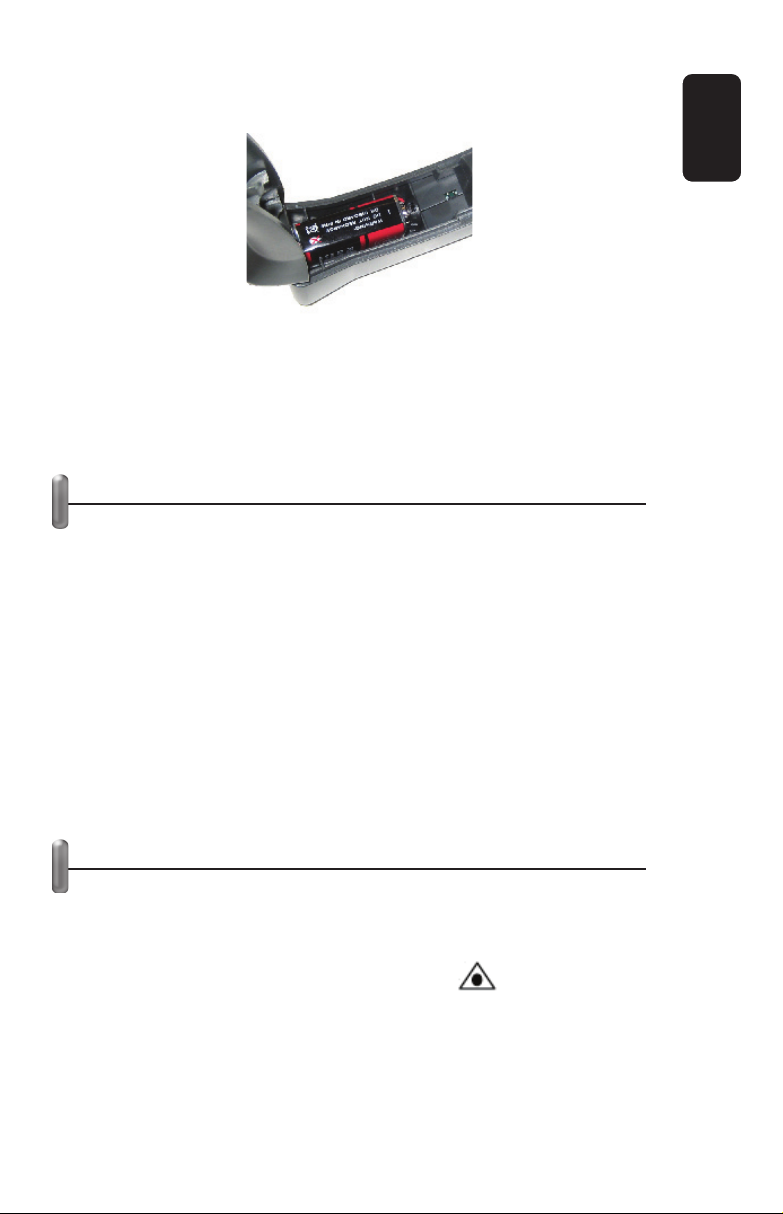
4. Compartimiento de batería
5. Pantalla de LCD
6. Láser encendido / apagado
7. Botón de temperatura
8. Luz de fondo
9. Interruptor de modo
10 Conector para tripie
•
•
•
•
•
•
•
•
•
•
ESPAÑOL
ESPAÑOL-2
A
ntes de utilizar su nuevo Termómetro infrarro
j
o
p
rofesional lea este instructivo
p
ara evitar cual
q
uier mal
f
uncionamiento. Guárdelo
p
ara futuras referencias
.
1
2
3
4
5
6
7
8
9
10

COLOCACIÓN DE BATERÍA
Este equipo utiliza una batería de 9V, asegúrese de instalarla
antes de comenzar a utilizarlo.
1.- Abra el compartimiento de baterías.
1
2
3
4
5
67
8
9
10
ESPAÑOL
ESPAÑOL-3

2.- Inserte una batería de 9V, poniendo atención a la polaridad.
3.- Cierra la tapa del compartimiento.
Cuando el símbolo de batería aparezca en la pantalla,
reemplácela por una nueva.
INSTRUCCIONES DE OPERACIÓN
Mediciones IR básicas
1.- Sostenga el termómetro por el mango y apunte hacia
delante, directamente al objeto o superficie a ser medida.
2.- Presione el interruptor de medición, la medición comenzará.
La temperatura del objeto, la palabra SCAN y la emisividad se
leerán en la pantalla de LCD.
3.- Suelte el interruptor de medición, la última lectura
permanecerá en pantalla por aproximadamente 7 segundos, la
letra H aparecerá en la pantalla. Después de este tiempo, el
termómetro se apagará automáticamente.
4. Si desea elegir una unidad de medición (°F / °C) presione el
botón de temperatura.
APUNTADOR LÁSER
Utilice el apuntador láser para saber que área se está midiendo.
1.- Mientras el equipo esté encendido, presione el botón de
láser una vez para activar esta función.
2.- Cuando el láser esté activado, el ícono aparecerá en
pantalla.
3.- Presione una vez más el botón de láser para desactivar la
función, en pantalla desaparecerá el ícono de láser.
ESPAÑOL
ESPAÑOL-4

LUZ DE FONDO
En caso de que requiera utilizar el equipo en condiciones de
luz pobres, presione el botón de Luz de Fondo, la pantalla de
LCD se encenderá. Para apagar la luz, presione una vez más el
botón de Luz de Fondo.
Se recomienda utilizar la luz de fondo sólo en determinadas
ocasiones, ya que la batería se agotará más rápido si se
mantiene encendida por periodos de tiempo largos.
INDICADOR DE SOBRE-RANGO
Si la temperatura medida excede el rango máximo o mínimo de
temperatura, el termómetro mostrará rayas en lugar de
temperatura.
BOTÓN DE MODO
El botón de modo le permite elegir entre diferentes funciones al
momento de realizar mediciones de temperatura.
Podrá elegir entre las siguientes opciones:
Promedio (AVG)
En pantalla se mostrará el valor promedio de las
mediciones realizadas
Máximo (Max)
Indicará el nivel máximo alcanzando en la última
medición
Mínimo (Min)
Indicará el nivel mínimo alcanzando en la última
medición
Max-Min
Muestra la diferencia entre el valor máximo y el valor
mínimo de las mediciones
CAMPO DE VISIÓN
El campo de visión del termómetro es de 12:1. Por ejemplo, si
el termómetro está a 12 pulgadas del objetivo, el diámetro del
objetivo debe estar al menos a 1 pulgada. Otras distancias se
muestran en el diagrama de campo de visión.
ESPAÑOL
ESPAÑOL-5

Note que las mediciones normalmente deben realizarse lo más
cercano posible al objetivo a medir. El termómetro puede
realizar mediciones de distancias moderadas, pero la medición
se puede ver afectada por fuentes externas de luz.
ESPECIFICACIONES
Entrada: 9V (1 x 9V)
Rango: -20 a 537°C
Emisividad: 0.95
Precisión de lectura: +1%
Tiempo de respuesta: 520ms
Potencia de láser: +1mW
Longitud de onda: 630-670nm
Peso : 258,6g
Dimensiones: 20x13x5,5cm
El diseño del producto y las especificaciones pueden
cambiar sin previo aviso.
E
l diseño del producto
y
las especificaciones pueden
c
ambiar sin
p
revio aviso
.
ESPAÑOL
ESPAÑOL-6
Unidad: mm Distancia (D): tamaño del spot (S)

WARRANTY
This Steren product is warranted under normal usage against defects in workmanship and materials
to the original purchaser for one year from the date of purchase.
CONDITIONS
1.- This warranty card with all the required information, invoice or purchase ticket, product box or
package, and product, must be presented when warranty service is required.
2.- If the product stills on the warranty time, the company will repair it free of charge.
3.- The repairing time will not exceed 30 natural days, from the day the claim was received.
4.- Steren sell parts, components, consumables and accesories to costumer, as well as warranty
service, at any of the addresses mentioned later.
THIS WARRANTY IS VOID IN THE NEXT CASES:
If the product has been damaged by an accident, acts of God, mishandling, leaky batteries, failure
to follow enclosed instructions, improper repair by unauthorized personnel, improper safe keeping,
among others.
a) The consumer can also claim the warranty service in the purchase establishment.
b) If you lose the warranty card, we can reissue it, if you show the invoice or purchase ticket.
RETAILER INFORMATION
Name of the retailer
Address
Product
Brand
Part number
Serial number
Date of delivery
In case your product fails or have any doubt, please contact a closest retailer. If you are in
Mexico, please give a call to our Call Center.
Call Center
Mexico City: 53 54 22 90
Province: 01 800 500 9000
Product: High Temperature Infrared Thermometer
Part number: HER-420
Brand: Steren

PÓLIZA DE GARANTÍA
Esta póliza garantiza el producto por el término de un año en todas sus partes y mano de obra,
contra cualquier defecto de fabricación y funcionamiento, a partir de la fecha de entrega.
CONDICIONES
1.- Para hacer efectiva la garantía, presente ésta póliza y el producto, en donde fue adquirido o en
Electrónica Steren S.A. de C.V.
2.- Electrónica Steren S.A de C.V. se compromete a reparar el producto en caso de estar defectuoso
sin ningún cargo al consumidor. Los gastos de transportación serán cubiertos por el proveedor.
3.- El tiempo de reparación en ningún caso será mayor a 30 días, contados a partir de la recepción
del producto en cualquiera de los sitios donde pueda hacerse efectiva la garantía.
4.- El lugar donde puede adquirir partes, componentes, consumibles y accesorios, así como hacer
válida esta garantía es en cualquiera de las direcciones mencionadas posteriormente.
ESTA PÓLIZA NO SE HARA EFECTIVA EN LOS SIGUIENTES CASOS:
1.- Cuando el producto ha sido utilizado en condiciones distintas a las normales.
2.- Cuando el producto no ha sido operado de acuerdo con el instructivo de uso.
3.- Cuando el producto ha sido alterado o reparado por personal no autorizado por Electrónica
Steren S.A. de C.V.
El consumidor podrá solicitar que se haga efectiva la garantía ante la propia casa comercial donde
adquirió el producto. Si la presente garantía se extraviara, el consumidor puede recurrir a su
proveedor para que le expida otra póliza de garantía, previa presentación de la nota de compra o
factura respectiva.
DATOS DEL DISTRIBUIDOR
Nombre del Distirbuidor
Domicilio
Producto
Marca
Modelo
Número de serie
Fecha de entrega
ELECTRONICA STEREN S.A. DE C.V.
Camarones 112, Obrero Popular, 02840, México, D.F. RFC: EST850628-K51
STEREN PRODUCTO EMPACADO S.A. DE C.V.
Biólogo MaximIno Martínez No. 3408 Int. 3 y 4, San Salvador Xochimanca, México, D.F. 02870,
RFC: SPE941215H43
ELECTRONICA STEREN DEL CENTRO, S.A. DE C.V.
Rep. del Salvador 20 A y B, Centro, 06000, México. D.F. RFC: ESC9610259N4
ELECTRONICA STEREN DE GUADALAJARA, S.A.
López Cotilla No. 51, Centro, 44100, Guadalajara, Jal. RFC: ESG810511HT6
ELECTRONICA STEREN DE MONTERREY, S.A.
Colón 130 Pte., Centro, 64000, Monterrey, N.L. RFC: ESM830202MF8
ELECTRONICA STEREN DE TIJUANA, S.A
Calle 2a, Juárez 7636, Centro, 22000, Tijuana, B.C.N. RFC: EST980909NU5
Producto: Termómetro infrarrojo profesional
Modelo: HER-420
Marca: Steren
En caso de que su producto
presente alguna falla, acuda
al centro de distribución más
cercano a su domicilio y en caso
de tener alguna duda o pregunta
por favor llame a nuestro Centro
de Atención a Clientes, en
donde con gusto le atenderemos
en todo lo relacionado con su
producto Steren.
Centro de Atención a Clientes
Ciudad de México:
53 54 22 90
Interior de la República:
01 800 500 9000
Table of contents
Languages: