Stewart MacDonald Erlewine Neck Jig User manual

21 N. Shafer St. Athens, OH 4570121 N. Shafer St. Athens, OH 45701
800-848-2273 800-848-2273
Fax: Fax:
740-593-7922740-593-7922
stewmac.comstewmac.com
page 1 of 9page 1 of 9
MM
aa
ii
n n
bb
ee
aa
mm
CC
rr
oo
ss
ss
bb
aa
rr
s s
((
3)3)
Angle supports (3)Angle supports (3)
Urethane pads for levelers and peghead jack (7)Urethane pads for levelers and peghead jack (7)
Allen wrenches (4)Allen wrenches (4)
Wood support slats with cork pads (4)Wood support slats with cork pads (4)
Body straps (2)Body straps (2)
Body levelers (6)Body levelers (6)
Dial indicators (2)Dial indicators (2)
Neck supports (3)Neck supports (3)
Peghead pullerPeghead puller
with strapwith strap
Peghead jackPeghead jack
Eyebolt hangerEyebolt hanger
How to assemble the Neck JigHow to assemble the Neck Jig
1.1.
Install an aInstall an a
ngle support in each ngle support in each
of the three of the three
crossbars.crossbars.
The T-shaped sliders fit The T-shaped sliders fit
the crossbars, and the the crossbars, and the
square nutssquare nuts
are for mounting to tare for mounting to t
he main beam. he main beam.
TwTw
o of the crossbarso of the crossbars
have etched centering scales, which should have etched centering scales, which should
face upward.face upward.
Sheet Sheet
#i-5399 #i-5399
04/201404/2014
Erlewine Neck JigErlewine Neck Jig
2.2.
Attach the crossbars to the main beam using the squaAttach the crossbars to the main beam using the squa
rere
nuts. The shortest bar provides support near the nenuts. The shortest bar provides support near the ne
ck jointck joint
and should be instaland should be instal
led first. led first.
The longest bar supports theThe longest bar supports the
tail end of the instrument and should be installed last.tail end of the instrument and should be installed last.
Square nut for main beamSquare nut for main beam
T-shaped slT-shaped sl
iderider
InstructionsInstructions

stewmac.com
page 2 of 9
3.
Install a
neck support rod on
the main beam
. These
three rods adjust vertically to support the instrument neck.
The bottom end of the rods drop down into the slot in the
main beam.
TIP:
Sand the top of the plastic cap to create a smooth, flat
surface for contacting the instrument neck.
4.
Attach the two dial
indicators to their
supports.
5.
Attach the first dial indicator t
o the main beam. The dial’s
mounting bracket is offset,
allowing the height-adju
stable
rod to move in relation to the main beam.
6.
Install the two rem
aining neck support rods and the dia
l
indicator.
7.
Attach the peghead puller and thread the strap throug
h
the eyebolt.
8.
Install the peghead jack. The threaded level
er can swing
to either side to support asymmetrical p
egheads.

stewmac.com
page 3 of 9
9.
Attach two le
velers to ea
ch beam.
We have included urethane pads to cushion the levelers.
Attach them to the swivel head levelers using super glue.
We have also included wooden slats which span the levelers,
giving gentle support to any instrument strapped into the
Jig. Self-adhesive cork pads are included, and
may be cut to
any size that suits your needs. Wrap these slats in clean paper
before using them; this provides a smooth surface to protect
instrument finishes under clamping pressure.
10.
Install the eyebolt hanger in
either end of the main beam
for storing the Neck Jig.
You
r assembled Neck Jig is
ready for use!
stewmac.com
page 4 of 9
Using the Neck Jig
The E
rlewine
Neck
Jig
is a
string
tension
simulat
or.
When
the
strings are removed, the Neck Jig holds the neck in
the same
curvature that existed under string tension.
This eliminates the problem of w
orking on frets, then find-
ing that everything has changed when you s
tring the guitar
back up to pitch. The result: fret
work without guesswork!
Quick overview
Jig
the
body
Begin with strings on the guitar, tu
ned to pitch.
It’s not necessary to loosen the truss rod
or adjust the neck
at this point. Rest the guitar body
on the adjustable-height
levelers, and hold it firmly with the body straps while the
neck remains free and untouched.
Tilt to playing position
With the g
uitar strapped in, tu
rn
the Neck Jig 90 degrees into the same position as when it's
being played.
Adjust the neck
In the pla
ying position wit
h the strings
tuned to pitch, adjust the neck for
the work you plan to do.
This usually mean
s straightening the neck.
Zero out the dials
Bring the dial
indicators into
contact
with the straightened neck, and set the dials to zero. Now,
any change in the neck will be evident in these dials, causing
them to deviate from zero.
Return to horizontal and
remove the strings
Tilt the
Jig
back into the horizontal working position and remove the
strings. The neck will backbow from the release of string
tension and the pull of the truss rod.
Simulate string tension
Use the peghea
d jack
and the
peghead puller, lifting and pulling to recreate string tension.
This forces
the neck
back into position
as you
see the
dial
indicators read zero again.
Support the neck
Now raise the neck s
upport rods, bring-
ing them into firm contact with the back of the neck. These
supports keep the ne
ck from flexing during leveling.
Consider replacing the nut:
Most refret jobs require a
new
nut. It’s easier to level the frets, or the fretboard, when the
guitar’s nut is out of the way. If you’re planning to replace
the nut, remove when you take the strings off.

stewmac.com
page 5 of 9
Jigging a guitar
, step-by-step
1.
Hold the guitar over t
he jig to determine where to position
the neck supports
and body levelers (photo, left). Move the
support rods, crossbars and
levelers roughly into position.
2.
Using the wooden support slats is optional
(see below).
Position them now so that they span
the levelers.
Warning about acoustic guitars:
Before
jigging
an acoustic, think about the guitar body’s internal
construction. The body must be suppor
ted under the strong
kerfed joint where the back meets the sides, not at the un-
supported areas of the back.
Some acoustic guitars, such as Martin
dreadnoughts, will jig
safely with the just body levelers supporting them directly
under the edge joint, but most won’t. We recommend
spanning the levelers with wooden slats for all acoustics.
The
adhesive-backed
cork
supplied
for
the
slats
is
useful
padding, but wrap the slats in clean paper
to have
a smooth,
non-reactive surface for contacting finishes under pressure.
Center the body strap over the guitar’s waist and tighten
it just enough to hold the body firmly.
!

stewmac.com
page 6 of 9
3.
Gently set the g
uitar on the
body levelers (and
paper-
wrapped slats, if you’re using them). A sandbag or padded
weight placed on the guitar body is a helpful temporary
weight to keep the guitar from moving as you position the
body on levelers and center the neck over the support rods.
Adjust the height of the levelers so that the fingerboard is
approximately parallel with the main beam. The
lower you
can set the le
velers the better—
for solid, stable s
upport.
4.
Arrange the neck support rods and dials a
long the neck,
centering the neck over the support rods. Position one
support rod near the cur
ve of the heel and another approxi-
mately under the first fret. Once they’re in
position, tighten
the cross bars, levelers, and neck supports.
5.
Now you’re ready to strap down the guitar body. This will
pull the guitar downward, so first lower the neck support
rods out of the way so they won’t mar the neck.
Place the body strap across the guitar’s waist, pass it under
the beam, and thread it through the slotted hub of the
ratchet. The ratchet opens toward you, with the strap con-
nection at the top. The ratchet can be p
ositioned above or
below the jig. Close the ratchet and snug the strap loosely.
Protect the guitar’s finish with
pieces of felt or paper where
the strap contacts the corners
of the instrument.
Add the second strap over the
body’s lower bout if needed.

stewmac.com
page 7 of 9
7.
Set each dial to zero by turning the indicat
or’s outer ring.
Tu
rn the dial to zero, then turn it past zero by two ful
l rota-
tions before arriving at zero again. These ex
tra rotations give
the dial room to move and adjust on either side of zero as
you adjust the neck. The thumbscrew locks
the outer ring.
8.
Return the Neck Jig t
o the horizontal
working position
and remove the guitar’s strings. Adjust the peghead jack
until it fits loosely between the beam and the end of the
peghead. Install the peghead pull-down strap allowing a
small amount of slack.
Caution:
Before tightening the body straps, lower
the neck support rods. Tighten the hold-down
strap gradually until the guitar body is snug
on the levelers.
Sometimes a guitar will require two straps in order to se
cure
it on the levelers.
6.
With the guitar tuned t
o pitch, move t
he Neck Jig onto
its side
(the playing position)
. Adjust the neck
for fret level-
ing or dressing; the truss rod should create backbow when
tightened and create relief when loosened. You want the
neck to be straight for fret work.
!

stewmac.com
page 8 of 9
11.
When the neck is re-
zeroed to your
satisfaction, slide
the neck supports up against the back of the neck. These
rods keep the neck from flexing while you level the frets
or
the fretboard.
12.
Here a fret leveler is used t
o level the t
ops of the frets.
Whether you're doing a complete refret, or a
fret-dress job,
once the frets have been
leveled you can remove it from the
Neck Jig to finish the details at your workbench.
The guitar can remain
in the Neck Jig throug
hout an entire
fret job if you’re pressing in frets, but
don’t hammer on the
frets over t
he support rods and
dial indicators
—
the hammer
blows can cause support rods to dent the
back of the neck.
Even when you hammer over the body extension, put cush-
ioning material between the neck and the support rods to
prevent damage.
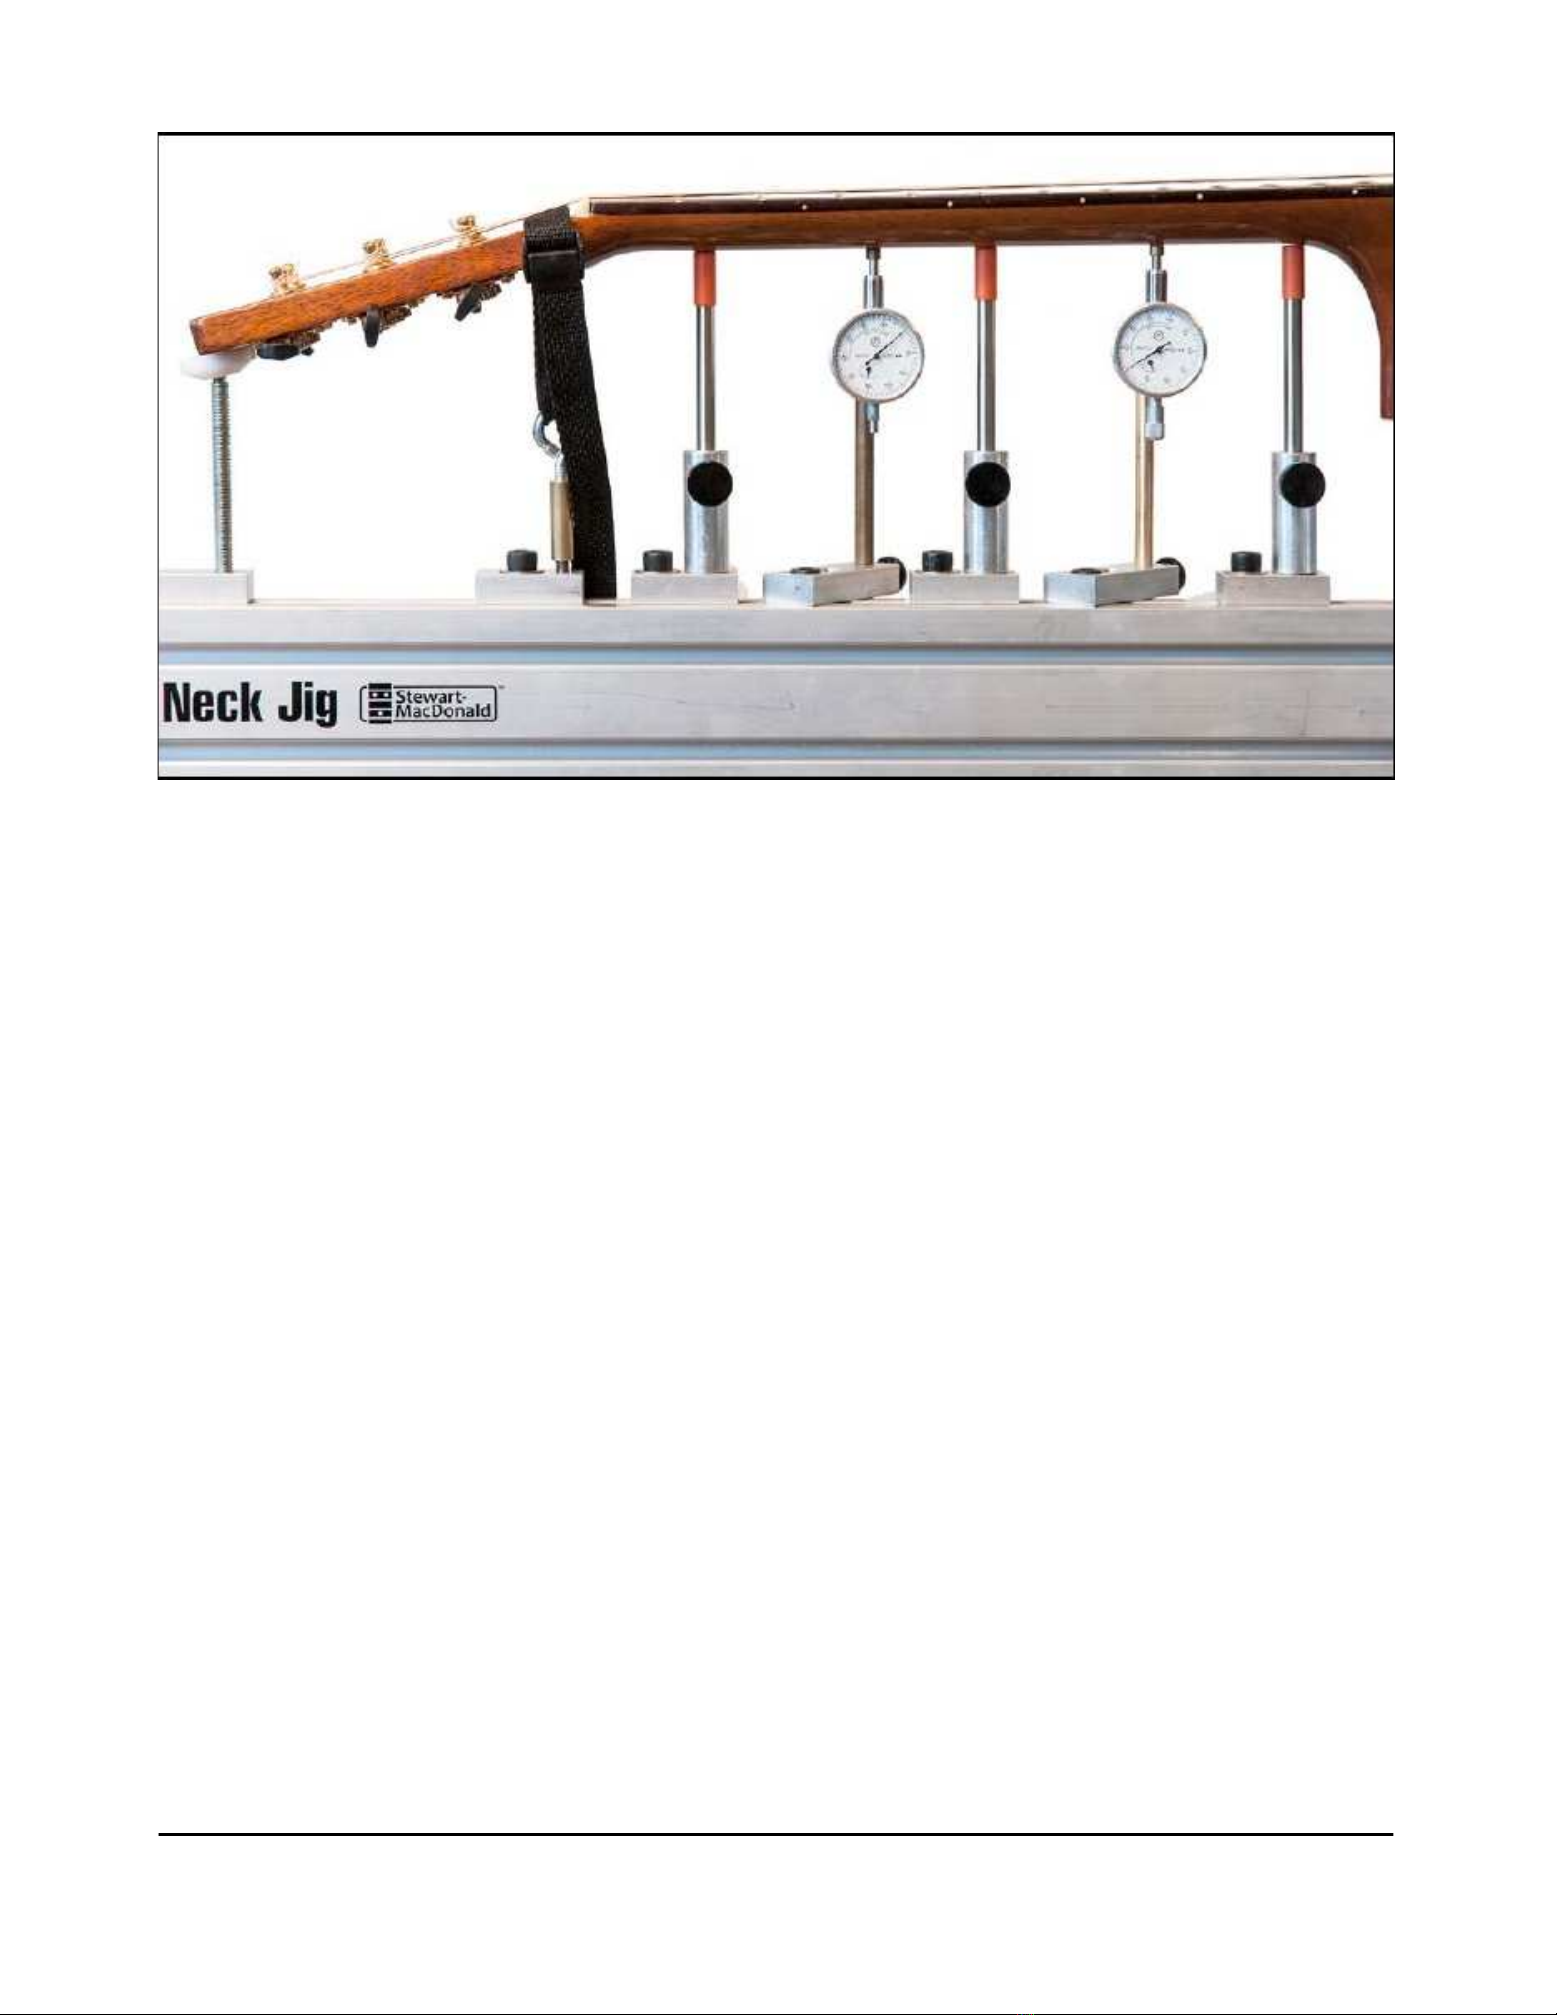
9.
The neck will backbow with the string
s removed, and the
dial settings will no longer read zero. In our case, the dial
nearest the nut has compressed .031" (left photo) and the
dial nearest the body has compressed .008" (right photo).
These are typical readings.
10.
Slowly raise the peghead jack u
ntil the dials read zero
again. If the rear dial is
off, tighten down the peghead strap
until zeroed. Go back and
forth between these
adjustmen
ts,
until both dials remain as close to zero as possible.
Depending on the neck, you may not always get perfect
zeros. If the peghead jack and pull-down strap don’t zero the
dials to your satisfaction, use your straightedge as a guide
while forcing the neck
into the same configuration you saw
when in the playing position.

stewmac.com
page 9 of 9
Using the Neck Jig wit
hout a ShopStand
Our Shop Stand/Angle Vise combination rotates the Neck
Jig quickly between the playing and working positions. We
recommend it as the best support for the Neck J
ig. But the
Neck Jig can also be used
on any benchtop: for supporting
the Jig in the working position, turn two of the levelers
downward to become stabilizing
feet (above).
To
rot
ate
the
Ne
ck
Jig
int
o
the
pla
yin
g
pos
iti
on
on
a
benchtop, place two wooden blocks under
the main beam.
Use two bar clamps to hold the Jig and block
s to the bench.
The guitar body is suspended off t
he end of the bench.
Table of contents
Popular Accessories For Musical Instruments manuals by other brands

EMG
EMG 40-TW Installation information

Vigilant
Vigilant Guardian 10 operating instructions

Awesome Guitars
Awesome Guitars Pickup Switch Upgrade installation instructions

Trance Audio
Trance Audio THE AMULET M owner's manual

FuzzDog
FuzzDog MUFF GUN quick start guide

Harley Benton
Harley Benton TrueTone SH-30 Pro Active quick start guide


