STI solar 5650 User manual

© 2006 STI Group, Inc.
For further information, including parts, warranty repair
or general inquiries, please contact the STI Group, Inc. at:
Intellectual Property
This product is covered by one or more international and US patents pending.
All logos, designs and colors are copyrights and trademarks of STI Group, Inc.
All rights reserved 2006
Please register your product online at our website:
www.stigroupinc.com/registration
USA Corporate Office
Tel: 847.918.8558
Address: 1203 Loyola Drive •Libertyville, IL 60048
Email: [email protected]
Website: www.stigroupinc.com
STI Group Inc. Locations:
CHICAGO LOS ANGELES ATLANTA SHENZHEN, CHINA
Model 5650
Advanced Optics
10-LED Solar Spotlight Set
Solar-powered illumination • Operates during nightfall
5650 manual 1/19/06 11:35 AM Page 2

ADVANCED OPTICS 10-LED SOLAR SPOTLIGHT SET
Instruction Manual Model 5650
CONTENTS
1. Introduction
2. Security instructions
3. Overview
4. Components
5. Assembling & using your product
6. Cleaning and maintenance
7. Troubleshooting
8. Technical data
9. Spare parts
10. Two year limited warranty
These instructions relate ONLY to this Solar Spotlight Set
and contain important information for using the product
for the first time. Please keep these instructions for later
reference. They should always accompany the product in
the event of transfer to a new user.
1. INTRODUCTION
Thank you for purchasing this Solar Spotlight Set.
You have purchased a product that complies with the latest
and most up-to-date solar technology available.
This product complies with the European and National Standards.
The relevant certificates of conformity are held by STI Group.
To preserve these standards and in order to maintain safety you
should adhere to the instructions for use detailed in this manual.
2. SECURITY INSTRUCTIONS
In the event of any problems arising or damage occurring as a
result of misuse the manufacturers warranty will be deemed
cancelled. The manufacturer is not responsible for any claims or
damages arising from the misuse of this product.
For safety reasons and in order to maintain standards (CE) you
are prohibited from altering or changing any component in this
Solar Spotlight Set.
Please follow the instructions very carefully.
For commercial applications due care and attention must be paid
to the Health and Safety Standards in your jurisdiction.
5650 manual 1/19/06 11:35 AM Page 4

ADVANCED OPTICS 10-LED SOLAR SPOTLIGHT SET
Instruction Manual Model 5650
ADVANCED OPTICS 10-LED SOLAR SPOTLIGHT SET
Instruction Manual Model 5650
5. ASSEMBLING AND
USING YOUR PRODUCT
Unpack all components carefully.
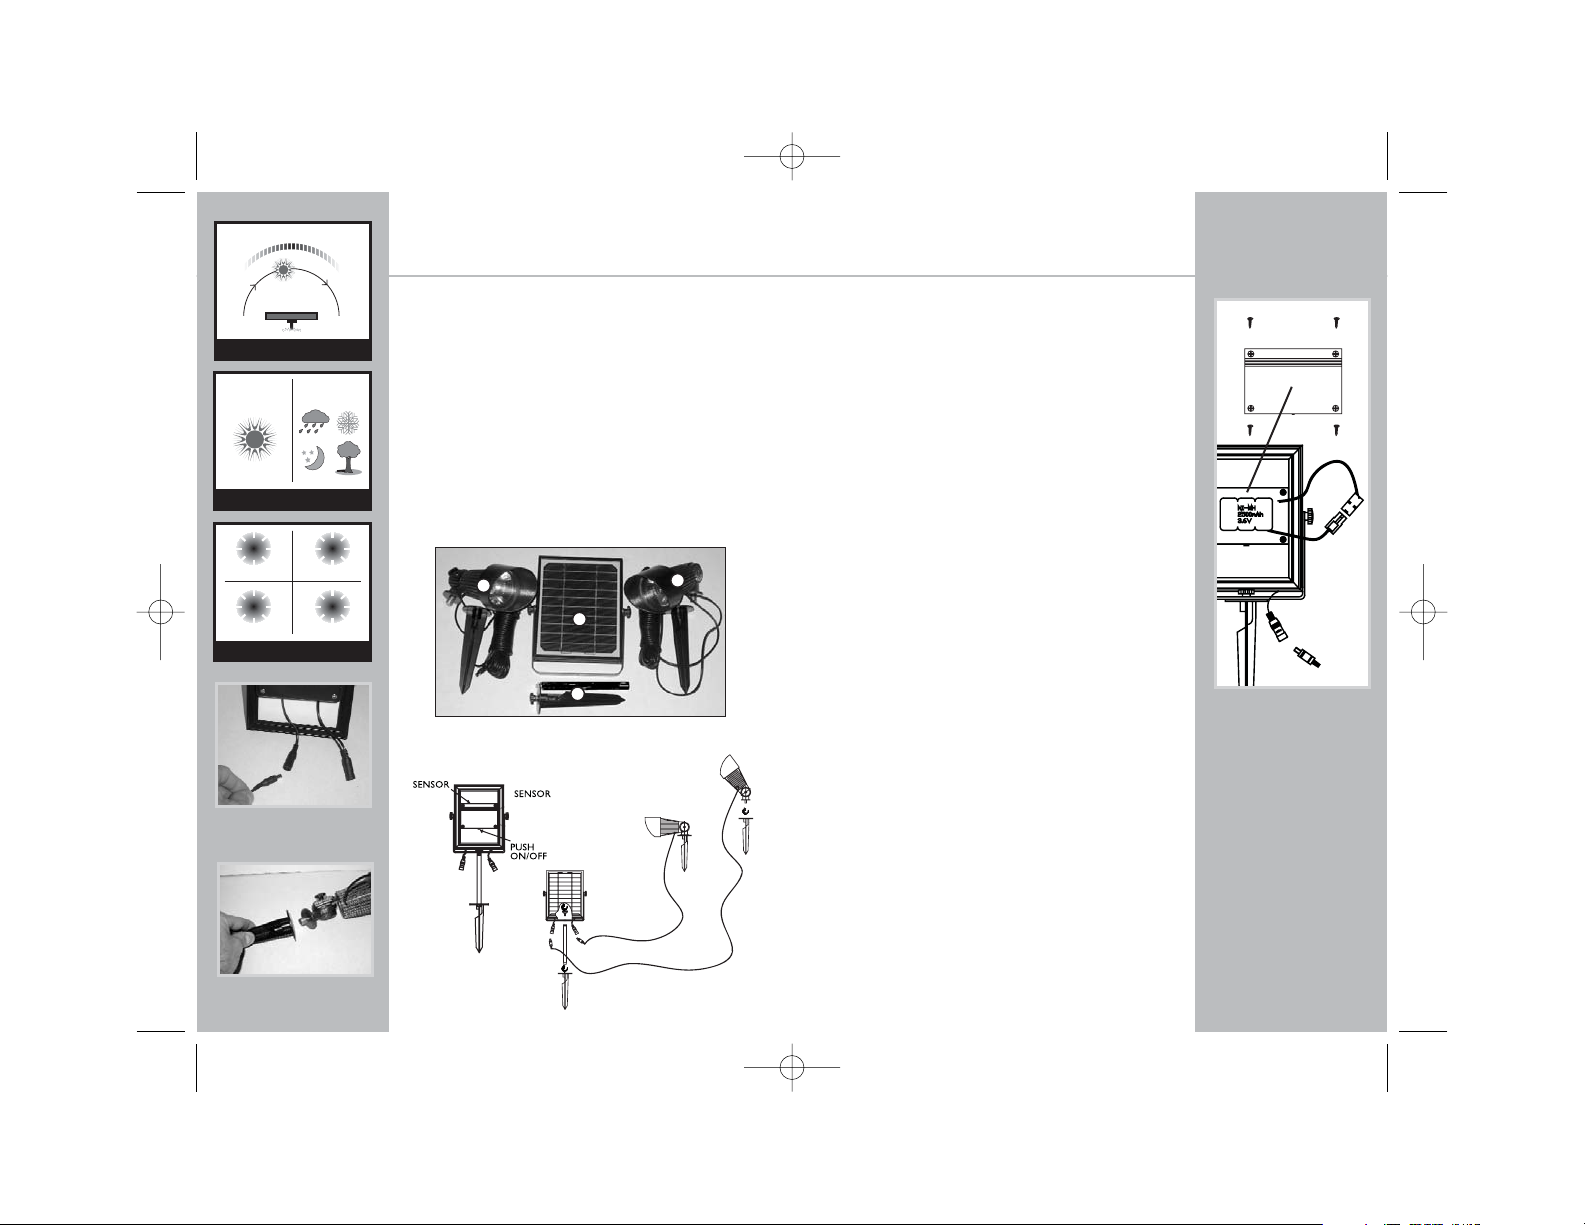
Decide on a suitable location for the solar power station and stake
into the ground. Insert the two spotlights in the desired location
using the ground spikes. Connect the ends of the cables from the
spotlights into the solar power station.
Note: Each cable is 32 feet long so you should make sure to
position the power station in the center of the spotlights.
Depress the power switch on the underside of the battery pack
on the solar power station to activate. When the switch is “ON”
the solar panel will charge the battery and the spotlights will
automatically switch on and off depending on light conditions.
When the switch is in the “OFF” position, the solar panel will
charge the battery pack but the spotlights will remain off.
PANEL PERFORMANCE
MIN. MIN.
MAX.
CONDITION FUNCTIONALITY
SEASONAL FUNCTIONALITY
OPTIMUM LOW
LOW MEDIUM
GOOD MEDIUM
WINTER SPRING
AUTUMNSUMMER
1
3
2
3. OVERVIEW
The Solar Garden Spotlight Set has been designed for outdoor use
only. The solar panel in the solar power station converts sunlight
into electricity, which is then stored in the integral rechargeable Ni-Mh
battery pack. The lights switch on automatically when it gets dark
and turn off automatically at daylight or when the battery pack is
fully discharged. The source of light comes from specialized high
performance Nichia Japanese LED’s - 5 Super bright white LEDs are
incorporated into each spotlight which provides a high level of
brightness with very low power consumption. LEDs are not like light
bulbs and are good for over 100,000 hours – essentially a lifetime.
In order for the light to operate, the solar panel on the solar power
station needs to be placed in direct sunlight. The performance of
the spotlights depends on the charging of the battery and this is
affected by the season of the year.
6. CLEANING AND MAINTENANCE
The solar module should only be cleaned with soft tissue and
proprietary glass cleaning solution.
Removing/Replacing the battery pack:
Use only original STI power packs for optimal performance.
Unplug both spotlights from the solar power station.
Turn the solar power station solar panel side down on a soft surface.
Unscrew the (4) crosshead screws at the four corners of the
battery pack. Remove battery pack cover. Unscrew the (2) small
crosshead screws holding the battery strap in place. Remove the
battery pack and disconnect the large white connector.
Reconnect a new battery pack to the white connector and replace.
Re-install the battery strap and secure with the (2) small screws.
Re-install the battery pack cover and secure with the (4)
crosshead screws.
Please note:
Used batteries must be disposed of carefully with regard to the
environment and should NOT be put into the family waste.
3
Connect each light to the
connector plus on the
solar power station
Includes 32 ft. of extension
cable with each light
Remove plate from the back
side of the solar power unit
to change the battery pack.
Connect each light to
the provided stakes.
1. Solar
Power
Station
2. Extension rod and
ground stake for
power station
3. 2 x spotlight units
with ground spikes
4. COMPONENTS
Extension pole
5650 manual 1/19/06 11:35 AM Page 6

ADVANCED OPTICS 10-LED SOLAR SPOTLIGHT SET
Instruction Manual Model 5650
7. TROUBLESHOOTING
Light does not switch on in darkness.
Check whether the switch is on “I” (on position).
Another light source (eg. streetlight) simulates daylight
and prevents the light from switching on automatically.
Position the module in a darker place.
Light does not switch on at all or only for a short time even
though there has been a full day of sunshine. In most cases
the battery pack is flat and needs to be replaced. To be sure, set
the switch to the “OFF” position for two days and charge the
battery pack fully. After two days try to operate the unit. If the
problem persists, you need to replace the battery pack.
8. TECHNICAL DATA
Operation voltage: 3.6 V
Solar module: 5v/600mA
Light source: 5x white Nicha LED (ea. light)
Battery pack: 3x 1.2v 2500mAh Ni-Mh
Battery operation capacity: 17 hr.
9. SPARE PARTS
Solar panel with battery pack: Item No. 5650-01
Spotlight: Item No. 5650-02
Battery pack: Item No. BP5650
10. 2 YEAR LIMITED WARRANTY
Please register your product within 7 days at:
www.stigroupinc.com/registration
If within 24 months from the date of purchase this product fails
due to a defect in material or workmanship. STI Group will
replace or repair it free of charge. You will need to provide proof
of purchase and you may be required to send in the solar power
station to the STI Group repair center for warranty.
The warranty does not apply to:
Damage caused by accidents, abuse, poor handling, frost or
normal wear and tear. Products which have been subject to
unauthorized repair or modification. Batteries are a normal wear
item and need to be replaced periodically. For further information
please contact your nearest service centre detailed on the last
page of this instruction manual.
5650 manual 1/19/06 11:35 AM Page 8
Table of contents
Popular Spotlight manuals by other brands

LITIAN
LITIAN LT-SL-10-20W installation instructions

Craftsman
Craftsman CMXLSB10 user manual

Harbor Freight Tools
Harbor Freight Tools 96141 Assembly and operation instructions

YeeSite
YeeSite 36LEDs user manual

Portfolio
Portfolio 17837-001 manual

Cooper
Cooper Invue ClearPath Bollard installation instructions