STIEBEL ELTRON S-Power SP-20 User manual

η
Innovation prize 2008
for the S-Power vacuum tubes.
From glass factory to finished
high performance vacuum tubes,
HighTech "Made in Germany".
Solar Keymark Installation instructions Heat Pipe
PERFORMANCE SERIES
S-Power
Heat Pipe Collectors Simply the Best

Simply the Best
Prior to installation, please check for updates to this document at
www.stiebel-eltron-usa.com/install.html
S-Power Performance Series
Instruction Manual
Rev. April 2012

03
SAFETY INSTRUCTIONS
WARNING
!
To reduce the risk of injury, the user must read and understand the operation manual before installing or
using this product.
!This is the safety alert symbol. It is used to alert you to potential personal injury
hazards. Obey all safety messages that follow this symbol to avoid possible injury or
death.
DANGER
!DANGER indicates a hazardous situation which, if not avoided, will result in death
or serious injury.
WARNING
!WARNING indicates a hazardous situation which, if not avoided, could result in death
or serious injury.
CAUTION
!CAUTION, used with the safety alert symbol, indicates a hazardous situation which,
if not avoided, could result in minor or moderate injury.
NOTICE
NOTICE is used to address practices not related to personal injury.
This symbol is used when there is a risk of of burning from touching hot surfaces or
contact with hot liquid.
This symbol is used when there is a risk of injury from falling or stumbling.
This symbol is used when there is a risk of injury from falling objects.
This symbol is used when there is a risk of injury due to implosion of object if too
much pressure, twisting or force impact is applied.
This symbol is used when there is a risk of electric shock due to live voltage
This symbol is used where there is a risk of injury due to a sharp or protruding object.
iThis symbol is used when there is additional information, advice, or tips available for
an object or purpose.

04
-
-
GENERAL SAFETY RULES
WORK AREA (Especially when working on the roof)
» Keep the work area clean and well organized.
» Keep bystanders, children and visitors away from the work area while installing this product. Distractions can
cause one to lose control and personal injury can occur.
» Be aware of, and avoid, any power lines that may be in the vicinity. Avoid using a metal ladder near power lines
or exposed energized electrical equipment.
» Always wear slip resistant (e.g., rubber-soled) shoes that have sufficient traction on the soles.
» When working on a ladder, try to achieve three points of contact whenever possible.
» If you need to get tools or supplies onto the rooftop, consider how you will get them up and down safely. Always
work with at least one assistant.
» Ensure that anything placed on the roof cannot fall off and hurt someone. If there is no way to completely and
safely secure material that is resting on the roof, then make sure that the ground area is cleared of all people.
» Get down off of the roof or ladder before you engage in activities that will divert your attention. Use your com
mon sense. Do not talk on your cell phone, eat, drink, or chat unnecessarily while you are on the rooftop or ladder.
» If it is windy or rainy, delay the project. Working at height with wet ladder steps and on slick surfaces invites un
necessary danger.
» Never work on the roof when lightning threatens.
» Even after the rain stops, avoid working on roofing projects. The ground may be muddy or saturated, and wet
ground conditions can lead to the ladder slipping or sinking.
» If you have balance problems or health risks, such as seizures or fainting spells, that increase the dangers of
working at height, contact a friend or a professional to complete this part of your project.
Personal Safety
» ALWAYS wear eye protection to avoid injury to the eyes while using hand or power tools.
» Wear heat resistant and puncture resistant gloves while handling evacuated tubes or working around
potentially hot pipes or fittings.
» Do not wear loose fitting clothing or jewelry that may get caught in power tools.
» Installers working below a roof installation should wear an impact resistant hard hat to avoid injury from falling
objects.
» On a steeply pitched roof, be sure to wear a safety harness that is securely tied off to a fall arresting device.
ALTERATIONS AND CHANGES APART FROM THOSE DESCRIBED IN
THE INSTRUCTION MANUAL ARE NOT ALLOWED.

Installation Safety
» Always consult local and state building codes and other applicable standards and regulations before begin-
ning a solar collector installation.
» Adhere to all applicable codes and standards during installation. Special consideration must be given to build-
ing code requirements for the penetration of structural members and fire rated assemblies.
» Ensure that the mounting surface to which the collector(s) will be attached are structurally sound and capable
of supporting the load of the collector(s).
» Read and follow all labels/markings on the ladder. Always inspect the ladder prior
to using it. If the ladder is damaged, it must be removed from service and tagged
until repaired or discarded.
» Do not use the top step/rung of a ladder as a step/rung unless it was designed for
that purpose
» Only use ladders and appropriate accessories (ladder levelers, jacks or hooks) for
their designed purposes.
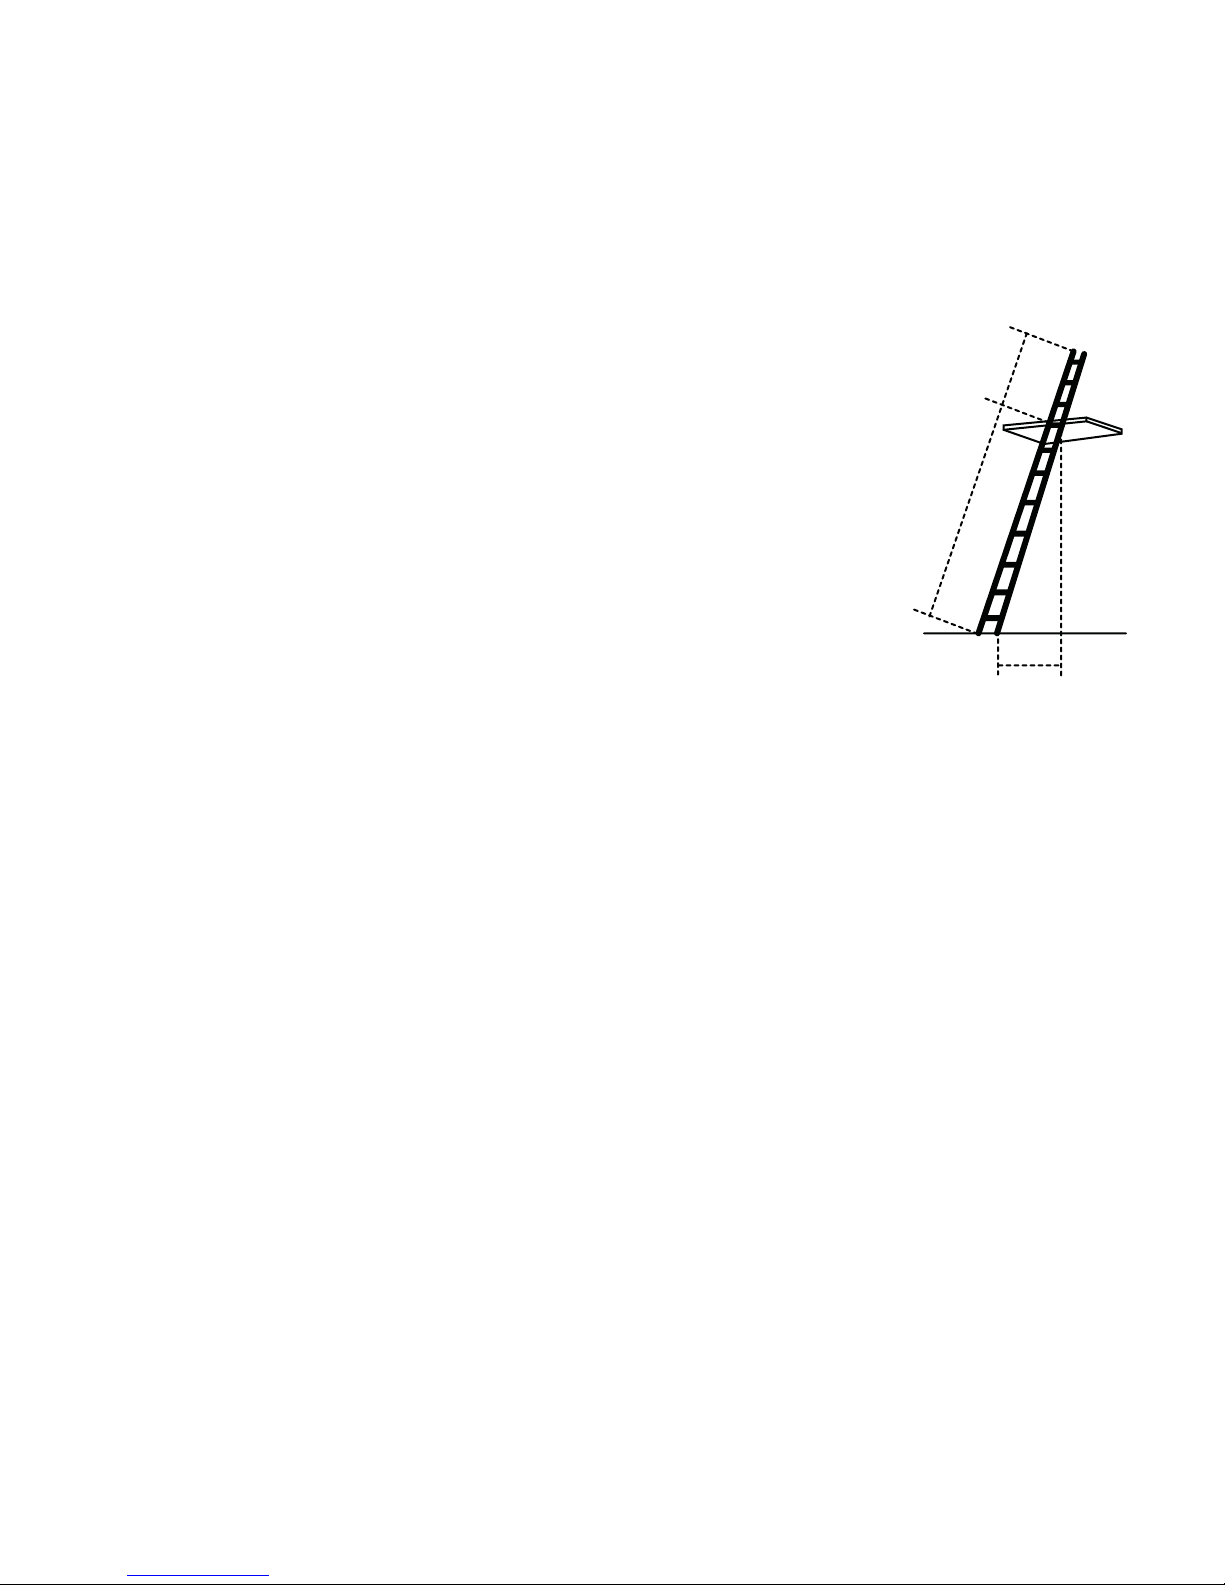
» An extension or straight ladder used to access an elevated surface must extend at
least 3 feet above the point of support (see diagram). Do not stand on the three top
rungs of a straight, single or extension ladder.
» The proper angle for setting up a ladder is to place its base a quarter of the work-
ing length of the ladder from the wall or other vertical surface (see diagram).
» Be sure that all locks on an extension ladder are properly engaged.
» Do not exceed the maximum load rating of a ladder. Be aware of the ladder’s load
rating and of the weight it is supporting, including the weight of any tools or equipment.
» A ladder placed in any location where it can be displaced by other work activities must be secured to prevent
displacement or a barricade must be erected to keep traffic away from the ladder.
3-ft. min.
x
Distance to top support
x/4
PRODUCT & SAFETY RISKS
This product has been manufactured to provide the highest level of performance and reliability. Nevertheless,
there can still be risks associated with installing, using and maintaining this product.
Dangers can arise from
» Components of the collector become very hot during operation (will burn when touched)
» Other risks may originate from broken glass (cut injury)
» Spurting hot fluid and flowing steam (scalding injury)
» Falling when working on the roof
The Stiebel Eltron S-Power Performance Series HP evacuated-tube solar collector must be installed and put into
operation in accordance with this instruction manual. It must be used exclusively for the described purpose. If used
other than the described purpose (abusive use), dangers for persons can arise and the collector can be damaged.
Misuse of this product can be, for example, filling the collector with other substances than an appropriate heat
transfer medium or the installation on surfaces that are not sufficiently stable.
ALTERATIONS AND CHANGES APART FROM THOSE DESCRIBED IN
THE INSTRUCTION MANUAL ARE NOT ALLOWED.
05

06
The Stiebel Eltron S-Power Performance Series HP evacuated-tube solar collector must be mounted and operated
according to theapproved safety rules and technical regulations, of each locale. During assembly, workers must
adhere to the respective national regulations for employee protection (e.g. OSHA) and accident prevention. This is
especially important when working on the roof.
Lightning Protection
NOTICE
All electrical equipment with a metal housing must be grounded. This also applies to solar-thermal
systems. The pump set, pipes, reservoirs and collectors must be provided with a ground connec-
tion, i.e., be connected to earth just like any standard water pipe. Grounding requires a secure con-
ductive contact between the ground point and the collector. The grounding clips can be installed to
the collector frame. The solar circuit pipeline system has to be connected to the building’s ground
over short runs for both the feed and the return lines.
Handling Glass Tubes
WARNING
!
The glass tubes have a vacuum. Damage due to external pressure, loading or twisting, application
of concentrated loads or force impact may cause implosion. Flying glass fragments may cause in-
juries. Only a certified heating contractor or North American Board of Certified Energy Practioners
(NABCEP) certified solar thermal installer should carry out dismantling and disposal. All materials
used are recyclable.
Maintenance
The maintenance of solar systems must be done by licensed heating contractors and relates mainly to the heat
transfer medium. The collectors undergo a visual inspection only. They have to be replaced if damaged or if the
tubes experience a loss of vacuum.
Single tubes may be replaced on-site.
Due to the nano coating on the vacuum tubes, the collector is self-cleaning. If, however, the tubes become dirty,
the collector may be cleaned with water.
DO NOT USE INDUSTRIAL CLEANERS OR ABRASIVE CLEANERS!

Risk of Burning
WARNING
!
»The metal parts of the collector can become very hot when exposed to the sun even on cloudy days and
can cause burns when touched! Do not leave a collector unprotected to the sunlight after unpacking it. Install
the roof assembly on a cloudy day and preferably not at noontime or shade the collector with a light blocking
material.
»TAKE THE COLLECTOR OUT OF THE BOX ONLY AFTER ALL FASTENING ELEMENTS ARE
ALREADY INSTALLED ON THE ROOF. If you install multiple panels, remove only one set of collector tubes
from the box and assemble one complete collector before you unpack the next.
»After a collector is completely installed and exposed to sunlight the risk of burns from hot metal parts is in-
creased. Use caution when working around the collector and use heat protective gloves when handling metal
pipes and connectors associated with the collector.
Personal Risk of Falling
WARNING
!
When working on the roof or climbing up or down ladders or scaffolding there is danger of falling. Please con-
sider the accident prevention regulations (e.g. OSHA) and use appropriate safeguards.
Personal Risk of Falling Objects
WARNING
!
During installations on the roof, there is a danger that tools, assembly equipment or the collector can fall from
the roof and injure persons standing below. Barricade off the danger area on the ground before the start of as-
sembly work and warn persons who are nearby to stay out of the work zone.
Make sure that children and bystanders are kept away.
Unauthorized persons are not allowed to climb onto the roof.
WARNING
!
If the collector is installed on a roof that is not suitable for the installation, the collector can become loosened.
This could lead to damage to the collector and the roof or, if the collector falls from the roof, injuries to some-
one. Therefore, the collector must only be installed on roofs where it can be properly attached.
Handling Glass Tubes
WARNING
!
The glass tubes have a vacuum. Damage due to external pressure, loading or twisting, application of concen-
trated loads or force impact may cause implosion. Flying glass fragments can cause injuries.
SAFETY INSTRUCTIONS &
REQUIREMENTS FOR ROOFTOP ASSEMBLY
07

»
»
»
»
»
»
»
Stiebel Eltron, Inc. 17 West Street West Hatfield, MA 01088
08
AT LEAST TWO PEOPLE ARE REQUIRED FOR THE ROOF INSTALLATION.
The planning of the installation and the installation on the roof as well as the setup of the Stiebel Eltron S-Power high performance
heat pipe collector may only be done by persons who are familiar with and can carry out a proper installation due to their qualifica-
tion and/or certification.
WHO IS ALLOWED TO INSTALL
SOLAR COLLECTORS?
The following aspects should be considered when planning a system:
What energy will be consumed in what period of time?
Will demand/consumption be continuous (weekends, vacation periods)?
How much energy will need to be stored so that there is enough usable energy when solar radiation is not available?
Will there be any alternative uses such as pool heating, solar cooling, geothermal processes, radiant heating or similar?
What is the current feed/return temperature of the heating system?
What is the planned orientation of the collector panels, and assembly options?
Determine the length, diameter and compositions of pipe(s).
SYSTEM PLANNING
Simply the Best

General information:
The tube sets should be transported horizontally. Only up to max. 7 cartons may be stacked on
top of one and other. Our installation sets are valid for all snow load zones (except zone 3).
In storm areas, special structural analyses must be carried out.
Work safety information:
Wear a helmet, hearing protection and protective glasses! Attach fall protection equipment!
Handle glass tubes only while wearing gloves (are included).
13
13 27 30
Installation instructions for:
Required tools:
Possible installation types:
Facade, Pitch roof, Folded seam roof, corrugated metal roof
Caution!
The collectors are to be installed so that the distributor tube is in the top position.
Please make sure that the tubes are oriented towards the sun.
The min. and max. installation angle should be from 20° to 90°.
i
Tile roof
Facade
Connection
1
220 °
90 °
+
09
Installation instructions • SP-20 • SP-30
Stiebel Eltron, Inc. 17 West Street West Hatfield, MA 01088
Simply the Best
Simply the Best
S-Power
SP-20
S-Power
SP-20 Simply the Best
S-Power
SP-30
S-Power
SP-30

Wall/facade, flat roof and corrugated metal installation
(roof and wall)
Set the cap profile in the façade or elevated track.
For wall/façade installation, the cap profile is to be vertically mounted.
i
» Corrugated metal installation (roof + wall):
Screw the cap profile onto the trapezoid in using self-cutting drill screws (sealing: Silicone among
others). Collector installation same as all other types of fastenings.
1
2
3a
3
Install on wall or façade
Install on corrugated metal
Mark , drill, insert wall plug , install cap profile
with key screw NW 13 nm , mount with suitable
screws for corrugated metal and flat roof installation,
Slide reflectors-if available-onto the cap profile and
secure with nuts M8.
12
3
3a
10
Cap profile
25.25 inches — 37.75 inches
38.75 inches — 55.5 inches
76.75 inches
Installation instructions • SP-20 • SP-30
Stiebel Eltron, Inc. 17 West Street West Hatfield, MA 01088
S-Power SP-20S-Power SP-20
S-Power SP-30S-Power SP-30

Header
» Tiled roof installation:
Installation measurements for the
heatpipe collector
76.75 inches
Footer
25.25 inches — 37.75 inches
38.75 inches — 55.5 inches
25.25 inches — 37.75 inches
38.75 inches — 55.5 inches
11
Installation instructions • SP-20 • SP-30
Stiebel Eltron, Inc. 17 West Street West Hatfield, MA 01088
Simply the Best
S-Power SP-20S-Power SP-20
S-Power SP-30S-Power SP-30
S-Power SP-20S-Power SP-20
S-Power SP-30S-Power SP-30

9
8
Install the supporting bracket:
Attach with Locking nut - screw nut M8. +
When installing multiple collectors in series, make sure that the o-ring connector is completely
inserted into both collectors. Collector casing and drum must be mounted straight and
flush with each other.
4
5
Insert the Stiebel Eltron S-Power high performance heatpipe tube into the rubber rings, which have to be
lubricated beforehand with soap.
6
Place the safety rubber ring on top of the glass metal connection. Rotate constantly the s-power high
performance heat-pipe tube while inserting into the hole in the collector casing. Insert the tube so the
safety rubber of the heatpipe tube touches the end of the collector casing and then retrieve the tube out
of the collector casing for 5mm. Stiebel Eltron S-Power high performance heat pipe is now sealed.
7
9
8
12
67
45
Installation instructions • SP-20 • SP-30
Stiebel Eltron, Inc. 17 West Street West Hatfield, MA 01088

1
10 11
1413
12
Footer:
Mount the end cap and connection tube
+:
Spray the screw-in connection and cogging of the supporting bracket with e.g. WD 40.
10 11
Screw upper casing to the supporting bracket.
Collector casing:
15
15 »Recommendation:
The casing may be mounted to the
supporting bracket even before inserting
the tubes, as the tube is lockable
by itself.
13
Installation instructions • SP-20 • SP-30
Stiebel Eltron, Inc. 17 West Street West Hatfield, MA 01088
Simply the Best

1
For all types of installations:
Mount the end cap. +
16 17
20
19
18
Screw on the connections,
pull tight with a spanner and
push the insulation over the
corrugated hose.
16 17
iCaution! The euro-conus connector or the sensor T-piece should always be mounted ont he
collector discharge side. For laterally-inverted connections, the adapter (Art.-No. 791069) should
be used. + +
18 19 20
21 22 23
On the left hand side: lubricate the o-ring of the collector connection with silicone grease, connect the
corrugated hose, push the side cap over the corrugated hose and mount. Following this pull the insula-
tion over the hose. + +
21 22 23
14
Installation instructions • SP-20 • SP-30
Stiebel Eltron, Inc. 17 West Street West Hatfield, MA 01088

WARNING! HANDLE THIS PRODUCT WITH CARE.
DO NOT ATTEMPT TO INSTALL THIS PRODUCT IF YOU HAVE NOT READ THE INSTALLATION MANUAL AND ARE NOT EXPERIENCED WITH SO-
LAR THERMAL COLLECTORS MADE BY STIEBEL ELTRON.
YOU SHOULD ALWAYS HIRE AN EXPERIENCED NABCEP CERTIFIED SOLAR THERMAL INSTALLATION CONTRACTOR. THE INSTALLATION
CONTRACTOR IS RESPONSIBLE FOR THE MECHANICAL STABILITY AND STRENGTH OF ALL INSTALLED INTERFACE CONNECTIONS TO THE
BUILDING/BUILDING’S ENVELOPE. IN ADDITION TO COMPLYING WITH ENGINEERING STANDARDS, LOCAL REGULATIONS AND BUILDING
CODES, AND INDUSTRY STANDARDS, PLEASE HAVE YOUR NABCEP CERTIFIED SOLAR THERMAL INSTALLATION CONTRACTOR CAREFULLY
READ THE SAFETY INSTRUCTIONS BEGINNING ON PAGE 4 OF THIS DOCUMENT.
FAILURE TO INSTALL THIS PRODUCT IN ACCORDANCE WITH THESE INSTALLATION INSTRUCTIONS AND/OR , FAILURE TO COMPLY WITH
ENGINEERING STANDARDS, LOCAL BUILDING CODES, AND INDUSTRY STANDARDS COULD LEAD TO DEATH, SERIOUS BODILY INJURY
OR PROPERTY DAMAGE. ONCE INSTALLED AND OPERATING, DO NOT TOUCH ANY METAL COMPONENTS OF THIS PRODUCT OR ANY
EXPOSED METAL COMPONENTS OF THE INSTALLATION. ANY EXPOSED METAL COMPONENT IN THE ACTIVE COLLECTOR LOOP CAN
BECOME VERY HOT WHICH CAN LEAD TO SERIOUS BURNS! PLEASE READ ALL WARNINGS BEGINNING ON PAGE 4 OF THIS DOCUMENT.
DISCLAIMER
WARRANTY LIMITATION AND EXCLUSION.
SELLER WILL HAVE NO FURTHER WARRANTY OBLIGATION UNDER THIS AGREEMENT IF THE EQUIPMENT IS SUBJECTED TO ABUSE, MISUSE,
IMPROPER INSTALLATION, NEGLIGENCE OR ACCIDENT, OR IF YOU FAIL TO FOLLOW THE INSTRUCTIONS SET FORTH IN THE MANUAL WHICH
ACCOMPANIES THIS PRODUCT, OR IF YOU FAIL TO PERFORM ANY OF THE DUTIES SET FORTH ABOVE AND BELOW.
DISCLAIMER OF UNSTATED WARRANTIES.
THE WARRANTY PRINTED ABOVE IS THE ONLY WARRANTY APPLICABLE TO THIS PURCHASE. ALL OTHER WARRANTIES, EXPRESS OR IM-
PLIED, INCLUDING, BUT NOT LIMITED TO, THE IMPLIED WARRANTIES OF MERCHANTABILITY AND FITNESS FOR A PARTICULAR PURPOSE
ARE DISCLAIMED.
LIMITATION OF LIABILITY.
IT IS UNDERSTOOD AND AGREED THAT SELLER'S LIABILITY WHETHER IN CONTRACT, IN TORT, UNDER ANY WARRANTY, IN NEGLIGENCE OR
OTHERWISE SHALL NOT EXCEED THE RETURN OF THE AMOUNT OF THE PURCHASE PRICE PAID BY PURCHASER AND UNDER NO CIRCUM-
STANCES SHALL SELLER BE LIABLE FOR SPECIAL, INDIRECT OR CONSEQUENTIAL DAMAGES. THE PRICE STATED FOR THE EQUIPMENT IS A
CONSIDERATION IN LIMITING SELLER’S LIABILITY. BUYER ASSUMES ALL RISK AND LIABILITY FOR LOSS, DAMAGE OR INJURY TO PERSONS
OR PROPERTY OF BUYER OR OTHERS ARISING OUT OF USE OR POSSESSION OF ANY MATERIAL SOLD HEREUNDER. NO ACTION, REGARD-
LESS OF FORM, ARISING OUT OF THE TRANSACTIONS UNDER THIS AGREEMENT MAY BE BROUGHT BY PURCHASER MORE THAN ONE YEAR
AFTER THE CAUSE OF ACTION HAS ACCRUED.
INDEMNITY AND HOLD HARMLESS.
WHEN PURCHASER, IN THE ORDINARY COURSE OF BUSINESS, HAS PERSONS USING ANY EQUIPMENT TO WHICH THE PRODUCTS SUBJECT
TO THIS SALE ARE INSTALLED, PURCHASER AGREES TO AND SHALL INDEMNIFY, DEFEND, AND HOLD HARMLESS SELLER, ITS EMPLOYEES
AND AGENTS FROM AND AGAINST ALL CLAIMS BROUGHT BY PARTIES OTHER THAN THE PARTIES TO THIS AGREEMENT. THIS PROVI-
SION SHALL APPLY TO ALL CLAIMS, REGARDLESS OF CAUSE, INCLUDING SELLER’S PERFORMANCE OR FAILURE TO PERFORM, AND IN-
CLUDING DEFECTS IN PRODUCTS, DESIGN, INSTALLATION, MAINTENANCE, OPERATION OR NON-OPERATION OF THE PRODUCTS, WHETHER
BASED UPON NEGLIGENCE, ACTIVE OR PASSIVE, WARRANTY, OR STRICT PRODUCT LIABILITY ON THE PART OF SELLER, ITS EMPLOYEES OR
AGENTS, BUT THIS PROVISION SHALL NOT APPLY TO CLAIMS FOR LOSS OR DAMAGE SOLELY AND DIRECTLY CAUSED BY AN EMPLOYEE OF
SELLER WHILE ON PURCHASER’S PREMISES.
15

16
Stiebel Eltron, Inc.
17 West Street
West Hatfield, MA 01088
Phone: 800.582.8423
Fax: 413.247.3369
E-mail:info@stiebel-eltron-usa.com
Internet:www.stiebel-eltron-usa.com
We are available for questions concerning the installation of our high quality vacuum tube collectors at
any time:
Stiebel Eltron, Inc. 17 West Street West Hatfield, MA 01088
Simply the Best
This manual suits for next models
1
Table of contents
Other STIEBEL ELTRON Inverter manuals
Popular Inverter manuals by other brands

Rishabh
Rishabh RADIUS AP V-S-50 k-AE -TL Installation & operation manual

Hitachi
Hitachi AN032404-1 Rev. A Application note

Tektronix
Tektronix CFG280 user manual

Growatt
Growatt 2500MTL Installation & operation manual

MIL-Solar
MIL-Solar Eclipse 5000-II Installation and operation manual

Solas
Solas PV-800HZ Installation & operation manual

Kisae
Kisae SWXFR1210 owner's manual

Fimer
Fimer TRIO-5.8-TL-OUTD-400 Quick installation guide

Wacker Neuson
Wacker Neuson G2.5A Operator's manual

Huawei
Huawei SUN2000-3.8KTL-USL0 quick guide

Mitsubishi Electric
Mitsubishi Electric FR-F740-00023 Installation guidelines

INVT
INVT Goodrive 35 Series Operation manual