GB/IE IMPORTANT! READ CAREFULLY AND KEEP FOR FUTURE REFERENCE.
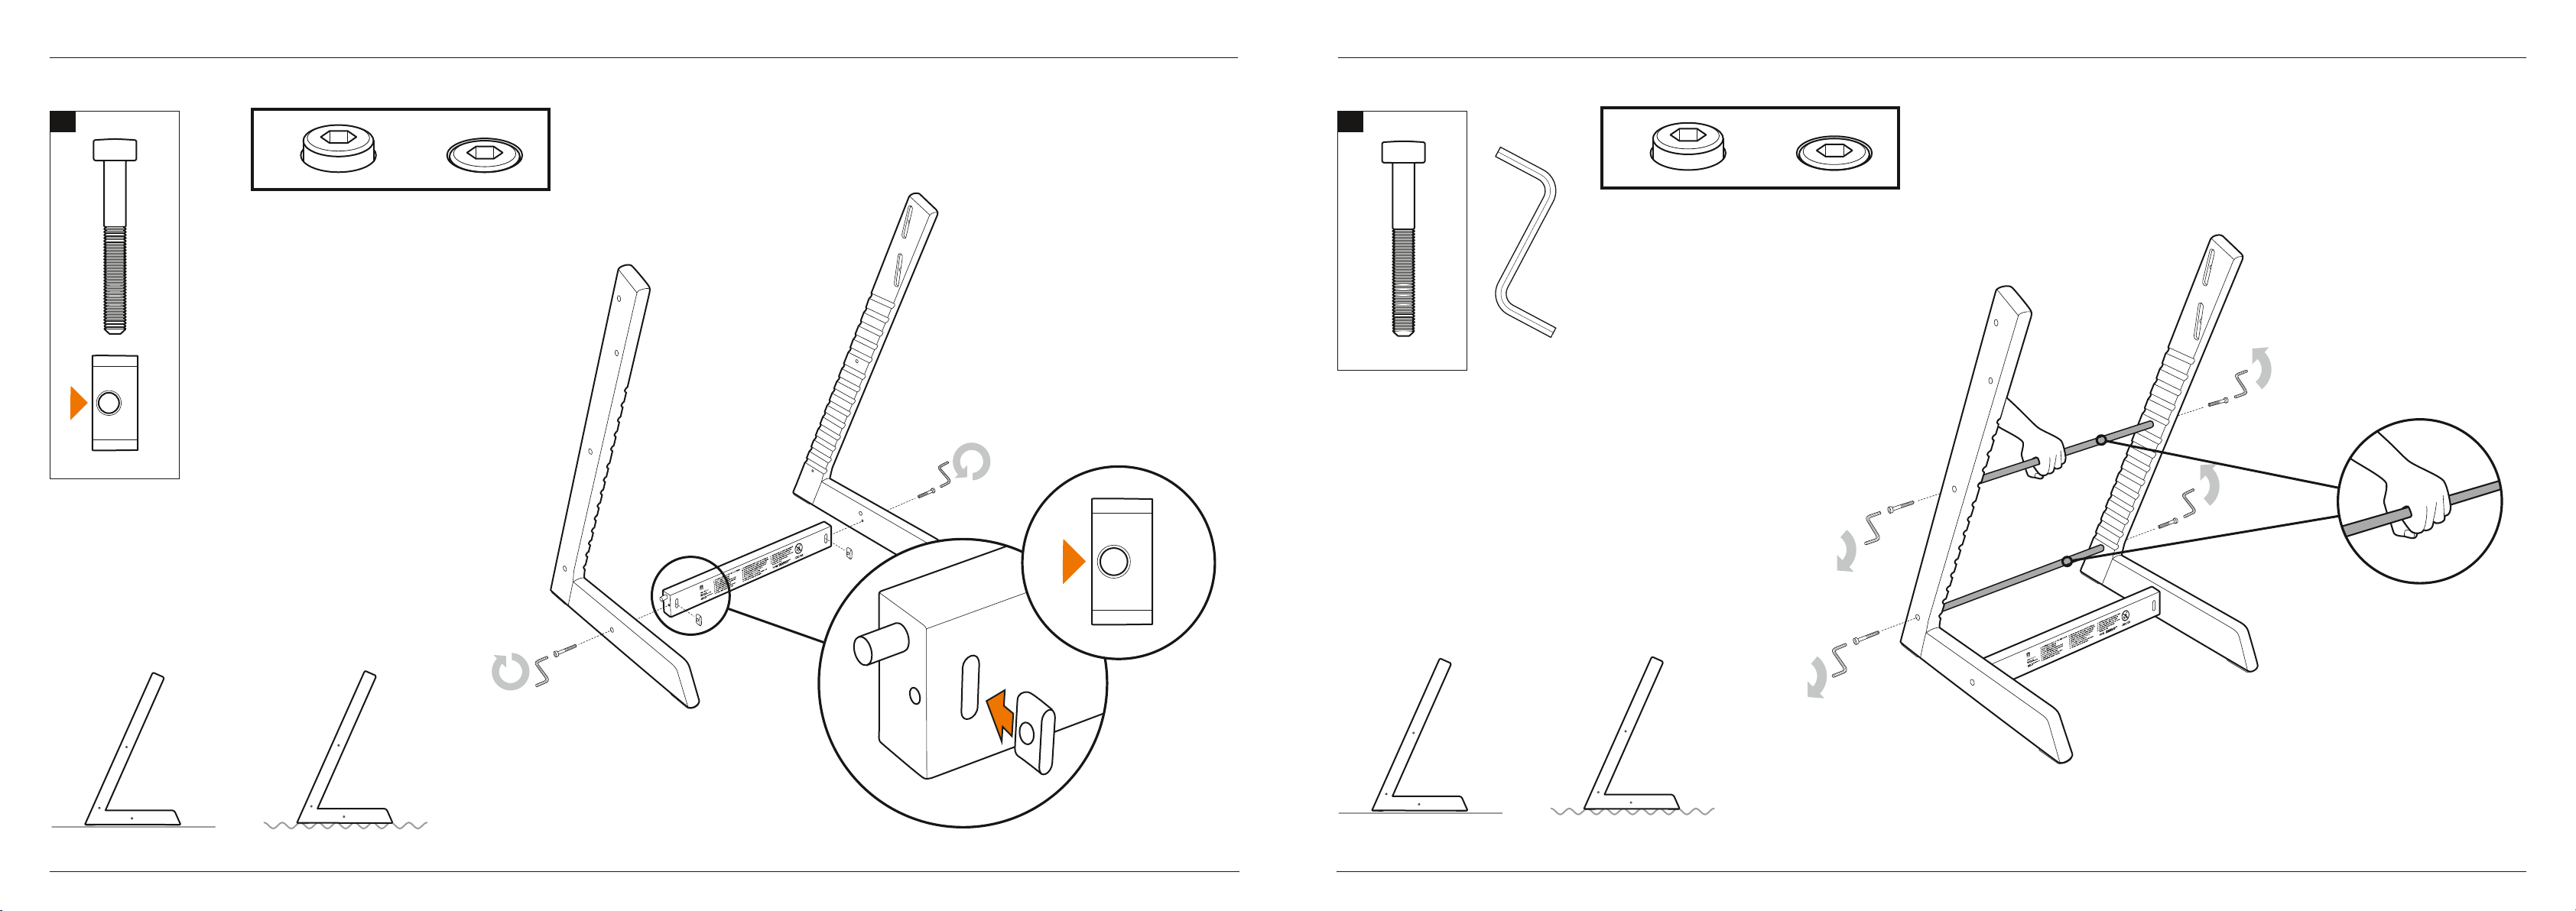
Assemble the Tripp Trapp® chair according to the instructions in this manual.
Place the seat and footplate in the correct position for your child, before the
screws are tightened.
If the chair will be used in combination with a Tripp Trapp® accessory, make sure
to set up the chair according to the instructions provided with the accessory.
Tripp Trapp® is designed for dining tables 72-76 cm high.
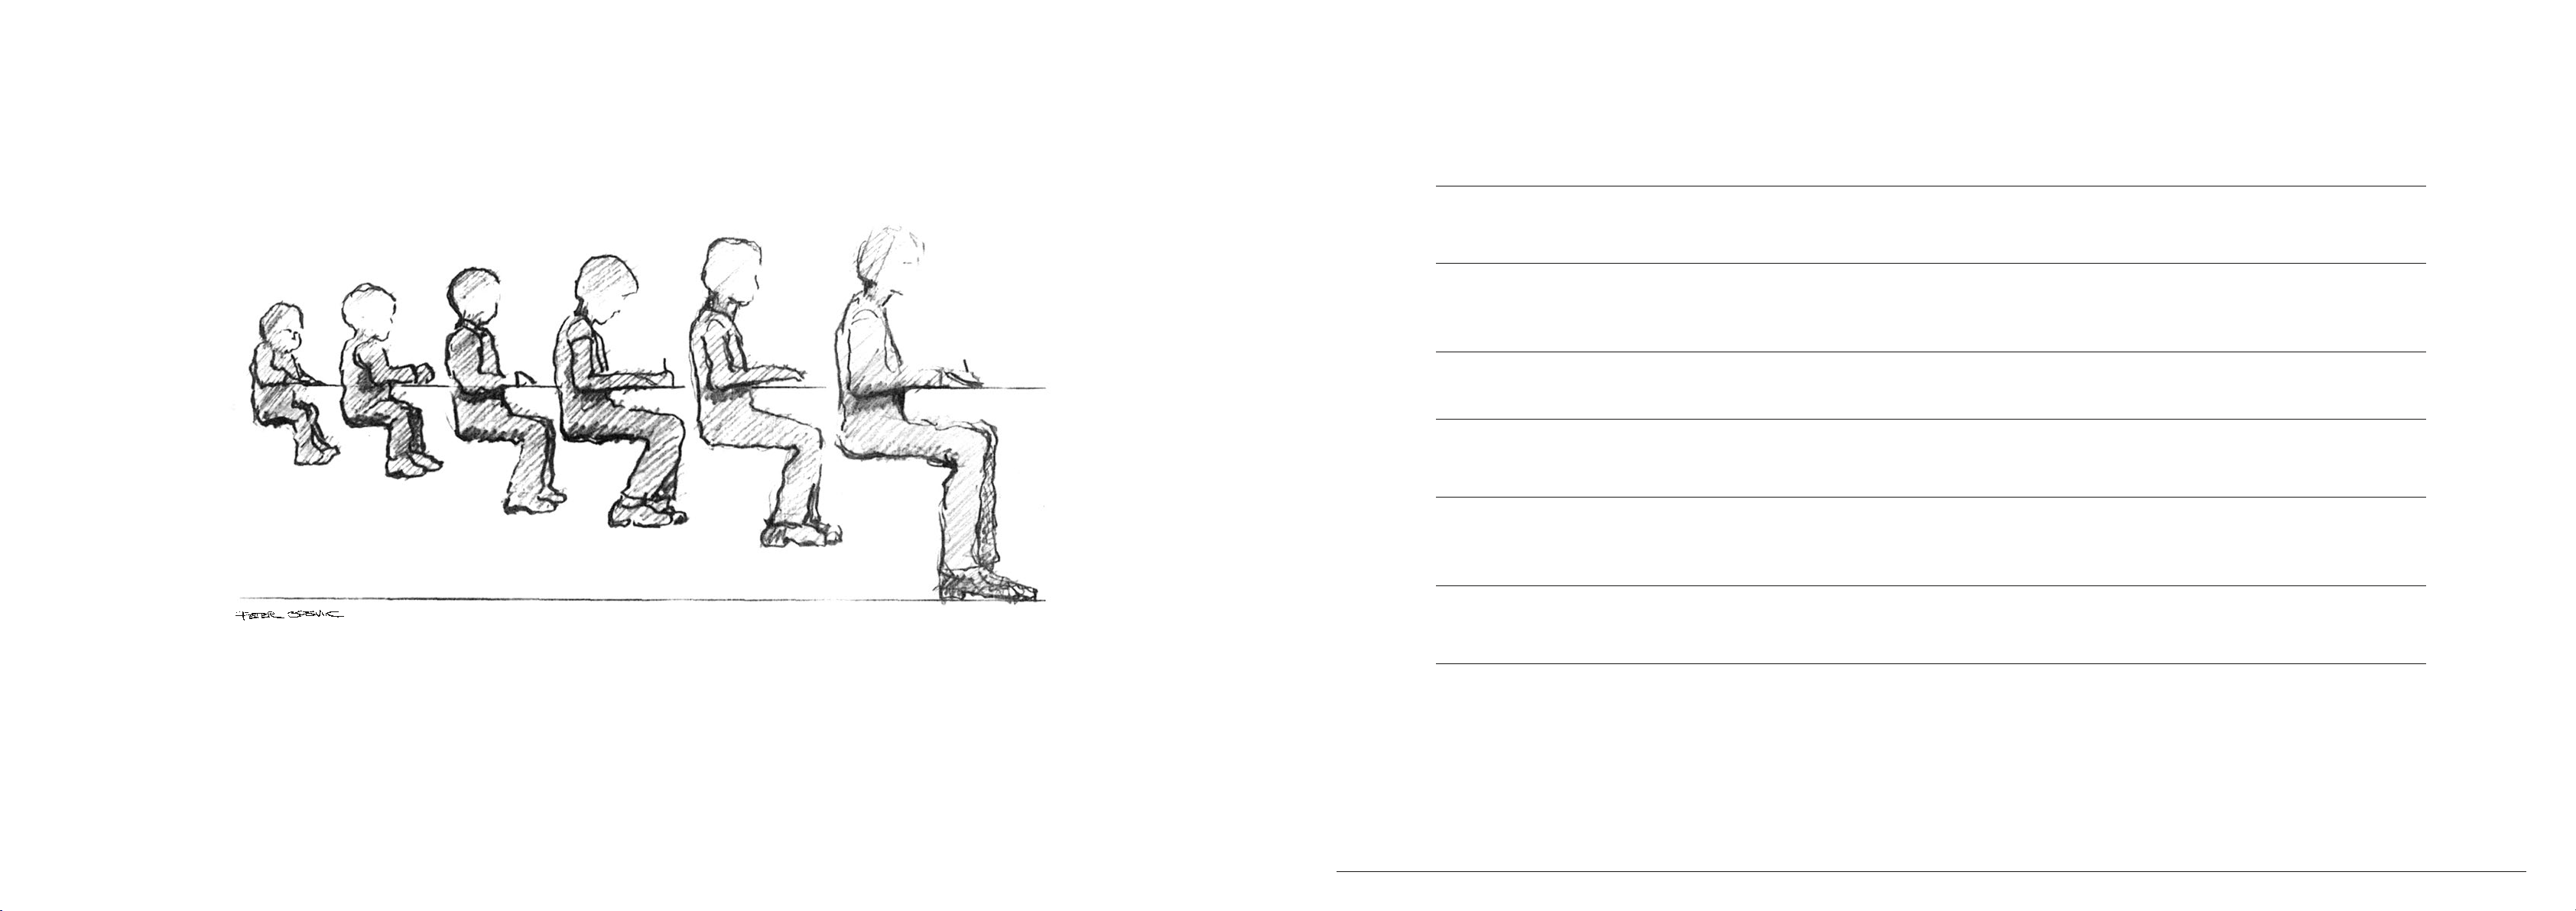
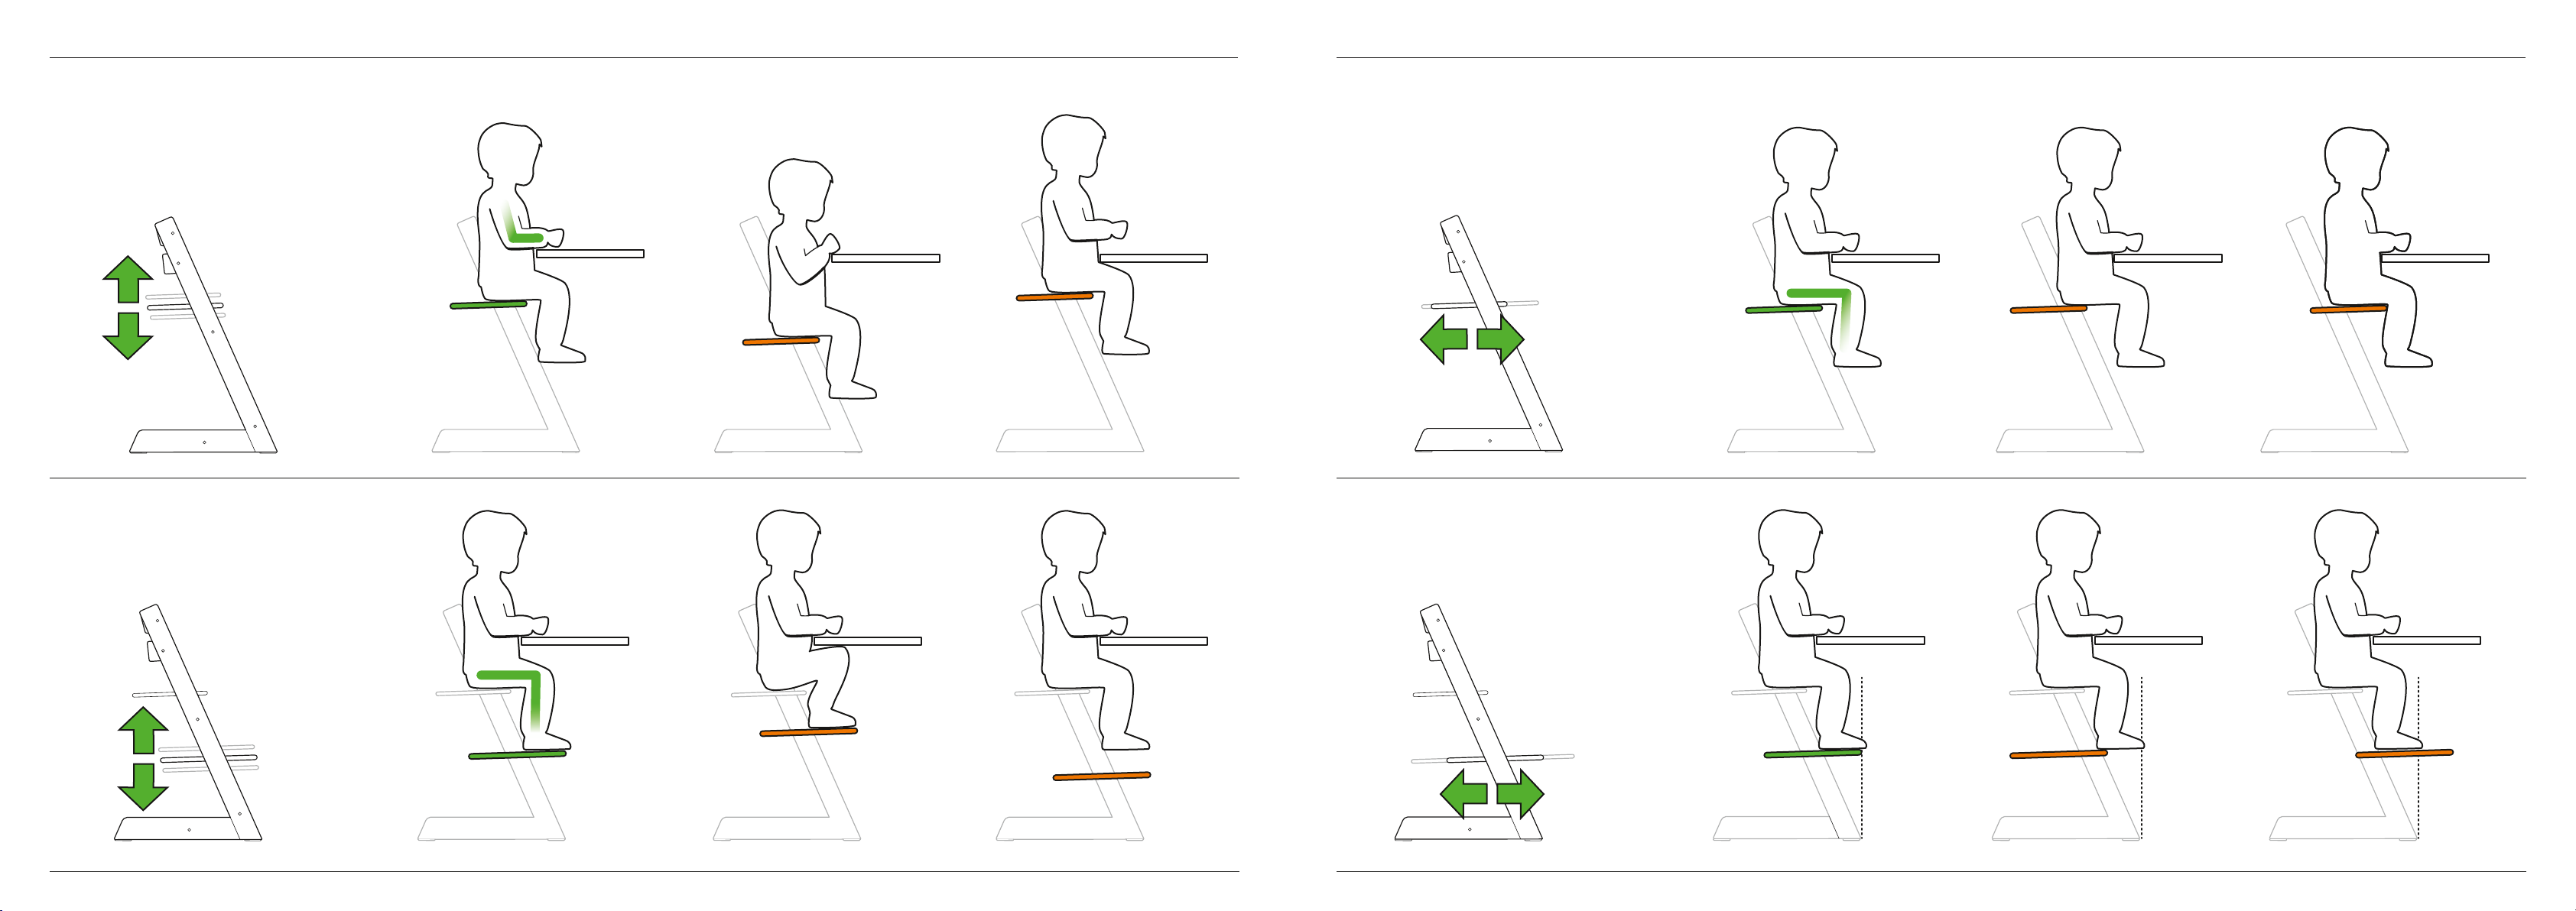
Seat placement
HEIGHT The seat is at the correct height when your child’s elbows are level
with the table top.
DEPTH - Position the child’s back against the backrest. The seat should support
¾ of the thighs. It is important that the seat depth is not too deep in order to
allow for the best comfort and natural movement for the child.
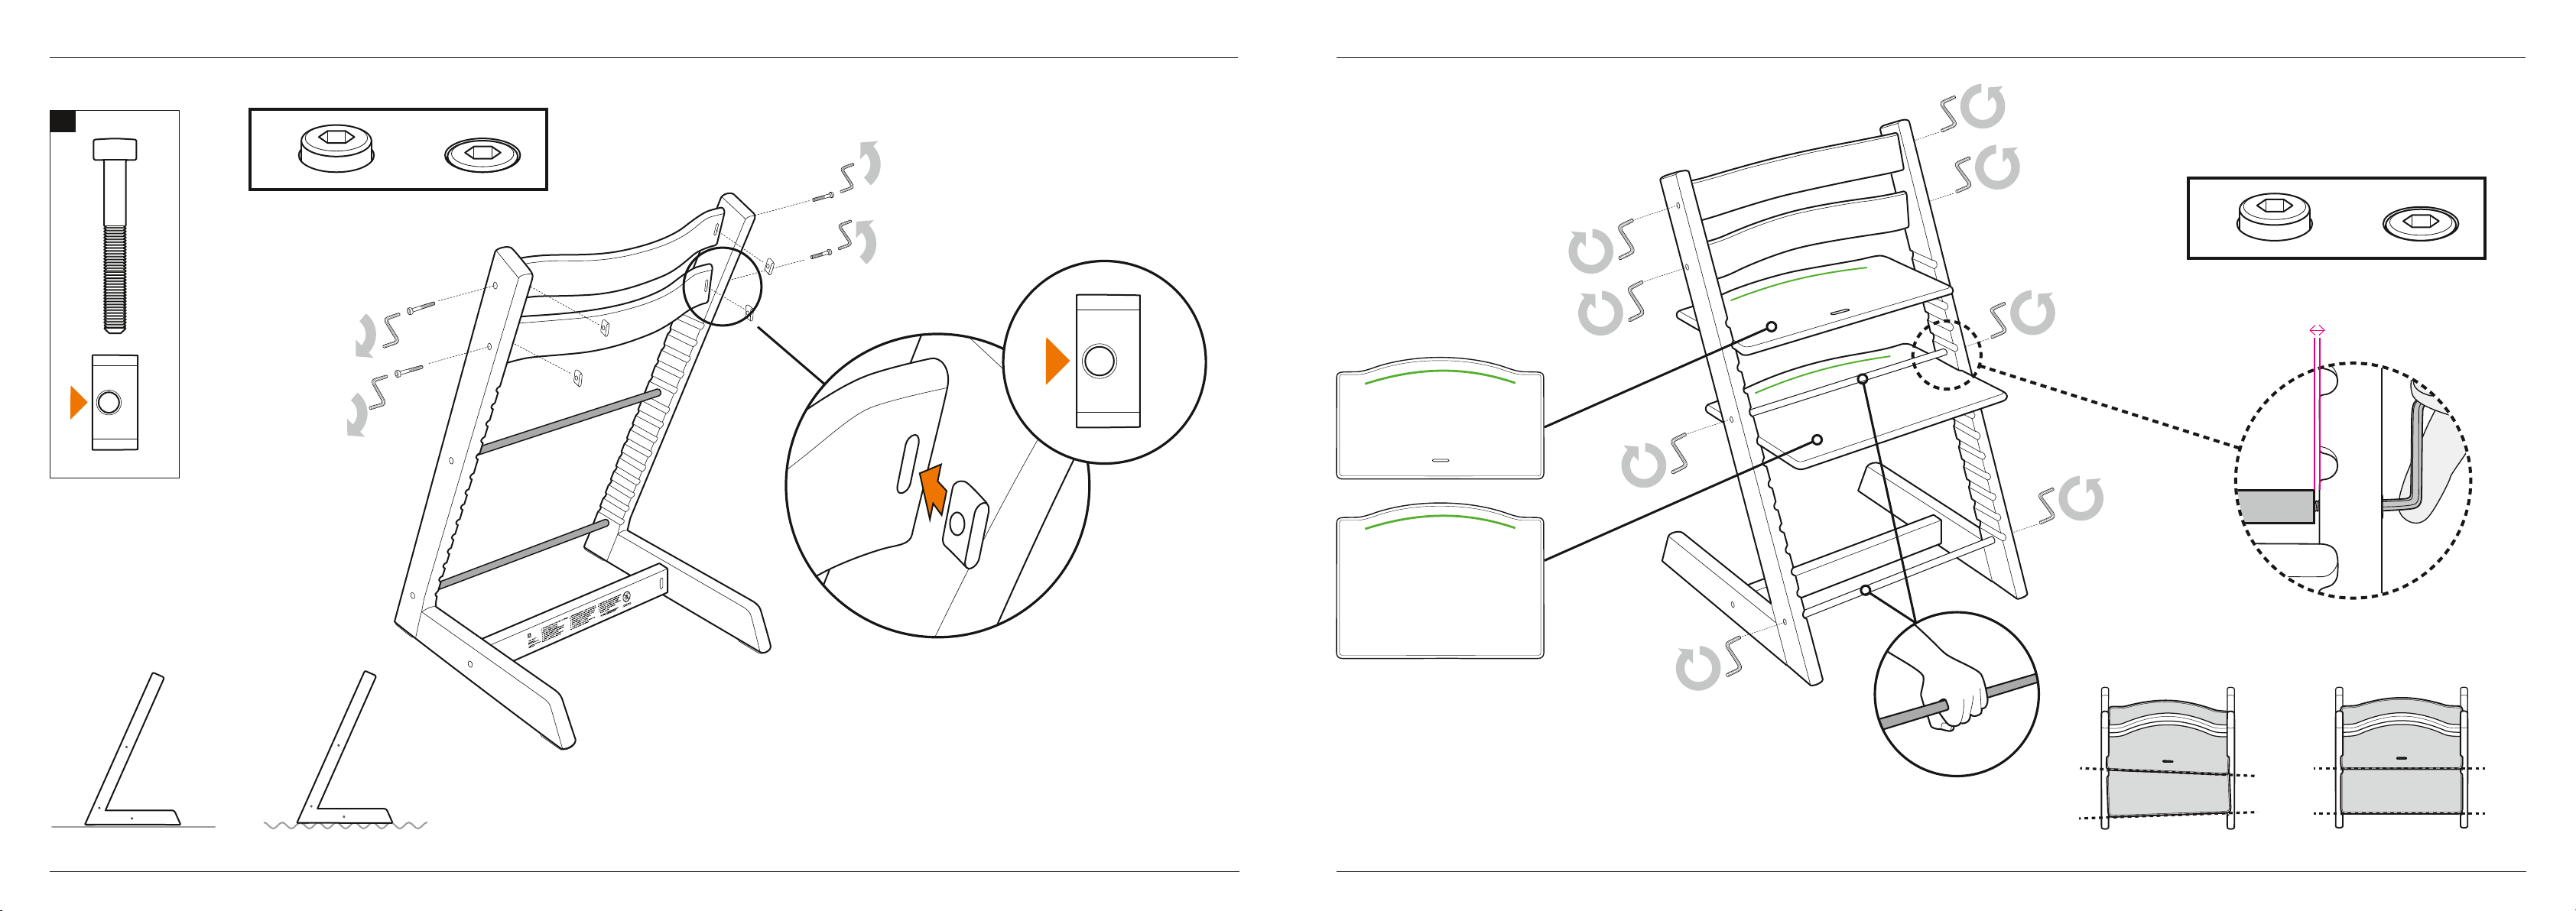
The seat should always be in the rst groove from the top when used with the
Tripp Trapp® Baby Set in order not to damage the rail.
Footplate placement
HEIGHT- The footrest is at the correct height when the sole of the child’s foot can
rest at on the footrest, while the thighs are touching the seat.
DEPTH – Make sure the forward edge of the footrest NEVER protrudes beyond
the front tip of the chair legs at oor level.
Seat and footrest adjustment
It is important to adjust the depth and height of the seat and footrest to t the
size of your child. The position of the seat and footrest should be checked as the
child grows - at least once a year!
Cleaning and maintenance
Wipe with a clean damp cloth, wipe o excess of water with a dry cloth. Moisture
will leave cracks in stain. We do not recommend the use of any detergent. Colours
may change if the high chair is exposed to sunlight.
Product information
The chair is made of cultivated beech. The varnish is water based.
Safety approval
Tripp Trapp® high chair assembled with Tripp Trapp® Baby Set or Tripp Trapp®
Newborn Set complies with EN 14988:2017.
If you are using a harness in combination with the Tripp Trapp® chair, make sure
it is correctly installed and adjusted.
WARNING
• Never leave the child unattended.
• Stay in reach of your child.
• Falling hazard: Prevent your child from climbing on the product.
•
Be aware of the risk of open res and other sources of strong heat in
the vicinity of the product.
• Be aware of the risk of tilting when your child can push its feet against
a table or any other structure.
•
When used as a high chair in combination with the Tripp Trapp Baby Set,
this product is intended for children able to sit up unaided and up to 3
years or a maximum weight of 15 kg.
•
If you use any harness with the high chair make sure it is correctly tted.
•
Do not use the product unless all components are correctly tted and
adjusted. Pay special attention to the seat and footplate - make sure
these are properly fastened and adjusted according to this user guide
before you put your child into the high chair.
• Do not place the high chair near an open re or other sources of strong
heat, such as electric bar res, gas res etc due to the risk of re.
• Do not use the high chair if any part is broken, torn or missing.
• Do not use the high chair before the child can sit up unassisted.
•
Always place the high chair on a level stable surface and make sure that
the high chair has space to slide backwards.
•
Do not to place small items, toxic substances, hot objects, electrical
exes etc near the high chair where your child can reach them, as they
may cause choking, poisoning or other injuries.
•
Remember to retighten all screws 2-3 weeks after assembly of the
high chair. After that you should check on and retighten the screws if
necessary on a regular basis, e.g. every second month. Keep the Allen
key for future use.
•
Do not use any accessories or replacement parts not manufactured by
STOKKE; this may aect your child’s safety.
• Do not use the high chair as a stepstool.
•
NEVER use the Tripp Trapp® chair without the gliders that are tted
under the chair legs.
•
This product is not a toy. Do not let children play with this product or
use it in any position not recommended by Stokke.
•
Certain types of oors (like hardwood and linoleum) may be sensitive
to abrasion. It is the user’s responsibility to decide whether the Tripp
Trapp® high chair is suitable for their ooring.
•
Do not attempt to remove the warning label on the product. The warning
label contains important safety reminders, and removing it can also
damage the surface of the product.
Right of complaint and Extended Warranty
Applicable worldwide in respect of the Tripp Trapp®, hereinafter
referred to as the product.
RIGHT OF COMPLAINT
The customer has a right of complaint pursuant to the consumer protection legislation
applicable at any given time, which legislation may vary from country to country.
Generally speaking, STOKKE AS does not grant any additional rights over and
above those laid down by the legislation applicable at any given time, although
reference is made to the ”Extended Warranty” described below. The rights of the
customer under the consumer protection legislation applicable at any given time
are additional to thoseunderthe ”Extended Warranty”,andare not aected thereby.
STOKKE® ”EXTENDED WARRANTY”
However, STOKKE AS, Parkgata 6, N-6003 Ålesund, Norway, grants an ”Extended
Warranty” to customers who register their product in our Warranty Database. This
may be done via our webpage www.stokkewarranty.com. Upon registration, a
warranty certicate will be issued and sent to the customer electronically (e-mail)
or by ordinary mail.
Registration in the Warranty Database entitles the owner to an ”Extended
Warranty” as follows:
• 7-year warranty against any manufacturing defect in the product.
The ”Extended Warranty” also applies if the product has been received as a gift or
purchased second-hand. Consequently, the ”Extended Warranty” may be invoked
by whoever is the owner of the product any given time, within the warranty period,
and subject to the warranty certicate being presented by the owner.
TheSTOKKE®”ExtendedWarranty” is conditional upon the following:
• Normaluse.
•
The product only having been used for the purpose for which the product
is intended.
•
The product having undergone ordinary maintenance, as described in the
maintenance/instruction manual.
•
Upon the ”Extended Warranty” being invoked, the warranty certicate shall be
presented, together with the original date-stamped purchase receipt. This also
applies to any secondary or subsequent owner.
• The product appearing in its original state, hereunder that the only parts used
have been supplied by STOKKE® and are intended for use on, or together with, the
product. Any deviations herefrom require the prior written consent of STOKKE®.
• The serial number of the product not having been destroyed or removed.
The STOKKE® ”Extended Warranty” does not cover:
•
Issues caused by normal developments in the parts making up the product (e.g.
colouration changes, as well as wear and tear).
• Issues caused by minor variations in materials (e.g. colour dierences between
parts).
•
Issues caused by extreme inuence from external factors like sun/light,
temperature, humidity, environmental pollution, etc.
• Damage caused by accidents/mishaps – for example any other objects having
bumped into the product or any person having overturned the product by colliding
with it. The same applies if the product has been overloaded, for example in
terms of the weight placed on it.
•
Damage inicted on the product by external inuence, for example when the
product is being shipped as luggage.
•
Consequential damage, for example damage inicted on any persons and/
or any other objects.
• If the product has been tted with any accessories that have not been supplied
by Stokke, the ”Extended Warranty” shall lapse.
•
The ”Extended Warranty” shall not apply to any accessories that have been
purchased or supplied together with the product, or at a subsequent date.
STOKKE®willunderthe”Extended Warranty”:
• Replace or – if STOKKE® thus prefers – repair the defective part, or the product
in its entirety (if necessary), provided that the product is delivered to a reseller.
• Cover normal transport costs for any replacement part/product from STOKKE®
to the reseller from whom the product was purchased. – No travel costs on the
part of the purchaser are covered under the terms of the warranty.
• Reserve the right to replace, at the time of the warranty being invoked, defect
parts by parts that are of approximately the same design.
• Reserve the right to supply a replacement product in cases where the relevant
product is no longer being manufactured at the time of the warranty being
invoked. Such product shall be of corresponding quality and value.
How to invoke the ”Extended Warranty”:
Generally speaking, all requests relating to the ”Extended Warranty” shall be made
to the reseller from whom the product was purchased. Such request shall be made
as soon as possible after any defect has been discovered, and shall be accompanied
by the warranty certicate as well as the original purchase receipt.
Documentation/evidenceconrmingthemanufacturingdefect shall bepresented,
normally by way of the product being brought along to the reseller, or otherwise
being presented to the reseller or a STOKKE® sales representative for inspection.
The defect will be remedied in accordance with the above provisions if the reseller
or a STOKKE® sales representative determines that the damage is caused by a
manufacturing defect.
AU/NZ IMPORTANT! KEEP FOR FUTURE REFERENCE.
Assemble the Tripp Trapp® chair according to the instructions in this manual.
Place the seat and footplate in the correct position for your child, before the
screws are tightened.
If the chair will be used in combination with a Tripp Trapp® accessory, make sure
to set up the chair according to the instructions provided with the accessory.
Tripp Trapp® is designed for dining tables 72-76 cm high.
Seat placement
HEIGHT The seat is at the correct height when your child’s elbows are level
with the table top.
DEPTH - Position the child’s back against the backrest. The seat should support
¾ of the thighs. It is important that the seat depth is not too deep in order to
allow for the best comfort and natural movement for the child.
The seat should always be in the rst groove from the top when used with the
Tripp Trapp® Baby Set™ in order not to damage the rail.
Footplate placement
HEIGHT- The footrest is at the correct height when the sole of the child’s foot can
rest at on the footrest, while the thighs are touching the seat.
DEPTH – Make sure the forward edge of the footrest NEVER protrudes beyond
the front tip of the chair legs at oor level.
Seat and footrest adjustment
It is important to adjust the depth and height of the seat and footrest to t the
size of your child. The position of the seat and footrest should be checked as the
child grows - at least once a year!
Cleaning and maintenance
Wipe with a clean damp cloth, wipe o excess of water with a dry cloth. Moisture
will leave cracks in stain. We do not recommend the use of any detergent. Colours
may change if the high chair is exposed to sunlight.
Product information
The chair is made of cultivated beech. The varnish is water based.
Safety approval
Tripp Trapp® high chair assembled with Tripp Trapp® Baby Set™ or Tripp Trapp®
Newborn Set complies with EN 14988:2017.
If you are using a harness in combination with the Tripp Trapp chair®, make sure
it is correctly installed and adjusted.
WARNING
• Do not leave the child unattended.
• Follow the manufacturers instructions.
•
The harness must always be used and correctly tted –most injuries
from high chair are caused by falls.
•
Position the high chair away from solid structures and benches to avoid
injuries caused by falls and by access to dangerous items.
•
Position the high chair away from furniture, walls, hot surfaces and
liquids, window covering cords and electrical cords and position the
high chair away from furniture when the chair is not being used at a
table with a tray removed.
• Do not elevate the high chair on any structure or table.
• Stay in reach of your child.
•
If you use any harness with the high chair make sure it is correctly tted.
•
Do not use the high chair unless all components are correctly tted and
adjusted. Pay special attention to the seat and footplate - make sure
these are properly fastened and adjusted according to this user guide
before you put your child into the high chair.
• Do not place the high chair near an open re or other sources of strong
heat, such as electric bar res, gas res etc due to the risk of re.
• Do not use the high chair if any part is broken, torn or missing.
• Do not use the high chair before the child can sit up unassisted.
•
Always place the high chair on a level stable surface and make sure that
the high chair has space to slide backwards.
•
Be careful not to place small items, toxic substances, hot objects, electrical
exes etc near the high chair where your child can reach them, as they
may cause choking, poisoning or other injuries.
•
Remember to retighten all screws 2-3 weeks after assembly of the
high chair. After that you should check on and retighten the screws if
necessary on a regular basis, e.g. every second month. Keep the Allen
key for future use.
•
Do not use any accessories or replacement parts not manufactured by
STOKKE; this may aect your child’s safety.
• Do not use the high chair as a stepstool.
•
NEVER use the Tripp Trapp® chair without the gliders that are tted
under the chair legs.
•
This product is not a toy. Do not let children play with this product or
use it in any position not recommended by Stokke.
•
Certain types of oors (like hardwood and linoleum) may be sensitive
to abrasion. It is the user’s responsibility to decide whether the Tripp
Trapp® high chair is suitable for their ooring.
•
When used as a high chair in combination with the Tripp Trapp Baby Set,
this product is intended for children able to sit up unaided and up to 3
years or a maximum weight of 15 kg.
•
Do not to use the high chair if it is not working correctly or something is
broken. Contact Stokke® regarding repair and spare parts.
•
Do not attempt to remove the warning label on the product. The warning
label contains important safety reminders, and removing it can also
damage the surface of the product.
Right of complaint and Extended Warranty
Applicable worldwide in respect of the Tripp Trapp®, hereinafter
referred to as the product.
RIGHT OF COMPLAINT
The customer has a right of complaint pursuant to the consumer protection legislation
applicable at any given time, which legislation may vary from country to country.
Generally speaking, STOKKE AS does not grant any additional rights over and
above those laid down by the legislation applicable at any given time, although
reference is made to the ”Extended Warranty” described below. The rights of the
customer under the consumer protection legislation applicable at any given time
are additional to thoseunderthe ”Extended Warranty”,andare not aected thereby.
STOKKE® ”EXTENDED WARRANTY”
However, STOKKE AS, Parkgata 6, N-6003 Ålesund, Norway, grants an ”Extended
Warranty” to customers who register their product in our Warranty Database. This
may be done via our webpage www.stokkewarranty.com. Upon registration, a
warranty certicate will be issued and sent to the customer electronically (e-mail)
or by ordinary mail.
Registration in the Warranty Database entitles the owner to an ”Extended
Warranty” as follows:
• 7-year warranty against any manufacturing defect in the product.
The ”Extended Warranty” also applies if the product has been received as a gift or
purchased second-hand. Consequently, the ”Extended Warranty” may be invoked
by whoever is the owner of the product any given time, within the warranty period,
and subject to the warranty certicate being presented by the owner.
TheSTOKKE®”ExtendedWarranty” is conditional upon the following:
• Normaluse.
•
The product only having been used for the purpose for which the product
is intended.
•
The product having undergone ordinary maintenance, as described in the
maintenance/instruction manual.
•
Upon the ”Extended Warranty” being invoked, the warranty certicate shall be
presented, together with the original date-stamped purchase receipt. This also
applies to any secondary or subsequent owner.
• The product appearing in its original state, hereunder that the only parts used
have been supplied by STOKKE® and are intended for use on, or together with, the
product. Any deviations herefrom require the prior written consent of STOKKE®.
• The serial number of the product not having been destroyed or removed.
The STOKKE® ”Extended Warranty” does not cover:
•
Issues caused by normal developments in the parts making up the product (e.g.
colouration changes, as well as wear and tear).
• Issues caused by minor variations in materials (e.g. colour dierences between
parts).
•
Issues caused by extreme inuence from external factors like sun/light,
temperature, humidity, environmental pollution, etc.
• Damage caused by accidents/mishaps – for example any other objects having
bumped into the product or any person having overturned the product by colliding
with it. The same applies if the product has been overloaded, for example in
terms of the weight placed on it.
•
Damage inicted on the product by external inuence, for example when the
product is being shipped as luggage.
•
Consequential damage, for example damage inicted on any persons and/
or any other objects.
• If the product has been tted with any accessories that have not been supplied
by Stokke, the ”Extended Warranty” shall lapse.
•
The ”Extended Warranty” shall not apply to any accessories that have been
purchased or supplied together with the product, or at a subsequent date.
STOKKE®willunderthe”Extended Warranty”:
• Replace or – if STOKKE® thus prefers – repair the defective part, or the product
in its entirety (if necessary), provided that the product is delivered to a reseller.
• Cover normal transport costs for any replacement part/product from STOKKE®
to the reseller from whom the product was purchased. – No travel costs on the
part of the purchaser are covered under the terms of the warranty.
• Reserve the right to replace, at the time of the warranty being invoked, defect
parts by parts that are of approximately the same design.
• Reserve the right to supply a replacement product in cases where the relevant
product is no longer being manufactured at the time of the warranty being
invoked. Such product shall be of corresponding quality and value.
How to invoke the ”Extended Warranty”:
Generally speaking, all requests relating to the ”Extended Warranty” shall be made
to the reseller from whom the product was purchased. Such request shall be made
as soon as possible after any defect has been discovered, and shall be accompanied
by the warranty certicate as well as the original purchase receipt.
Documentation/evidenceconrmingthemanufacturingdefect shall bepresented,
normally by way of the product being brought along to the reseller, or otherwise
being presented to the reseller or a STOKKE® sales representative for inspection.
The defect will be remedied in accordance with the above provisions if the reseller
or a STOKKE® sales representative determines that the damage is caused by a
manufacturing defect.
18 | Tripp Trapp® User Guide User Guide Tripp Trapp® | 19