STOTT PILATES CADILLAC/TRAPEZE TABLE User manual
P00184 2082C MAY11 ™/® Trademark or registered trademark of Merrithew Corporation, used under license. Printed in Canada. All rights reserved.
Please review this important assembly, safety and warranty information about
your new STOTT PILATES®Cadillac/Trapeze Table and keep it handy for future reference.
Owner’s
MANUAL
FOR STOTT PILATES®CADILLAC/TRAPEZE TABLE
Please keep this manual in a safe place.
IMPORTANT
This is your STOTT PILATES
Cadillac / Trapeze Table Serial Number:
3
REQUIRED TOOLS:
OPEN-END WRENCH (SUPPLIED)
1/2" (13MM) X9/16" (14MM)
ADJUSTABLE WRENCH
LEVEL
TAPE MEASURE
A
B
30.
31.
Cadillac/Trapeze Table
29.
20
1
21
22
23
24
25
27
28
26
17
19
22
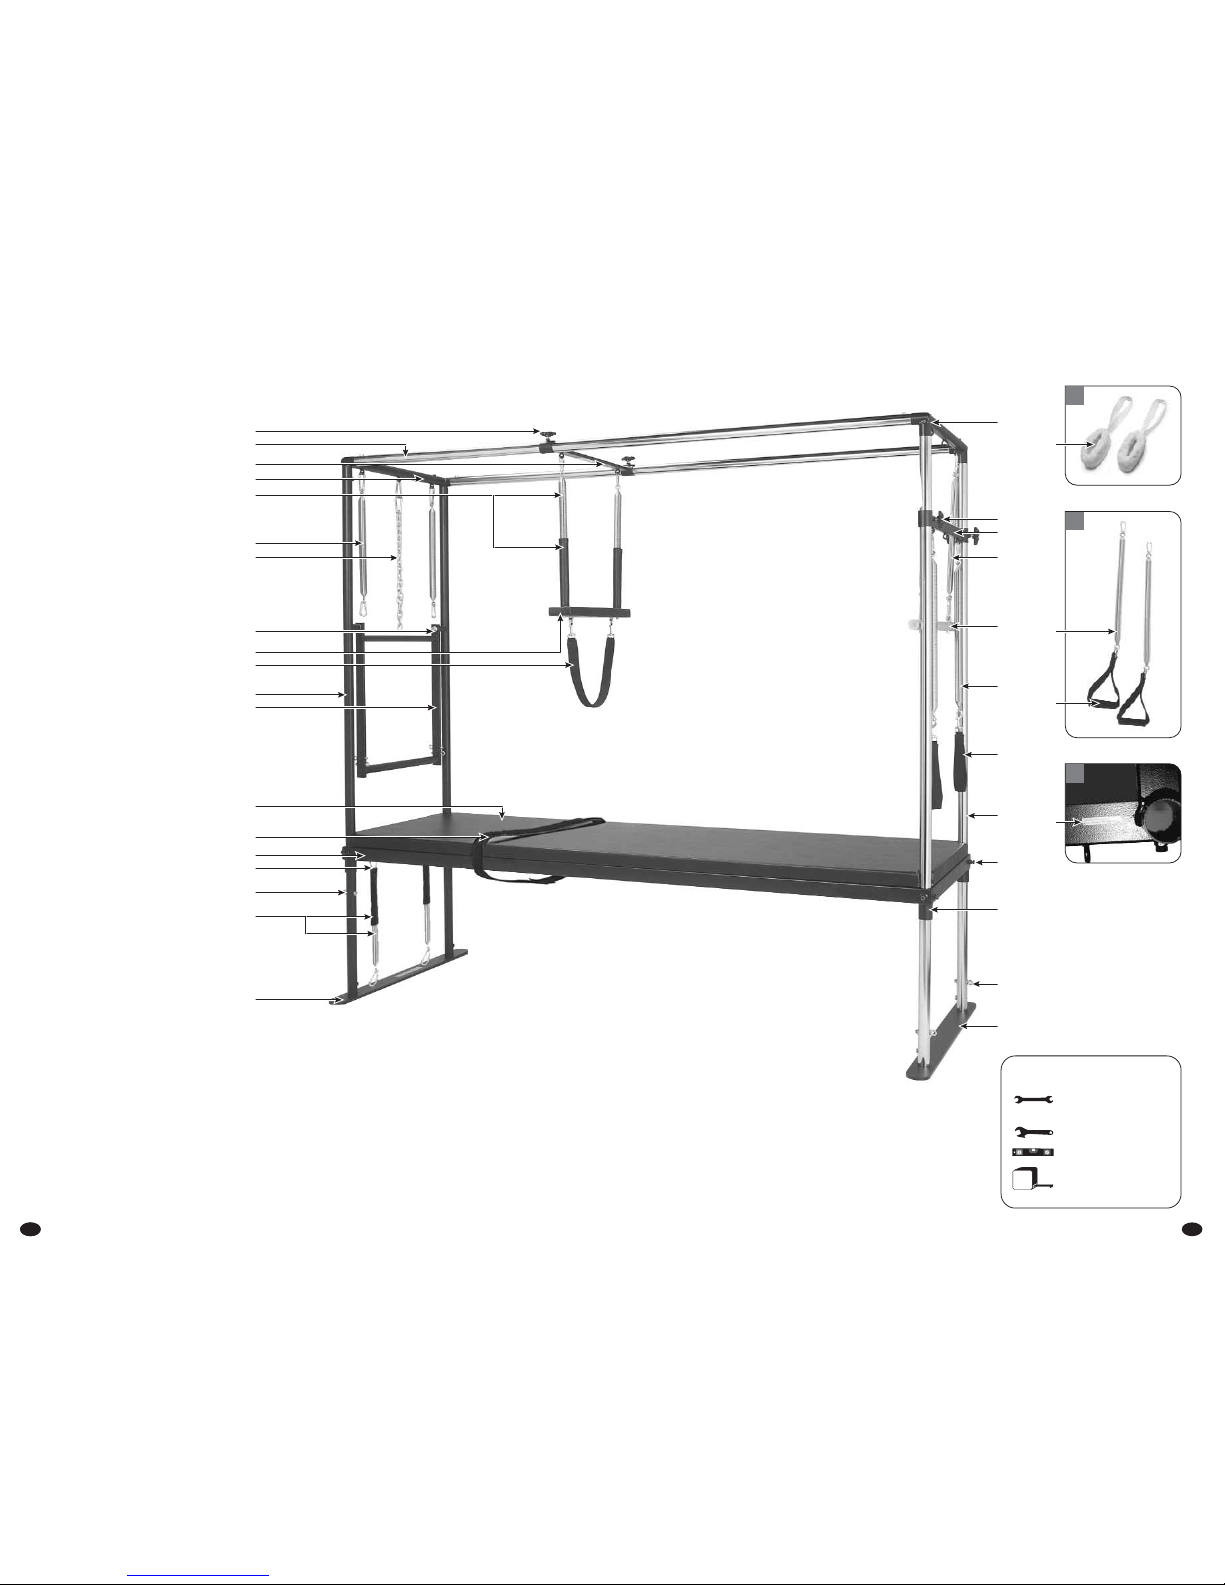
1 Star Knob
2 Top Frame Assembly (Horizontals)
3 Horizontally Sliding Bar
4 Strut
5 Trapeze Spring (red) & Cover
6 Push-Thru Spring (blue)
7 Safety Chain
8 1/2" Hex Bolt Pivot (pre-set)
9 Trapeze
10 Trapeze Strap
11 Vertical Black Pole (Upright)
12 Push-Thru Bar
13 Upholstered Bed
14 Support Strap
15 Bed Frame [fig. C]
16 Locking Spring Clip
17 Eyehook
18 Push-Thru Spring (blue) & Cover
19 Base Plate
20 Three-Way Joint
21 Vertically Sliding Bar
22 Roll-down Spring (black)
23 Roll-down Bar
24 Leg Spring (white)
25 Padded Long Spine Strap
26 Vertical Chrome Pole (Upright)
27 3/8" Hex Bolt
28 Receptor
29 Fuzzy Hanging Strap [fig. A]
30 Arm Spring (yellow) [fig. B]
31 Foam Grip Handle [fig. B]
1.
2.
3.
6.
11.
7.
12.
8.
18.
19.
15.
14.
13.
5.
9.
10.
4.
17.
16.
Part Identification for the STOTT PILATES®
C
15.
SERIAL NUMBER STICKER

55
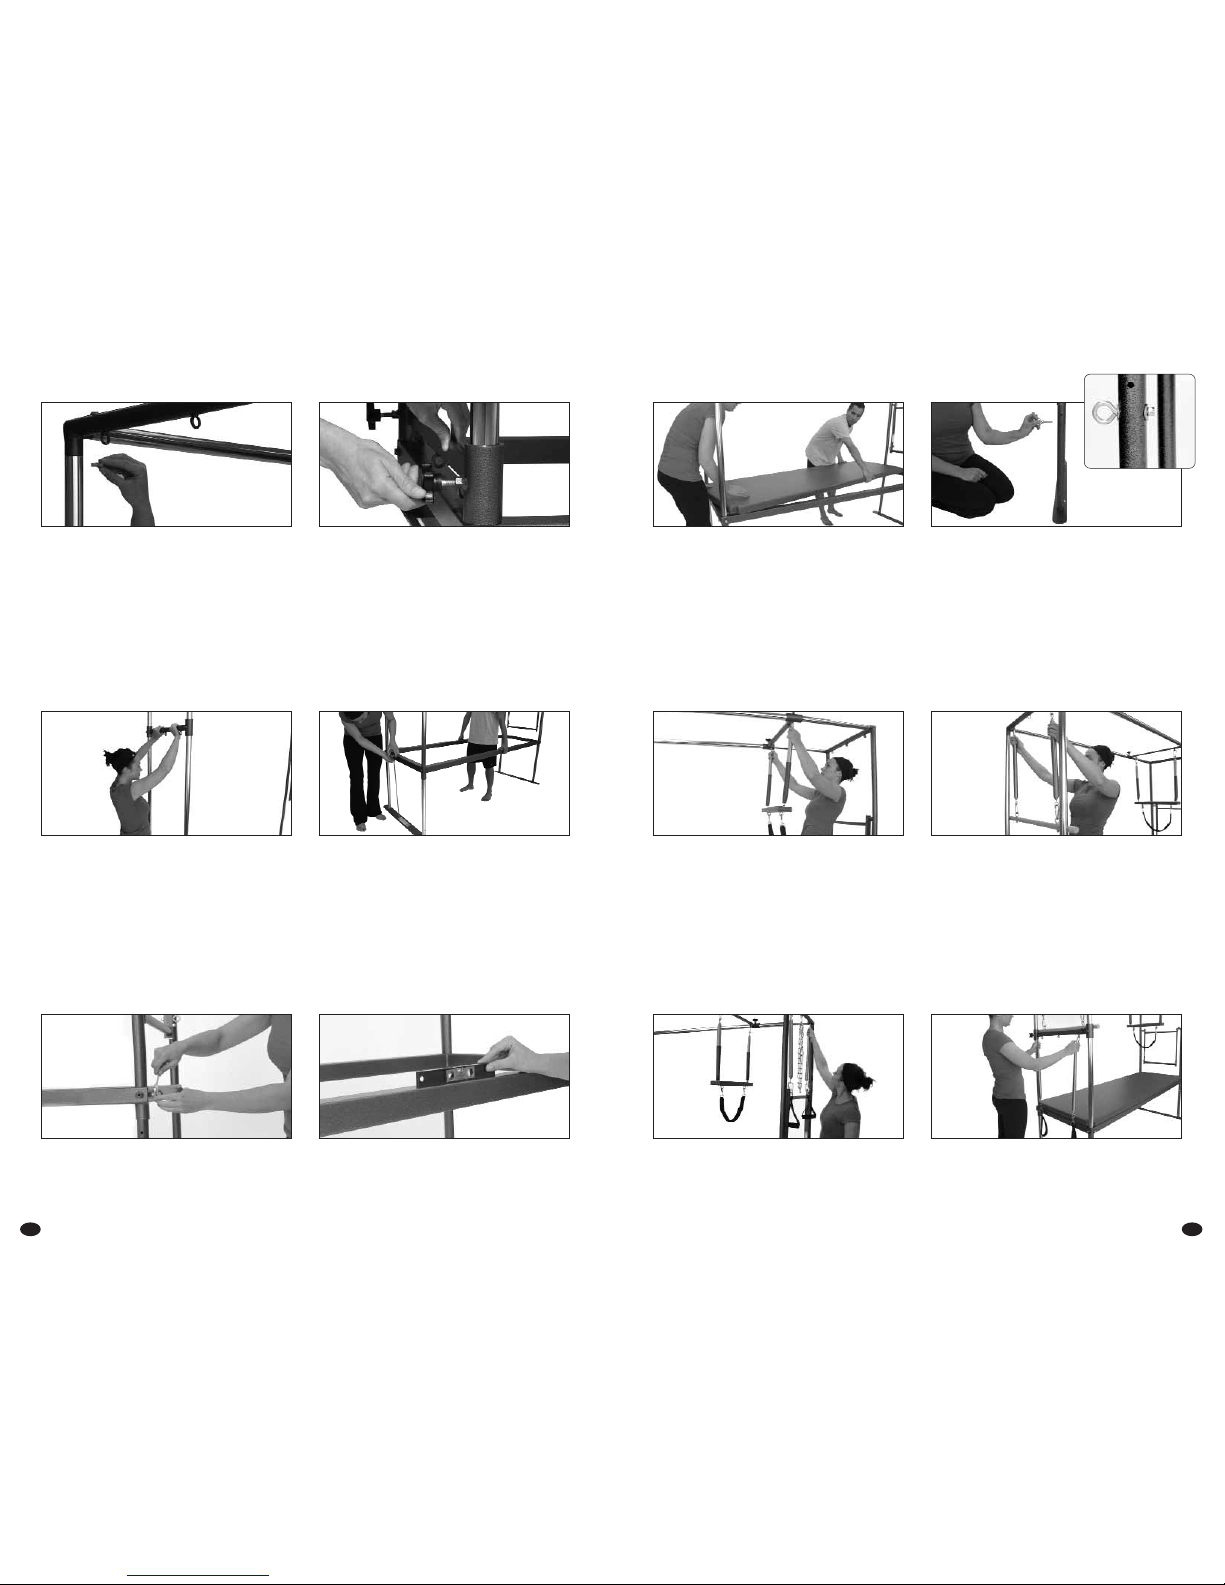
1Place both base plates [19] on floor approximately
7.5' (2.26m) apart, with hex bolts facing inward.
Remove all hex bolts from base plates.
2REQUIRES TWO PEOPLE.With one person at each end,
place receptors [28] of bed frame [15] onto pins
of base plates. Loosen hex bolts on frame so
that receptors are clear.
3One short end of the bed frame [15] has fixed
eyehooks. Place black uprights [11] into receptors
[28] on that end.
NOTE: Holes at bottom of black uprights must face
inward to align with holes in the base plates [19].
Inset shows view after bed frame has been set at
final height [after step 11].
5 Fit vertically sliding bar [21] onto chrome uprights [26]
so that the fixed eyehooks face downward and holes
for star knobs [1] face outward. Guide sliding bar
down uprights and rest it on top of bed frame.
6REQUIRES TWO PEOPLE. Screw star knobs [1] into
horizontally sliding bar [3] on top frame assembly [2].
Ensure drilled hole at top of each chrome upright [26]
faces diagonally inward. On top assembly, remove
hex bolt from open end of each three-way joint [20].
With one person at each end, lift assembly and
place it onto all four uprights.
4Each chrome upright [26] has two drilled holes at the
bottom and one at the top. Place the bottom end of
each chrome upright into remaining receptors [28]
of bed frame, ensuring both holes line up with the
holes in the base plates, and the single hole at the
top faces diagonally inward.
NOTE: There is a distinct right and left upright.
If holes do not line up correctly, switch uprights.
Assembly Instructions
11
19
User’s Guidelines
The STOTT PILATES Cadillac/Trapeze Table is a
sophisticated piece of equipment that, when used
properly, can facilitate many Pilates exercises safely
and effectively. However, care and caution must be
taken as there are some inherent dangers when using
any exercise equipment – especially when spring
resistance is involved.
For inexperienced or first-time users, the
STOTT PILATES Cadillac/Trapeze Table should
only be used under the supervision of
a trained professional.
This manual includes general guidelines for setup
and usage.To get the most out of your Cadillac/
Trapeze Table, Merrithew Health & Fitness offers a full
range of instructional DVDs and manuals. Personalized
training is offered through our Licensed and Corporate
Training Centers. Visit www.merrithew.com
for more information.
For questions or technical assistance, please email
equipment@merrithew.com
IMPORTANT!
This manual contains important assembly, safety and
warranty information. Read the manual carefully before
using your new STOTT PILATES Cadillac/Trapeze Table
and keep the manual handy for future reference.
UNSAFE OR IMPROPER USE OF THIS EQUIPMENT
BY FAILING TO READ AND COMPLY WITH ALL
REQUIREMENTS AND WARNINGS COULD RESULT
IN SERIOUS INJURY.
It is impossible to predict every situation and condition
which can occur while using your Cadillac/Trapeze Table.
Merrithew Health & Fitness makes no representation
about the safe use of the Cadillac/Trapeze Table under
all conditions.There are risks associated with the use of
any exercise equipment which cannot be predicted or
avoided, and you assume the responsibility for that risk.
Merrithew Health & Fitness recommends cautious
assembly and usage and wishes you many hours of
safe and effective exercise.
Safety Check
Proper maintenance and timely replacement
of your equipment or component parts is
your responsibility. Conduct a regular weekly
inspection of the following:
◗Replace springs every 24 months, or as needed
within that period if deformation occurs.
◗Check wear on ALL spring clips and replace
every 12 months.
◗Ensure all bolts of the Cadillac/Trapeze Table
are securely fastened.
◗Ensure all eyehooks are securely fastened.
◗Ensure push-thru bar bolts are securely fastened.
◗Ensure Cadillac/Trapeze Table bed is at correct
height to perform exercises.
◗Check wear on all star knob threads, replace as needed.
◗Check wear on straps and handles, replace
as needed.
Refer to this manual for initial assembly instructions
and part labeling.
REPLACE ALL SPRINGS EVERY 24 MONTHS AND
SPRING CLIPS EVERY 12 MONTHS OR AS NEEDED
WITHIN THAT PERIOD.
FAILURE TO PERFORM RECOMMENDED SAFETY
CHECKS, OR USING THE MACHINE WITH IMPROPERLY
ADJUSTED, BROKEN OR WORN PARTS, COULD RESULT
IN SERIOUS BODILY INJURY.
Care & Cleaning
Wipe vinyl surfaces with a mixture of water and tea
tree oil, a natural disinfectant. Add 1tsp of tea tree oil
to a 1L or 1qt spray bottle of water. A mixture of mild
soap and water may be used to remove more persistent
dirt. Ensure cleaner does not leave an oily residue,
or make surfaces slippery.
4
7
13 REQUIRES TWO PEOPLE. Carefully place upholstered
bed [13] on top of bed frame [15] and ensure it
sits fully supported on all sides.This is easiest done
by tilting bed on a diagonal angle and sliding it
through the chrome uprights.
14 Slide washer onto eyehooks and insert eyehooks
[17] into holes near bottom of chrome uprights [26]
and below bed frame on black uprights [11].
Place second washer on other side of upright, thread
on bolt and tighten securely. Ensure eyehooks are
facing outward and positioned vertically.
TRAPEZE
Loosen star knobs and adjust the horizontally sliding
bar to desired position. Tighten star knobs securely and
attach trapeze springs to eyehooks on underside of
bar. Ensure spring clips are fully closed and the trapeze
strap is securely attached. Ensure the vinyl sleeves are
covering the lower part of the trapeze springs.
ROLL-DOWN BAR
Attach roll-down springs to roll-down bar, then
to the fixed eyehooks on the top frame assembly.
Both springs must be attached.
CAUTION: The roll-down bar can release at high
velocity due to spring tension. Ensure a secure grip
at ALL times. Gripper mats may be used.
LIGHT ARM SPRINGS
Attach light arm springs to eyehooks on vertically
sliding bar. Ensure spring clips are completely
closed and secure.
LEG SPRINGS
Attach leg springs to eyehooks on vertically sliding bar
or top frame assembly. Ensure spring clips are
completely closed and secure.
Safety & Usage
Full instructions on proper set-up and execution of each exercise is provided in the STOTT PILATES Cadillac training
manual. This safety manual includes general guidelines only.
6
7 Line up pre-drilled holes on chrome uprights [26]
with top frame assembly [2]. Insert hex bolts into
all four uprights and tighten securely.
8Screw star knobs [1] into vertically sliding bar [21],
but do not tighten completely.
9Move vertically sliding bar [21] to top of uprights.
Tighten star knobs [1] to hold bar in place.
11 Tighten one hex bolt [27] in place per upright
on short side of bed frame. Repeat at other end.
Subtle adjustments may be required.
12 Ensure vertically sliding bar [21] slides freely,
push-thru bar [12] rotates freely and bed frame [15]
is level. Tighten all remaining hex bolts [27]
securely. Insert hex bolts into base plates [19]
and tighten all securely.
10 REQUIRES TWO PEOPLE. Have one person lift bed
frame [15] while standing in the center. At one end,
have second person ensure height of frame is
22.75" (58cm) from top of frame to the floor.
Assembly Instructions CONT’D

9
CAUTION
IMPROPER USE OF EXERCISE EQUIPMENT
MAY CAUSE SERIOUS BODILY INJURY.
TO REDUCE RISK, PLEASE READ THE FOLLOWING:
◗Before starting any exercise program,
consult a physician.
◗Use equipment for intended exercises only.
◗Ensure the equipment is properly adjusted for
your size and ability level.
◗Stop exercising immediately if you experience chest
pain, feel faint, have difficulty breathing or
experience any discomfort.
◗Keep body, clothing and hair free from all moving parts.
◗Do not use if equipment appears worn,
broken or damaged.
◗Do not attempt to repair equipment yourself.
◗Do not allow children to use or be around
equipment without adult supervision.
◗For optimal performance, allow at least four to
five feet of clear space on either short end of a
STOTT PILATES Cadillac/Trapeze Table.
◗When springs are used on the Cadillac/Trapeze
Table, ensure spring clips are fully closed at both
ends of springs.A spring clip that is only half closed
risks coming undone and detaching with high force.
◗When using the push-thru bar with springs from
below, locking spring clips must be used to attach
to the bed frame or uprights, and the safety chain
must be attached.
◗When using the push-thru bar, a trained professional
must keep a hand on the bar at all times.
◗All springs must be replaced every 24 months or as
needed within that period.
◗All spring clips must be replaced every 12 months or
as needed within that period.
8
SUPPORT STRAP
When using the support strap, adjust the strap tightly
but comfortably around feet or ankles and make sure
as much of the velcro as possible is pressed together.
FUZZY HANGING STRAPS
Lay strap over upright or horizonal and thread fuzzy
loops through the loop of the strap. Tug to tighten.
To clean: machine wash on gentle cycle, hang to dry.
SPRING CLIPS
Whenever springs are used, ensure spring clips at both
ends are closed completely. If a spring clip is only half
closed, it may come undone and detach with high force.
Replace all spring clips every 12 months or
as needed within that period.
Safety & UsageCONT’D
EXTENSION STRAPS
Attach leg springs to eyehooks on vertically sliding bar
or top frame assembly, then attach extension straps to
springs and attach padded long spine straps. Ensure all
spring clips are completely closed and secure.
LOCKING SPRING CLIPS
CAUTION: When using the push-thru bar with springs
from below, locking spring clips must be used to attach
to the bed frame or uprights.
DO NOT use non-locking spring clips.
SAFETY CHAIN
The safety chain must be attached when using the
push-thru bar with springs from below. Attach safety
chain first from middle eyehook of strut between
uprights to either upper eyehook of push-thru bar.
Ensure spring clips are completely closed and secure.
HANGING FROM HORIZONTALS
Individual horizontal bars are designed to
support a maximum of 200lbs (90kg) to prevent
excessive bowing and possible damage.
PUSH-THRU BAR
SPRINGS FROM BELOW
When using the push-thru bar with springs from below,
attach safety chain first. Adjust length of Safety Chain
as required. Then, attach springs to eyehooks on bed
frame using locking spring clips. Next, attach one or
two springs to eyehooks on lower side of bar, ensuring
spring clips are completely closed and secure.
Spring covers are used on push-thru springs from
below to prevent spring coils from coming into
contact with upholstered bed.
SPRINGS FROM ABOVE
A trained professional must keep a hand on the
push-thru bar for any exercises.
CAUTION: To prevent accidental injury, never put
your face (or another body part) above the push-thru
or roll-down bars while spotting an exercise.
10
Replacement Parts
To order, visit www.merrithew.com/replacementparts or email equipment@merrithew.com
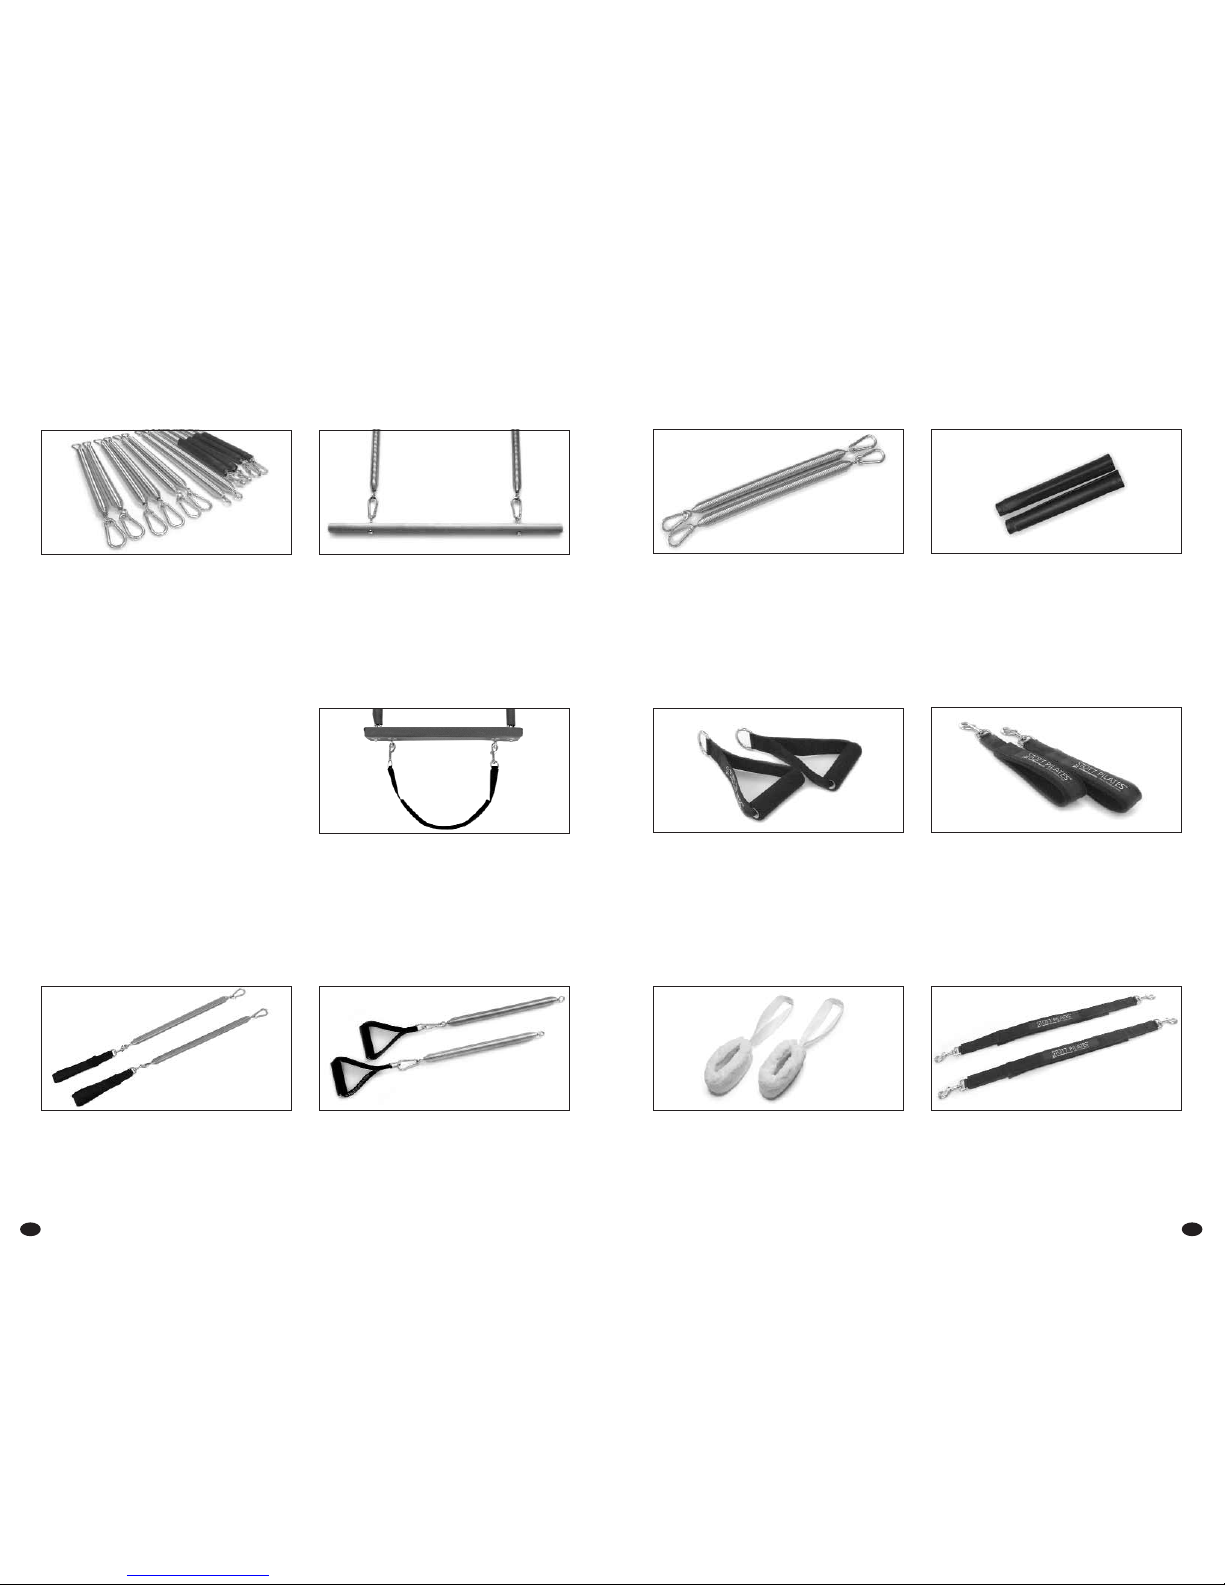
REPLACEMENT SPRING PACKAGE
Springs should be replaced every 24 months,
or as needed within that period.
A complete spring replacement package is available
for the Cadillac/Trapeze Table and includes:
◗roll-down springs (2)
◗leg springs (2)
◗light arm springs (2)
◗push-thru springs (2)
◗push-thru springs with covers (2)
◗trapeze springs with covers (2)
ROLL-DOWN SPRINGS (black)
Shown with roll-down bar attached. Can also function
as regular arm springs.
LEG SPRINGS (white)
Shown here with padded long spine straps attached. LIGHT ARM SPRINGS (yellow)
Shown here with foam grip handles attached.
TRAPEZE SPRINGS (red)
Shown here with trapeze, trapeze strap and
covers attached.
11
PADDED LONG SPINE STRAPS
Also available without padding.
FOAM GRIP HANDLES
Cushioned and rounded, these provide extra comfort.
EXTENSION STRAPS
OPTIONAL PURCHASE
For use with leg springs and long spine straps.
FUZZY HANGING STRAPS
Soft and woolly, these add extra comfort and security
for specific exercises.
PUSH-THRU SPRINGS (blue)
For use with push-thru bar. SPRING COVERS, VINYL
Vinyl covers for use with push-thru springs from below
and trapeze springs.

12
Replacement PartsCONT’D
VERTICALLY SLIDING BAR
Supports arm and leg springs.
STAR KNOB
Secures vertically and horizontally sliding bars.
SPRING CLIPS
Locking spring clips are required when using push-thru
bar with springs from below.
Non-Locking Spring Clip Locking Spring Clip
SAFETY CHAIN
For use with push-thru bar.
HORIZONTALLY SLIDING BAR
Supports the trapeze.
SUPPORT STRAP
Wraps securely around upholstered bed.
13
Optional Items
FOAM CUSHIONS
Available in three sizes. Used for comfort and
additional support when performing a wide variety
of exercises.
GRIPPER MATS
Non-slip rubber mats are handy to increase traction
and prevent slipping.
A gripper mat can be wrapped around push-thru bar,
roll-down bar, uprights or placed on upholstered bed.
RUBBER PADS
Non-slip rubber pads can help establish
correct alignment and positioning or to provide
cushioned support.
PADDED PLATFORM EXTENDER
Can be used on the upholstered bed for
seated or standing exercises.
REFORMER BOX
Used to facilitate or vary exercises. MAPLE ROLL-UP POLE
Provides added scapular awareness.

14
Cadillac Manuals
Step-by-step guides to the STOTT PILATES®
Cadillac repertoire!
Choose from a variety of
cutting-edge DVD titles
Increase your expertise with three levels of Cadillac instruction.
Expand Your Repertoire
Contact Us Today:
visit www.merrithew.com
or call toll-free North America 1-800-910-0001
United Kingdom 0800-328-5676
Warranty
STOTT PILATES®CADILLAC / TRAPEZE TABLE
Merrithew Health & Fitness™warrants that all new Cadillac / Trapeze Table products are free of manufacturing defects in
workmanship and materials, subject to the terms below. This warranty becomes effective at the invoice date of the original
purchase. Parts repaired or replaced under the terms of this warranty will be warranted for the remainder of the original
warranty period.
This warranty applies to the STOTT PILATES Cadillac / Trapeze Table only:
◗while it remains in the possession of the original purchaser and proof of purchase is demonstrated
◗if claims are made within the warranty period
◗if upgrades are made as required by Merrithew Health & Fitness
THIS WARRANTY SHALL BE NULL AND VOID SHOULD:
◗the equipment be used for any other purpose other than as intended
◗all safety and usage guidelines are not followed as specified
◗if equipment failure is a result of improper maintenance
◗if equipment has been subjected to accident, misuse, abuse, improper service,
or any modification not authorized by Merrithew Health & Fitness
This warranty does not cover damage to the finish of any STOTT PILATES equipment, or shipping charges, customs clearance fees
(if applicable) or any costs incurred in installing repaired or replacement parts shipped under the provisions of this warranty.
LIMITED LIFETIME WARRANTY
Merrithew Health & Fitness will, at its option, repair or replace any of the parts listed below,
provided that the part(s) fail due to a defect in workmanship or materials:
◗vertical bars and overhead frame
◗components of the frame and related welding
ONE (1) YEAR LIMITED WARRANTY
On straps and spring clips.We recommend that spring clips be changed annually.
TWO (2) YEAR LIMITED WARRANTY
Merrithew Health & Fitness will, at its option, repair or replace all other components, other than upholstery, that fails
for any reason, provided such failure is reported to STOTT PILATES within a period of two years from the invoice date
of the original purchase.
90-DAY FABRIC WARRANTY
The vinyl fabric upholstery on your STOTT PILATES Cadillac / Trapeze Table will be replaced if it fails to give normal wear for
90 days after delivery. Proof of damage may be required.This warranty does not cover cuts, burns, stains, soiling, pet damage
or damage caused by other unreasonable use.This warranty does not apply to fabrics cleaned with abrasive, corrosive or
chemical cleansers. If the identical fabric is not available, Merrithew Health & Fitness will provide an equivalent fabric.
DISCLAIMER OF IMPLIED WARRANTIES AND LIMITATION OF REMEDIES
Repair or replacement of defective parts is your exclusive remedy under the terms of this limited warranty. In the event of
parts availability issues, Merrithew Health & Fitness will not be responsible for any consequential or incidental damages
arising from the breach of either this limited warranty or any applicable implied warranty, or for failure or damage resulting
from acts of nature, improper care and maintenance, accident, alteration, replacement of parts by anyone other than
STOTT PILATES, misuse, transportation, abuse, hostile environments (inclement weather, acts of nature), improper installation
or installation not in accordance with local codes or printed instructions.
This limited warranty is the sole express warranty given by Merrithew Health & Fitness. No product
performance, specification or description wherever appearing is warranted by Merrithew Health & Fitness
except to the extent set forth in this limited warranty. Any implied warranty protection arising under
the laws of any state, province or territory including implied warranty of merchantability or fitness for
a particular purpose, or use, is hereby limited in duration to the duration of this limited warranty.
Neither dealers, web resellers, nor the retailers selling this product have any authority to make any additional warranties
or to promise remedies in addition to or inconsistent with those stated above. Merrithew Health & Fitness maximum liability,
in any event, shall not exceed the purchase price of the product paid by the original purchaser.
Table of contents
Other STOTT PILATES Fitness Equipment manuals


Popular Fitness Equipment manuals by other brands


G-FITNESS
G-FITNESS AIR ROWER user manual

CAPITAL SPORTS
CAPITAL SPORTS Dominate Edition 10028796 manual

Martin System
Martin System TT4FK user guide

CIRCLE FITNESS
CIRCLE FITNESS E7 owner's manual

G-FITNESS
G-FITNESS TZ-6017 user manual

Accelerated Care Plus
Accelerated Care Plus OMNISTIM FX2 CYCLE/WALK user manual


