Stoveman Stoveman 16 User manual

SAUNA HEATER INSTALLATION AND OPERATING MANUAL
Table 1. Heater specifications
1. GENERAL
Stoveman product range includes various modifications of sauna heaters. You can choose between round and angular shaped
stoves. The heater may have a door panel made of heat-resistant glass or metal (M). The heater can be heated directly from
the hot room or have an extended fire chamber (LS) to be heated
from another room.
Declaration of performance for the purchased
sauna heater type is annexed to the manual.
Choose the heater with suitable heating output for your sauna
room. Sauna room’s suitable cubage for this heater is given in the
specifications.
When choosing a suitable heater it is important to know that
uninsulated wall and ceiling surfaces (such as brick, glass, stone
and concrete surfaces) increase the required output of the heater.
Our sales assistant or a representative of our factory can assist you
at choosing a suitable heater or you can use a special application
for choosing the heater on our website www.stoveman.ee
http://www.stoveman.ee/kerise-valimine/
1.1. Heater components
(See Fig. 1)
1- Heater stones (not included in the supply)
2- Steel mesh
3- Cleaning hatch
4- Flue gas outlet to be connected with chimney pipe
5- Heater casing
6- Fire chamber door
7- Glass panel door (optional metal door)
8- Ash drawer
9- Fire chamber extension for wall penetration (LS models)
10- Fire grate
Figure 1. Heater components
Type
Stoveman 16
Models
16R; 16R-M; 16; 16-M; 16R-LS; 16R-M-LS;
16-M-LS; 16-LS
Heating output in the sauna room
17 kW
Sauna room cubage
8-16 m³
Fuel
Wood logs up to 40 cm in length
Refuelling loads
11,2 kg in three parts
Minimum required draft
12 Pa
Required temperature class of chimney
T600
Inner diameter of a chimney pipe to be connected to the
heater
115 mm
Safety distance to combustible materials:
sides
ceiling
back
front (from the furnace door)
500 mm
1200 mm
500 mm
1000 mm
Carbon dioxide emissions at 13% O2content
0.61%
Total efficiency
66%
Flue gas temperature
443 °C
Weight without sauna stones
70 kg / LS 82 kg; Heavy 92 kg / LS 107 kg
Weight of sauna stones
140 kg
Diameter of sauna stones
10–15 cm
Minimum cross-section of ventilation openings
7850 mm²
Minimum cross-section of smoke flue
10200 mm²
Thickness of furnace walls and ceiling
5 mm; Heavy-8mm
Opening of the ash drawer after igniting the stove
up to 10 mm
Mass of generated flue gas
14,7 g/s

1
2. Installation instructions
2.1. Before installation
We recommend performing the first heating outside without heater stones before installing the heater, because the
final curing of the external heat-resistant paint of sauna heaters is completed only after heating and the curing process
may give off an unpleasant burning smell. Before that avoid scratching the metal parts of the heater. If necessary,
connect a smoke pipe to the flue outlet of the heater to get draft.
Before installation, make sure that all requirements of safety distances are met. There should be no electrical devices, wires
or combustible materials around the heater in the distances as provided by the requirements. During installation, also
chimney pipe safety requirements must be followed.
• Installation of the sauna heater must comply with all respective applicable national and EU regulations and standards.
The heater is also suitable for use in case when several fire chambers have a joint flue pipe, provided that all requirements
necessary for the operation of the heater are met. The chimney with joint flue pipe must be designed and built in compliance
with technical requirements of all heating appliances connected to the joint flue and taking into account their possible
simultaneous operation.
• Please ask for further information on the fire safety rules from local fire safety officials and representatives of relevant
supervising authorities.
• The heater must be installed in such a way that ensures an access to the heater flue pipe and chimney flue for cleaning.
2.2. Sauna room ventilation
Sauna room ventilation can be designed and built as a natural or mechanically forced ventilation.
Natural ventilation can be designed in two ways:
1) Fresh air inlet is located near the heater close to the floor and its outflow as far as possible from the heater, near the
ceiling.
2) Fresh air inlet is located above the heater approximately 500 mm above the upper surface of the stones, and the outlets
are located as far away from the heater as possible so that the core outlet is placed 50-100 mm higher from the floor and
the opening required for adjusting comes from the same channel drawn out under the ceiling.
The grilles installed on the inlet(s) should not impede the necessary amount of air flow.
Mechanical (forced) ventilation fans may cause problems.
Forced ventilation systems may only be designed and built by qualified specialists.
2.3. Protecting the floor
(See Fig. 2)
N.B. Stoveman heater must be installed onto a floor made of non-flammable material or on a special protective base.
A. Concrete floor without tiles.
If the concrete layer is at least 60 mm thick, the heater can be installed directly on the concrete, without applying any
additional special precautions. Make sure that there are no electrical cables or water pipes in the concrete beneath the heater.
B. Tile floor and floor made of combustible material.
Tile adhesives and mortars, as well as waterproofing materials used under tiles do not tolerate heat radiation coming from the
heater. Protect the floor with a plate made of stone or insulated metal. If the floor in front of the heater is made of
combustible material, a floor protection of non-combustible material must be installed.
The floor under the heater must be able to withstand the pressure generated by the legs of the heater with stones and chimney.
If the existing floor cannot withstand the weight of the heater, additional measures must be applied - for example, using a
load distributing plate.
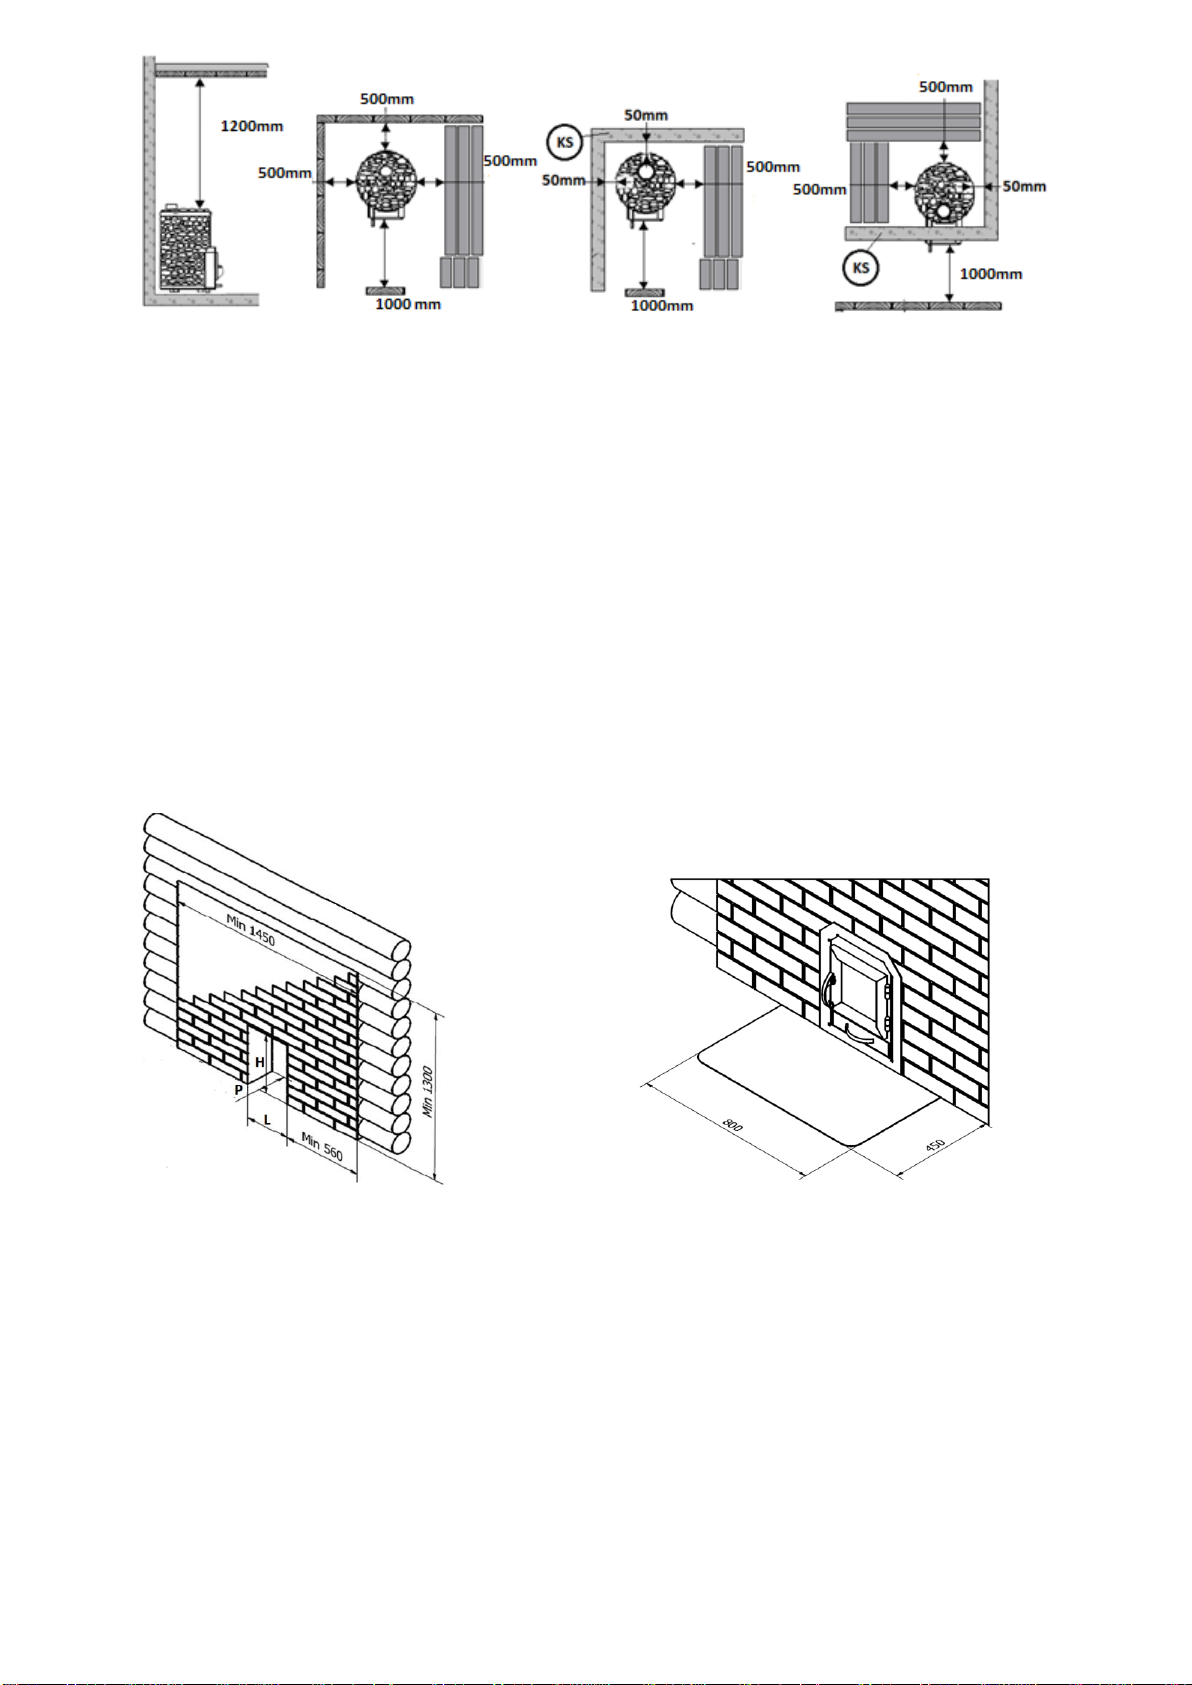
2.4. Safety distances to flammable materials
(See Fig. 3)
Safety distances apply for a heater filled with heater stones.
- Ceiling. The minimum safe distance from the surface of
heater stones to the ceiling is 1200 mm.
- Walls, benches, doors, partitions, and sauna stand made of
flammable materials.
The minimum safe distances to flammable materials are:
sides 500 mm;
back 500mm;
front (from the fire chamber door) 1000
mm.
- Stone walls (KS). Between the side walls and the heater we
recommend leaving at least 50 mm wide air gap, provided that
air can circulate to the front and one side of the heater.
Figure 2. Floor protection
2
Figure 3. Safety distances
2.5. Connecting the heater to the smoke flue
Stoveman heaters have the flue gases outlet on top of the fire chamber. The heater will be connected to the smoke flue with
proper (temperature class T600) pipe fitting with inner diameter of at least 115 (+2) mm. When performing the connection
with smoke flue it is important to make sure that in the direction of chimney outlet the connection won’t be in any part at
declining angle, in order to avoid any obstructions that could impede the flue gas flow.
- Place the connector to the heater’s flue gas output and make sure that the connector fits tightly.
- Perform the connection until the fireproof flue outlet.
- Push the heater into place.
N.B. Avoid pushing the pipe connector too far into the flue not to obstruct the draft in the flue. If necessary, shorten the
respective pipe section.
-Seal the connecting pipe and the connection of the fire-resistant flue using fire-resistant mineral wool, for example. Make
sure the entire connection of the smoke flue is sealed properly. If necessary, add fire-resistant mineral wool.
The connection between the heater and the chimney flue must be inspected by a person with relevant expertise.
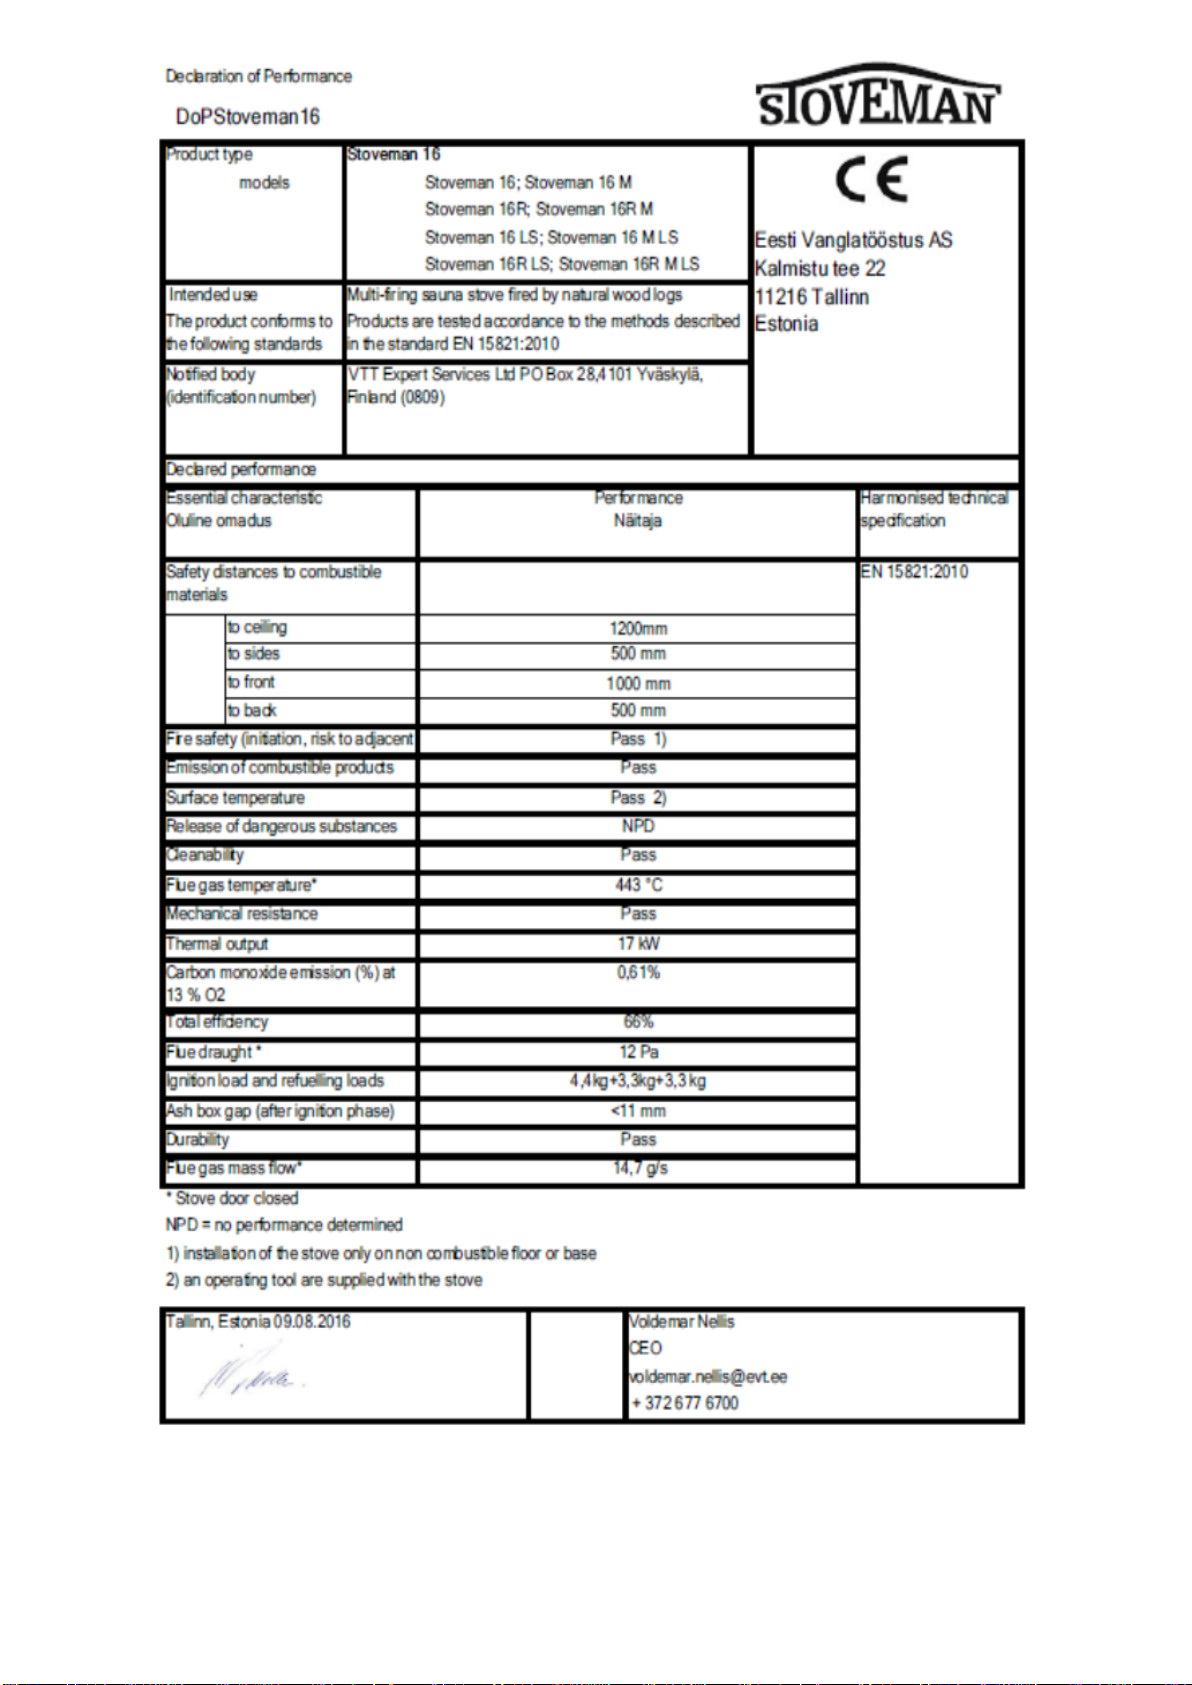
2.6.
Installation of a heater with fire chamber expansion (heated from another room)
(See Fig. 4)
The heater must be installed into an opening of a concrete or brick wall. The recommended dimensions of the opening are:
Height H 470 mm
Width L 320 mm
Thickness/Depth P 200 mm
If the floor in front of the fire chamber door is made of flammable material, a floor protection must be installed.
Figure 4.
3. Instructions for use
Please read carefully all instructions.
3.1. Warnings
- Direct exposure of a human body to heated stones or other parts of the heater is harmful to health.
- Do not throw water onto the stones (generate steam), when someone is in the immediate vicinity of the heater as hot steam
can cause him/her burns.
- Do not use sea water for throwing onto the stones.
3.2. Preparation for use
Hopefully, it is possible for you to perform the initial heating outdoors as said in section 2.1. If it is not possible to heat the
heater outdoors, you must perform the first heating of the already installed heater in a well ventilated sauna room. In such a
case, the final curing of the cover paint will generate a lot of fumes in the sauna room. Heat the heater, using only half the
load of firewood, until the paint on the outer wall of the fire chamber becomes entirely mat and does not emit smoke any
more.

3
3.3. Fuel
The heater can be heated with dry wood logs with a moisture content below 16%. Moisture content of wood affects the
cleanliness of combustion and heater’s overall efficiency. Different types of wood have different calorific value. You can
start the fire with birch bark, a dry newspaper or specific ignition material (e.g. hexamine fuel tablet).
Do not use the following materials for heating the heater:
- Materials with high combustion temperature (such as chipboard, plastic, coal, briquettes, pellets, etc.);
- painted or impregnated wood;
- waste (such as plastic film, textiles, leather, rubber, disposable diapers);
- garden waste (such as grass, leaves);
- liquid fuels and materials suffused with them.
3.4. Heater stones
The most suitable are the stones with a diameter of 10–15 cm. For heater stones, use only stones that are specifically
provided for this purpose. Before stacking the stones onto the heater they must be cleaned of dust.
Stacking the heater stones:
1. Use the stones, which suite between the steel mesh and heater housing.
2. Place the stones in a uniform layer between the heater housing and the steel mesh so that the entire housing is covered.
Thermal radiation of uncovered heater housing can cause the surrounding objects to heat up to dangerous temperatures, even
beyond the safety distances.
3. Fill the upper part of the mesh and the top of the housing with stones. Do not make a high pile of stones on top of the
heater. After you have placed all the stones, make sure that none of them can roll off the heater.
3.5. Heating the sauna heater
Before heating the heater, make sure that in the sauna or in the safety zone of the heater there are no objects that do
not belong there.
1. Empty the ash drawer.
2. Make sure that the combustion and ventilation air supply is not obstructed.
3. Place the larger logs on the bottom of the fire chamber and smaller ones on top leaving enough space between them for the
combustion air to flow. Use firewood with a diameter of 8-12 cm (at the ignition consider the amount of logs, see Table 1).
LS-heaters
Place the firewood on the rack in the back of the fire chamber. Avoid burning the firewood in the extension part of the
chamber. Do not use too long firewood, even if they fit into the fire chamber (see Figure 5).
Figure 5.
4. It is recommended to pick the first heater-load of firewood (the ignition load) from smaller and easily-igniting pieces of
wood, thus having more air and less weight than the standard load. This is especially important in case of low draft due to
poor weather conditions, in which case the recommended initial load is 1/3 of the norm (Table 1), using 3-5 cm diameter
logs.
Place the ignition material on top of the firewood. Starting the fire on the top part of the wood load produces lower
emissions and combustion is of higher quality.
5. Light the ignition material and close the door. N.B. The heater is not intended for use with the open door. The door can
be opened during ignition, when adding firewood and during combustion products removal. During any other times the door
must be closed. The flow of combustion air is regulated by changing the position of the ash drawer.
N.B. The handles heat up when the heater is heated. For opening the door and ash drawer use the heat protection
cloth included in the supply. For igniting the heater, it is recommended to keep the ash drawer open by up to 40 mm. When
the wood has started to burn, the ash drawer must be placed so that the distance between the ash drawer’s front and the fire
chamber’s wall is 3–10 mm, depending on the actual draft.
- Using too strong draft for heating will cause a risk that the unburned parts can get into the ambient air and cause fire hazard
and environmental pollution, as well as that too intense burning will cause overheating of the heater.
- When the sauna room has been heated up enough and it is time to go to the sauna, you can close the ash drawer to reduce
the intensity of the flame and save firewood.
6. If necessary, when the fire starts to go out, add more firewood with a diameter of 12-15 cm (consider the amount when
adding logs, see Table 1).
N.B. Intensive heating over a long period of time increases the risk of fire.
Excessive heating or overheating (such as several consecutive full loads) can cause the heater and chimney to overheat.
Overheating will shorten the heater’s service life and can cause a fire.
Please note that temperatures over 100 °C in the sauna room may damage the sauna and pose hazard to the sauna user’s
health. If necessary, let your heater, chimney and sauna room cool down.
3.6. Water for generating steam
Please use only clean fresh water for throwing onto the heater. The water must be of sufficient quality because water
containing salt, lime, iron, humus, acidic compounds can cause the heater to rust prematurely. Seawater, in particular, can
lead to corrosion especially quickly.
N.B. Do not throw seawater onto the heater!
Water suitable for throwing onto the heater has:
• humus content of <12 mg/liter;
• the iron content of <0.2 mg/liter;
• calcium content of <100 mg/liter;
• manganese content of <0.05 mg/liter;.

4
Throw steam water directly onto heater stones and if possible avoid water getting onto the metal parts of fire chamber and
chimney.
3.7. Maintenance
N.B. The heater must not be modified without the manufacturer’s consent.
Heater
-The ash drawer of the heater must be cleaned before each heating, because the draft is regulated by way of
adjusting the ash drawer’s position and the air needed for burning can cool the combustion grate sufficiently, which
extends the service life of the grate.
-Soot and ash accumulate into the smoke ducts and these have been periodically removed through the cleaning hatch
and fire chamber.
-Temperature fluctuations cause heater stones to crumble. It is therefore recommended to rearrange them at least
once a year or even more frequently if the sauna is used very often. You should also remove all stone pieces and
replace cracked stones with new ones.
-You should clean the heating surfaces of the fire chamber periodically - at least after every 20 heatings.
Chimney
-Chimney and connecting pipes should be cleaned regularly, at least once a year, and certainly whenever the heater
is not been in use for a long period of time (three months and longer).
-The soot caused by incomplete combustion and accumulating due to non-regular cleaning can catch fire in the
chimney. In case of chimney soot fire proceed as follows:
1. Close the ash drawer, heater door and damper (if the damper is installed).
2. Call the local rescue service.
3. Do not use water to extinguish the fire.
4. After the soot fire a chimney sweeper has to inspect the heater, the connection pipes of the heater and chimney
flue as well as the chimney.
3.8. Troubleshooting
-There is no draft in the smoke flue. Smoke enters the sauna room.
• There are leaks in the smoke flue connections. Find leaking connections and seal them.
• Brick flue pipe is cold and the natural draft is insufficient. Start the ignition with a smaller and faster ignition, if possible
make the chimney longer.
• There is negative pressure in the room due to an extraction ventilator or other devices. Ensure adequate air volume for
compensation.
• Several fire chambers are used simultaneously. Bring the construction in compliance with the requirements.
• The ash drawer is full. Empty the ash drawer.
• The smoke ducts of the heater are blocked. Clean the smoke ducts of the heater.
• The flue pipe is installed too deep into the chimney flue. Install the flue pipe correctly.
Sauna does not heat up.
• The sauna room is too big for the heater’s heating output (section 1.).
• The sauna has uninsulatd wall surface. Have the quality of construction inspected and bring the construction in compliance
with the requirements.
• Firewood is damp or its quality is otherwise low (section 3.3).
• Lack of sufficient draft in the smoke pipe. Have the entire smoke pipe inspected if it complies with the requirements.
• The smoke ducts of the heater are blocked (section 3.7.).
Heater stones do not heat up
• Heater’s heating output is too big for the sauna room (section 1.).
• Lack of sufficient draft in the smoke pipe. Have the entire smoke pipe inspected whether it complies with the requirements.
• Firewood is damp or its quality is otherwise low (section 3.3).
• The smoke ducts of the heater are blocked (section 3.7.).
• Check the placement of stones p 3.4.). Remove small stone pieces and stones with a diameter of less than 10 cm from the
stone rack. Replace weathered stones with new undamaged stones.
The heater emits odors.
• See sections 2.1. and 3.2.
• Onto heater stones substances have been spilled that emit odors when heated. Clean or replace contaminated stones.
• The hot heater can amplify the odors mixed with air, which, however, are not caused by the sauna room or heater.
Examples: paint, varnish, oil, spices. Locate and remove the source of the smell.
4. Warranty
The sauna heaters have a manufacturer’s warranty of 24 months (Stoveman Heavy 36 months) after the date of
purchase, proven by a purchase receipt.
The warranty covers defects due to manufacturing errors. The warranty does not cover the following effects caused by the
joint effect of temperature and steaming water to:
Metal deformations;
Surface covering;
Door glass;
Reclamations due to defects must be sent via e-mail to the address [email protected] or as paper mail to the address of AS
Eesti Vanglatööstus, Kalmistu tee 22, Tallinn 11216, Estonia.
The reclamation must describe the defect and must state the serial number of the sauna heater. The serial number is marked
on the sauna heater, at the lower edge of the mesh, at the right side of the fire chamber’s door, and/or on the top plate of the
fire chamber. The reclamation must be accompanied by photographs of the places where the defect can be seen, and by
copies of the purchase documents of the sauna heater.
5

6
Manufactured by:
AS Eesti Vanglatööstus
Kalmistu tee 22
11216 TALLINN, ESTONIA
Tel.: +372 677 6700
Fax: +372 677 6701
www.stoweman.ee
This manual suits for next models
8
Table of contents
Other Stoveman Heater manuals


Popular Heater manuals by other brands


RUSTA
RUSTA 906512020201 manual

SoliTherm
SoliTherm LT 58100-120V user manual

Empire Heating Systems
Empire Heating Systems BF-10-2 Installation instructions and owner's manual

Hotbox
Hotbox ELITE User instructions

Marley
Marley FZL Series Installation & maintenance instructions

HeatStar
HeatStar JET20 Operating instructions and owner's manual