UMA Solar eco-SPARK User manual

Before attempting installation, read these instructions and
acquaint yourself with the component names. Great care
has been taken to make this an easy-to-follow procedure.
A little time spent understanding the system and its parts
will assure a successful, trouble-free installation.
CAUTION: SAFETY COMES FIRST
When working on or around your roof or pool, please take
care to avoid hazards such as electrical wires and loose
shingles.
1506 | Rev. 06
ECO-INSTALL | 1506
©2015 UMA Solar
RESIDENTIAL
INSTALLATION MANUAL
eco-SPARK™ SOLAR POOL HEATER

eco-SPARK collectors are manufactured utilizing cutting
edge technology and the most advanced production
techniques. An eco-SPARK solar system will provide years
of worry-free performance as it captures safe, reliable
heat from the sun year after year.
This manual will give you a great deal of valuable
information. Take time and read through this manual. It
will guide you through the most efficient way to correctly
install an eco-SPARK solar system. By following this step-
by-step guide, your system will meet the installation
standards recommended by the factory.
While the manual explains how to install eco-SPARK solar
panels properly in typical situations, it cannot address
all the unique or individual circumstances possible. If
you have any installation questions, contact your eco-
SPARK Representative for assistance. As the installing
contractor, you are responsible for exercising good
judgment when installing eco-SPARK systems to protect
the long term integrity of the collectors as well as the
mounting surfaces.
1 1. Introduction.
22. Getting Started.
33. Things to Remember.
54. Installation Kits & Components.
65. Parts Breakdown.
76. Solar Panel Layout & Hydraulics.
12 7. Connecting the Solar
Connectors Together.
14 8. Mounting the Solar Panels Using
eco-SPARK Mounts.
20 9. Mounting the Solar Panels on a Flat Roof.
21 10. Assembly of Row Spacer Kits.
22 11. Connecting the Collectors to the
Feed & Return Lines.
1. Introduction/Table of Contents.
INTRODUCTION/TABLE OF CONTENTS. -1
23 12. Running the Feed & Return Lines From
Roof to Ground Level.
25 13. Connecting the Feed & Return Lines to
the Filtration System.
28 14. Pressure Testing The eco-SPARK System.
29 15. Operation & Check-out Procedures.
31 16. Troubleshooting.
35 17. Repair Procedures.
©2015 UMA Solar
INSTALLATION MANUAL eco-SPARK™ SOLAR POOL HEATER

2. Getting Started.
1.
2.
3.
4.
5.
6.
7.
Caution - SAFETY COMES FIRST!
There is no substitute for safety. Always exercise extreme caution, care, and good judgment when working on or
around a roof or pool area.
BEFORE YOU START YOUR INSTALLATION, HERE ARE A FEW IMPORTANT TIPS:
Check with your local building department to determine permitting and code requirements in your area.
While this manual explains how to install eco-SPARK solar collectors properly in typical situations, it cannot
possibly address all the unique or individual circumstances possible. If you have any installation questions, contact
your eco-SPARK representative for assistance.
Before starting any work, determine the location of your system and prepare a schematic drawing of the
installation area. Include the location of the feed and the return lines in this drawing. Roof areas often times look
bigger than they really are, so be sure to measure the available area before making your schematic. Be sure that
the layout of the collectors will allow the collectors to drain when the pool pump shuts off.
Familiarize yourself with all of the eco-SPARK components and plumbing materials that you will need to complete
the installation.
Don’t take shortcuts. Whenever possible, panels should be installed so they are accessible without being walked on.
Walking on the collectors should only take place when absolutely necessary.
Depending upon your specific job, you will need various plumbing items and materials. Be sure to use quality
products that will withstand direct sunlight year after year.
• Please take care to avoid hazards such as overhead electrical wires or loose shingles.
• Be sure to secure ladders so they will not slip or fall.
• Do not allow extension cords to lie in the pool or in standing water.
• Wear shoes with proper tread to prevent slipping on the ladder or sloped roof areas.
• Disconnect all power to the pool equipment when installing an automatic control system.
©2015 UMA Solar
CPVC/PVC PIPE - Use CPVC/PVC SCHEDULE 40 pressure rated pipe. Do not use ABS or a lower standard substitute.
CPVC/PVC FITTINGS - Use CPVC/PVC SCHEDULE 40 pressure rated fitting to match your CPVC/PVC pipe.
DO NOT USE - “plumber’s” fittings or DWV fittings (drain, waste, vent).
PVC CLEANER AND CEMENT - It is important to both CLEAN and CEMENT each CPVC/PVC joint. When gluing CPVC
fittings to PVC pipe, it is necessary to use a good quality multi-purpose cement.
NOTE: As the installer, you are responsible for exercising good judgment when installing eco-SPARK systems to
protect the long term integrity of the collectors as well as the mounting surfaces.
INSTALLATION MANUAL eco-SPARK™ SOLAR POOL HEATER GETTING STARTED -2

3. Things to Remember.
THINGS TO REMEMBER. -3
NO TWO INSTALLATIONS ARE EXACTLY ALIKE BUT
THERE ARE SOME GENERAL BITS OF TECHNICAL
INFORMATION THAT YOU WILL FIND HELPFUL IN
THE FIELD.
ROOF ORIENTATION - Ideally, collectors should
be located on a south facing or flat roof or on an
elevated ground mounted rack facing south. The next
best orientation is west and finally east. Collectors
should never be installed facing north in the Northern
hemisphere.
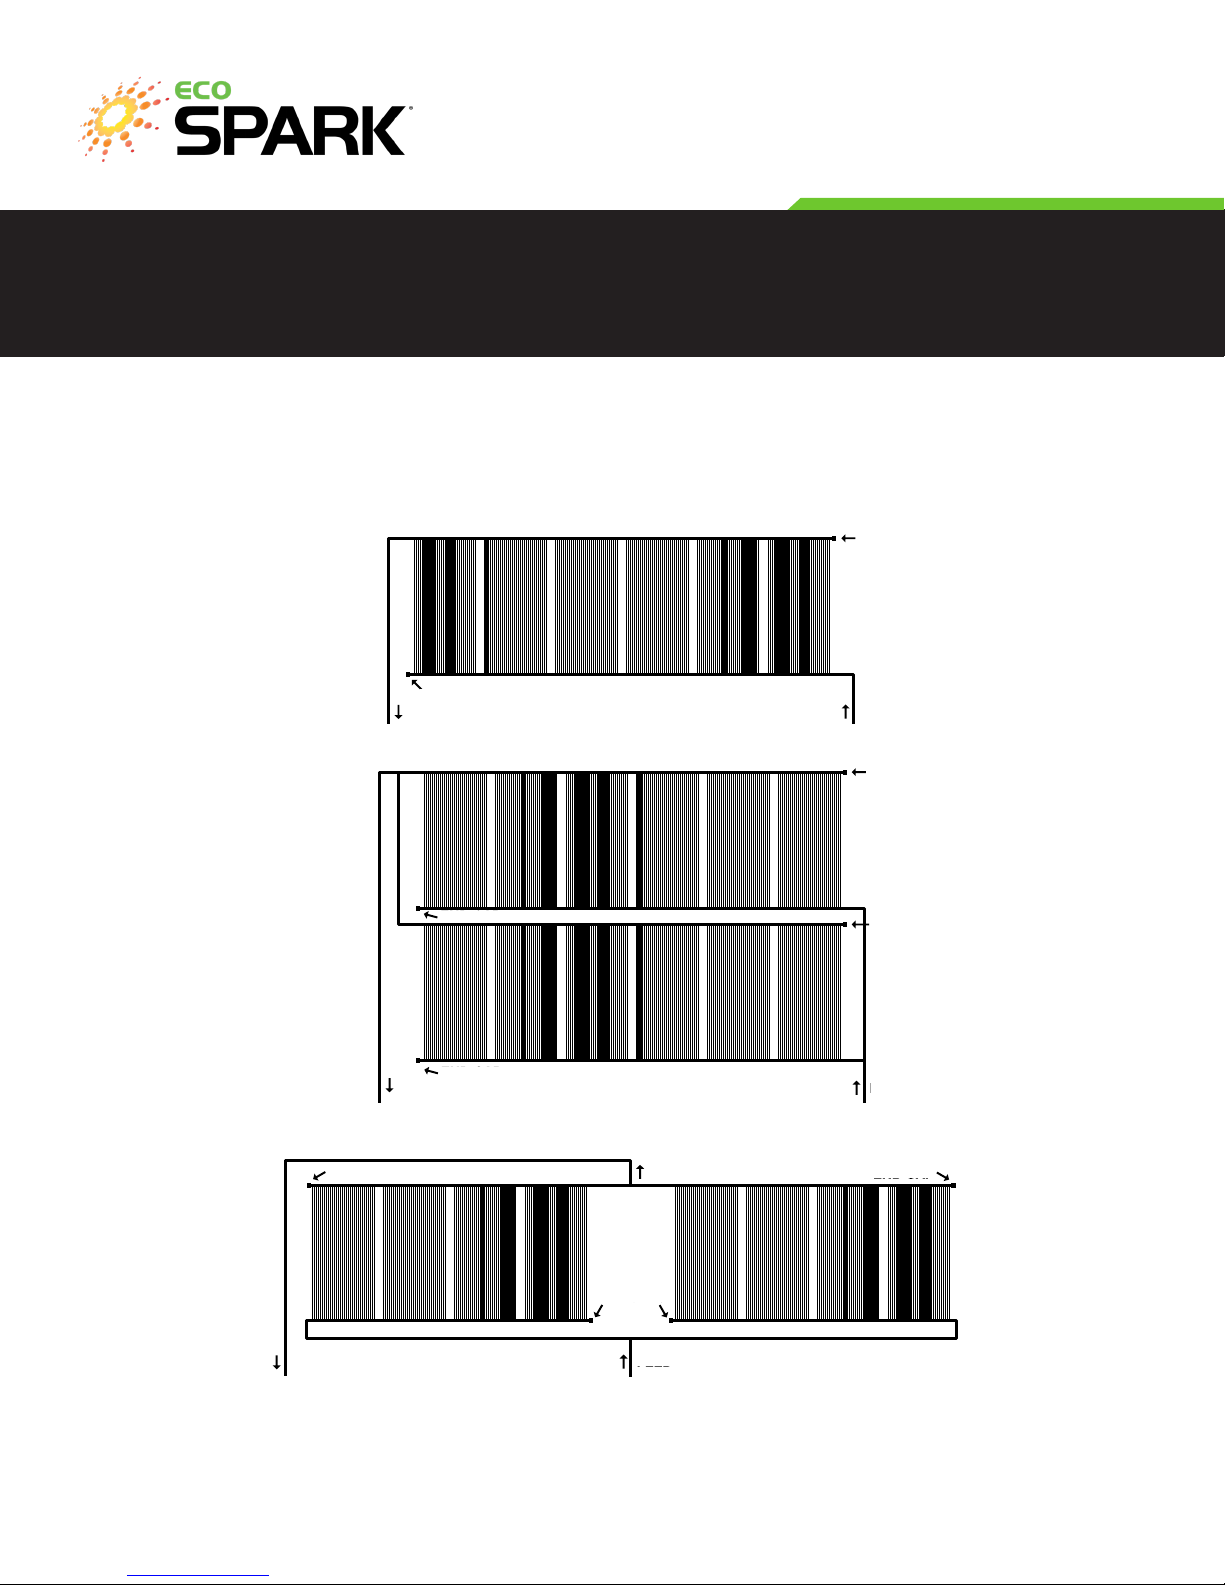
COLLECTOR CONFIGURATIONS - There are many
ways to configure a solar array. The most common and
preferred is in a continuous row. The recommended limit
to the number of collectors that can be installed this way
to achieve even flow throughout the array is (12) SLES-
30’s, (10)SLES-40’s.
This maximum guideline can be exceeded if there is a
high flow or substantial back pressure on the system
which will force adequate flow through every collector.
When you have more than the maximum, you should
either use the double row layout or the single row split
feed layout. Of course, the double row can also be used
for smaller installations when space is a problem. (Fig.
6.2, page 7).
If you have to split up an array due to a skylight or change
in roof level or direction, the layout will be similar to
single row split feed layout.
PUMP HORSEPOWER - The horsepower of your
swimming pool filtration pump must be adequate to
supply the solar system with enough water to provide
the recommended flow rate necessary for the collectors
being installed. The recommended rates are:
Generally, a 1-horsepower pump is sufficient for a
standard pool solar system unless there is an unusually
long pipe run, a high roof or a large number of collectors.
If you are not sure what your pump flow rate is, consult
your eco-SPARK representative for the pump’s flow
characteristics. To limit or balance collector flow, a
series/parallel plumbing configuration may be used.
PLUMBING - It is important that you use the proper
size CPVC/PVC pipe for the size of the solar array. Under
sizing the pipe will produce too much restriction to the
water flow and unnecessarily reduce the flow rate to the
collectors. Use the following as a guide:
Plumbing runs should be as short as possible and the
“hot return” pipe should have the shortest run to reduce
the potential heat loss in the pipe. Horizontal pipes
should be supported with a pipe clamp at least every
4 feet to prevent sagging. The pipe clamp used on pipe
runs across a roof should be ½” larger than the pipe
diameter to allow for expansion and contraction. Pipe
clamps should be used on vertical or horizontal runs on
the side of a building and should be the same size as the
pipe diameter to prevent movement.
PLUMBING NOTE: PVC pipe may be used on the supply
side ONLY. CPVC MUST be used on the return side and
may be used on the supply side.
FLOW RATE MINIMUM PIPE SIZE
0 to 30 GPM 1½”
31 to 50 GPM 2”
51 to 70 GPM 2½”
PANELS RECOMMENDED FLOW
SLES-30 3-4 gallons per minute
SLES-40 4-5 gallons per minute
©2015 UMA Solar
INSTALLATION MANUAL eco-SPARK™ SOLAR POOL HEATER

THINGS TO REMEMBER. -4
3. Things to Remember. - Cont.
AUTOMATIC DRAIN DOWN - The collectors and the
CPVC/PVC pipe should be installed so the water will drain
out of them when the pump shuts off. This is especially
important in areas of the country where freezing
conditions occur.
The eco-SPARK solar pool collectors are warranted
against internal freezing when installed to allow for
drain down. If, as a result of a unique roof design or
adverse pool equipment locations, it is not possible to
achieve complete automatic drain down, manual drain
down valves should be installed in appropriate places in
the plumbing or at the end of the bottom (feed) header.
[Instead of installing an end cap (2-1410-013) at the
end of the header, you would place a (2-1410-005) type
connector (2-1410-004) 1½” x 1½” THD PVC reducer
bushing along with a ½” boiler drain (1-5115-017)].
These valves should be opened when shutting down
the system for the winter months or when freezing
conditions are possible. Your eco-SPARK representative
can assist you with the parts necessary for manual drain
down installations.
©2015 UMA Solar
INSTALLATION MANUAL eco-SPARK™ SOLAR POOL HEATER

One of these kits is required for each row or bank of collectors. It contains the parts necessary to connect the collectors to the feed and
return lines.
This kit gives you the components you need to pressure test the system once installation is complete.
In the event a collector is damaged, this kit contains everything needed to make a repair to a riser tube.
2-1045-001: COLLECTOR KIT
2-3045-003: ROW SPACER KIT
2-1145-006: SYSTEM KIT
2-3020-022: PRESSURE TESTING KIT
2-3020-025: REPAIR TOOL KIT
INSTALLATION KITS & COMPONENTS. -5
One of these kits is required for each collector it contains: (2) (∂v) plastic panel clamps, (2) 2-1160-002, and (2) 2-1160-003.
One of these kits is required if you need to bypass a vent pipe, or obstacle larger than 6”. It is also used to connect collectors into one row
that are on dierent roof levels or that are facing dierent directions. It contains the part necessary to connect the collectors to the CPVC
pipe between them.
4. Installation Kits & Components.
The following is a description of the installation kits that are required for a complete eco-SPARK installation. The (2-
1145-006) system kit and (2-1045-001) collector kits are always required while the (2-3045-003) row spacer kit is only
required for certain installations. The (2-3020-022) pressure testing kit is used at the end of the installation to test the
system while the (2-3020-025) repair tool kit is used if you ever need to repair a collector.
MISCELLANEOUS - Depending upon your specific job, you will need other plumbing items and materials such as: PVC/
CPVC valves, stainless steel lag bolts, polyurethane caulk, silicone spray, pipe straps, black electrical wire ties, electrical
wire nuts, 18ga-22ga sensor wire, 12ga-14ga electrical wire with ground, Teflon tape, concrete anchors and screws,
electrical conduit, etc. Be sure to use quality products that will withstand direct sunlight year after year.
NOTE: While this manual explains how to install eco-SPARK solar panels properly in typical situations, it cannot
address all the unique or individual circumstances possible. If you have any installation questions, contact your
eco-SPARK representative for assistance. As the installing contractor, you are responsible for exercising good
judgment when installing eco-SPARK systems to protect the long term integrity of the collectors as well as the
mounting surfaces.
• Flat head and Phillips head screwdriver
• Power drill with bits, 5/16” and 7/16” sockets
• Pipe cutter or hacksaw
• Garden hose
• Channel lock pliers
• Caulking gun
• Ladder
INSTALLATION MANUAL eco-SPARK™ SOLAR POOL HEATER
©2015 UMA Solar

5. Parts Breakdown.
PARTS BREAKDOWN. -6
PART NO. DESCRIPTION 2-1145 - 0 04 2-3045-001 2-3045-003 2-3020-022 2-3020-025
2-1160 - 0 03 Top Mounting Pad 2
2-1410-004 Panel Clamp with Gasket 2 2 2
2-1410-005 Pipe Connector 2 4
2-1410 -013 End Cap 2
2-1160 - 0 02 Bottom Mounting Pad 2
1-5115 - 023 ½” ball valve 1
2-3020-001 0-60 PSI Pressure Gauge 1
2-2015-101 Pressure Test “T” Assembly 1
2-1410-007 Pin Insert Tool 1
2-1410-008 ¼” Chisel 1
OTHER INSTALLATION COMPONENTS
2-1410-023 Vacuum Breaker 2-2015-010 PVC 2” Check Valve
2-2000-015 Pipe Clamp 2-2015-064 Two Way Ball Valve
1-5060-011 1/4” x 4” S.S Lag bolt 2-2015-066 Three-Way Valve
2-1020-004 Tap Cons 1/4”x1-3/4’ w/ Drill Bit 2-1410-017 Gasket for Panel Clamp
2-1020-007 Repair Plugs Straps, Strap Mounts
2-1160-003 2-1410-005 2-1410-013
2-2015-101
PRESSURE TEST “T”
ASSEMBLY
2-116 0 - 0 02 2-1410-004
2-1410-008
1/4” CHISEL
1-5115- 023
½” BALL VALVE 2-1410-007
PIN INSERTION TOOL
INSTALLATION MANUAL eco-SPARK™ SOLAR POOL HEATER
©2015 UMA Solar
2-3020-001

SOLAR PANEL LAYOUTS & HYDRAULICS. -7
Shown below are the 5 most common solar collector installations.
6. Solar Panel Layouts & Hydraulics.
FIG 6.1 - SINGLE ROW
FIG 6.2 - DOUBLE ROW
FIG 6.3 - SINGLE ROW SPLIT FEED
END CAPS
END CAP
RETURN END CAP
END CAP
RETURN
RETURN FEED
END CAP
FEED
END CAP
FEED
END CAP
END CAP
END CAP
Fig. 6.1 - SINGLE FEED
Fig. 6.3 - SINGLE ROW SPLIT FEED
Fig. 6.2 - DOUBLE FEED
INSTALLATION MANUAL eco-SPARK™ SOLAR POOL HEATER
©2015 UMA Solar

SOLAR PANEL LAYOUTS & HYDRAULICS. -8
RETURN
FEED
END CAP END CAP
END CAP
FEED
END CA
P
END CAP
RETURN
END CAP END CAP
END CAP
FIGURE 5.5
SERIES/PARALLEL FEED
FIGURE 5.4
SERIES FEED
Shown below are the some common solar collector installations.
6. Solar Panel Layouts & Hydraulics. - Cont.
FIG 6.4 - SERIES FEED
FIG 6.5 - SERIES/PARALLEL FEED
FEED
FEED
RETURN
RETURN
END CAP
END CAP
END CAP
END CAP
END CAP
END CAP
END CAP
END CAP
Fig. 6.4 - SERIES FEED
Fig. 6.5 - SERIES/PARALLEL FEED
INSTALLATION MANUAL eco-SPARK™ SOLAR POOL HEATER
©2015 UMA Solar

PANEL CONFIGURATIONS - There are many ways to configure a solar array. The most common and preferred is in one
continuous row as shown in Fig. 6.1, page 7. Hoever, there are, recommended limits to the number of panels that can be
installed this way to achieve even flow throughout the array. The maximums are:
These maximums can be exceed if there is high flow or substantial back pressure on the system, which will force adequate
flow through every panel. When you have more than the maximums, you should either use the double row layout as in
Fig. 6.2 or the single row split feed layout as in Fig. 6.3, page 7. Of course, the double row can also be used for smaller
installations when space is a problem.
SOLAR PANEL LAYOUT & HYDRAULICS. -9
Whenever possible, the largest panel (SLES-40) should be used. This will:
However, unique roof designs may require a combination of different size collectors to best cover the roof area.
6. Solar Panel Layouts & Hydraulics. - Cont.
PANEL SIZE
SLES-8 1’ x 8’
SLES-10.5 1’x10.5’
SLES-30 4’x8’
SLES-40 4’x10.5’
MODEL # MAXIMUM PER ROW
SLES-30 12
SLES-40 10
Reduce your total collector cost.
Reduce labor and installation material cost.
Reduce the length of the solar array.
Reduce the number of roof penetrations.
Produce a more attractive installation.
•
•
•
•
•
ROOF ORIENTATION - Ideally, collectors should be located on a south-facing or flat roof on an elevated ground
mounted rack facing south. The next best orientation is west and finally east. A collector should never be installed on a
north roof without a reverse rack in the Northern hemisphere.
CHOOSING THE RIGHT SIZE COLLECTOR - The roof space available to you will determine which model collector to
use. Since eco-SPARK manufactures collectors in four different sizes, you have great flexibility in what you can design.
The four panels sizes are:
INSTALLATION MANUAL eco-SPARK™ SOLAR POOL HEATER
©2015 UMA Solar

SOLAR PANEL LAYOUT & HYDRAULICS. -10
PUMP HORSEPOWER - The horsepower of your swimming pool filtration pump must be adequate to supply the
solar system with enough water to provide the recommended flow rate necessary for the panels being installed. These
recommended rates in gallons per minute (GPM) are (0.1-0.15 gal/ft²).
PLUMBING - It is important that you use the proper size CPVC/PVC pipe for the size of the solar array. Under sizing the
pipe will produce too much restriction to the water flow and unnecessarily reduce the flow rate to the panels. Use the
following as a guide:
For example: If you are installing (10) SLES-40 panels, your pump must be able to deliver 40 GPM to the solar array. These
flow rates may be exceeded by as much as 100% without any detrimental impact on the performance of the system. The
existing pool recirculation pump is typically adequate for recirculating the water through the solar system. Generally, a
1-horsepower pump is sufficient for a standard pool solar system unless there is an unusually long pipe run, a high roof,
or a large number of panels. If you are not sure what your pump flow rate is, consult your eco-SPARK representative
or pump manufacturer for the pump’s flow characteristics.
For larger flow rates, consult your eco-SPARK representative for the proper pipe size or alternative series plumbing
techniques, which will reduce the necessary flow rates on larger systems.
Plumbing runs should be as short as possible and the “hot return” pipe should have the shortest run to reduce potential
heat loss in this pipe. Pipes should be supported with pipe clamps or “G” clamps at least every 4 feet to prevent sagging.
(Check with plumbing code in local jurisdiction.) The pipe clamp used on horizontal pipe returns across a roof should be
½” larger than the pipe diameter to allow for expansion and contraction. The pipe clamp used a on vertical or horizontal
runs on the side of the building should be the same size as the pipe diameter to prevent vibration and to assure a
professional looking installation.
Since 90-degree elbow fittings produce a restriction to flow, you will want to use as few as possible; keep this in mind
when planning your plumbing runs. Their use cannot be avoided, but with careful forethought, you will use the least
number possible. Occasionally, the use of (2) 45-degree fittings will eliminate a 90, but it is not necessary to always use
them as this will run up the expense of your materials.
6. Solar Panel Layouts & Hydraulics. - Cont.
MODEL # MINIMUM FLOW
SLES-10.5 1 GPM
SLES-30 3 GPM
SLES-40 4 GPM
FLOW RATE MINIMUM PIPE SIZE
0 to 30 GPM 1½”
31 to 50 GPM 2”
51 to 70 GPM 2½”
INSTALLATION MANUAL eco-SPARK™ SOLAR POOL HEATER
©2015 UMA Solar

SOLAR PANEL LAYOUT & HYDRAULICS. -11
BALANCED FLOW - When you have to split a solar system as in Fig. 6.2 or Fig. 6.3, page 7, it is critical that the shown
plumbing runs be followed to assure equal water flow through both rows of panels. Since water will follow the path of
least resistance, if one plumbing run is shorter than the other, more water will flow through it than through the other
one. Keep this in mind if you design a panel layout different than the examples. Your eco-SPARK representative can also
assist with this and explain the use of “balancing valves” on larger systems.
If you are installing the solar panels on a flat roof or flat ground rack, the top (return) header of the panel should be at
least 3” higher than the bottom (feed) header to assure equal flow through all of the tubes of all the panels. To achieve
even distribution of water throughout the row of panels, proper flow rates and a little back pressure should be present.
AUTOMATIC DRAIN DOWN - The panels and the CPVC/PVC pipe should be installed so the water will drain out of them
when the pool pump shuts off. This is especially important in ares of the country where freezing conditions occur. (The
eco-SPARK solar pool panels are warranted against internal freezing when installed to allow for drain down.) To allow
for the water to drain, a vacuum breaker (2-1410-023) is installed on the solar feed line above the non-positive three-
way valve as shown in (Fig. 13.1, page 25). (Non-positive means that the valve allows for water to drain back through
the valve even while in the off position. If you have If you have a 3-way valve that is not non-positive, you can make it
so by drilling an 1/8” hole in the diverter). If, as a result, of a unique roof design or adverse pool equipment location, it is
not possible to achieve complete automatic drain down, manual drain down valves should be installed in appropriate
places in the plumbing or at the end of the bottom (feed) header.
Instead of installing and end cap (2-1410-013) at the end of the header, you would place a pipe connector, and (2-1410-
005) 1½” slip x 1½” threaded PVC reducer bushing, along with a ½” boiler drain. These valves should be opened when
shutting down the system for the winter months or when freezing conditions are possible. Your eco-SPARK representative
can assist you with the parts necessary for the manual drain down installations.
6. Solar Panel Layouts & Hydraulics. - Cont.
INSTALLATION MANUAL eco-SPARK™ SOLAR POOL HEATER
©2015 UMA Solar

CONNECTING THE SOLAR PANELS TOGETHER. -12
7. Connecting the Solar Panels Together.
Place two collectors next to each other. Lay a plastic panel clamp (2-1410-004) top,
bottom, gasket and clip where the two headers meet.
Clean the groove of both headers and dry them.
Spray the gasket with silicone and insert it into the groove of one of the headers.
Make sure that the gasket is fully seated into the header groove by pushing firmly
with your thumb all the way around the gasket.
Connect the two headers by inserting the rubber gasket (O-ring) into the opposite
header groove and fitting the ends of both headers into the (PPC) plastic panel clamp.
Place the bottom half of the PPC under the header end of the larger, flat portion
facing away from the panel.
Interlock the tab in the top half of the clamp with the hole in the bottom half, swing
the top half round over the headers.
NOTE: Make sure that the gasket sits snugly in the grooves of both headers, and
is not squished or pinched between the headers, as this could result in leaking.
1.
2.
3.
4.
5.
6.
INSTALLATION MANUAL eco-SPARK™ SOLAR POOL HEATER
©2015 UMA Solar

CONNECTING THE SOLAR PANELS TOGETHER. -13
7. Connecting the Solar Panels Together. - Cont.
INSTALLATION MANUAL eco-SPARK™ SOLAR POOL HEATER
Notice that the latch and the latch lock are connected. Gently disconnect the two
parts from the small plastic bit holding them together. Discard the small piece and
keep both the latch and latch lock near by.
Use channel lock pliers to tighten the clip grip by squeezing it with reasonable force
until it seats flush or even slightly farther so it cannot slide out of its position.
Lock the two halves of the clamp together using the latch (2-1410-018). Do this by
sliding the wide end of the cone shaped latch over the thin end of the PPC assembly.
Use channel lock pliers to tighten the latch grip by squeezing it with moderate force
until you hear a ‘click’ sound and it seats flush so it cannot slide out of its position.
Move your finger over the wide end of the latch to make sure it is in fact flat. This will
confirm that it is positioned securely.
Take the latch lock and tilt it so the lock’s gripping teeth are positioned
inside the groove of the latch. Gently press downwards into position until
you hear a ‘click’ sound or the latch lock is flat against the latch.
If you wish to dismantle the PPC Set, strongly pull the latch lock upwards while your
thumb is holding the flat part of the latch or use a flat-head screwdriver. Gently
insert the flat-head screwdriver under the lock and gradually pull upwards until it is
released from place. If the latch lock is in good conditions it can be used again. The
gasket (O-ring) will be better replaced
7.
8.
9.
10.
11.
©2015 UMA Solar

MOUNTING THE SUNSTAR PANELS USING SUNSTAR MOUNTS. -14
The most important feature of the eco-SPARK installation method is its simplicity. The mounting pad’s flexibility allows
for the relativity simple installation of the eco-SPARK collectors on any roof or rack surface regardless of pitch. To
properly install collectors utilizing mounting pads follow these few steps:
1.
2.
3.
4.
5.
Prepare each collector by sliding the (2-1160-003) mounting pad onto the mounting rail molded to the top header.
(2) top pads per collector are required and should be located on the mounting sections of the collector. (2) mounting
pads are also required at the bottom of the header.
Snap a chalk line across the roof where you want the top edge of the collector header to be. This chalk line should
slope upward towards where the return line will be located, to allow for proper drainage. The return line corner of
the collectors should be the top corner closest to the pool pump so that once the water is heated, it will be returning
to the pool as quickly as possible. Be sure to allow 2” of clearance above this chalk line for the mounting pads.
Number of mounting pads required:
Lay the first two collectors so that the top edge of the top header is located at the chalk line.
Connect the top headers of the collectors together using the (PPC) plastic panel clamp by following the procedures
described in the section of this manual on connecting solar collectors together.
After positioning the mounting pads in the proper location, secure the first collector to the roof. Apply ample roof
sealant to both lag bolts or appropriate roof fasteners and to the roof. Position mounting pad on the roof and lag
to the roof. The (1-5060-011) ¼” x 4” lag bolt should be securely fastened, but not over tightened. In the case of
tile roofs, tap cons are commonly used to attach the mounting pads to the tile. Using tap cons avoids the need to
penetrate the roof membrane or substrate in cases where the roof tiles are properly anchored to the roof. On all types
of roofs be sure to seal each penetration with the proper sealant.
(2) on top header
(2) on bottom header
Top S roof mounting pad “left”.
Bottom S roof mounting pad “right”.
(2) mounting pads required for each side.
NOTE: Typically, each mounting pad should be centered on the mounting rail; however, the pad can be slid from
side to side so that it can be centered on a roof truss or on the top of a barrel tile. You may even want to move
the mounting pad to a different mounting rail, but remember to always keep the pads spaced out as evenly as
possible.
8. Mounting the Solar Panels
Using eco-SPARK Mounts.
Fig. 8.1
INSTALLATION MANUAL eco-SPARK™ SOLAR POOL HEATER
©2015 UMA Solar

6.
8.
7.
9.
Before securing the next collector to the roof, connect an additional collector to the row using the plastic panel
clamp. This allows you to lift up the header of the adjacent collector when connecting the two collectors together.
Follow the procedures listed above until all collectors are connected to each other and anchored to the roof.
Install bottom mounting pads.
After all collectors are anchored to the roof, connect the bottom headers together with additional plastic panel
clamps.
8. Mounting the Solar Panels
Using eco-SPARK Mounts. - Cont.
The S Roof Mounting Pad is made up of two parts: top and bottom. Please use the following information as a guide for installation.
The bottom S Roof Mounting Pad set is created from two separate parts:
Slider Track
Slider and Track Assembly Together
MOUNTING THE SUNSTAR PANELS USING SUNSTAR MOUNTS. -15
Fig. 8.2
INSTALLATION MANUAL eco-SPARK™ SOLAR POOL HEATER
©2015 UMA Solar

8. Mounting the Solar Panels
Using eco-SPARK Mounts. - Cont.
The track of the bottom S Roof Mounting Pad set is very useful. Notice the graphic marks. These marks are here to assist you in
determining how to position the mount during installation. Each symbol refers to a possible weather condition: “snowake” for
cold and “heat waves” for hot.
As you know, the collector expands and contracts in correlation to the weather conditions. When it’s hot outside, the collector is
longer and when it’s cold, the collector is shorter.
While installing the S Roof Mounting Pad, the installer should consider the current ambient temperature and position the slider over
the track (and grid) so that it is closer to the icon that best denes the weather. This will allow enough room for the system to expand
and contract as needed.
MOUNTING THE SUNSTAR PANELS USING SUNSTAR MOUNTS. -16
Fig. 8.3
Fig. 8.4
INSTALLATION MANUAL eco-SPARK™ SOLAR POOL HEATER
©2015 UMA Solar

Install (2) top S mounts and (2) bottom S mount set for each collector as illustrated in the sketch below.
(2) CLAMPS REQUIRED FOR EACH SIDE
8. Mounting the Solar Panels
Using eco-SPARK Mounts. - Cont.
MOUNTING THE SUNSTAR PANELS USING SUNSTAR MOUNTS. -17
Fig. 8.5
INSTALLATION MANUAL eco-SPARK™ SOLAR POOL HEATER
1/4" ANCHOR
SCREW PER ECO
SPARK MOUNT
ECO SPARK TOP MOUNT,
(2) PER COLLECTOR
ECO SPARK
COLLECTOR
ECO SPARK BOTTOM MOUNT,
(2) PER COLLECTOR
(1) 1/4" ANCHOR
SCREW PER ECO
SPARK MOUNT
¼ Anchor
screw per eco-
SPARK mount
(1) ¼ Anchor
screw per eco-
SPARK mount
eco-SPARK Bottom Mount,
(2) per collector
eco-SPARK Top Mount,
(2) per collector
eco-SPARK Collector
©2015 UMA Solar

MOUNTING THE SOLAR PANELS USING eco-SPARK MOUNTS -18
NOTE: As the installing contractor, it is your job to evaluate any site specific conditions that might create
unwanted roof wear. As an example, if you are installing the system on an inexpensive or soft asphalt shingle
roof, you’ll want to put some 4” by 4” pads underneath each panel clamp along the bottom headers to prevent
roof wear. Some installers make these pads from aluminum roof flashing or old mat systems, and attach them
to the roof with roof sealant or an adhesive.
NOTE: Install lower header based on temperature at the time of installation.
NOTE: Typical residential mounting plan shown. For additional mounting options for commercial installations
please refer to addendum provided by manufacturer’s engineering department.
eco-SPARK Top Mounting Pad
(Placed at panel rail)
eco-SPARK Top Mounting Pad
(Placed at panel rail)
PPC PPC PPC
PPC
Pipe Strap
(To support plumbing)
Pipe Strap
(To support plumbimg)
8. Mounting the Solar Panels
Using eco-SPARK Mounts. - Cont.
Fig. 8.6
INSTALLATION MANUAL eco-SPARK™ SOLAR POOL HEATER
©2015 UMA Solar

USING STRAPS IN HIGH WIND AREAS - In coastal and other high wind areas mounting straps may be required in
addition to stand and moutning pads. Contact your eco-SPARK dealer to determine if strapping is required on your
installation.
MOUNTING THE SUNSTAR PANELS USING SUNSTAR MOUNTS. -19INSTALLATION MANUAL eco-SPARK™ SOLAR POOL HEATER
8. Mounting the Solar Panels
Using eco-SPARK Mounts. - Cont.
Fig. 8.7
Fig. 8.8 Fig. 8.9
Intermediate
Strap Mount, TYP
End Strap
Mount, TYP
eco-SPARK Clamp
(2) minimum, TYP
“ Woven Nylon Strap,
TYP - See sched. For Req. QTY.
4’-0” TYP.
eco-SPARK
collector
TYP
End Cap
TYP
eco-SPARK Clamp (2) minimum TYP
eco-SPARK
Binder, TYP
Srap Mount
Flashing &
Strap Clamp
TYP
Roof Asphalt
or Metal Shingles TYP
Strap Mount
Flashing & Strap
Clamp
TYP
” Woven Nylon
Strap TYP
(2) #14 ST. STL. Wood
Screw - See schedule
for embed.
Depth Req. TYP.
Each Strap Mount Wood Roof
Truss TYP
Wood
Sheathing
TYP
” Woven Nylon
Strap TYP
TYP. STRAP CONNECTION DETAILS
©2015 UMA Solar
This manual suits for next models
3
Table of contents
Popular Heater manuals by other brands

Amerec
Amerec Designer 4.5 Installation and operating instructions

Velleman
Velleman PEREL TC78020N user manual

Chromalox
Chromalox CXH-A/B-03S Installation, operation and maintenance instructions

Lakeland
Lakeland DRY SOON 53343 Instruction booklet

Goldair
Goldair Platinum GPPH220 manual

Burda
Burda RELAX io IP65 Instructions for use

Truma
Truma Trumatic E 2800 A operating instructions

Airthereal
Airthereal EVENING TIDE user manual

Black & Decker
Black & Decker BXSH2003E Original instructions

Eterna
Eterna FPH400 Safety and installation instructions

Barton
Barton 96968 Owner's manual and safety instructions

Fluke
Fluke INCU II instructions