Strata DW7000 User manual

5-13
Variable Shade
':
AUTO DARKENING
WELDING HELMET
Please ensure you read this instruction manual carefully before using your 6WUDWD Welding Helmet
INSTRUCTIONS FOR USE

DW7000
2
Staple your receipt here in order to aid
your warranty or for future reference.
INTRODUCTION
The ': auto darkening, flip front welding helmet affords reliable protection for the eyes for most welding and
grinding applications. The auto-darkening feature of the ': welding helmet allows the welder to see the point
of arc strike more precisely whilst keeping both hands free. The helmets light weight and automatic features reduce
fatigue and lead to time savings.
With the front of the ': raised (flipped-up), the inner visor offers a wide field of view for grinding and slag
removal, providing adequate protection in accordance with relevant standards. With the front of the welding helmet
lowered (flipped-down), the ': will offer permanent protection against UV/IR rays (up to Shade 13 DIN), heat
and sparks. The protection shades of the ': auto darkening welding helmet have been chosen to avoid eye
damage caused by the welding arc.
WARNING: Do not look directly at welding rays with unprotected eyes when the arc strikes - this can cause a
painful inflammation of the cornea and irreparable damage to the lens of the eye leading to cataracts. Ensure the
front of the welding helmet is lowered (flipped down) at all times during any Welding, Gas or Plasma Process.
WARNING AND INSTRUCTIONS FOR USE
Read the instructions before operating this Auto Darkening Welding Helmet. This helmet is designed to protect your
eyes and face from sparks, spatter and harmful IR and UV radiation. This helmet will not protect you from explosive
devices or corrosive liquids.
Never operate this helmet without the lens cover properly installed. Keep front lens cover and light sensors clean
for proper operation. Replace auto darkening lens if it is cracked, scratched or pitted to avoid serious personal
injury. Use only replacement parts specified in this manual.
DANGER
Arc rays from the welding process produce intense
heat and strong ultraviolet rays that can burn eyes
and skin. Use the following table to select the
appropriate shade number for a Welding Helmet or
Welding Face Shield.
1.Use a Welding Helmet or Welding Face Shield fitted
with a proper shade of filter to protect your face and
eyes when welding or watching.
2.Use protective screens or barriers to protect others
from flash and glare; warn others not to watch the
arc.
3.Wear protective clothing made from durable,
flame-resistant material (wool and leather) and foot
protection.
4.Never wear contact lenses while welding.
WARNING
If any of the functions fail in use, DO NOT USE
the ': Welding Helmet and contact your
local 6WUDWD store.
CAUTION
• Operating range of the ': is between
-5ºC - 50ºC.
• Materials that may get in contact with the wearers
skin could cause allergic reactions to susceptible
individuals
• The auto-darkening filters fitted in the ':
helmets are not waterproof and will not work
properly if they have been in contact with water.
• Welding helmets and filters only resist a certain
amount of heat. Do not place them near naked
flames or hot work areas etc.
www.strata.co.nz

3
DW7000
RANGE OF APPLICATION
The ': welding helmet can be used for the following applications: MMA, MIG, Mag, TIG.
The welding filter must not be used for any other purpose other than welding. The welding filters operate well under
both extreme low lighting and very strong sunlight.
Table 1 - Suitable Shade Levels
Process
AMPS
1.5 6 10 15 30 40 60 70 100 125 150 175 200 225 250 300 350 400 450 500 600
MMA 8 9 10 11 12 13 14
MAG 8 9 10 11 12 13 14
TIG 8 9 10 11 12 13
MIG with
Heavy Metals 91011121314
MIG with
Light Alloys 10 11 12 13 14
Air-Arc
Gouging 10 11 12 13 14 15
Plasma
Jet Cutting 910111213
Micro-Plasma
Arc Welding 4 5 678910 11 12
1.5 6 10 15 30 40 60 70 100 125 150 175 200 225 250 300 350 400 450 500 600
Note: The term “Heavy Metals” applies to steels, alloy steels, copper and it’s alloys, etc.
www.strata.co.nz

DW7000
4
OPERATION
Before using the helmet, it is recommended that the following adjustments are made:
Adjustment of Headgear:
': welding helmets are equipped with a headgear that can be adjusted in different ways.
A B C
Push and Move
‘Head Height’
Friction
Adjustment Knob
Push and Move
‘Head Size’
Auto Darkening Filter
Longitudinal
Adjustment
Rake
Adjustment
Flip Visor and Grinding Shield
The helmet front with welding filters can be flipped up and ‘locked’ in a “parked” position to enable grinding and/or
the removal of slag whilst ensuring suitable eye protection.
Use the Friction Adjustment Knob to adjust the ease of movement and ensure positive positioning of the flip visor.
Replace the polycarbonate grinding lens (P/No W4000-3) whenever visibility is impaired by pushing the lens from
the inside of the helmet and easing the lens away from the lower tabs . To insert a new lens, start by inserting the
top tabs into the top of the helmet, and ensure all other tabs are positively located into the corresponding cut-outs
in the helmet.
Auto Darkening Filter
Selecting the Shade Level (B)
Set the shade by turning the knob on the inside of the helmet (B).
The most suitable setting can be found in Table 1 - Suitable Shade Levels (pg3) or chosen using your experience.
This setting can also be made manually during the welding process.
Turning clockwise = darker
Turning anti clockwise = clearer
Selecting Sensitivity (A)
Turn the sensitivity knob clockwise to the max. setting (A). Depending upon the surrounding light the filter will
switch to the dark state or will flicker (if the surrounding light is very low, the filter may not switch to the dark state).
Turn back the sensitivity knob (A) until the filter switches to the clear state. The filter is now set to its optimum
sensitivity according to the surrounding light conditions.
If the lighting conditions change significantly you are advised to repeat this process. This will ensure you always
have your helmet set to the optimum sensitivity.
www.strata.co.nz

5
DW7000
Selecting the Delay (C)
The clearing delay can be adjusted manually by turning the delay knob (C) between a fast clear (0.1 sec) fully anti
clock wise and a slow clear (1.0 sec) fully clockwise.
SERVICING AND MAINTENANCE
': welding helmets should not be dropped. To avoid damage the electro-optical filter, do not place heavy
objects or tools (hammers etc.) on or inside the helmet.
Always make sure that the helmet is equipped with an outer and inner lens (in front of the filter on the outside and
on the inside, behind the filter). These protection lenses must be replaced if damaged in any way (see overleaf).
They are consumables and should checked and replaced regularly. Please see table overleaf for part codes relating
to these consumable products.
The filter should be cleaned when changing the protection lenses.This can be done by any of the following ways:
• Wipe with a clean, dry piece of cloth;
• Clean with a piece of smooth cloth moistened with pure alcohol;
• Clean with a commercial disinfectant.
If used properly the welding filter requires no further maintenance during its lifetime.
If the filter should be replaced on your ': welding helmet, only use the recommended replacement filter from
your local 6WUDWD store. The use of any other Auto Darkening Filter will void the warranty. Please see table at the
rear of this manual for part codes relating to these consumable products.
The filter itself contains no special or toxic products and can be disposed of in the same way as other electronic
devices.
WARNING If any of the functions fail in use or during the following tests, DO NOT USE the ':
Welding Helmet and contact your local 6WUDWD store.
Evaluating Filter Performance and Function
Before use of the welding helmet the Auto Darkening Filter (ADF) and helmet needs to be checked in accordance
with the following procedure:
• Check outer protection lens is clean and sufficiently clear to allow visibility.
• Ensure the the sensors are NOT covered and are clean.
Once these checks have been carried out you should test the ADF.
Select the darkest setting (Shade 13) and set the sensitivity to the highest setting. Now point the sensor towards a
light source such as an overhead light, lamp etc. The ADF should now switch to the dark state (please note if the
ADF is stored in a dark area away from light it may need to be left out in strong light or sunlight for 1 hour to absorb
power, if after 1 hour the ADF does still not react then there is an issue with the sensor). Once the filter is in the dark
state you can check the shade variation is functioning correctly, simply adjust the shade. By doing this, the shade
should get lighter. If the shade does not appear to alter then you have an issue with the shade variation.
To test the Delay Function - set the delay to the maximum setting. Now move the filter sensor away from the light
source it should take 1 second to return to the light state, now alter the delay setting to the minimum and repeat the
process, the time taken to return to the clear state should be 0.1 second. If the ADF does not react in this way then
there is an issue with the delay function.
To evaluate the Sensitivity - set the sensitivity to minimum setting. Point the ADF at the light source you used to
test the other functions. If the ADF switches to a dark state, move away until the filter returns to a clear state, then
slowly reduce the sensitivity until the filter switches to dark state (if it does not change then move closer to the light
until it reacts). If the ADF does not react then there is an issue with the light sensors.
www.strata.co.nz

DW7000
6
Replacing the Outer Spatter Lens (6)
Ensure that the helmet is always equipped with
an Outside Spatter Lens (on the outside of the
helmet) and an Inner Lens (inside the helmet).
These protection lenses must be replaced if broken,
damaged or covered with welding spatter or other
matter to such an extent that vision is impaired.
Inner & Outer Lenses are consumables and must be
replaced regularly with certified 6WUDWD spare parts.
NOTE: Before using the ': helmet for the first
time the protective films must be removed from the
Front Spatter Lens (Fig. 1). The film cannot be
removed from the Front Spatter Lens with the Lens
in place, Please follow the instructions below to
remove the Spatter Lens.
Fig. 1
Inserting and Removing a new Protection Lens
To change the outer protection (3) lens the filter
must be removed by unscrewing the two retaining
screws (6) from the inside of the helmet flip (1). The
old protection lens can then be removed and the new
lens inserted followed by the light seal cradle (4), Auto
Darkening Filter (5), inner protection lens (7) and then
the ADF retaining frame (6) before finally replacing the
two retaining screws (see Fig. 2).
Inserting and Removing the Grinding Lens (2)
To remove the grinding lens – simply push out from
the inside, ensuring to disconnect from the lugs at the
top of the visor. To replace with a new lens – locate
the lugs at the top and then clip the lens into all the
helmet lugs.
Auto Darkening Filter (5)
To allow the filter to switch, the sensors on the front of
the filter must not be covered. The filter then switches
to the dark state when the arc strikes and to the clear
state when the welding arc stops.
Fig. 2
www.strata.co.nz

7
DW7000
SPECIFICATIONS
Usage: For use when ARC, MIG, TIG, Pulse ARC, Micro-TIG and Plasma Cutting.
Viewing Area: 100 x 50 mm
Light State Shade: DIN 4
Dark State Shade: Variable DIN 5 - 13
UV/IR Protection: Up to shade DIN 15 at all times
Operating Temp.: -5ºC ~ 50ºC
Switching Time: 1/10,000 second
Optical Classes: 1/1/1/2
Weight: 621g
SPARE PARTS
The following items are available from your nearest 6WUDWD store.
Part Number Description Suits
W4000-1 Protective Outer Welding Lens (3pk) DW4000, DW7000
W7000-1Protective Inner Welding Lens (3pk) DW7000
W4000-3 Protective Grinding Lens DW4000, DW7000
W4000-4 Headband DW4000, DW7000
W7000-10 Replacement Auto Lens DW7000
www.strata.co.nz

DW7000
1. Introduction:
This is a respiratory protective system which
is based on the principle of circulated
over pressured air in the hood. The belt-
mounted blower unit delivers air through a filter
and via an air hose into a headpiece (a hood or
mask). The supply of filtered air creates
positive pressure inside of the headpiece,
which prevents the external contaminated
air from entering the user's breathing zone.
2. Approvals:
The STRATA RESPIRATOR has been
designed and manufactured to comply with
EN12941: 1998 as a TH2P R SL device.
BS4275 (Guide to implementing an effective
respiratory protective device program), which the
user is advised to read, defines an EN12941 TH2P
R SL device as offering an Assigned
Protection Factor of 20.
The STRATA RESPIRATOR can only provide this
level of protection when used with filters
provided by STRATA.
The STRATA RESPIRATOR is
manufactured under ISO 9001:2000 Quality
System.
3. Preconditions for use:
This Respirator must be used strictly
in accordance with this instruction leaflet
and the instructions supplied with the
corresponding head-units (hoods).
The user must read and understand all
the following "Instructions for Use" well to be
able to use the respiratory protective system
correctly.
When the blower unit is switched off little or no
respiratory protection is to be expected. When
the blower unit is switched off a rapid buildup of
carbon dioxide and depletion of oxygen within
the head unit may occur and so it is essential
not to use the blower unit when itisswitched
off.
THE UNIT MUST NOT BE USED:
x In an atmosphere that is immediately
hazardous to user hygiene or health and /
or has oxygen content of less than 17%
or contains unknown substances.
x In confined spaces or unventilated areas
such as tanks, pipes, canals etc.
x Near to flames and or sparks
x In areas with danger of explosion.
x In an area where there are high winds.
x If the blower unit stops working due to any
reason, the user must leave the contaminated
area immediately.
x If no filter is installed.
AIRKOS Respiratory Protective Device
POWERED RESPIRATORY FILTERING DEVICE,
INCORPORATING A WELDING HELMET OR
IMPACT PROTECTIVE FACESHIELD, CLASS TH2P R SL DEVICE
8www.strata.co.nz

9
DW7000
It is also essential that:
x Nothing is allowed to touch the moving parts.
x There is no attempt to modify or alter the unit
or filter in any way
x Water or other liquids enter the unit in any
way – in particular the motor and fan, the
filter or the battery.
Make sure that the headpiece fits the user's face
perfectly. Only then the efficiency of the system
is sufficient. The protective factor of the
complete system is reduced if the seal of the
headpiece is not fitted properly, for example due
to beards or long hair intervening into the seal
line. There is a possibility that the hose to the
head unit may become caught up in use. The
blower unit should be positioned on the person in
such a way as to reduce this possibility.
Filters cannot be fitted directly to the head units
and should not be adapted to do so. Correct
respiratory protection will not be provided if any
parts of the equipment are modified.
At very high work rates the pressure in the
device may become negative at peak inhalation
flow. STRATA RESPIRATOR systems are for use
only by competent, trained personnel. Filters
should not be modified to fit different blower
units.
ATTENTION! If any of these conditions is not
kept or followed, the warranty automatically
invalid.
The user is advised to leave the
contaminated area immediately if:
The Manufacturer’s Minimum Design
Flow (MMDF) warning Alarm sounds.
Breathing becomes difficult.
Dizziness or distress occurs.
Any part of the system becomes damaged.
Airflow into the Head-Unit decreases or stops.
Contaminant can be smelt or tasted inside
the Head-Unit
Materials that may come into contact with
the user’s skin are not known to cause
allergic reactions to the majority of individuals
but in the unlikely event of a reaction, the
user should immediately leave the
contaminated area, remove the unit and
seek medical advice.
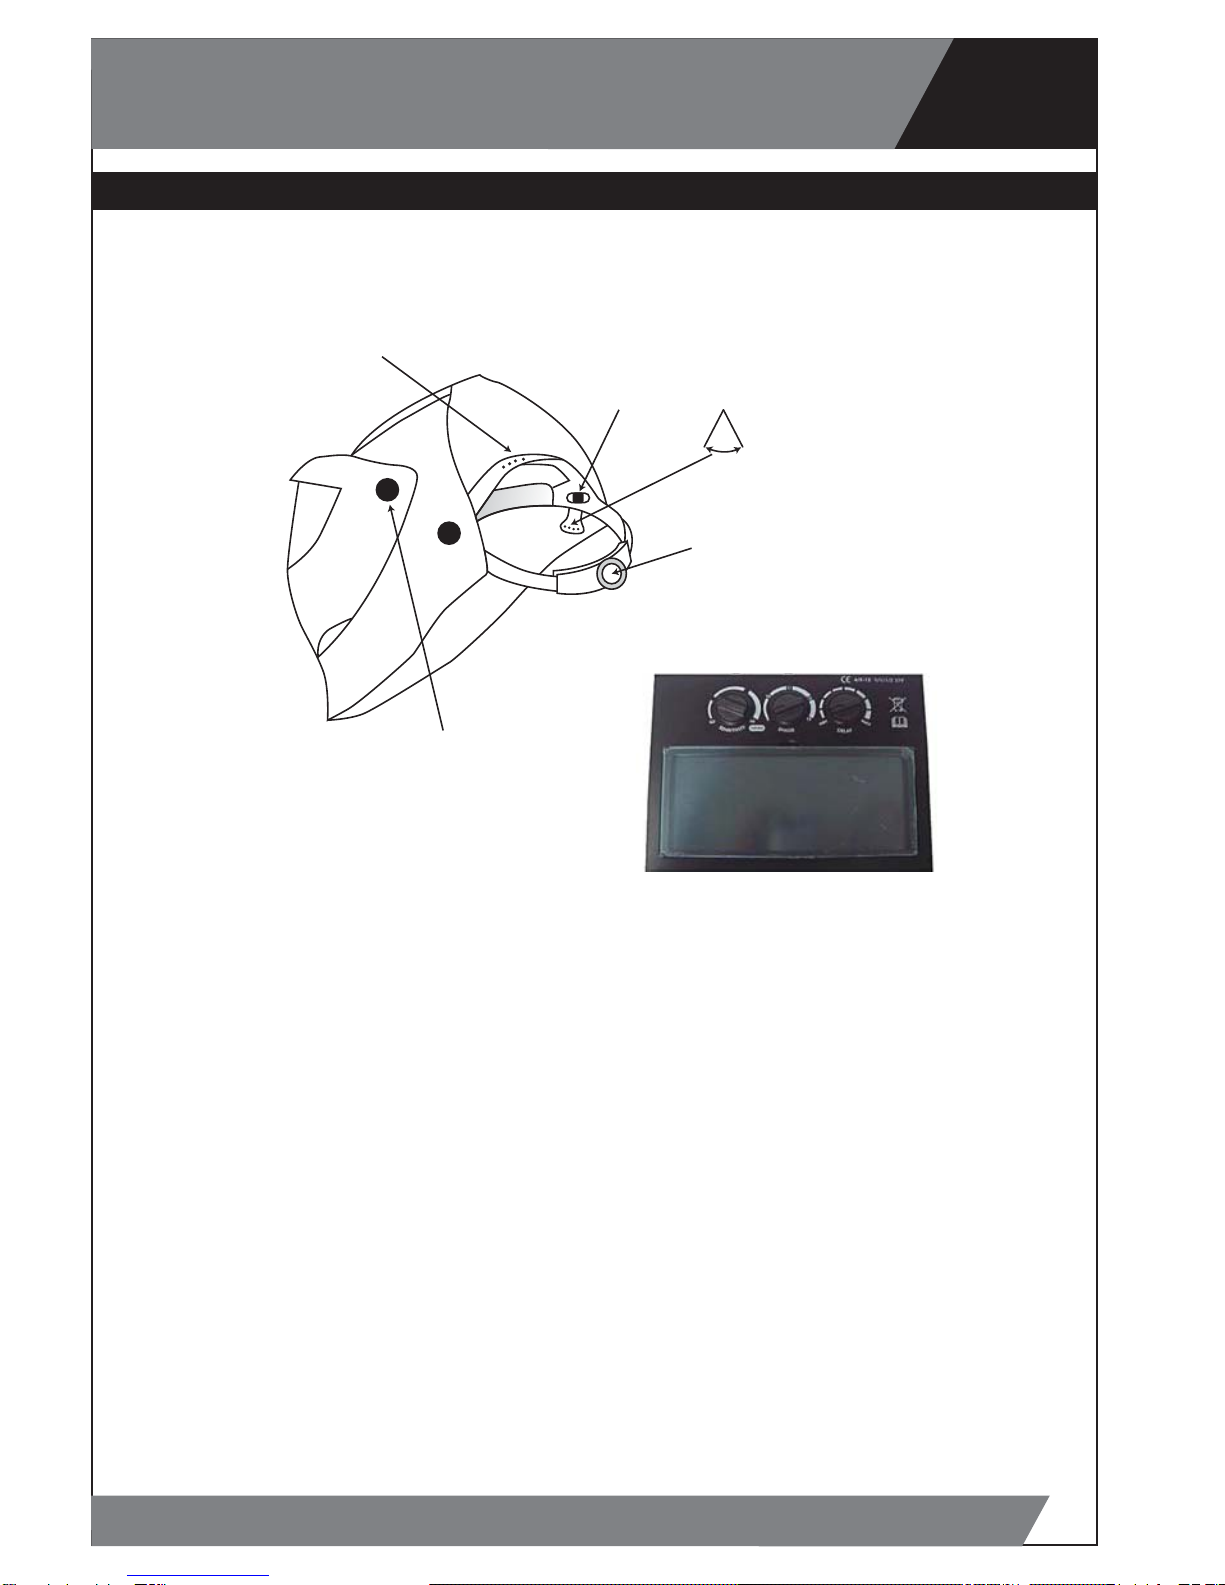
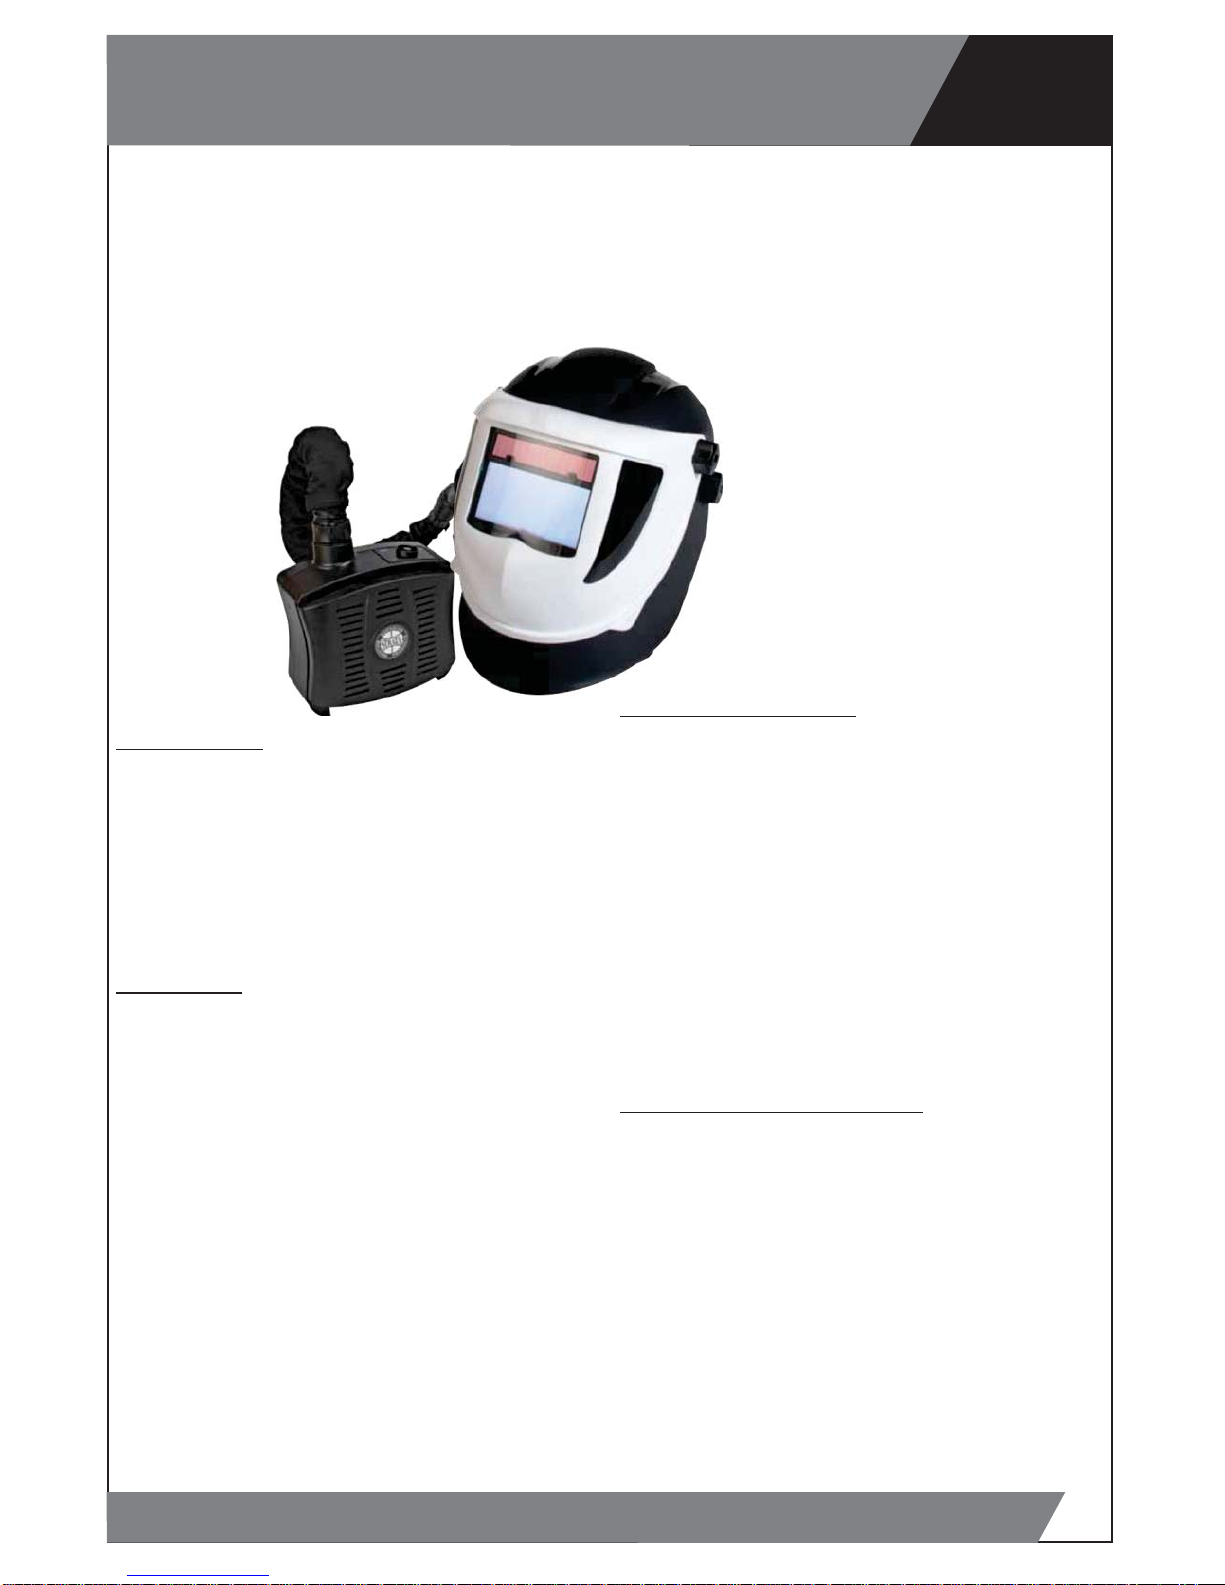
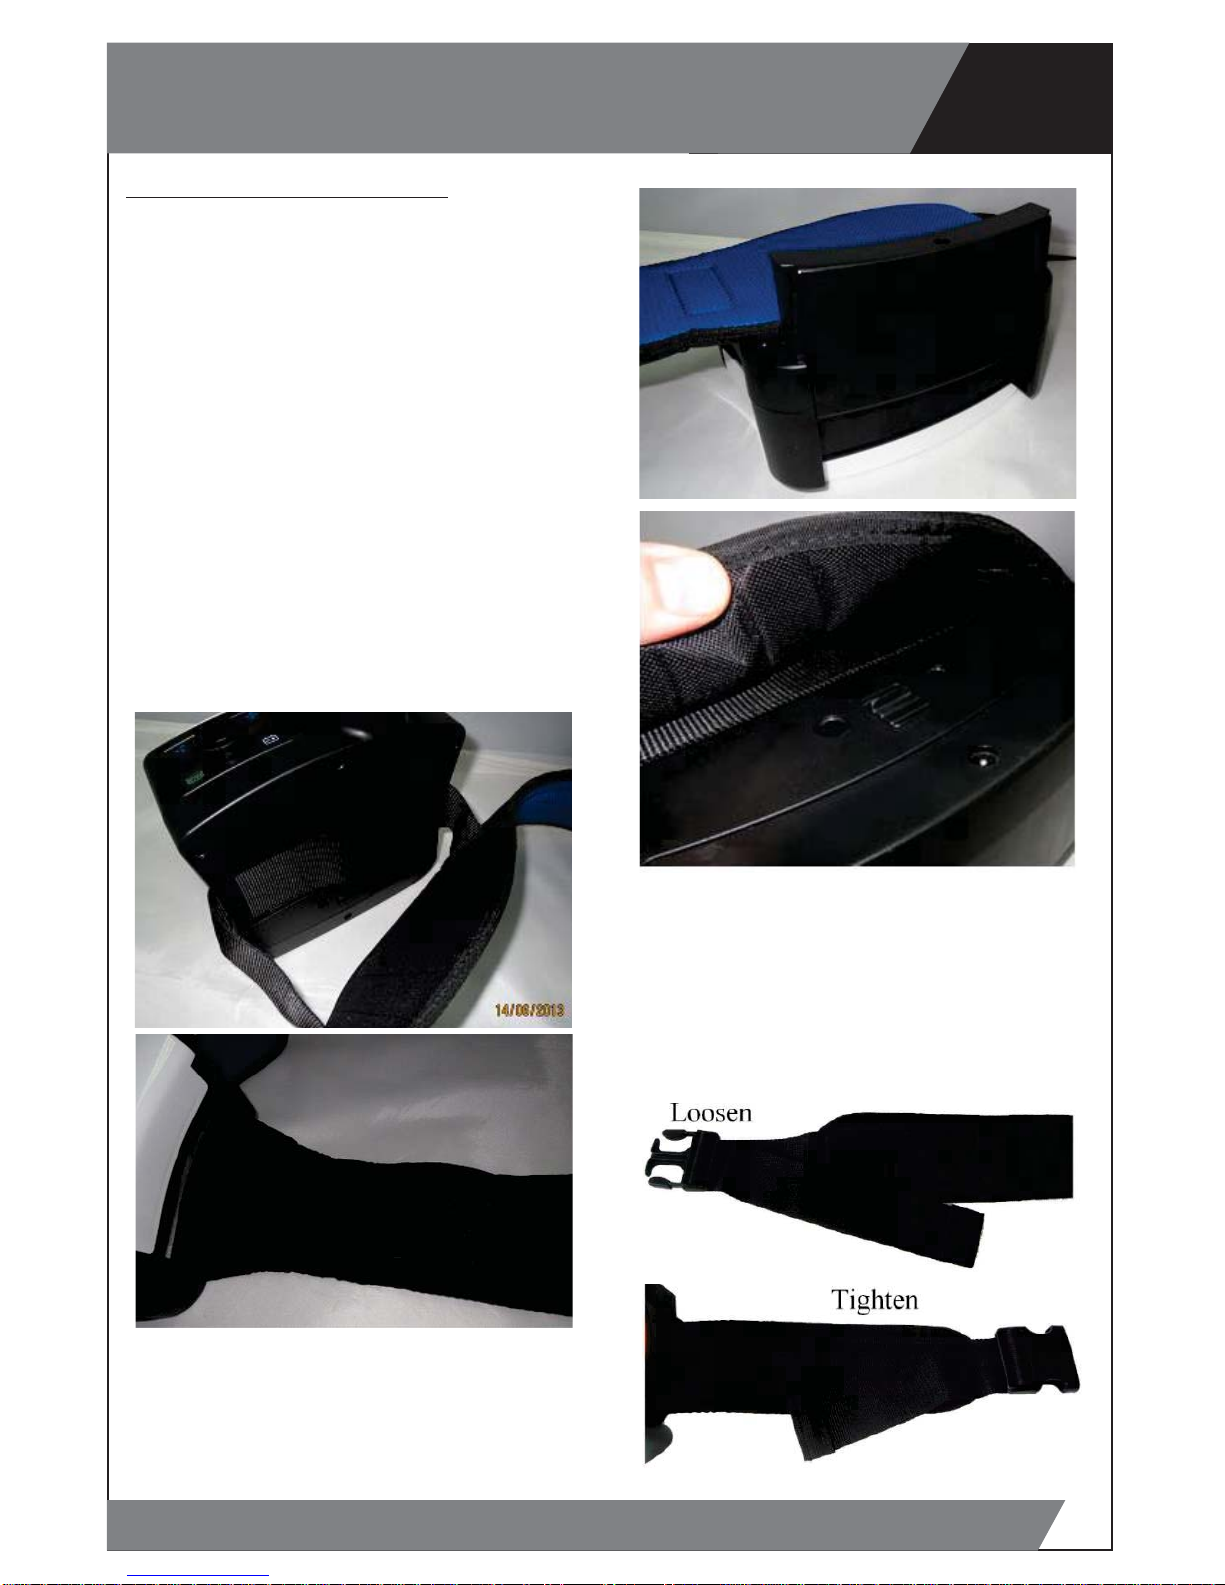
4. System Overview:
The STRATA Respirator unit is a belt mounted
powered respirator with a replaceable,
disposable high efficiency particle filter system.
The helmet covers head sizes from 535 to
600mm circumference.
The STRATA Respirator unit contains a
removable 8hr rechargeable battery pack.
The STRATA Respirator unit will warn the user
when the MMDF of 170 L/min, is not achieved
with its audible alarm.
In operation once the alarm sounds, the user
must immediately leave the work area and
reach an area nominated to be safe. The unit
has audible and visual alarms for a low battery
and a blocked filter. Depending on the fault, the
user should replace the Pre Filter with a new
one (In very dusty environments the Pre Filter
will need changing frequently) and or re-charge
or change the battery for a fully charged one. If
the blocked filter alarm continues to sound the
main filter should be changes. Only when the
unit will function with the alarm switched off
and the flow rate has been tested to be
acceptable, should the user return to the work
place.
The filter has been developed especially for this
unit. It is used to filter the air the user will
breathe. It is essential that the user checks the
filter for any signs of damage or deformation
that could potentially let contaminated air into
the unit. The filter must be disposed of if the
filter is damaged or if clogged to the point of
triggering the systems alarm mechanism.
The removable rechargeable battery used is a
Lithium Ion cell. When supplied the battery may
hold a small charge, the unit should be run flat
and then charged for sixteen hours before the
first use.
www.strata.co.nz

DW7000
5. Unpacking / Assembly / Usage:
5.1. Unpacking:
Check that the package is complete and that
no part is damaged due to the transport or for
other reasons.
A package with the complete system
including accessories contains:
1. Blower unit incl. Battery and P R SL Filter and
Pre Filter and Filter Cover
2. Belt
3. Air hose
4. Air flow indicator
5. Battery charger
6. User Instructions
5.2. Assembly:
Attach the respiratory unit onto the belt: Pass
the inner strap through the back of the blower
loops. The pass through the 3 belt loops
and then through the buckle.
Fit the battery to the Blower unit:
5.2.1. Waist-Belt Adjustment:
Put the belt around your waist with the
blower unit to the back and fasten the two
ends together
If the belt is too loose, slide the male adjuster
down the belt, towards the female half. If the
belt is too tight. Slide the male adjuster away
from the female half.
Repeat the above processes until a comfortable
and secure fit is achieved. Once the belt fits
correctly, secure any excess belt material using
the Velcro sections.
10 www.strata.co.nz

11
DW7000
5.2.2. Particulate Filter:
Use only STRATA RESPIRATOR filters and Pre
Filters as supplied by Strata.
It should first be ascertained by consulting an
occupational hygienist or by calling the
manufacturers technical help line as to whether
or not the STRATA RESPIRATOR Filter will offer
suitable protection from the hazard.
The respiratory power unit is equipped with a
high efficiency particle filter of class P R SL and
a Pre Filter.
As soon as the warning alarm sounds, the pre
filter should be exchanged or checked. In very
dusty area's this can be necessary on a frequent
basis.
The filters must be regularly checked (see Air
Flow Test) and replaced.
Make sure that the new filters are within their
expiry date, unused and not evidently damaged.
From the hygienic point of view the maximum
working time of a main filter is 180 hours and
should not be exceeded.
It is prohibited to clean the filters by any
procedure!
5.2.3. Removing the Filter:
Opening the filter cover: Grip the cover on the
right hand side and pull the cover open.
ATTENTION! It is strictly forbidden to use any
tools to open the filter cover.
To remove the filter, pull it off the filter seal while
rotating it. Clean the unit from dust.
5.2.4. Fitting anew Filter:
Inserting a new filter: Put the filter back into
position using the same rotating motion and
gently push until it fits well on the body of
the unit. Re fitting the Cover; follow the
alignment as per the pictures.
5.2.5. Changing the Pre Filter
The pre filter is a sleeve which is fitted over
the main filter. To remove / replace simply pull
off the old filter and stretch the new one into
position. It's important to ensure that the filter
media of the main filter is completely covered by
the pre filter.
Ensure the filter clips enter the Blower body,
then rotate Clockwise until closed. Do not
attempt to use the blower unit without the
cover fitted correctly.
www.strata.co.nz

DW7000
5.2.6. Attaching the Hose to the Blower Unit:
Align the pins of the Hose Bayonet connector with
the slots in the air outlet of the blower. Push
the Bayonet connector into the blower until it
reaches the bottom of the hole and then
twist in a clockwise direction until the
locating pins clip into place. Fitting the hose
to the hoods is the same procedure.
5.2.7. Donning the Welding Helmet:
First set the Welding helmets rake and adjust
the welding filter to suit (See the helmet’s
user instructions). Lift the helmet to its upper
position. Place over the head and adjust the
headgear ratchet wheel by pushing it in and
twisting until a satisfactory tightness is
achieved. Pull the elasticated chin guard
downwards and at the same time pull the
helmet down. Ensure the elasticated chin
guard fits comfortably under the chin.
The Welding helmet is now ready for use
5.3. Usage:
Switch on the unit by pressing the ON/OFF
button on the control panel. The airflow can be
6. Before use:
6.1 Inspection before use:
Each time before starting work check that:
- All components are in good condition with no
visible damage (like holes, tears etc) Replace any
damaged or worn parts. Carefully examine the air
hose, seals and the face piece.
- There is a good connection between the air hose
and the headpiece as well as the blower unit.
- There is sufficient air flow (see 6.2.)
- The air is supplied through the whole respiratory
system from the blower to the hood.
- Charge the battery before the first use. (See 6.3.)
12
either the low speed 180 l/min or the high speed
220 l/min. The speed denoted buy the lit LED and
the fan symbol. You can change the speed by
pressing the ON/OFF switch. Only by depressing
the ON/OFF switch for several seconds will stop
the unit.
The unit ensures a constant supply of air. The
microprocessor inside the unit automatically
regulates the motor speed to compensate the filter
clogging and the battery state. If the
microprocessor cannot keep the adjusted airflow,
the unit will sound a 'beeping' alarm (an acoustic
signal can be heard). At which point the user must
check the blower unit. if possible, the
microprocessor automatically reduces the airflow
to the lower level, if it fails to meet the lower level,
the alarm will still sound. When the airflow falls
below the minimum safe operating level, a second
audible alarm joins the first. At this point, the user
must stop working at once, leave the working
environment and reach an area nominated to be
safe and change the filter or recharge/change the
battery.
To check the battery: When first starting the unit,
the battery LED must show red – this shows a fully
charged battery. It is recommended that only a
fully charged battery should be used when starting
a work shift.
With a fully charged battery in place, the unit
should function normally, but if the audible alarm
still sounds, the user must change the filter. If the
problem still persists, see section 10 for additional
suggestions.
www.strata.co.nz

13
DW7000
6.2. Air Flow Test:
1. Disconnect the air hose from the Blower unit.
Minimum
Airflow
Level
2. Insert the Airflow indicator into the air hose
connector and keep the hose in vertical position
at about the eye level.
3. Switch the power unit on. The airflow is
sufficient only if the ball indicator reaches the
minimum flow rate level. If the indicator sinks is
below the minimum flow rate level, it is necessary
to charge the battery or change the filter. If the
problem still persists, see section 10 for
additional suggestions.
purpose than that for which it was
manufactured. Do not charge the battery
in a potentially explosive atmosphere. The
battery charger is intended for indoor use.
It must be protected against damp. The
charger controls the charging automatically.
After the battery has been charged, the
charger switches to the trickle charging
regime and keeps the battery fully
charged. The charging time is 6 to 8 hours.
6.3.1. Battery charging:
1. Check that the voltage of the electrical power
supply is correct.
2. Plug the charger into the socket.
3. Connect the battery to the charger. The socket
of the battery is positioned on the back side. The
charging state is indicated by a red LED diode
light.
4. After charging has been completed, the trickle
charging regime is activated: - red LED diode goes
out, the green LED diode comes on at the moment
of trickle charging.
5. Disconnect the charger from the power supply.
Do not leave the charger inthe power supply if
not inuse!
6.3. Batteries:
NOTE! Batteries are delivered only partially
charged, all batteries must be charged before
they are used for the first time. The battery can be
charged separately or on the blower unit.
The charger must not be used for any other
6.3.2. Battery changing: Removing the battery
Locate the battery catch. Pull back the battery
catch and at the same time the Battery can be
removed by lifting upwards.
www.strata.co.nz

DW7000
Fitting the battery: Make sure the battery is
the correct way up (as per 5.2) and then slide
into the bower until the battery catch
engages. It is essential that the battery catch
is fully locked.
7. Maintenance / Cleaning:
The Blower unit, filter housing and head
units must all be regularly cleaned to keep them in
good working order.
For single users, the units can all be cleaned with a
cloth moistened with luke warm water and soap.
For multiple users, the units should be disinfected
when passed from one user to another.
Liquids must not be allowed to enter the workings
of the blower unit or get on to the element of the
filter.
Parts should be allowed to air dry. Under no
circumstances should any solvents or abrasive
cleaning agents be used. The unit must not be
dried using hot air or radiant heat.
The unit should continue to provide protection to
the designed specification for 2 to 3 years, when
maintained in accordance with these instructions.
Prior to each use the user should check that the
unit is free from defects, such as cracks, split
filters and hoses, cracked visors and helmet
components as appropriate.
8. Storage and Transportation:
When not in use or during transportation
the blower and head units should be stored
in the container in which they were provided,
or other similar container, such that it is out
of direct sunlight, not in contact with solvents
and cannot be damaged by physical contact
with hard surfaces/items. Do not store
outside the temperature range of 0°C to
+40°C or with humidity above 75%RH.
14
9. List of Parts
Part Numbers and Descriptions
W4000-1 Protective Outer Welding Lens (3pk)
W4000-3 Protective Grinding Lens
W4000-4 Headband
W7000-1 Protective Inner Welding Lens (3pk),
W7000-2 Flame Retardant Belt for DW7000
Filtration Unit
W7000-3 Airhose for DW7000 Filtration Unit
W7000-4 Heavy-duty Battery for DW7000
Filtration Unit
W7000-5 Battery Charger for DW7000 Filtration
Unit
W7000-6 Headband with A ir-duct
W7000-7 Face seal Suits DW7000
W7000-8 PRSL Filter Suits DW7000
W7000-9 Pre-filter for DW7000 PRSL Filter
(10pk)
W7000-10 Replacement Auto Lens Suits DW7000
www.strata.co.nz

15
DW7000
10. Fault finding:
If there is a sudden change in air supply while using the STRATA RESPIRATOR system, it is
necessary to check the following:
· That all parts of the air-supply system are assembled properly.
·The battery and its connector.
·Whether the charger is not faulty or malfunctioning.
·Filters and their clogging.
·That there is not a hole in the air hose.
·Whether the hood seal is not damaged.
· Whether the working time after a full recharging of the battery has not decreased (if so, it is
necessary to replace the battery).
Fault Probable reason Recommendation
The blower unit
does not work at
all
Entirely discharged battery. (verify if
the blower unit works with another
charged battery)
Faulty motor, circuit board or
connector
Charge the battery. (if problem persists, check
the battery)
Contact your supplier.
Low airflow Blocked air hose or air duct.
Leakage
Battery is not charged enough.
Blocked Filter or Pre Filter
Check and remove blockage.
Check all seals, connectors and the air hose.
Make sure that air cannot leak through holes
or tears.
Charge the battery (if problem persists,
check the battery)
Change the Pre – Filter. Then if the problem
persists change the main filter.
Short operating
time.
Clogged Filter.
Battery is not charged properly.
Change the filters
Charge the battery.
(If problem persists, check the battery)
Battery cannot be
charged.
Battery contact is damaged.
Charger is faulty.
Check the battery contact.
Contact your supplier.
Battery cannot be
charged sufficiently. Battery is worn out. Install a new battery.
11. Technical data:
This powered respirator is light-weight and easy
to handle. It is equipped with a replaceable
particulate filter. The system affords reliable
protection against particulates and aerosols.
Minimum flow rate 170 Litres/ min.
Weight with filter
Type of filter
Type of Battery
920 grams
P R SL
Replaceable + rechargeable
Li-Ion 7.4V/5200Ah
- Visual, audible alarm for low battery voltage
and for insufficient flow rate (below 170L/min)
- Operating time greater than 8 hours on
minimum flow rate with a new filter and fully
charged battery in a clean environment. (5
hours on maximum flow rate.)
Note! Operating time can be shortened in case
of clogged filter under changed battery
Certification EN 12941:1998+A1:2003+A2:2008
Filter Symbols:
R = the filter is reusable for more than one shift.
S = the filter protects against solid particles.
L = the filter protect against liquid particles.
Charging Cycles >350
Actual Protection Factor (APF) 20
Noise level 65dBA
Air flow 180 or 220 Litres/ min
www.strata.co.nz

RESPONSIBILITIES OF WARRANTOR UNDER THIS
WARRANTY:
Repair or replace, at Warrantor’s option, products
or components which have failed within duration of
the warranty period.
RESPONSIBILITIES OF PURCHASER UNDER THIS
WARRANTY:
A. Please call the store where purchased, or
nearest available branch, or the numbers listed
above for warranty assistance.
B. Provide dated proof of purchase and
maintenance records.
C. All welders must be delivered or shipped to the
nearest Service Agent, store where purchased or
nearest available branch. Freight costs, if any, must
be borne by the purchaser.
D. Use reasonable care in the operation and
maintenance of the products as described in the
owner’s manual(s).
WHEN WARRANTOR WILL PERFORM REPAIR OR
REPLACEMENT UNDER THIS WARRANTY: Repair or
replacement will be scheduled and serviced
according to the normal work flow at the servicing
location and depending on the availability of
replacement parts.
12. Warranty:
DURATION: The manufacturer warrants that it will
repair, at no charge for parts or labour, the Welding
Helmet, proven defective in material or
workmanship, during the following time period after
date of original retail purchase:
For 1 Year: The Helmet and Air Unit
WHO GIVES THIS WARRANTY
(Warrantor): EUROQUIP
Stoke, Nelson
New Zealand 7011
Euroquip NZ
www.strata.co.nz
WHO RECEIVES THIS WARRANTY (Purchaser): The
original purchaser of this STRATA Welding Helmet.
WHAT IS COVERED UNDER THIS WARRANTY:
Defects in material and workmanship which occur
within the duration of the warranty period. This
warranty extends to the Welding Helmet only.
WHAT IS NOT COVERED UNDER THIS WARRANTY:
A. Implied warranties, including those of
merchantability and FITNESS for a particular
purpose are limited in duration to this express
warranty. After this period, all risks of loss, from
whatever reason, shall be on the purchaser.
B. ANY INCIDENTAL, INDIRECT, OR
CONSEQUENTIAL LOSS, DAMAGE, OR EXPENSE
THAT MAY RESULT FROM ANY DEFECT, FAILURE
OR MALFUNCTION OF THIS PRODUCT.
C. This warranty does not apply to any accessory
items included with the product which are subject
to wear from usage; the repair or replacement of
these items shall be at the expense of the owner. In
addition, this warranty does not extend to any
damage caused by the untimely replacement or
maintenance of any of the CONSUMABLE parts.
D. Any failure that results from accident,
purchaser’s abuse, neglect or failure to operate
products in accordance with instructions provided
in the owner’s manual(s) supplied with the product.
E. Pre-delivery service, i.e. assembly and
adjustment.
16
DW7000
www.strata.co.nz
Table of contents