Strend Pro SP-6277 User manual

SP-6277
SK Solárne svetlo
so senzorom
EN Solar light
with sensor
Krajina pôvodu: PRC, Dovozca: Slovakia Trend Export-Import s.r.o., Michalovská 87/1414, 073 01 Sobrance
WATERPROOF

Charging the rechargeable batteries
Note: The rechargeable batteries (11) inside the froduct are fully charged at delivery. However, they may
have lost charge during transport from the manufacturer to the retail location. Therefore charge the
rechargeable batteries (11) prior to use. During summer, initial charging will take at 3 days of 8 hours of
sunlight. Set the ON/OFF switch (2) to the "ON" position. Note: In low sunlight conditions drained
rechargeable batteries ( 11 ) can take up to 10 days to fully charge. Note: The built-in charging controller
of the product prevents the rechargeable batteries (11) from overcharging. Replace the rechargeable
batteries (11) if light output does not improve after charging (Flg. C).
Inserting / Replacing Batteries
Note: The rechargeable batteries (11) are pre-Installed. Only use batteries as
stated In the "Specications" chapter. To remove the rechargeable batteries
(11), switch the spotlight (3) o using the ON / OFF switch (2). • Open the
battery compartment (12) on the back side of the spotlight (3) by loosening
the xing screws (13) to remove the front cover (10) F10. C). • Remove the old
rechargeable batteries (11). • Insert the new rechargeable batteries (11). Use
only batteries of the specied type (see "Specications").
INSTALLATION Note: The included mounting material is suitable for ordinary solid concrete
or masonry construction. Other wall substrates may require other fastening materials. Seek specialist
advice if necessary. Note: You will need an electric drill. CAUTION: RISK OF INJURY!
Read the operating instructionsfor your drill.
CAUTION: Ensure that you do not damage any electricity cables in the wall or ceiling.
EN
Note: When inserting the battery, ensure the correct polarity! This is indicated in the battery
compartment (12). • Close the battery compartment (12 again with the front cover (10) and x the front
cover (10) by turning the xing screws (13) clockwise.

Remove the mounting plate (6) from the spetlight (3) by loosening
the screws of the ball joint cover (7) ( Fig. F). Use the slotted holes
of the mounting plate (6) intended for the screws (8) to mark the drill
holes. Now drill the xing holes, diameter 8 mm. depth 40 mm.
Before drilling the xing holes. ensure there are no gas, water
or electrical lines that could be drilled into or damaged in the area
where you will be drilling. Insert the dowels (5) into the drill holes
(Fig. F).
INSTALLATION (cont.)
• Now drill the xing holes. Before drilling the xing holes, ensure there are no gas, water or electrical lines
that could be drilled into or damaged in the area where you will be drilling.
When selecting the mounting location for the solar panel (1) pay attention to the following:
The solar panel (1) needs to be as directly exposed to sunlight as possible. Even partial shading of the solar
panel (1) during the day can have a signicant inuence on charging.
Cardinal Direction: Orientation towards the north is optimum. Orientations with slight deviations
towards the east are preferable to those with slight deviations towards the west.
Horizontal Orientation: The horizontal orientation of the solar panel (1) depends on the geographic
latitude of the mounting location, an angle of 30° to 40° is ideal. Your product is now ready to use.
When selecting the mounting location, pay attention to the following:
• Ensure that the spotlight (3) illuminates the desired area.
You can swivel the spotlight (3) Into the desired position.
• ,Ensure the sensor (4) covers the desired. The sensor (4) has a maximum
coverage range of 5 m to 8 m, with a coverage angle of about 90°
(depending on the mounting height - a height from 1.8 m to 2.5 m is ideal)
(Fig. D). • Ensure the sensor (4) is not illuminated at night by street lighting.
This can inuence its functioning.
• Ensure that the solar panel (1) is mounted in a place with direct sunlight. • Ensure that the solar panel (1)
is not installed where there are strong temperature uctuations, e.g. due to heating devices.
• Ensure that the solar panel (13) is installed far away from unnatural light sources and in a northerly direction.
Ensure that the connection cable (17) of the solar panel (1) can reach the spotlight (3).
Max. distance between the solar panel (1) and the spotlight (3) is 2.5 m.
Attach the mounting plate (6) using the screws (8) provided (Fig. F). Now place the spotlight (3) towards
the mounting plate (6). Ensure that the ball joint of the mounting plate (6) is correctly inserted
into the slot (9) of the spotlight (3). Then, close the ball joint cover (7) by tighten the screws clockwise (Fig. F).
Now use the slots in the mounting bracket (14) intended for the screws (16) to mark the drill holes
(diameter 8 rm. depth 40 mm). Ensure that you can connect the spotlight (3) using the connection cable (17)
to the solar panel (1) .
• Insert the dowels (15) into the drill holes (Fig. G). • Attach the mounting bracket (14) using the screws (16).
• Place the solar panel (1) into the mounting bracket (14) (Fig. G).
• Ensure that the solar panel (1) is orientated towards the sun. • Insert the plug (18) into the socket (19) (Fig. G).
• Set the ON / OFF switch (2) on the spotlight (3) to the "ON" position (Fig. B).
• I he rechargeable batteries (11) will now charge when there is sucient solar radiation.
• Insert the dowels (15) into the drill holes (Fig. G).
• Attach the mounting bracket (14) using the screws (16).
• Place the solar panel (1) into the mounting bracket (14) (Fig. G).
• Ensure that the solar panel (1) is orientated towards the sun.
• Insert the plug (18) into the socket (19) (Fig. G).
• Set the ON / OFF switch (2) on the spotlight (3) to the "ON" position
(Fig. B). • I he rechargeable batteries (11) will now charge when there
is sucient solar radiation.

Solárny panel
Zapínač/vypínač
Bodové svetlo
Senzor
Hmoždinky
Montažná doska
Guľový klb
Skrútka
Štrbina
Predný kryt
Batérie
Priehradka pre batérie
Upevňovacie skrutky
Montážna konzola
Popis:
Časť
ČASTI VÝROBKU
SK
Hmoždinka
Skrútka
Kábel
Zástrčka
Elektrická zásuvka
Obr. A
SAFETY MEASURES:
1. Be aware of the fact that the solar light is designed to switch on automatically after dark. If it is
near a powerful source of light, it might not come on.
2. The light’s batteries are fully charged by the producer, but by the time the light arrives with the
nal customer, it might be partially, or completely, discharged. For this reason, please leave the solar
light to charge all day for its maximum performance.
3. Maintain the surface of the solar panel clean. A dirty panel may reduce the eciency of the
charging.
Parameters:
∙ 6x LED, 150lm
∙ white (6000-6500K)
∙ 3x AAA 1,2 V, 600 mAh Ni-MH
rechargeable battery (battery is included)
∙ Material: plastic
∙ Size: 10 x 3,2 x 9 cm
∙ Switch ON/OFF
∙ Sensing angle: 90°
∙ Sensing range: 7 m
EXPLANATION OF SYMBOLS:
Do not expose the device to adverse
weather conditions (rain, wind, etc.)
CHANGING BATTERIES:
If the solar light stops working after 12 months of use, the battery must be changed.
You can open the battery cover and change the battery for a new rechargeable battery.
Do not throw batteries away with regular household waste.
Turn all used batteries over to a recycling centre
for proper and ecological disposal. Please take care to protect the environment.
The product complie with valid European directives and assessment of conformity
with these directives has been carried out.

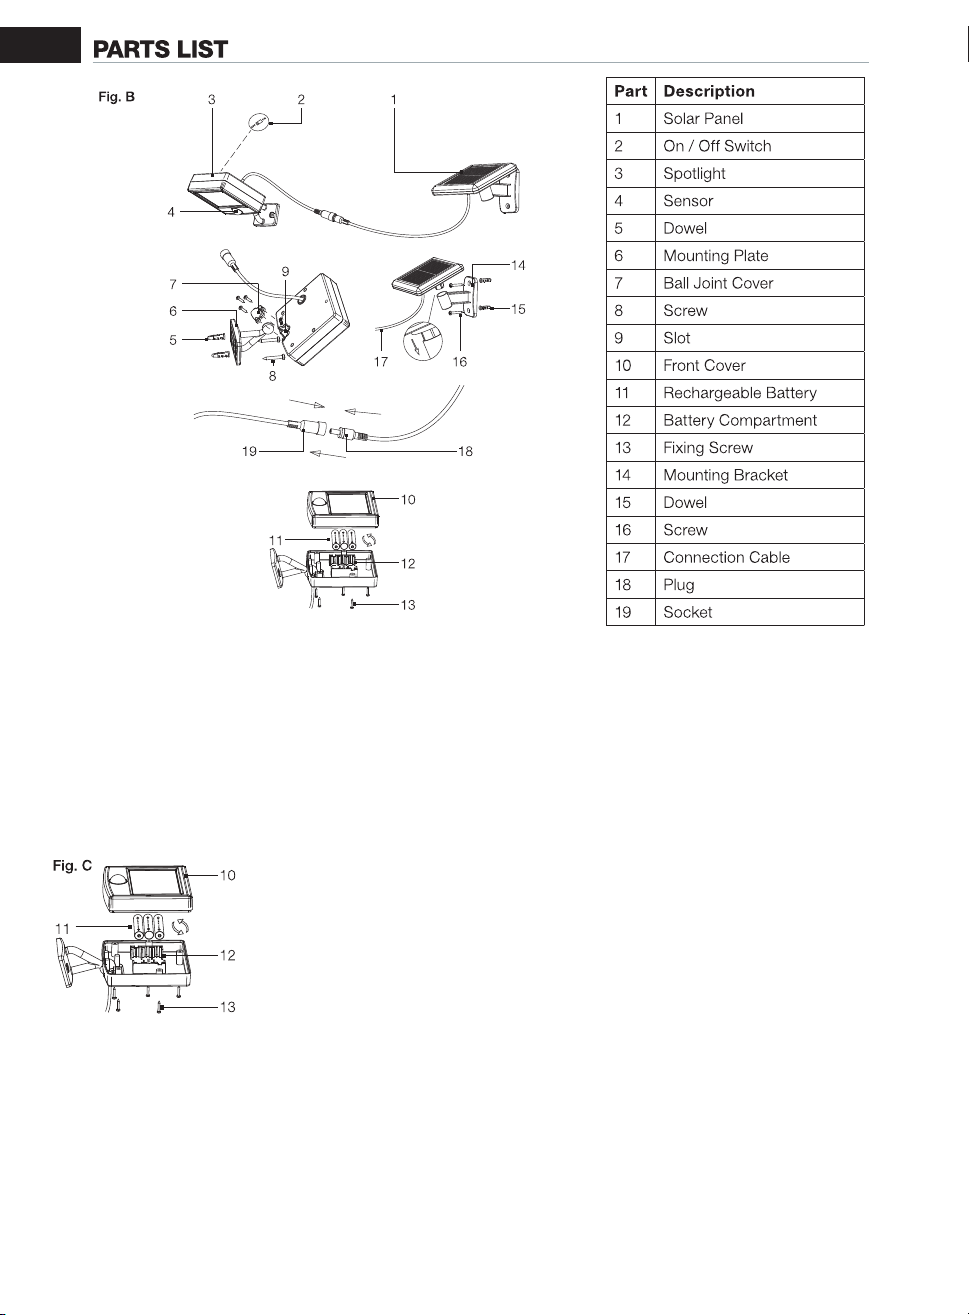
Vloženie/výmena batérií
Poznámka: Nabíjateľné batérie (11) sú vopred nainštalované. Používajte len
batérie podľa pokynov uvedených v kapitole„Technické parametre“.
Pri vyberaní nabíjateľných batérií (11) vypnite svetlo (3) pomocou vypínača (2).
• Otvorte priehradku pre batériu (12) na zadnej strane svetla (3) tak, že uvoľníte
upevňovacie skrutky (13) a zložíte predný kryt (10) Obr. C).
• Vyberte staré nabíjateľné batérie (11).
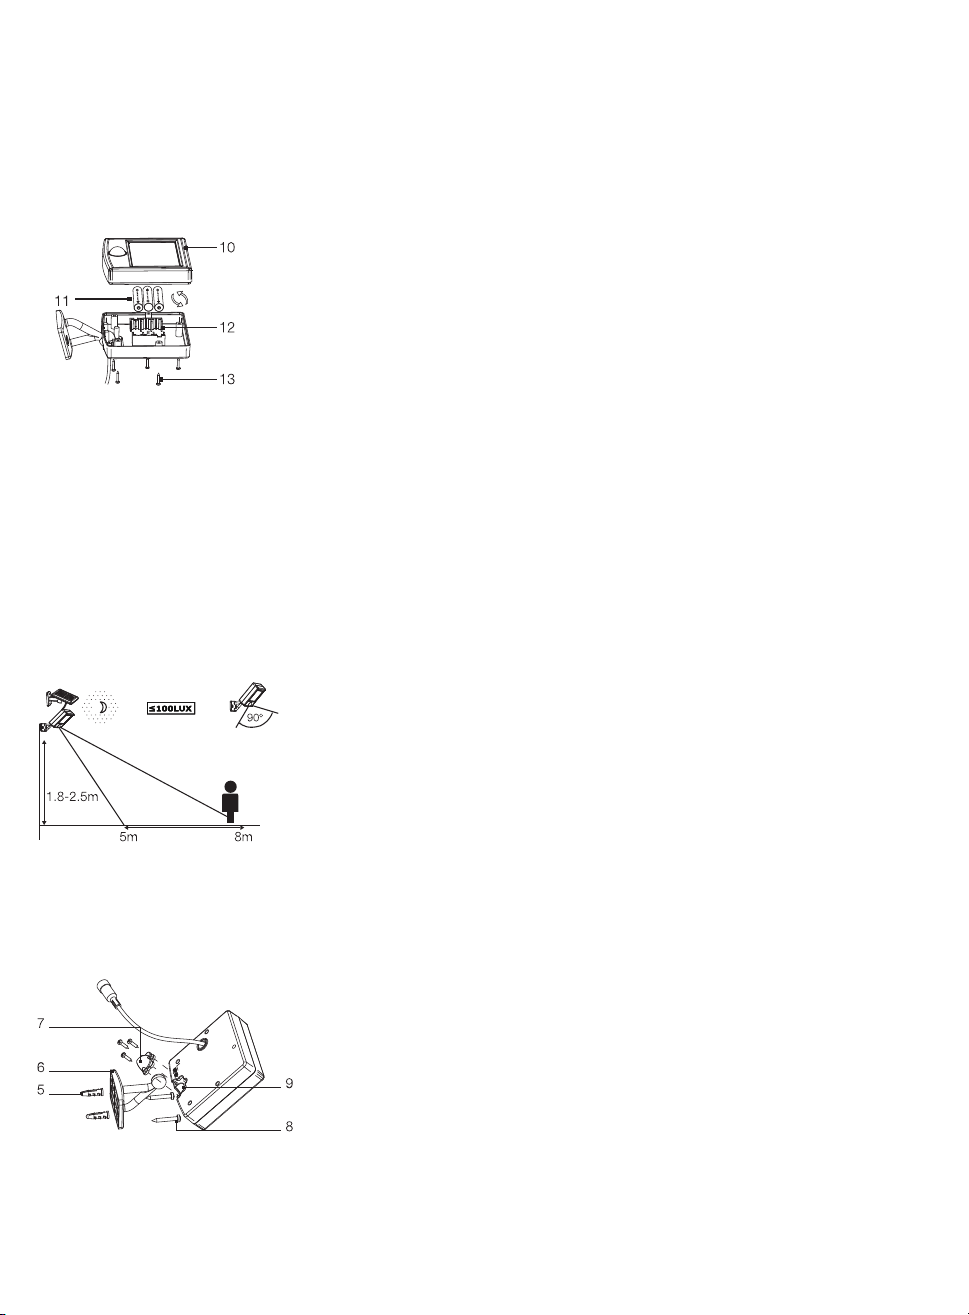
• Zaistite, aby bodové svetlo (3) osvetľovalo požadovanú plochu.
Bodové svetlo (3) môžete natočiť do požadovanej polohy.
• Uistite sa, že snímač (4) pokrýva želané. Senzor (4) má maximálny rozsah
pokrytia 5 m až 8 m, s uhlom pokrytia asi 90 ° (v závislosti od montážne-
jvýšky - ideálna je výška od 1,8 m do 2,5 m) (obr. D).
• Uistite sa, že senzor (4) nie je v noci osvetlený pouličným osvetlením.
To môže ovplyvniť jeho fungovanie. • Zaistite, aby bol solárny panel (1)
namontovaný na mieste s priamym slnečným žiarením.
Obr. C
Obr. F
Nabíjanie nabíjateľných batérií
Poznámka: Nabíjateľné batérie (11) vo vnútri produktu sa dodávajú plne nabité. Môžu však stratiť nabitie
počas prepravy od výrobcu do maloobchodnej pobočky. Nabíjateľné batérie (11) preto pred použitím nabite.
Počas leta bude počiatočné nabíjanie trvať 3 dni pri 8 hodinách slnečného svetla.
Vypínač (2) prepnite do polohy„ON“ (ZAP.). Poznámka: Pri slabom slnečnom svetle môže úplné nabitie
vybitých nabíjateľných batérií (11) trvať až 10 dní. Poznámka: Zabudovaný regulátor nabíjania produktu
bráni tomu, aby sa nabíjateľné batérie (11) nadmerne nabili. Nabíjateľné batérie (11) vymeňte, ak sa svetelný
výstup nezlepší ani po nabití (obr. C).
• Vložte nové nabíjateľné batérie (11). Používajte iba batérie uvedeného typu (pozri časť„Technické
parametre“). Poznámka: Pri vkladaní batérie dbajte na správnu polaritu! Tá je uvedená v priehradke
pre batérie (12). • Opäť zatvorte priehradku pre batérie (12) pomocou predného krytu (10) a upevnite predný
kryt (10) tak, že otočíte upevňovacie skrutky (13) v smere hodinových ručičiek.
INŠTALÁCIA
Poznámka: Dodávaný montážny materiál je vhodný na bežnú výstavbu z pevného betónu alebo na murárske
práce. Pri iných stenových podkladoch sa môžu vyžadovať iné upevňovacie materiály.
V prípade potreby požiadajte o radu odborníka. Poznámka: Na prácu budete potrebovať elektrickú vŕtačku.
POZOR: RIZIKO PORANENIA! Prečítajte si návod na použitie vŕtačky. POZOR: Uistite sa, že nepoškodíte
elektrické káble v stene alebo v strope. Pri výbere miesta montáže si všímajte nasledovné:
Obr. D
Vyberte uvoľňovaciu skrutku krytu guľového kĺbu (7) (obr. F)
z upevňovacieho svetla (3). Na označenie vŕtaných otvorov použite
štrbinové otvory montážnej dosky (6) určené pre skrutky (8).
Teraz vyvŕtajte upevňovacie otvory, priemer 8 mm. hĺbka 40 mm.
Pred vŕtaním upevňovacích otvorov. Uistite sa, že v oblasti, kde budete
vŕtať, neexistujú žiadne plynové, vodovodné alebo elektrické vedenia,
ktoré by sa mohli vŕtať alebo poškodiť. Zasuňte hmoždinky (5)
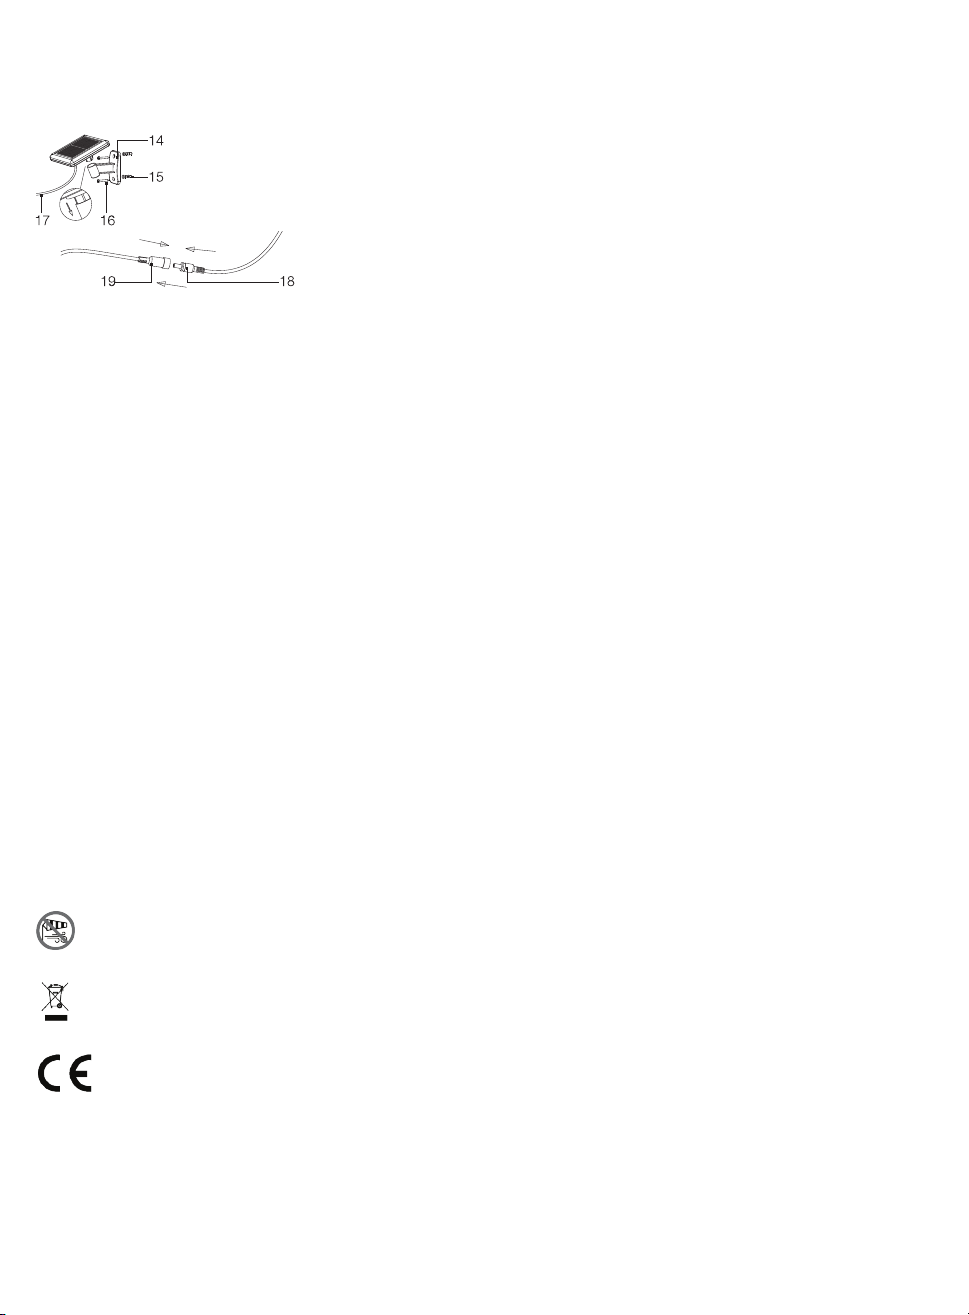
• Zaistite, aby bol solárny panel (1) nainštalovaný na mieste s priamym slnečným žiarením.
v prípade výrazných kolísaní teploty, napr. kvôli vykurovacím zariadeniam.
• Zaistite, aby bol solárny panel (13) nainštalovaný ďaleko od neprirodzených svetelných zdrojov
a smerom na sever. Zaistite, aby prepojovací kábel (17) solárneho panelu (1) dosiahol bodové svetlo (3).
Max. vzdialenosť medzi solárnym panelom (1) a bodovým svetlom (3) je 2,5 m.
do vyvŕtaných otvorov (obr. F). Pripevnite montážnu dosku (6) pomocou dodaných skrutiek (8)
(obr. F). Teraz nasmerujte bodové svetlo (3) na montážnu dosku (6). Zaistite, aby bol guľový kĺb montážnej
dosky (6) správne zasunutý do štrbiny (9) bodového svetla (3). Potom zatvorte kryt guľového kĺbu (7)
utiahnutím skrutiek v smere hodinových ručičiek (Obr. F). Teraz použite drážky v montážnej konzole (14)
určené pre skrutky (16) na označenie vrtných otvorov (priemer 8 mm hĺbka 40 mm). Zaistite, aby ste mohli
bodový reektor (3) spojiť pomocou prepojovacieho kábla (17) so solárnym panelom (1).

INŠTALÁCIA (pokr.)
• Teraz navŕtajte upevňovacie otvory. Pred vŕtaním upevňovacích otvorov sa uistite, že nebudete vŕtať
do plynovodov, vodovodných potrubí či elektrických vedení a že ich pri vŕtaní ani nebudete môcť poškodiť.
Pri výbere miesta montáže solárneho panela (1) si všímajte nasledovné: Solárny panel (1) musí byť
v čo najväčšej možnej miere vystavený slnečnému svetlu. Dokonca aj čiastočné zatienenie solárneho
panela (1) počas dňa môže mať na nabíjanie veľký vplyv. Hlavný smer: Otočenie smerom na sever
je optimálne. Otočenie s miernou odchýlkou smerom na východ je vhodnejšie ako mierna odchýlka smerom
na západ. Horizontálna orientácia: Horizontálna orientácia solárneho panela (1) závisí od zemepisnej
šírky miesta montáže; ideálny uhol je 30° až 40°. Váš produkt je teraz pripravený na použitie.
Obr. G • Do navŕtaných otvorov (obr. G) vložte kolíky (15).
• Pripevnite montážnu konzolu (14) pomocou skrutiek (16).
• Solárny panel (1) umiestnite do montážnej konzoly (14) (obr. G).
• Uistite sa, že solárny panel (1) je obrátený smerom k slnku.
• Zástrčku (18) zapojte do elektrickej zásuvky (19) (obr. G).
• Vypínač (2) na svetle (3) prepnite do polohy„ON“ (ZAP.) (obr. B).
• Nabíjateľné batérie (11) sa začnú nabíjať, ak budú mať
dostatok slnečného svetla.
VYSVETLIVKY SYMBOLOV:
Zariadenie nevystavujte nepriaznivým vplyvom pocasia
(dážd, vietor, mráz atd.)
Nevyhadzujte do bežného domového odpadu. Namiesto toho, ekologicky prijatelnou cestou
sa obrátte na recyklacné strediská. Prosím venujte starostlivost ochrane životného prostredia.
Výrobok je v súlade s platnými európskymi smernicami a bola vykonaná metóda hodnotenia
zhody týchto smerníc.
BEZPEČNOSTNÉ OPATRENIA:
1. Uvedomte si, že solárne svetlo je navrhnuté tak, že sa automatický zapne po zotmení. Ak je blízko neho
silný zdroj svetla, môže sa stať, že sa nerozsvieti.
2. Batérie svetla sú plne dobité výrobcom, avšak kým sa svetlo dostane ku konečnému spotrebiteľovi
už môžu byť čiastočne alebo úplne vybité. Preto prosím nechajte solárne svetlo dobíjať sa po celý deň
pre jeho maximálny výkon.
3. Udržujte povrch solárneho panelu čistý. Znečistený panel znižuje účinnosť dobíjania.
VÝMENA BATÉRIÍ:
Ak solárne svetlo prestane fungovať po 12 mesiacoch používania, je možno nutné vymeniť batériu.
Môžete otvoriť kryt batérie a vymeniť batériu za novú, dobíjateľnú batériu.
Parametre:
∙ 6x LED, 150lm
∙ biela (6000-6500K)
∙ 3x AAA 1,2 V, 600 mAh Ni-MH
nabíjateľná batéria (súčastou balenia)
∙ Materiál: plast
∙ Veľkosť: 10 x 3,2 x 9 cm
∙ Spínač ON/OFF
∙ Snímací uhol: 90°
∙ Detekčná vzdialenosť: 7 m
Table of contents
Languages: