Stromberg Carlson Products JET-2500 User manual

StrombergCarlson.com • 231.947.8600
INS-JET2500-C 04.27.2021
Electric Tongue Jack JET-2500
FIGURE 2
FIGURE 1
WARNING: Keep hands, feet, and body out from beneath
the jack and trailer to avoid risk of harm or fatal injury!
Before installation, compare the lift capacity of the
Stromberg tongue jack with your trailer to ensure safe
operation of the jack.
Tools Required
9/16” Wrench
Torque Wrench
Wire Cutters/Strippers
Crimpers OR Soldering Iron
Carton Contents
(1) Removable Foot Pad
(1) 3/8” Safety Lock Pin
(1) Manual Crank Handle
(1) 30 A Spare Fuse
(3) 3/8” Star Washers
(3) Bolts
(1) Wire Butt Connector
(1) Terminal ring
Specifications
n2500 lb Electric A-Frame Jack
nMaximum Lift Capacity:
2500 lb (continuous use)
nRetracted Height: 31-3/8”
nVertical Travel: 18”
nPower Requirements: 12V DC
nOuter Tube Diameter: 2”
nPower Cord Length:
6 ft of 10 Gauge Wire
nFoot Pad Diameter: 5-1/2”
nLED Work Lights For Easy
Nighttime Hookups
nShipping Weight: 23 lb
1. Park the trailer on a level surface and block the wheels.
2. Support the trailer tongue by the frame with the jack stands.
3.
Remove the paint tab
masking one of the three
mounting holes on the
jack. Also, sand paint
from the area around the
mounting holes on the
jack mounting plate (both
top and bottom) and the
corresponding location on the trailer coupler. Lubricate these
bare metal connection points with dielectric grease to ensure
the best ground possible for the jack and to prevent rust.
4. Insert the electric jack into the jack hole, aligning the bolt
holes so the motor housing is facing forward (Figure 1).
Secure the jack using the mounting bolts and star washers
provided. If mounting holes on the coupler are too large for
the bolts to thread into, use grade 5, 3/8”-16 UNC bolts and
washers. Bolts should be tightened to 15 to 20 ft-lb.
5. If a lower support plate is not already present, install one
in the bottom of the trailer frame. Do not operate the jack
without a lower support plate – shown in Figure 2.
6. Connect the fuse holder to the power wire using the
butt connector and terminal ring; crimp or solder the
connections. Place the fuse holder as close as possible to
the positive battery terminal – preferably inside the battery
box. Since the jack is internally grounded, a ground wire is
not necessary. Attach the power wire to the positive battery
terminal.
7. Alternately, wire the jack
directly to the reset breaker
(if available). The reset
breaker may be located at
the corner of the first cross
member of the A-frame.
Electric Tongue Jack JET-2500
Operation Instructions
1. Park your trailer on a level surface and block all dolly and
trailer wheels. TIP: For night time hookups, flip the light
switch ON to illuminate your work area.
2. Before operating the jack, attach the foot with the 3/8”
safety lock pin provided.
WARNING: DO NOT stack blocks under the jack’s foot to
increase the height. Stacked blocks may become unstable
and fall.
3. Extend the jack by pushing the operating switch UP.
NOTE: Under heavy use, the circuit breaker may open,
causing the motor to switch off. In this case, release the
operating switch and wait 15 seconds for the breaker to
reset. Retract the jack by pushing the operating switch down
NOTE: The jack will slow down and stop as it approaches
the fully retracted position. Release the switch at first sign of
slowing.
4. Before driving, remove the foot or position it in the highest
position and completely retract the jack.
Manual Operation Instructions
1. Disconnect the jack from the power source.
2. Remove the rubber access covers on the top of the jack and
on the side of the motor cover.
3. Insert the manual crank handle into the access hole on the
top of the jack, engaging the drive screw.
4. Rotate the manual crank handle counter-clockwise to extend
the jack, and clockwise to retract it.
Maintenance
To keep your jack in good, functional condition, fully extend the
jack and clean the inner jack tube once a year. After cleaning,
coat the tube with a light grease or silicone spray lubricant.
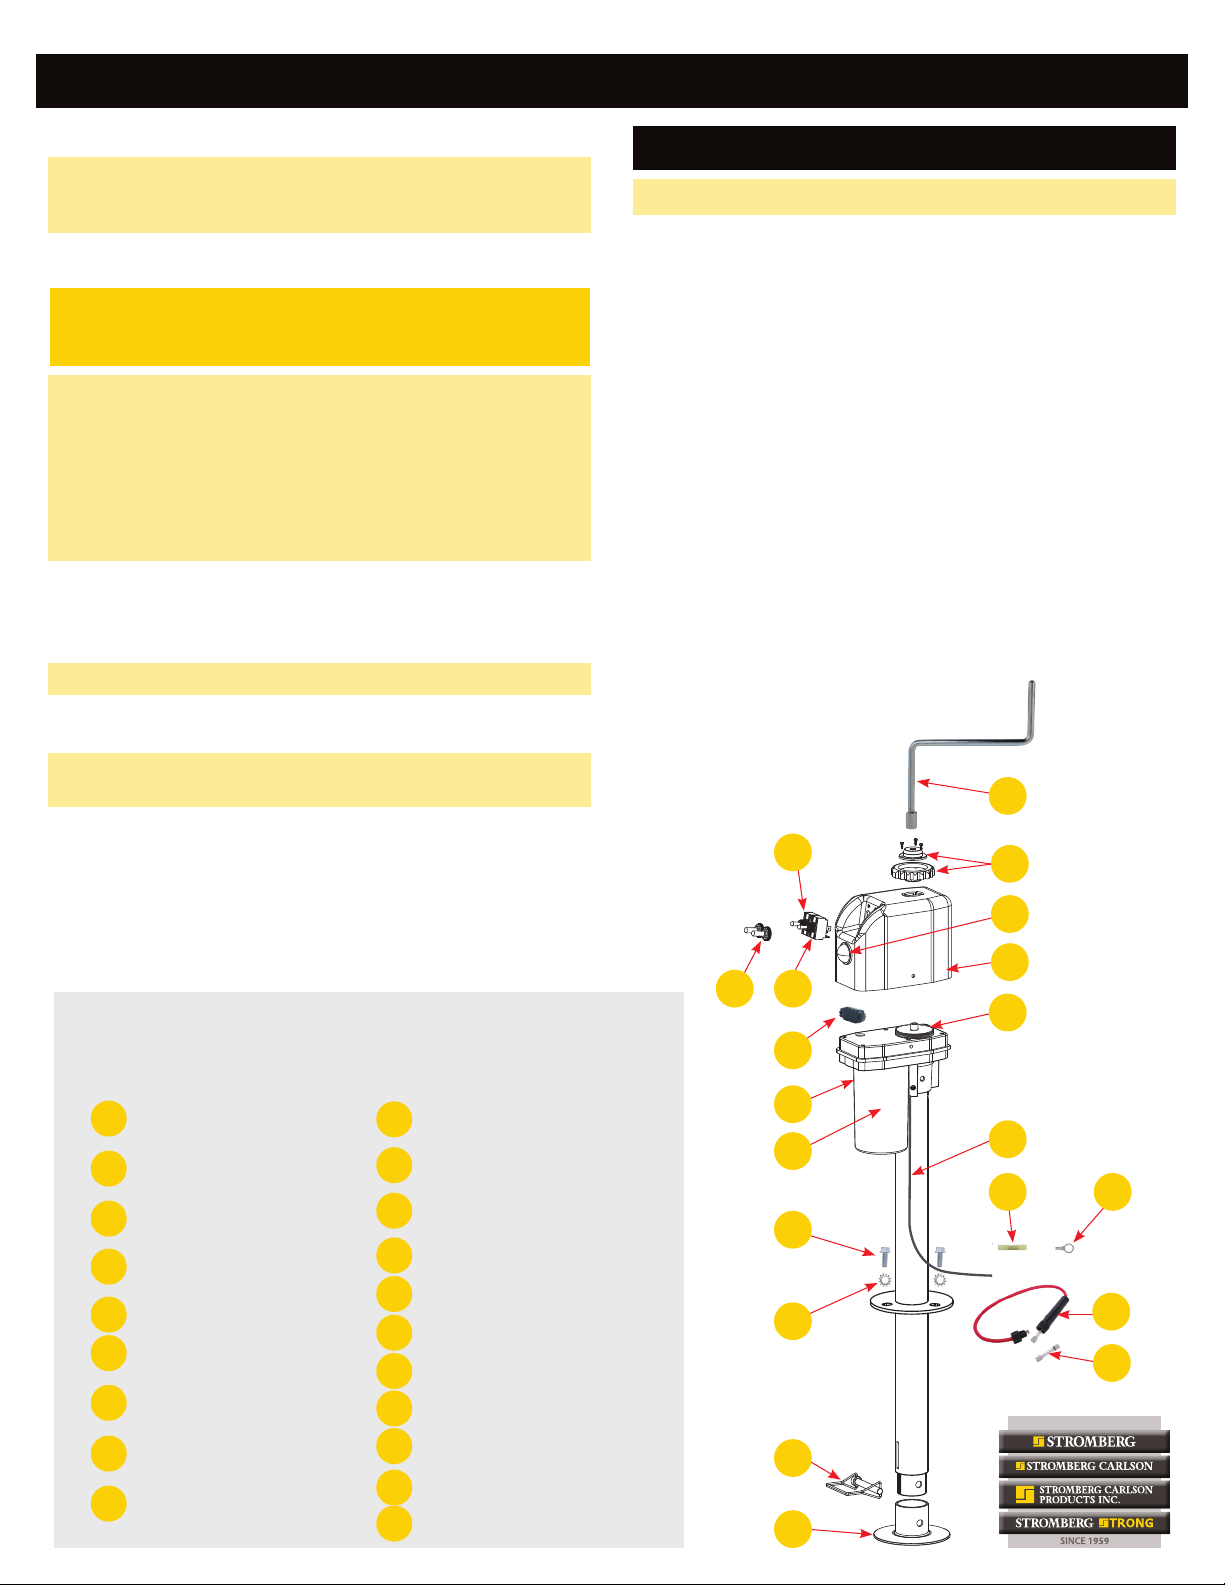
Replacement Parts
A-H UPPER JACK ASSEMBLY
(Includes all housing, gear motor
box assembly and items A-F)
A1 Extend/retract switch
Item # 2500-03
Light on/off switch
Item # 2500-04
Switch boot (set of 2)
Item # 2500-05
LED light and lens
Item # 2500-06
Circuit breaker
Cap with bubble level
Item # 2500-3755E
Motor
Item #2500-18
Top Housing/Cover
(Item #2500-02)
Motor Housing/Cover
(Item # 2500-20)
A1
A2
B
C
D
E
F
I-S LOWER JACK ASSEMBLY
(Includes outer jack tube, Inner jack
tube, screw shaft and items G-P)
G Removable foot pad
Item # 2500-25
3/8” safety lock pin
Item # 2500-26
Manual crank handle
Item # 2500-24
Star washer (3 pieces)
Power lead
Gear Box
Terminal ring
Wire butt connector
30A spare fuse
Item # 2500-3755K
Fuse holder
3 Bolts
G
H
I
J
K
L
M
N
O
P
Q
R
S
TROUBLESHOOTING
Motor isn’t operating
CAUSE SOLUTION
Open Circuit Breaker Wait 15 seconds for the breaker to close.
Poor Ground Clean area between the jack mounting
plate and coupler, and ensure paint
has been removed by the star washers.
Direct metal-to-metal contact must exist
between mounting components to ensure
good electrical contact.
No or Low Voltage Check battery and electrical connections.
Power supplied must be at least 10V DC.
If the battery is low, plug the trailer cable
into the tow vehicle, and start the tow
vehicle to provide power to the jack.
Blown Fuse Replace fuse with a new 30A fuse.
R
Q
A1
I
A2
J
B
K
C
L
S
D
E
G
N
M
F
H
PO
Other Stromberg Carlson Products Jack manuals


Popular Jack manuals by other brands

Pittsburgh
Pittsburgh 62590 Owner's manual & safety instructions

Powerbuilt
Powerbuilt 640405 Operating and maintenance instruction manual

Clarke
Clarke STRONG-ARM CTJ3000G quick start guide

Clarke
Clarke CTJ2500QLG Operating & maintenance instructions

Omega Lift Equipment
Omega Lift Equipment 18122C Operating instructions & parts manual

Pittsburgh
Pittsburgh 58816 Owner's manual & safety instructions


