Strongway 49581 User manual

W
INST
R
preca
u
W
ARNING
:
R
UCTIONS b
u
tions may r
e
S
A
Re
t
:
Read care
f
efore opera
t
e
sult in serio
u
Item
A
VE THE
t
racta
W
ith
T
Own
e
ully and und
ing. Failure
t
u
s personal
i
#s49
5
SE INS
T
ble C
o
T
ripl
e
e
r’s M
a
erstand all
A
t
o follow the
i
njury.
5
81, 4
9
T
RUCTI
O
o
rd R
e
e
Tap
s
a
nual
A
SSEMBLY
A
safety rules
9
582,
4
NS
e
els
s
A
ND OPER
A
and other b
a
4
9583
A
TION
a
sic safety

Page 2 of 22
Thank you very much for choosing a Strongway product!
For future reference, please complete the owner’s record below:
Serial Number/LotDate Code: ________________________________
Purchase Date: ____________________________________________
Save the receipt, warranty, and this manual. It is important that you read
the entire manual to become familiar with this product before you begin
using it.
These retractable cord reels are designed for certain applications only.
Northern Tool and Equipment cannot be responsible for issues arising
from modification or use of these products in an application for which
they were not designed. We strongly recommend that these products not
be modified and/or used for any application other than that for which they
were designed.
For technical questions, please call 1-800-222-5381.

Page 3 of 22
Table of Contents
Intended Use .......................................................................................................................................... 4
Technical Specifications ...................................................................................................................... 4
Important Safety Information ............................................................................................................... 5
Specific Operation Warnings ............................................................................................................... 6
Grounding .............................................................................................................................................. 7
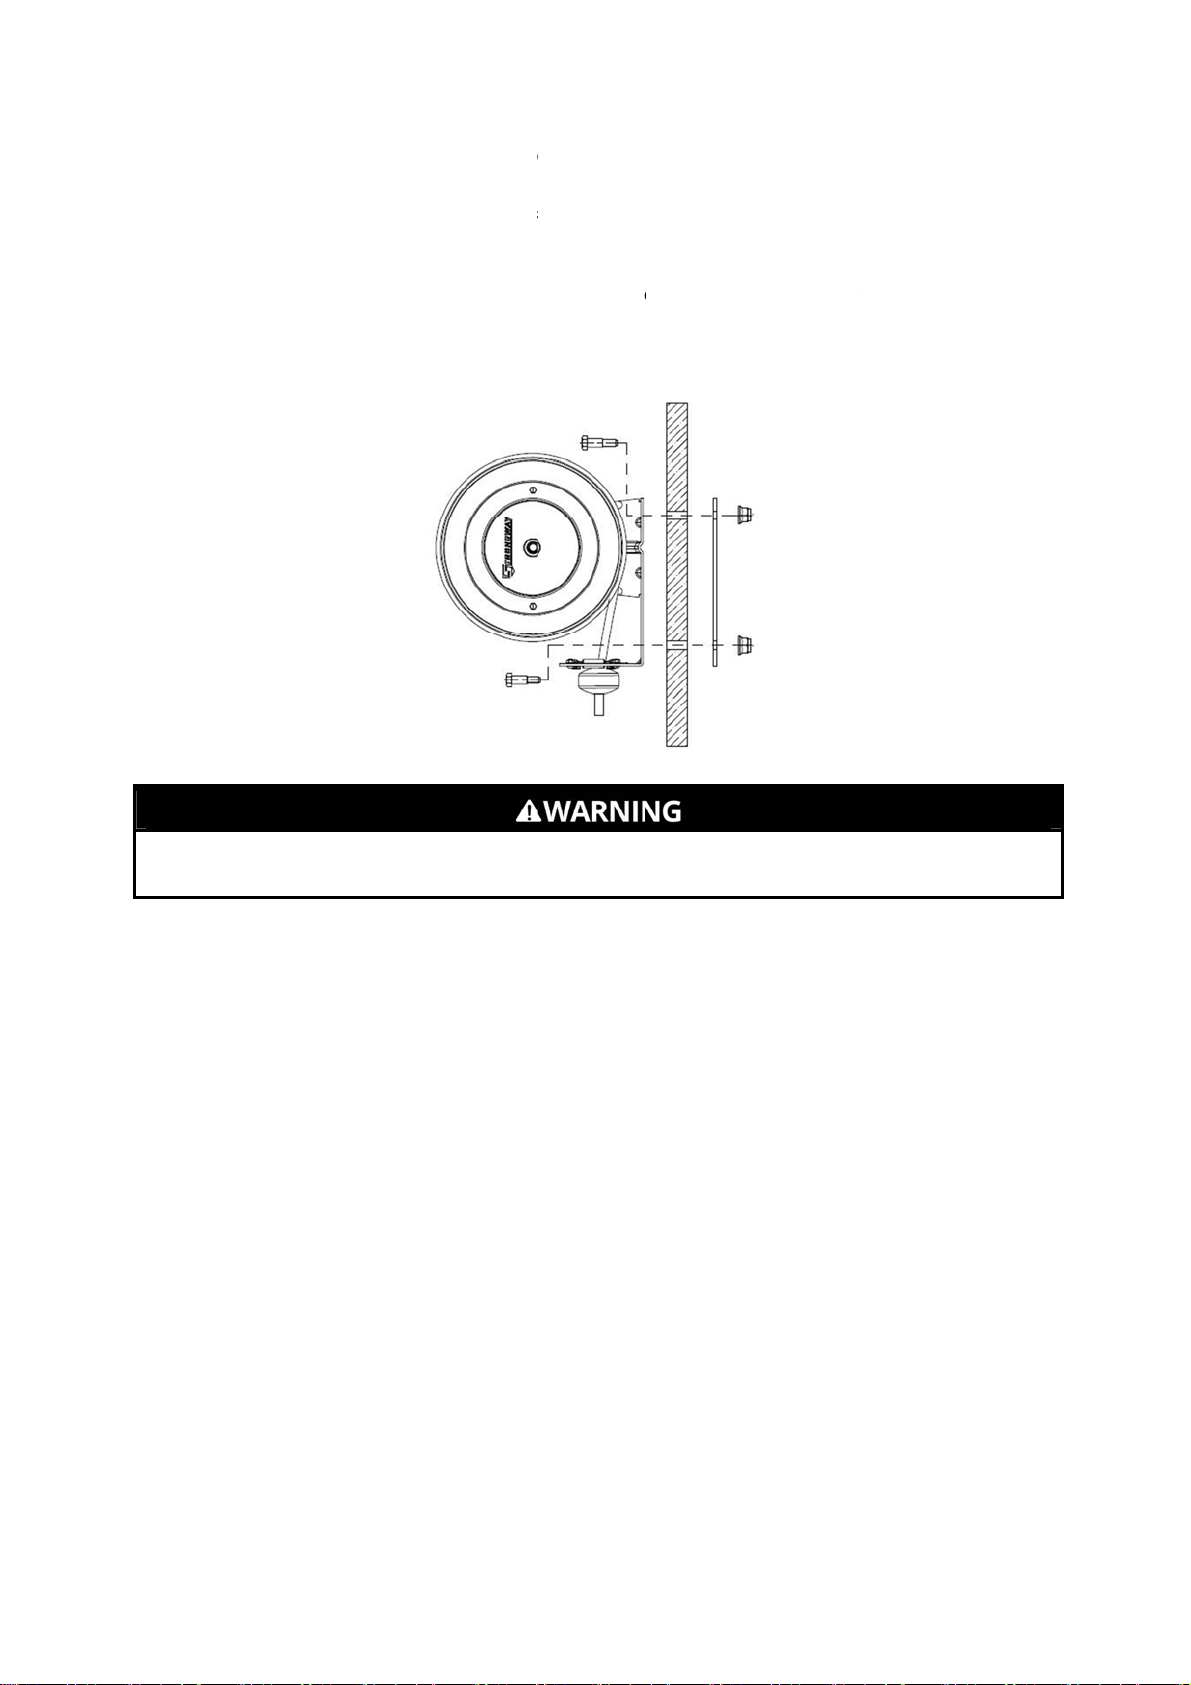
Assembly – 49581 ................................................................................................................................. 8
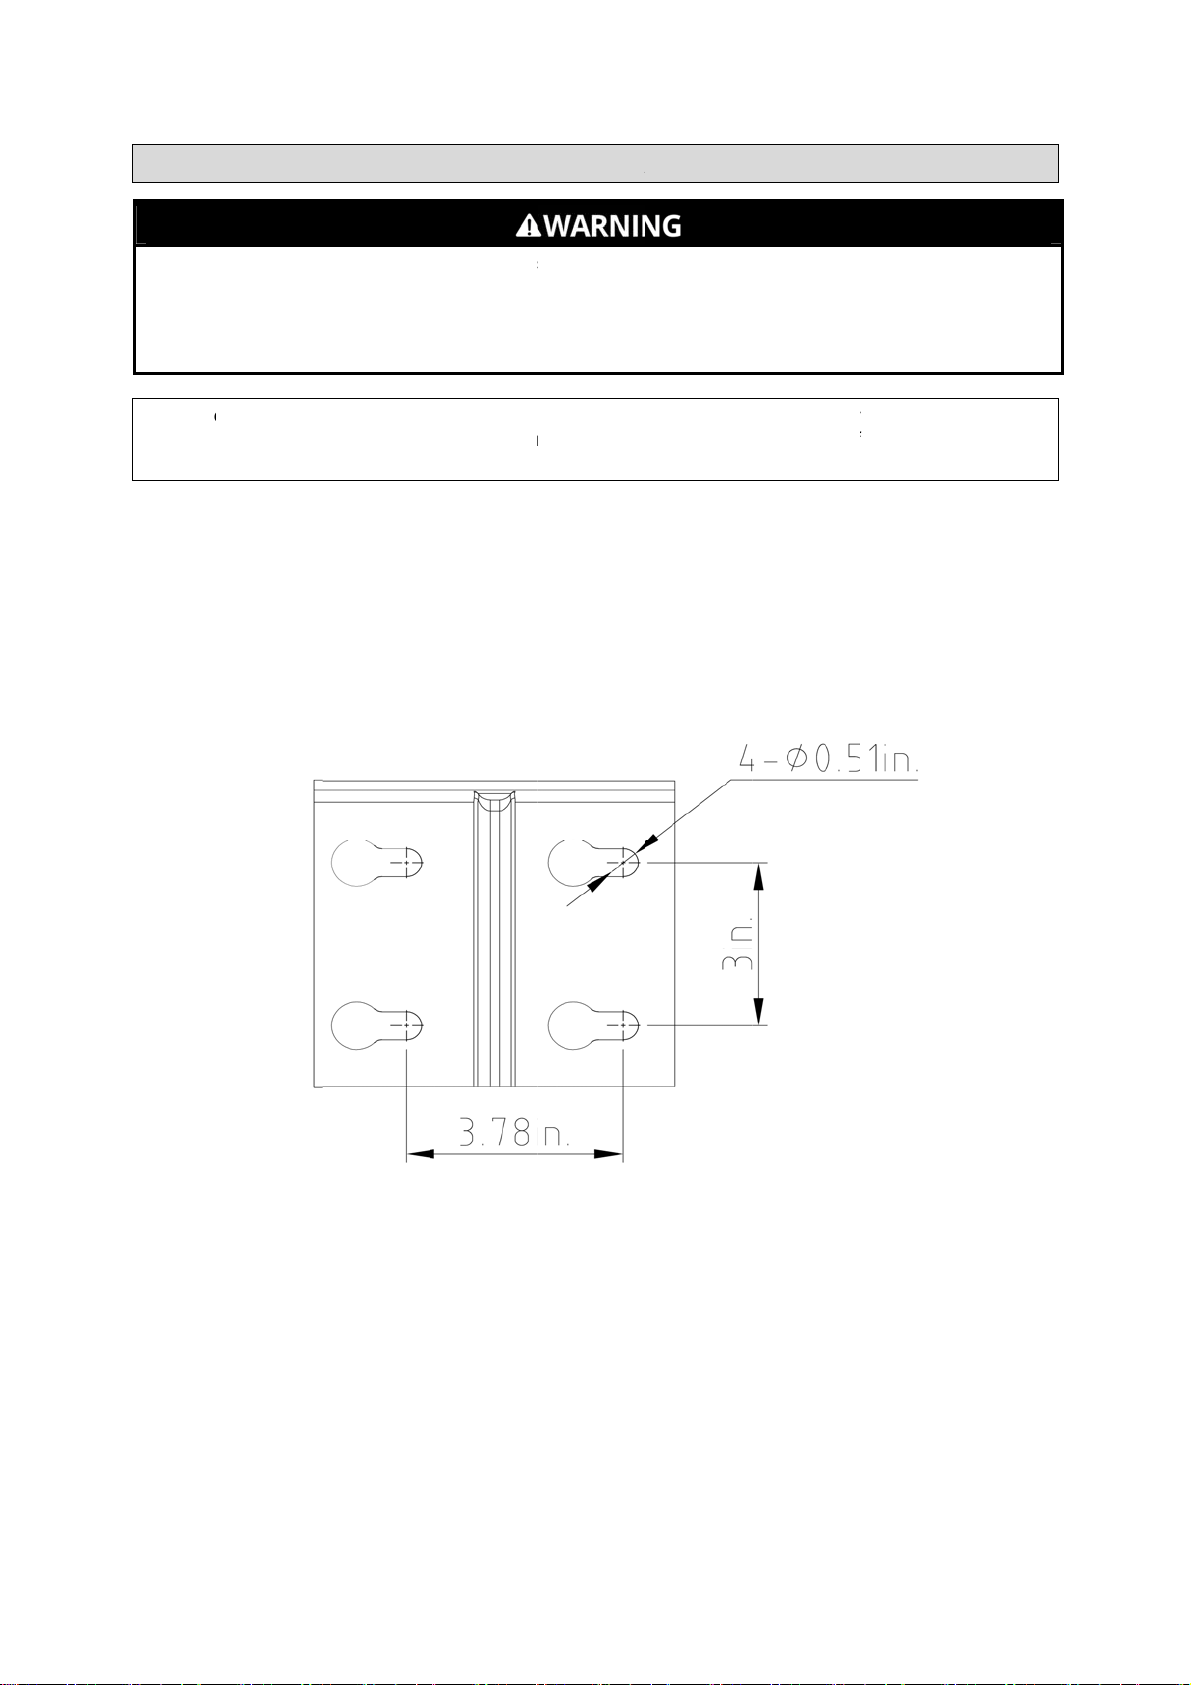
Assembly – 49582 & 49583................................................................................................................. 10
Before Each Use .................................................................................................................................. 12
Operating Instructions ........................................................................................................................ 13
Spring Tension Adjustment ............................................................................................................ 14
AfterEach Use ...................................................................................................................................... 14
Maintenance ........................................................................................................................................ 15
Parts Diagram – 49581 ........................................................................................................................ 16
Parts List – 49581 ................................................................................................................................ 17
Parts Diagram – 49582 & 49583 ......................................................................................................... 18
Parts List – 49582 & 49583 ................................................................................................................. 19
Troubleshooting .................................................................................................................................. 20
Replacement Parts .............................................................................................................................. 20
Limited Warranty ................................................................................................................................. 21

Page 4 of 22
Intended Use
This heavy-duty retractable cord reels are designed for professional use. The guide arms adjust to
wall, floor or overhead positions. The spring-driven retractable reels have adjustable locking ratchets
to secure the cord at any desired length. Each reel has a triple-tap electrical cord.
Technical Specifications
49581, 30-ft. Cord Reel
Property Specification
Length (ft.) 30
Cord Size 12/3
Product Size (in.) 12-7/8 Lx 8-1/8Wx 12-3/8 H
Lead-in Cord Length (ft.) 5
Amps 15
Power 125V AC, 60Hz
Mounting Type Wall, Floor or Ceiling
Weight 20 lbs.
49582, 50-ft. Cord Reel
Property Specification
Length (ft.) 50
Cord Size 12/3
Product Size (in.) 13-3/8Lx8-3/4Wx15-1/8H
Lead-in Cord Length (ft.) 5
Amps 15
Power 125V AC, 60Hz
Mounting Type Wall, Floor or Ceiling
Weight 31 lbs.
49583, 75-ft. Cord Reel
Property Specification
Length (ft.) 75
Cord Size 12/3
Product Size (in.) 16-5/8Lx8-5/8Wx17-3/4H
Lead-in Cord Length (ft.) 5
Amps 15
Power 125V AC, 60Hz
Mounting Type Wall, Floor or Ceiling
Weight 40 lbs.

Re
a
Th
e
situ
a
aw
a
DO
hav
DO
saf
e
wa
s
Us
e
ind
u
do
t
equ
Ind
u
Kee
res
u
cutt
i
Be
a
wor
k
ma
y
Sta
y
use
of i
n
Dre
s
and
We
a
saf
e
ma
s
sys
t
Do
n
a
d and unde
r
e
warnings,
c
a
tions that c
o
a
re of the en
v
NOT allow
p
e developed
NOT modif
y
e
ty and coul
d
s
designed.
e
the right to
o
u
strial equip
m
t
he job bette
r
ipment for a
u
strial or co
m
p work area
u
lt in injury.
U
i
ng tools an
d
a
ware of all
p
k
area. Som
e
y
cause pers
o
y
alert, watc
h
the reel whi
l
n
attention w
h
s
s properly.
gloves awa
y
a
r the prope
r
e
ty goggles (
s
k in dusty w
t
ems, and h
e
n
ot overreac
I
m
r
stand all in
s
c
autions, an
d
o
uld occur.
E
v
ironment a
n
p
ersons to o
p
a thorough
y
the produc
t
d
affect the li
o
l for the job
m
ent. There
r
and more
s
purpose for
m
mercial ap
p
clean, dry, f
U
sing the to
o
d
rotating pa
r
p
ower lines,
e
of these h
a
o
nal harm o
r
h
what you a
l
e you are ti
r
h
ile operatin
g
Do not wear
y
from movi
n
r
personal p
r
not safety gl
a
ork conditio
n
e
aring prote
c
h. Keep pro
p
m
portant
s
tructions. F
a
d
instruction
s
E
xercise co
m
n
d ensure th
a
p
erate or as
s
understandi
n
in any way.
fe of the pro
d
.
DO NOT a
t
are certain
a
s
afely at the
c
which it wa
s
p
lications mu
WO
R
r
ee of clutte
r
o
l in confined
r
ts.
electrical cir
c
a
zards may
b
r
property d
a
PE
R
re doing, an
d
ed or under
g
the tool m
a
loose clothi
n
n
g parts. Lo
o
otective equ
a
sses) with
s
n
s. Also use
c
tion when a
p
p
er footing a
Page 5 of 2
2
Safety I
n
a
ilure to follo
w
s
in this man
u
m
mon sense
a
t the tool is
s
emble this
p
n
g of how th
Unauthoriz
e
duct. There
t
tempt to for
c
a
pplications
f
c
apacity for
w
s
not intend
e
u
st follow O
S
R
K AREA S
A
r
, and well li
t
d
work areas
c
uits, water
p
b
e below th
e
a
mage if uni
n
R
SONAL SA
F
d
use comm
the influenc
e
a
y result in s
e
n
g, dangling
o
se clothes, j
ipment whe
n
s
ide shields,
non-skid sa
f
p
propriate.
T
nd balance
a
2
n
formati
w
all instruc
t
u
al cannot c
o
and caution
used in a s
a
p
roduct until
e
product w
o
e
d modificati
o
a
re specific
a
c
e a small e
q
f
or which thi
s
w
hich it was
e
d.
S
HA require
m
A
FETY
. Cluttered,
w
may put yo
u
p
ipes, and o
t
e
work surfa
c
n
tentionally
c
F
ETY
on sense w
h
e
of drugs, a
e
rious perso
n
objects, or j
e
ewelry, or lo
n
necessary.
or when ne
e
f
ety shoes,
h
T
his applies
t
a
t all times.
on
t
ions may re
s
o
ver all pos
s
when using
a
fe and resp
o
they have r
e
o
rks.
o
n may imp
a
a
pplications
q
uipment to
d
s
equipment
intended. D
O
m
ents.
w
et, or dark
w
u
dangerousl
t
her mecha
n
c
e hidden fro
c
ontacted.
h
en operatin
g
l
cohol, or m
e
n
al injury.
e
welry. Kee
p
ng hair can
b
Use ANSI
Z
e
ded, a face
h
ardhat, glov
e
o
all person
s
s
ult in serio
u
s
ible conditio
this tool. Al
w
o
nsible man
n
e
ad this ma
n
a
ir the functi
o
for which th
e
d
o the work
was design
e
O NOT use
t
w
ork areas
c
l
y close to o
t
n
ical hazard
s
o
m your vie
w
g
the reel. D
o
e
dication. A
m
p
your hair,
c
b
e caught.
Z
87.1 compli
shield. Use
es, dust coll
e
s
in the wor
k
u
s injury.
ns or
w
ays be
n
er.
ual and
o
n and/or
e
product
o
f larger
e
d. It will
t
his
c
an
t
her
s
in your
and
o
not
m
oment
c
lothing
ant
a dust
e
ction
k
area.

E
x
dr
u
D
o
fo
o
M
o
ch
E
n
us
E
n
E
n
E
n
C
h
W
h
w
o
Di
s
N
e
D
o
x
ercise care
w
u
m powered
o
not use co
r
o
t, length of
c
o
unting hard
w
ecked perio
d
n
sure that o
n
ed by childr
e
n
sure that p
o
n
sure that th
e
n
sure that all
h
eck for fray
e
h
en pulling t
o
rk device.
s
connect po
w
e
ver remove
,
o
not use th
e
S
p
w
hen handli
n
by a spring
r
d different t
h
c
ord or flexi
b
w
are and fa
s
d
ically to en
s
n
ly the qualifi
e
n or unskill
e
o
wer supply
v
e
reel is pro
p
electrical p
o
e
d or broken
he electrical
w
er from th
e
,
tamper wit
h
e
reel in dam
p
ecific
O
n
g the cable
under tensi
o
h
an what is
s
b
ility will affe
c
s
teners sho
u
s
ure tightne
s
ed electricia
e
d persons.
v
oltage doe
s
p
erly installe
d
o
wer is disc
o
wires befor
e
cord from t
h
e
reel immed
h
or cut out t
h
p
or wet con
Page 6 of 2
2
O
peratio
n
reel during
n
o
n.
s
upplied wit
h
ct the opera
t
u
ld be install
e
s
s. Mounting
n can install
s
s
not exceed
d
before con
o
nnected fro
m
e
each use.
h
e reel alwa
y
iately if any
m
h
e safety de
v
ditions. Avoi
2
n
Warnin
n
ormal oper
a
h
this reel. C
h
t
ion of the r
e
e
d to mainta
hardware a
n
s
/services th
the maximu
necting to p
o
m
reel befor
e
y
s grasp the
e
m
alfunction
o
v
ices fitted
b
d getting de
b
gs
a
tion. Cord r
e
h
anges in di
a
el.
i
n tightness
u
n
d fasteners
is cord reel.
m
voltage ra
o
wer supply.
e
servicing.
e
lectrical co
r
o
ccurs.
b
y the manuf
a
b
ris in the c
o
r
eels have a
a
meter, wei
g
under vibrati
not include
d
And it must
a
ting of the r
e
.
r
d itself, not
t
f
acture.
o
rd reel.
rotating
g
ht per
on and
d
.
not be
e
el.
t
he

Thi
s
drill
gro
u
and
DO
rec
e
CH
E
gro
u
Groun
Tools m
must be
down, g
risk of e
The gro
u
system
i
system
a
Your to
o
with all
c
s
machine m
u
press is eq
u
u
nding plug.
grounded i
n
NOT MODI
F
e
ptacle insta
l
E
CK with a
q
u
nding instru
ded Tool
s
arked with
G
connected
t
rounding pr
o
lectric shoc
k
u
nding pron
g
i
n the tool.
T
a
nd must ne
o
l must be pl
c
odes and o
r
u
st be grou
n
u
ipped with
a
The plug M
U
n
accordanc
e
F
Y THE PR
O
l
led by a qu
a
q
ualified elec
ctions, or if
y
s
: Tools
w
G
rounding
R
t
o a properly
o
vides a low
k
. (See Figur
e
g
in the plug
T
he green wi
r
ver be attac
h
ugged into
a
r
dinances. T
G
n
ded while in
n electrical
c
U
ST be plug
g
e
with ALL lo
c
O
VIDED PL
U
a
lified electri
c
trician or se
r
y
ou are not
s
w
ith 3-Pro
n
R
equired ha
v
grounded o
u
resistance
p
e
A.)
is connecte
d
r
e in the cor
d
h
ed to an el
e
a
n appropria
t
he plug and
Page 7 of 2
2
G
roundi
n
use to prot
e
c
ord that ha
s
g
ed into a m
cal codes a
n
U
G. If it will n
c
ian.
r
vice person
s
ure the tool
n
g Plugs
v
e a 3-wire
c
utlet. If the t
o
p
ath to carry
d
through th
e
d
must be th
e
e
ctrically live
t
e outlet, pro
outlet shoul
d
2
n
g
e
ct the oper
a
s
an equipm
e
atching rec
e
n
d ordinanc
e
ot fit the rec
e
if you do no
t
is properly
g
c
ord and 3-p
r
o
ol should el
electricity a
w
e
green wire
e
only wire
c
terminal.
perly install
e
d
look like th
a
tor from ele
c
e
nt groundin
g
ptacle that i
s
s.
e
ptacle, hav
e
t
completely
g
rounded.
r
ong groundi
ectrically m
a
w
ay from the
inside the c
o
onnected to
e
d and grou
n
ose in the f
o
c
trical shock
g
conductor
s
properly in
s
e
the proper
understand
i
ng plug. Th
e
a
lfunction or
user, reduc
i
o
rd to the gr
o
the tool’s g
r
n
ded in acco
r
o
llowing illus
t
. This
and a
s
talled
the
e
plug
break
i
ng the
o
unding
ounding
r
dance
t
ration.

Thi
s
equ
Onl
y
Fail
Note: B
e
The pe
d
7/16” or
1. Bef
o
rati
n
2. Un
p
for
s
Note: T
h
3. Fas
t
hol
e
Note: E
fastene
r
tightnes
s
If the re
e
next ste
4. Tur
n
pre
c
5. Ins
e
the
h
6.
A
tta
s
cord reel i
s
ipment sho
u
y
qualified p
e
ure to comp
l
e
fore begin
n
d
estal has fo
u
M12 bolts (
n
o
re installing
n
g of the ree
l
p
ack the reel
s
mooth rotat
i
h
e reel shou
t
en the ped
e
e
s in the bas
e
nsure the re
e
r
s should be
s
.
e
l was suppl
p.
n
the reel dr
u
c
aution whil
e
e
rt the plug
e
h
ole in the d
ch the cord
s
s
intended fo
r
u
ld be prope
r
e
rsonnel sh
o
l
y with instru
n
ing assemb
l
u
r 7/16” (10.
5
n
ot included
)
the reel, be
l
.
then check
t
i
on.
ld NOT be i
n
e
stal (5) in th
e
e
are shown
e
l has been
installed to
m
ied with hos
e
u
m by hand
u
e
installing th
e
nd of the n
e
rum flange
a
s
topper (30)
Ass
e
r
industrial u
s
r
ly installed
b
o
uld underta
k
ctions could
l
y/installatio
n
5
mm) holes
)
along with
w
certain the
p
t
hat all parts
n
stalled high
e
e
desired lo
c
below. Tigh
t
properly ins
t
m
aintain tigh
e
already w
o
u
ntil the rewi
e new cord,
e
w cord thr
o
a
nd plug it in
t
to the other
Page 8 of 2
2
e
mbly –
4
se and is pr
o
b
efore use i
n
k
e the instal
l
result in pe
r
n
, purchase
a
for mountin
g
w
ashers.
p
ower suppl
y
are present
er than 15 f
e
c
ation. Reel
d
t
en all hard
w
t
alled before
h
tness under
o
und on it, c
o
nd spring is
secure the
d
o
ugh roller g
t
o the electr
o
end of cord.
2
4
9581
o
vided with
p
n
accordanc
e
l
ation and c
o
r
sonal injury
a
ppropriate
h
g
on a suita
b
y
does not e
x
and inspect
e
et above th
e
d
imensions
a
w
are securel
y
connecting
vibration an
o
ntinue with
s
tight, and dr
d
rum in its la
t
uide of the
p
o
nic bushing
p
ermanent
m
e
with local c
o
o
mmissionin
g
and/or prop
e
h
ardware for
le flat surfa
c
x
ceed the v
o
for damage
.
e
floor.
a
nd the patt
e
y
.
p
ower. Mou
n
d
checked p
e
s
tep 8. If no
t
u
m has latc
h
t
ched positi
o
p
edestal (5)
assembly (
2
m
ounting me
a
o
des and or
d
g
of this pro
d
e
rty damage
r
mounting t
h
c
e. Purchas
e
o
ltage / amp
e
. Check reel
e
rn of the m
o
n
ting hardw
a
eriodically t
o
t
, continue
w
h
ed. As an e
x
o
n.
then route i
t
2
4) of the re
e
a
ns. This
d
inances.
d
uct.
.
h
e reel.
four
e
rage
function
o
unting
a
re and
o
ensure
w
ith the
x
tra
t
through
e
l.

7. Car
e
ma
k
8. Plu
g
reel
9. If a
f
at a
cor
d
To
m
Do
n
are
e
fully releas
e
k
ing sure the
g
the cord in
t
for correct r
o
f
inal adjust
m
desired len
g
d
then retigh
t
m
ount reel t
o
not disasse
m
equipped wi
e
the drum l
a
cord winds
t
o the power
o
tation/latch
m
ent to the h
o
g
th. Loosen
t
t
en the stop
p
o
a pillar you
m
ble a sprin
g
th a spring
u
a
tch, and slo
i
n even, stra
outlet and c
ing (see the
o
se stopper
i
t
he stopper
b
p
er bolts.
will need m
o
g
assembly f
o
u
nder tensio
n
Page 9 of 2
2
o
wly allow co
ight turns o
n
c
heck that th
e
Operating I
n
is required,
p
b
olts, and sli
d
o
unt plate (3
o
r any reas
o
n
.
2
rd to wind o
n
n
the reel.
e
re is power
n
structions).
p
ull the cord
d
e the stop
p
1) as shown
o
n! Serious
p
n
to the reel i
n
at all three t
from the re
e
er to a desir
e
below
ersonal inju
r
n a controlle
t
aps. Also c
h
e
l and allow i
r
ed position
a
r
y could res
u
d way
h
eck the
t
to latch
a
long the
u
lt. Reels

Thi
s
equ
Onl
y
Fail
Note: B
e
The L-s
h
Purcha
s
1. Bef
o
rati
n
2. Un
p
for
s
Note: T
h
3. Fas
t
mo
u
The roll
e
function
Otherwi
s
s
cord reel i
s
ipment sho
u
y
qualified p
e
ure to comp
l
e
fore begin
n
h
aped supp
o
s
e four 7/16”
o
re installing
n
g of the ree
l
p
ack the reel
s
mooth rotat
i
h
e reel shou
t
en the L-sh
a
u
nting holes
e
r guide bra
c
as shown i
n
s
e continue
w
A
s
intended fo
r
u
ld be prope
r
e
rsonnel sh
o
l
y with instru
n
ing assemb
l
o
rt has four
7
or M12 bolt
s
the reel, be
l
.
then check
t
i
on.
ld NOT be i
n
a
ped suppo
r
in the base
a
c
ket (4) that
g
n
the picture
s
w
ith step 9.
P
A
ssembl
y
r
industrial u
s
r
ly installed
b
o
uld underta
k
ctions could
l
y/installatio
n
7
/16” (10.5m
m
s
(not includ
e
certain the
p
t
hat all parts
n
stalled high
e
t (12) in the
d
a
re shown b
e
g
uides the c
o
s
below. If d
e
P
age 10 of
2
y
– 4958
2
se and is pr
o
b
efore use i
n
k
e the instal
l
result in pe
r
n
, purchase
a
m) holes for
e
d) along wi
t
p
ower suppl
y
are present
er than 15 f
e
desired loca
e
low. Tighte
n
ord on and
o
esired, follo
w
2
2
2
& 495
8
o
vided with
p
n
accordanc
e
l
ation and c
o
r
sonal injury
a
ppropriate
h
mounting o
n
t
h washers.
y
does not e
x
and inspect
e
et above th
e
tion. Reel di
m
n
all hardwa
r
o
ff the reel c
a
w
steps 4 thr
8
3
p
ermanent
m
e
with local c
o
o
mmissionin
g
and/or prop
e
h
ardware for
n
a suitable f
x
ceed the v
o
for damage
.
e
floor.
m
ensions a
n
r
e securely.
a
n be reposi
t
o
ugh 8 to re
p
m
ounting me
a
o
des and or
d
g
of this pro
d
e
rty damage
r
mounting t
h
f
lat surface.
o
ltage / amp
e
. Check reel
n
d the patter
n
t
ioned for b
e
position the
a
ns. This
d
inances.
d
uct.
.
h
e reel.
e
rage
function
n
of the
e
tter
bracket.

4. Pull
5. Mai
n
of t
h
6. Re
m
7. Tur
n
was
8. Tig
h
Note: E
fastene
r
tightnes
s
If the re
e
next ste
9. Tur
n
pre
c
10. Ins
e
hol
e
11.
A
tta
12. Car
e
ma
k
13. Plu
g
reel
14. If a
f
at a
cor
d
To
m
out the hos
e
n
taining a fir
h
e drive spri
n
m
ove the nut
s
n
the bracke
t
hers.
h
ten the driv
e
nsure the re
e
r
s should be
s
.
e
l was suppl
p.
n
the reel dr
u
c
aution whil
e
e
rt the plug
e
e
in the drum
ch the cord
s
e
fully releas
e
k
ing sure the
g
the cord in
t
for correct r
o
f
inal adjust
m
desired len
g
d
then retigh
t
m
ount reel t
o
e
(if installed
m hold on s
p
n
g approxim
a
s
and wash
e
t
to any of th
e
spring by t
u
e
l has been
installed to
m
ied with hos
e
u
m by hand
u
e
installing th
e
nd of the
n
flange and
p
s
topper (35)
e
the drum l
a
cord winds
t
o the power
o
tation/latch
m
ent to the h
o
g
th. Loosen
t
t
en the stop
p
o
a pillar you
P
on the reel)
p
ool, diseng
a
a
tely two or
t
e
rs holding t
h
e positions
s
u
rning the s
p
properly ins
t
m
aintain tigh
e
already w
o
u
ntil the rewi
e new cord,
n
ew cord thr
o
p
lug it into t
h
to the other
a
tch, and slo
i
n even, stra
outlet and c
ing (see the
o
se stopper
i
t
he stopper
b
p
er bolts.
will need m
o
P
age 11 of
2
or turn the
r
a
ge the reel
t
hree revolu
t
h
e roller gui
d
s
hown abov
e
p
ool two or t
h
t
alled before
h
tness under
o
und on it, c
o
nd spring is
secure the
d
r
ough roller
g
h
e electronic
end of cord.
o
wly allow co
ight turns o
n
c
heck that th
e
Operating I
n
is required,
p
b
olts, and sli
d
o
unt plate (3
2
2
r
eel drum un
t
l
atch and all
o
t
ions until te
n
d
e bracket to
e
then repla
c
h
ree revoluti
o
connecting
vibration an
o
ntinue with
s
tight, and dr
d
rum in its la
t
g
uide asse
m
bushing as
s
rd to wind o
n
n
the reel.
e
re is power
n
structions).
p
ull the cord
d
e the stop
p
6) as shown
t
il the reel la
t
o
w the reel t
o
n
sion is rele
a
the L-shap
e
c
e and tighte
n
o
ns then en
g
p
ower. Mou
n
d
checked p
e
s
tep 22. If n
o
u
m has latc
h
t
ched positi
o
m
bly (5) the
n
s
embly (29)
o
n
to the reel i
n
at all three t
from the re
e
er to a desir
e
below
tches.
o turn in the
a
sed.
e
d support (1
n the nuts a
n
g
age the lat
c
n
ting hardw
a
eriodically t
o
o
t, continue
w
h
ed. As an e
x
o
n.
n
route it thr
o
f the reel.
n a controlle
t
aps.
A
lso c
h
e
l and allow i
r
ed position
a
direction
2).
n
d
c
h.
a
re and
o
ensure
w
ith the
x
tra
o
ugh the
d way
h
eck the
t
to latch
a
long the

Do
n
are
Ch
e
Car
e
da
m
A
s
w
not disasse
m
equipped wi
e
ck for dama
g
e
fully check
m
aged or wo
r
w
ith any ele
c
m
ble a sprin
g
th a spring
u
g
ed reel par
t
that the reel
r
n parts imm
e
c
trical device
P
g
assembly f
o
u
nder tensio
n
Bef
o
t
s and for fr
a
will operate
e
diately. Ne
v
, dry your h
a
P
age 12 of
2
o
r any reas
o
n
.
o
re Eac
h
a
yed, worn,
o
properly an
d
v
er operate
t
a
nds before
u
2
2
o
n! Serious
p
h
Use
o
r lacerated
p
d
perform its
t
he reel with
u
sing the re
e
ersonal inju
r
p
ower cord
b
intended fu
n
a damaged
e
l.
r
y could res
u
b
efore each
u
n
ction. Repl
a
part.
u
lt. Reels
u
se.
a
ce

Do
n
fla
m
Do
n
tap.
A
lw
Ex
e
dru
m
rec
o
Ke
e
chil
d
Ch
e
eve
r
Do
n
rew
Kee
Un
p
war
det
e
and
not use the
r
m
mable liqui
d
not exceed
1
Exceeding
ays pull on
c
e
rcise care
w
m
powered
b
o
il speed. N
e
e
p children a
d
ren to han
d
e
ck the reel f
o
r
y half revol
u
To latch the
“click”.
To unlatch t
h
the cord, let
not allow ca
b
inding.
p the cord a
Periodically
A
lso periodi
c
for the cord
p
lug the pow
e
r
m water to r
e
e
rgents or s
o
connection
s
r
eel where t
h
d
s, gases, o
r
1
5 amps tot
a
the rated c
a
c
ord/cable it
s
w
hen handlin
g
b
y a spring u
e
ver let go o
f
nd bystande
d
le the tool.
o
r correct o
p
u
tion of the d
reel, pull ou
t
h
e reel, slo
w
it retract in
a
b
le to retrac
t
nd taps dry,
clean the c
o
c
ally check t
replacemen
t
e
r source b
e
e
move dirt o
o
lvents whic
h
s
to THORO
U
P
Operat
i
h
ere is a risk
r
dust. The r
e
a
l current us
e
a
pacity could
s
elf. Never p
u
g
the cable r
nder tensio
n
f
the cord w
h
rs away fro
m
p
eration by s
l
rum.
t
the cord th
e
w
ly pull out th
a
controlled
w
without res
t
clean, and f
r
o
rd.
he cord con
d
t
procedure.
e
fore cleanin
g
r deposits a
n
h
could prov
e
U
GHLY dry
b
P
age 13 of
2
ing Inst
r
of causing
a
e
el can crea
t
e
with one, t
w
result in los
s
ull on the at
t
r
eel during n
o
n
. Do not all
o
h
en rewindin
g
m
the work a
r
l
owly pulling
e
n allow it to
e cord until
t
w
ay until th
e
t
raining reco
i
r
ee from oil
a
d
ition for we
a
g
the cord t
o
n
d ensure c
o
e
incompati
b
before plug
g
2
2
r
uctions
a
fire or an e
x
t
e sparks, w
h
w
o, or three
t
s
of power a
t
achment.
o
rmal opera
t
o
w the cord t
o
g
.
r
ea while op
e
out the cor
d
retract after
t
he “clicking”
e
cord stop r
e
i
l speed. Ne
v
a
nd grease.
a
r or damag
e
o
avoid elect
r
o
rrect windin
g
b
le with cabl
e
g
ing the cord
x
plosion; e.
g
h
ich may ign
t
ools plugge
d
nd overheat
i
t
ion. Cable r
e
o
retract wit
h
e
rating the t
o
. A “clicking”
hearing the
noise stops
e
sts against
t
v
er let go of
t
e
. See the
m
r
ical shock.
U
g
on the ree
l
e
-winder ma
t
back into a
g
., in the pre
s
ite the dust
o
d
into the re
e
ing
e
els have a
r
h
out restrain
i
o
ol. Do not
a
”
noise will b
e
first, secon
d
then, holdi
n
the cord gui
d
t
he cable w
h
m
aintenance
U
se a cloth
d
l. Do not us
e
t
erials.
A
llo
w
power outle
t
s
ence of
o
r fumes.
e
l’s triple
r
otating
i
ng the
a
llow
e
heard
d
, or third
n
g on to
d
e rollers.
h
en
s
ection
d
ipped in
e
w
the cord
t
.

Sprin
g
I
m
m
e
Av
a
c
D
o
w
h
If neces
s
at a tim
e
1. Pul
2. Re
m
When
capa
c
mech
a
3. To
ten
4. Re
-
co
r
5. Un
l
Ins
p
can
H
a
D
O
te
n
g
Tension
m
proper tensi
e
chanism.
O
v
oid acciden
t
c
cidental rel
e
o
not allow t
h
h
en rewindin
s
ary, adjust
e
, until desir
e
l
l out approx
i
m
ove cord s
t
adding wra
p
c
ity. Add just
a
nism will re
s
increase sp
r
sion, un-wr
a
-
insert the c
o
r
d end.
l
atch the dru
p
ect the reel,
be ordered
a
a
ve damage
d
O
NOT disa
s
n
sion and a
c
Adjustm
e
oning of spri
O
nly authoriz
e
t
ally releasin
e
ase can cau
h
e cord to re
t
g.
spring tensi
o
e
d tension is
i
mately 6 or
t
op from the
p
s of cord to
enough wra
s
ult if spring
r
ing tension,
a
p the cord o
o
rd through
g
m and chec
k
parts, align
m
a
nd replace
d
d
or worn pa
s
semble the
m
c
cidental rel
e
P
e
nt
ng or addin
g
e
d personne
g the reel’s l
se a wildly
s
t
ract without
o
n on reel b
y
obtained.
8 feet of cor
d
cord and p
u
the reel, be
p
s of hose t
o
is over-tens
wrap the lo
o
ne turn from
g
uide rollers
k
the tensio
n
A
ft
e
m
ent, and c
o
d
before the
rts repaired
o
m
ain spring
a
e
ase can ca
u
P
age 14 of
2
g
too many
p
l should ma
k
atching me
c
s
pinning reel
restraining
t
y
adding or r
e
d
and allow
t
u
ll the cord b
a
careful not t
o
o
achieve th
e
ioned.
o
se cord one
drum.
and install t
h
n
. Readjust
t
e
r Each
o
rd periodic
a
next use.
or replaced
b
assembly fo
u
se severe p
e
2
2
p
re-wraps m
a
k
e these adj
u
c
hanism. Th
e
and person
a
t
he recoil sp
e
e
moving wr
a
t
he drum to l
a
ck through
o
exceed th
e
e
desired te
n
extra turn a
h
e cord stop
t
he tension
b
Use
a
lly after use
b
y an autho
r
r
any reaso
n
e
rsonal inju
r
a
y cause da
m
u
stments.
e
reel is und
e
a
l injury.
e
ed. Never l
e
a
ps of cord fr
o
atch.
guide roller
s
e
winding m
e
n
sion. Dama
g
r
ound the dr
u
at the desir
e
b
y repeating
t
so that wor
n
r
ized service
! The spring
y
.
m
age to the
s
er tension a
n
e
t go of the
c
r
om spool, o
n
s
.
e
chanism’s
s
g
e to the wi
n
um or, to de
c
e
d distance
f
these steps.
n
or damage
d
technician.
can be und
e
s
pring
n
d
c
ord
n
e wrap
s
pring
n
ding
c
rease
f
rom the
d
parts
e
r high

O
n
p
e
Di
s
st
o
If the
r
spring
tensio
n
Maintai
n
used. K
e
accorda
Use
reel
the
r
Do
n
the
e
con
t
A
fte
cor
d
n
ly properly
t
e
rsonnel cou
l
s
connect th
e
o
ring the ree
r
ewind sprin
g
canister be
n
and accid
e
n
the reel. It
i
e
ep the reel
nce with the
only identic
a
. Changes i
n
r
eel.
n
ot use dete
e
vent of hav
t
act an auth
o
r maintenan
c
d
back into a
t
rained pers
o
l
d prove haz
a
e
power sup
p
l.
g
fails, for sa
performed b
e
ntal release
i
s recomme
n
in good rep
a
recommen
d
a
l parts with
n
diameter,
w
rgents or sol
ing to perfor
o
rized after-
s
c
e, allow th
e
power outle
P
M
a
o
ns should i
n
a
rdous; the
r
p
ly from the
r
f
ety reason
s
y
an authori
z
can cause
s
n
ded that th
e
a
ir by adopti
n
d
ed procedu
r
the reel. Do
w
eight per fo
o
vents which
m maintena
n
s
ale service
c
e
cord and c
o
t.
P
age 15 of
2
a
intena
n
n
spect a reel
r
isk involved
r
eel before
m
s
, it is strongl
z
ed service
t
s
evere pers
o
e
general co
n
n
g a progra
m
r
es found in
t
not use a c
o
o
t, length of
could prove
n
ce on the e
c
enter.
o
nnections t
o
2
2
n
ce
. Dismantlin
g
mainly con
c
m
aking any
a
y recomme
n
t
echnician.
T
o
nal injury.
n
dition of an
y
m
of conscie
n
t
his manual.
o
rd different
cord or flexi
b
incompatibl
e
lectrical, me
c
o
dry THOR
O
g
of the unit
c
ern the prel
o
a
djustments,
n
ded the repl
T
he spring c
a
y
tool be exa
n
tious repair
t
han what is
b
ility will affe
e
with cord-
w
c
hanical par
t
O
UGHLY be
f
by unskilled
o
aded sprin
g
changing p
a
l
acement of
t
a
n be under
a
mined befo
r
and mainte
n
supplied wi
t
ct the opera
t
w
inder mate
r
t
s or replac
e
f
ore pluggin
g
g
.
a
rts, or
t
he
high
e it is
n
ance in
t
h this
t
ion of
r
ials. If
e
the cord,
g
the

P
Parts
D
P
age 16 of
2
D
iagram
–
2
2
–
49581

Page 17 of 22
Parts List – 49581
Part No. Description Quantity
1 M16 Hexagon Nut 1
2 M16 Spring Gasket 1
3 M10 Nut 2
4 M10 Flat Gasket 1
5 Pedestal 1
6 Big Axis 1
7 Metal Gasket 1
8 Ratchet Spring 1
9 Ratchet Bushing 1
10 Ratchet 1
11 Ratchet Axis 1
12 M6 Nut 3
13 Ratchet Wheel 1
14 Plastic piece for Ratchet Wheel 1
15 M5 Nut 7
16 Drum 1
17 Cord Clip 2
18 Semicircle Carriage Bolts 3
19 Main Spring Assembly 1
20 Gasket 1
21 Circle Clip 1
22 Fixed Screw 3
23 Fixed Plate 1
24 Electronic Bushing Assembly 1
25 Wire Connector 1
26 Cover 1
27 Fixed Screw for Cover 2
28 M5 Spring Gasket 2
29 M5 Round Head Hex Nuts 2
30 Cord stopper 1
31 Mount Plate (not shown) 1

Pa
r
P
r
ts Diag
r
P
age 18 of
2
r
am – 49
5
2
2
5
82 & 4
9
9
583

Page 19 of 22
Parts List – 49582 & 49583
Part No. Description Quantity
1 M16 Hexagon Nut 1
2 M16 Spring Gasket 1
3 M8 Nut 2
4 Roller Guide Bracket 1
5 Roller Guide Assembly 1
6 M8 Hexagonal Screw 1
7 M8 Semicircle Carriage Bolts 1
8 Big Axis 1
9 Metal Gasket 1
10 M10 Nut 1
11 M10 Flat Gasket 1
12 L Shape Support 1
13 Ratchet Spring 1
14 Ratchet Bushing 1
15 Ratchet 1
16 Ratchet Axis 1
17 M6 Nut 1
18 Ratchet Wheel 1
19 Plastic Piece For Ratchet Wheel 1
20 M5 Nut 1
21 Right Drum 1
22 Cord Clip 1
23 Semicircle Carriage Bolts 1
24 Main Spring Assembly 1
25 Gasket 1
26 Circle Clip 1
27 Fixed Screw 1
28 Fixed Plate 1
29 Electronic Bushing Assembly 1
30 Wire Connector 1
31 Cover 1
32 Fixed Screw For Cover 2
33 M5 Spring Gasket 2
34 M5 Round Head Hex Nuts 2
35 Cord Stopper 1
36 Mount Plate (not shown) 1

Page 20 of 22
Troubleshooting
TROUBLE CAUSE REMEDY
Cable will not fully
retract.
a) Outlet attachment is too
heavy.
b)Spring is fatigued
a) Add spring tension. See "Spring
Tension Adjustment".
b) Add spring tension. See "Spring
Tension Adjustment".
Cable will not retract at
all.
Spring has lost all tension
or has possibly broken. Reinstall Spring Tension
Reel will not latch. Incurred operation
Reel latches on first, second, third or
fourth "click." After forth "click," it
automatically rewinds.
No electrical power at
output end of cable.
a) Wires are severed.
b) Wires have become
disconnected.
a) Replace.
b) Check all connections ensuring they
are properly wired.
Breaker or use
repeatedly blown.
a) Application does not
conform to the electrical
rating of the reel.
b) Wires are broken or
shorted.
a) Check electrical rating on reel label
Do not attempt to use a reel that is not
rated properly for the application.
b) Check wiring path on reel to
determine if wires are broken or shorted.
Reel retracts too fast. Reel is improperly tensioned.
Decrease spring tension. See "Spring
Tension Adjustment "Note: When
weather is extremely hot, the reel will
normally operate slightly faster than in
cooler conditions.
Cable locks up when
fully extended.
Cable damp is in the
incorrect position.
Relocate cable clamp to optional
location.
Replacement Parts
For replacement parts and technical questions, please call Customer Service at 1-800-222-5381.
Not all product components are available for replacement. The illustrations provided are a
convenient reference to the location and position of parts in the assembly sequence.
When ordering parts, the following will be required: model number, serial number/lot date code,
and description.
The distributor reserves the rights to make design changes and or improvements to product lines
and manuals without notice.
This manual suits for next models
2
Table of contents
Other Strongway Tools manuals
Popular Tools manuals by other brands

ARO
ARO 8257-A Operator's manual

Beta
Beta 1461/C3B Instructions for use

SUHNER
SUHNER LWC 17-45 operating instructions

DeWalt
DeWalt DCE200M2K instruction manual

Gulfstream Aerospace
Gulfstream Aerospace AA-58 TIGER 1977 Pilot operating handbook

General International
General International 30-120 M1 Setup & operation manual