Suder SW-1000 User manual

1
Content
Classification............................................................................................2
Symbol.....................................................................................................2
Precaution................................................................................................3
Instrument Components ..........................................................................4
Theory and Function................................................................................4
Characteristics.........................................................................................5
Environment Requirement.......................................................................6
Install and Connection.............................................................................7
Introduction of the Interface and Setting .................................................8
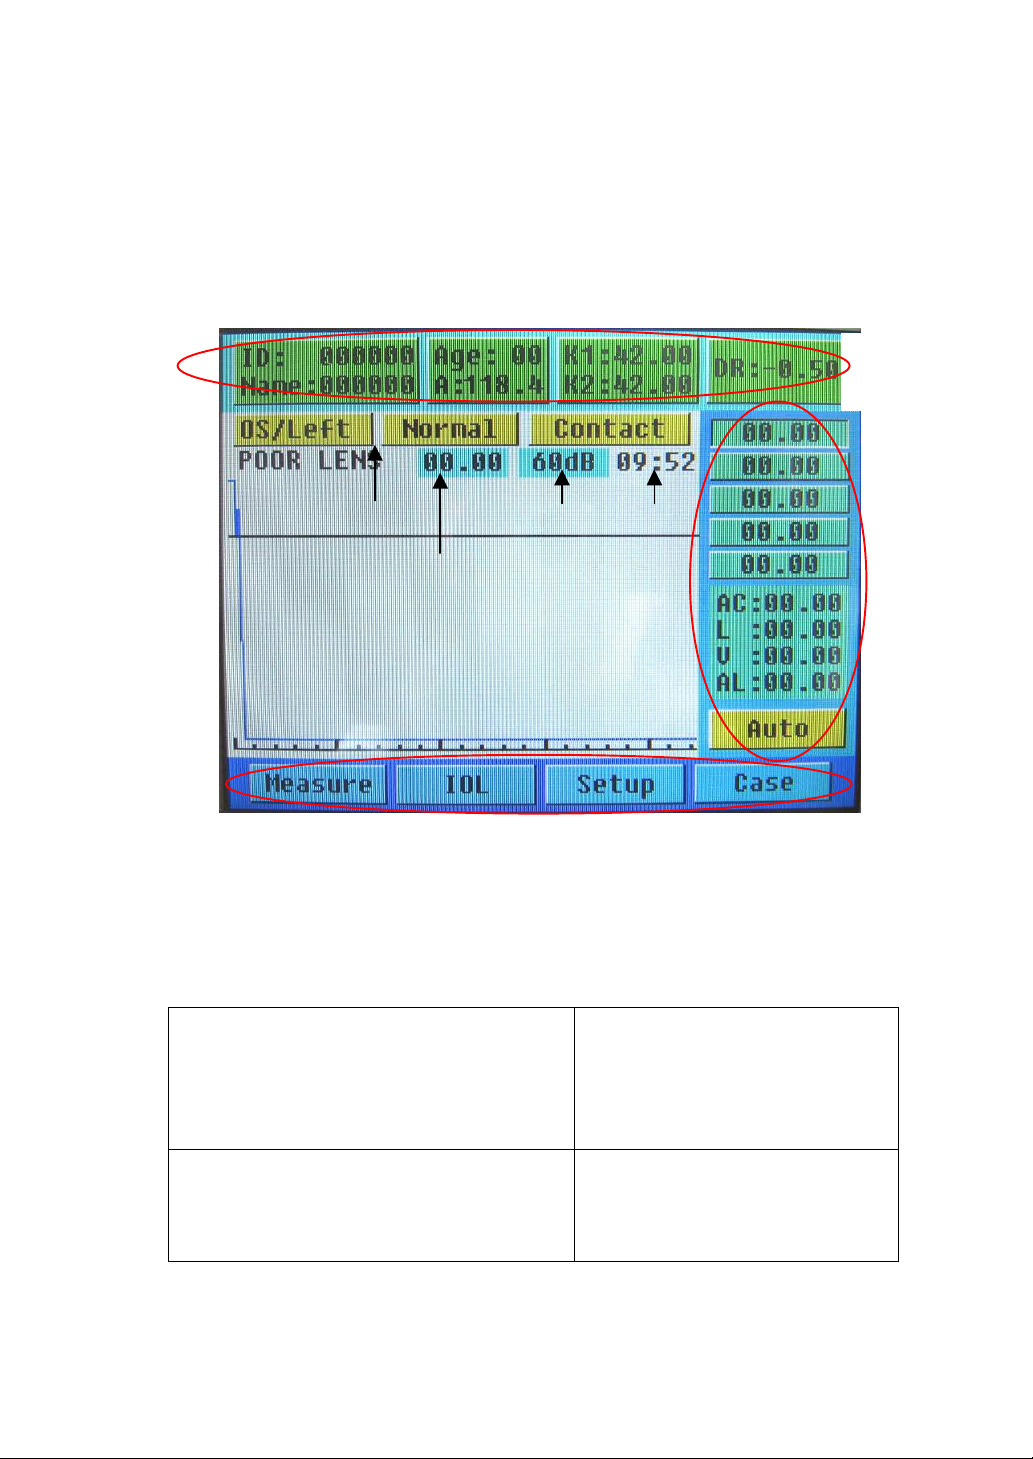
1. Interface Introduction....................................................................8
2. Setting...........................................................................................9
2.1 Input ID and Setting Parameters................................................9
2.2 Input the Name of Patient.........................................................10
2.3 Eye mode..................................................................................10
2.4 Left/right eye setting.................................................................10
Measure..................................................................................................11
1. Preparation..................................................................................11
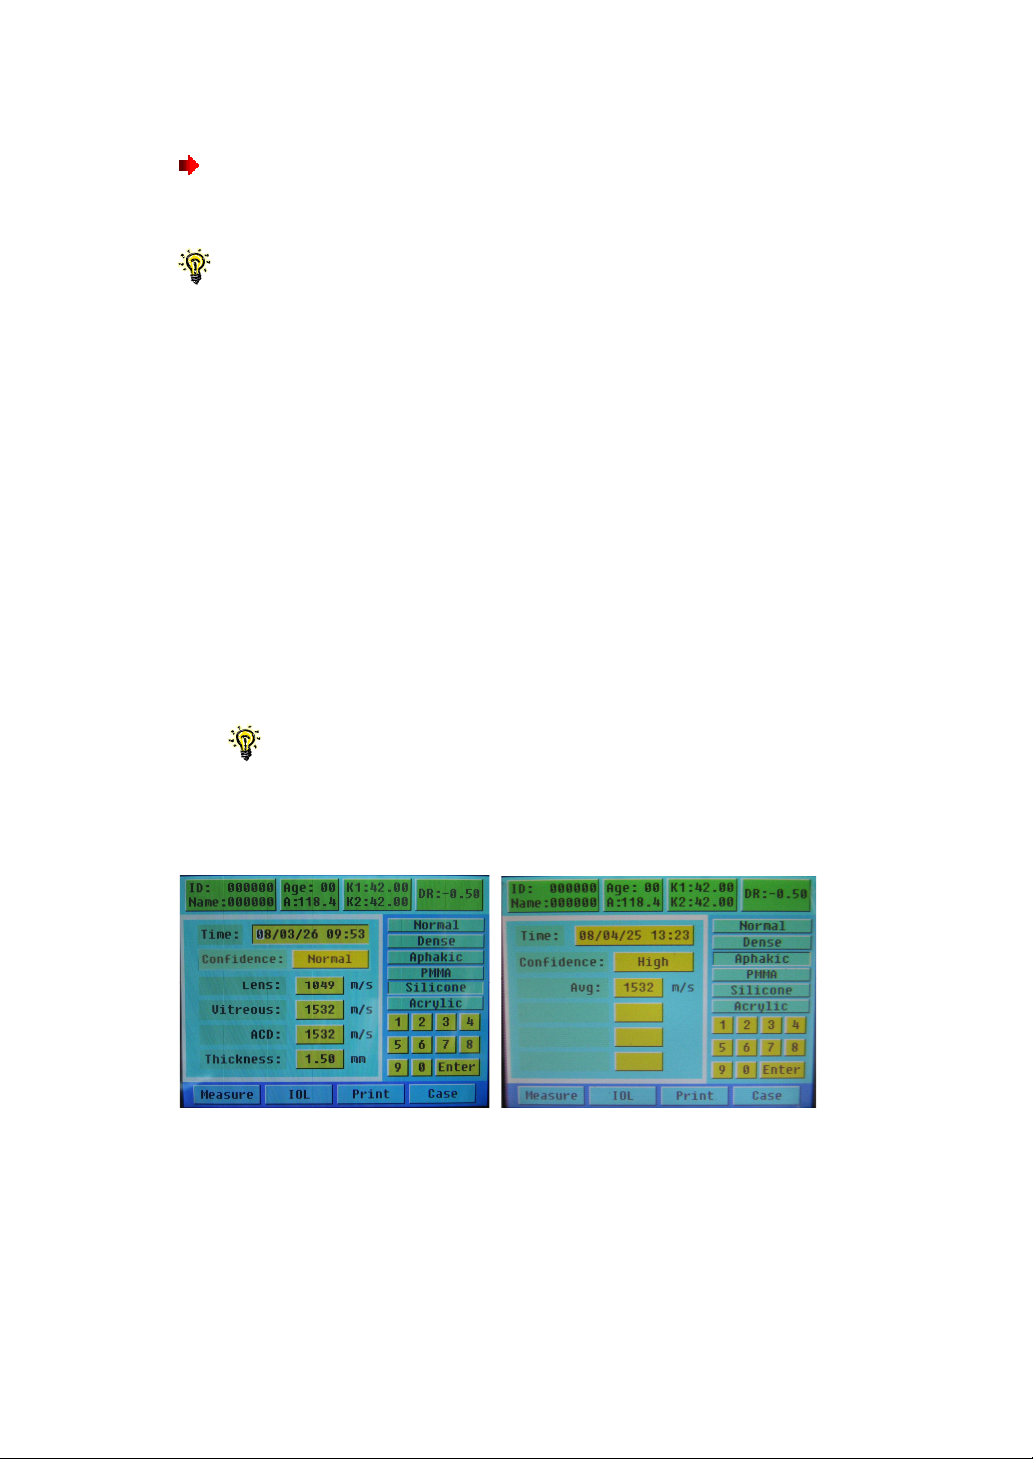
2. Auto Mode...................................................................................13
3. Manual Mode..............................................................................14
4. IOL Calculation...........................................................................14
5. Print ............................................................................................15
6. Case Review ..............................................................................15
7. System Criteria Testing...............................................................15
Change the Print Paper.........................................................................16
Package and Transportation..................................................................17
Daily Maintenance.................................................................................18
Trouble Shooting....................................................................................19

2
Introduction
Dear User:
SW-1000 is a precise ultrasound measure instrument, designed for
detecting axial length, depth of anterior chamber, thickness of lens and
calculating the IOL.
This User’s Guide is designed as a training and reference manual.
We recommend you carefully read and follow the steps in this guide to
ensure that the machine would have optimum performance.
Classification
SW-1000 is classified as Class I, Type B instrument.
This product has got ISO9001 and CE approval.
Symbol
Power
Warning,May cause hurt or damage
Attention May do harm to machine and accessories.
Hint, how to use it better
Protective grounding
CE approval
Type B
0197

3
Precaution
This instrument requires the power supply of AC 90~230V,
50HZ±2%. The power socket indoors should have ground line. If
the local power net could not fit the requirement, then we
recommend you to use regulated power supply. Improper power
supply may cause instrument damage or person injury.
All the accessories should be well kept. If anything is missing, the
instrument could not be warranted.
The instrument should be installed indoors with good ventilation
and avoid direct sun radiation, and kept away from strong magnetic
or electric field or other strong disturbance sources.
The probe is key, delicate and expensive. Do not stress it, knock it
or fall it from high place. Don’t dip it into alcohol to perform
disinfection. Don’t twist or pull the leading line violently.
It is not permitted that user himself dissembles the main unit or probe.
If there are any problems, please send it to the warranty station.
The maintenance and warranty of the printer is executed by the
warranty station near user’s location. We recommend you to send
the printer to warranty station periodically. That will make the
printer last longer.
Contraindication of A scan:
1. Infective eye disease, such as Keratitis and so on.
2. Open eye damage, such as avulsion or perforation of cornea
3. Children under 5 years old that could not cooperate with the
examination
When the ambient temperature is under 10℃, the instrument should
warm up for 5 minutes before it begins to work.
As to the safety and effective result caused by ignoring the
declaration above, our company does not take the responsibility.

4
Instrument Components
Pic.1 Front View of SW-1000
Pic.2 Back view of SW-1000
LCD
Touch Pen
Buzzer
Printer
Brightness
Gain
Foot switch
Probe
A Probe socket
Foot
switch socket
Power cable socket
Power switch

5
Theory and Function
Ophthalmic A scan SW-1000 is composed of main unit, probe, pedal
and so on. The probe contacts the cornea and sends out ultrasound of
10MHz. The echo wave from front surface, back surface of lens and
retina is detected. The signal is processed and then we get the depth of
chamber, thick of lens and axial length. The data are transmitted to MP
(Micro processor). The values of A constant and K1, K2 are input from
keyboard. The MP automatically calculates the IOL according to the
chosen formula. The data are displayed on the color LCD screen through
output interface, or stored in the machine, or printed out.
This instrument is designed for detecting axial length, depth of
anterior chamber, thickness of lens and calculating the IOL. It has high
resolution and is easy to use, with the function of auto-calculating IOL
and touch screen input. Six groups of formula could be chosen: SKR-Ⅱ、
SKR-T、BINKHORST-Ⅱ、HOLLADAY、HOFFER-Q HAIGIS-STD. It has
manual and auto measure mode. The build-in printer could print the data
and IOL table.
Characteristics
A Probe:10MHz solid probe, compact and inner luminated;
Resolution:± 0.05 mm;
Eye mode:Normal/ Aphakic/Dense/PMMA/Silicone/Acrylic
IOL formula:SRK-II、SRK-T、BINKHORST-Ⅱ 、 HOLLADAY、
HOFFER-Q、HAIGIS-STD;
User could check the case according to the ID;
Each ID can have the data of 5 scans, and 10 IDs can be saved;

6
Output:IOL calculating table;
Measure:Anterior chamber, lens, vitreous body and total length.
Curve freezing:Manual/Auto mode, controlled by pedal;
Output:Build-in fast thermal printer;
Display:Color liquid-crystal screen;
Input: touch screen.
Power: 30W
Environment Requirement
1. Work Environment
Ambient temperature:+5℃~ +40℃
Relative moisture:≤ 80%
Power Supply:AC 90~230V,50×(1±2%)Hz
Keep away from strong magnetic or electronic field.
2. Transport and Storage
Ambient temperature:-40℃~ +40℃
Relative moisture:≤ 95%;
Atmosphere pressure:500hPa~1060hPa
3. Running
Ambient temperature:+5℃~ +40℃
Relative moisture:≤ 80%
Power Supply:AC 90~230V,50×(1±2%)Hz
Atmosphere pressure:860hPa~1060hPa
Warm-up time:5min

7
Install and Connection
1. Check the package to see if
anything missing. (Reference to
Appendix: package list)
2. Insert probe, pedal and power
plug to respective socket. (See
Pic.3)
Align the salient on the probe
connector to the gap on the probe
socket, and plug it in. When you hear “click”, the probe is ready. The
probe must be treated gently following the steps above; otherwise it
may be damaged by improper operation.
The probe must be connected before power on. Don’t plug or pull the
probe when power is on.
Pedal is to freeze and unfreeze the image manually. Put the pedal at
handy place. Gently step once and it will be ok. Don’t use too much
strength or not let it go.
3. After each part is properly connected, turn on the power. You could
hear a “beep”. The measure interface will appear in a second,.
Do not turn on and turn off the power too swiftly. Otherwise on the
screen will appear random pictures.
Foot switch A scan probe
Pic.3
Pull and plug the probe

8
Introduction of the Interface and Setting
1. Interface Introduction
Pic.4 measure interface
After switch on, “Measure” mode and “Contact” is default. See Pic.4.
Press ”Contact” to switch to “Immersion”.
1.1 On the upper part is the setting menu. Press the items to begin
setting up data.
DR* :The recover degree after the
operation, set according to doctor’s
experience.
A:Constant A(auto stored after
each input)
K1:Horizontal diopter (auto stored after
each input)
K2:Vertical diopter (auto stored
after each input)
*: DR=1.00 means the eyesight is expected to recover to 100
Setting
Menu
Left or
right
Eye Type
Measurement Data
Gain
Time
Reading
Window
Mode
Threshold
Scale

9
farsighted;while DR=-1.00 means the recovery eyesight is
expected to be 100 nearsighted.
1.2 On the right is reading window displaying the result of measurement.
Readings:the eye axial length of each measure. 5 groups can be
displayed.
AC:Depth of anterior chamber L:Thickness of Lens
V:Thickness of vitreous body AL:eye axial length
1.3 On the lower part is the Mode menu.
Measure:Perform A scan measure
IOL:IOL calculating displaying
Setup: Set up the time and velocity
of ultrasound
Case:Show stored cases
Auto:Auto measuring mode; Press ”Auto” to switch to” Manual”
1.4 On the middle is the main window displays the A scan curve, scale,
threshold, left/right eye setting, eye type setting and average of 5
scan
2. Setting
2.1 Input ID and Setting Parameters
Press “ID” in the setting menu. The
interface will change into “key in” mode. (See
pic.5) And the numbers begin to blink.
Press the number keys on the screen by
touch pen to input ID. It is the same way to
set AGE, A, K1, K2 and DR. If you want to set
the name of patient, press “Enter” and the letter input interface will
appear.
Pic.
5 Setting: input

10
The touch screen is very sensitive. In order to prevent damage of
touch screen, don’t press it with much strength.
If you want to re-enter the items, press other item or press ”Enter”,
then press the item you want to correct. Now you can reset the item.
Use Caps and Shift to change between Capitalization and
lowercase.
2.2 Eye mode
Press “Normal” in setting menu,and it will switch among different
eye types.
2.3 Left/right eye setting
Press “OD/right” in main window,it will switch between OS/left and
OD/right.
The parameters could be input only in measure mode.
2.4
Time and velocity setting
Press “SETUP” in the main window.
Use small keyboard to set up time and velocity.
It has default data for the velocity, see the chart below:
Pic.6 Time& velocity setting

11
LENS VITREOUS ACD THICKNESS AVG
NORMAL 1641 1532 1532
DENSE 1629 1532 1532
APHAKIC 1532
PMMA 2718 1532 1532 0.8
SILICONE 1049 1532 1532 1.5
ACRYLIC 2200 1532 1532 0.9
Normal & High: It’s easier to take a reading under ”Normal”, but with
less precision, “High” can get more precise reading, but more difficult.
AVG only can be used under eye mode APHAKIC
Thickness only used under eye mode PMMA, SILICONE,ACEYLIC
Measure
1. Preparation
The surface of the probe contacting the cornea should be
sterilized by alcohol tampon before measurement. The probe can
be used only after the alcohol has completely evaporated. Don’t
dip the A scan probe into the alcohol to perform disinfection.
Let the patient lie in supine posture on the bed. Perform the
anaesthesia of the cornea. Make the transducer perpendicular
to the center of the cornea and make them contact properly.

12
Proper contact Improper Contact
Immersion:
1. In order to release the pain in the eye, the cornea needs
anaesthesia.
2. Choose suitable size eye cup and Put it in the eye lid.
3. Use suitable media (couplant) for ultrasound transfer. (which is
low acoustic impedance, and can comfort patient)
Cornea
A scan probe Cornea
A scan probe

13
2. Auto Mode
Click ‘Measure’ below after
setting the parameters to choose
measure mode. When ‘AUTO’ is
displayed on the lower-right
corner of the screen, it shows that
it is under AUTO mode. (see
pic.7)
Make preparation as above-mentioned. The instrument will
catch and freeze the waveform automatically, and beep to
indicate the completion of a measure. 5 readings can be listed
continuously. 5 AL (axial length) readings are listed on the right
side of the screen. The average of these readings will be shown
on the screen.
After the auto measure is finished, you can click the AL
readings by touch pen, and corresponding measure curves will
appear on the main window. Choose the inaccurate reading by
touch pen under freezing status, step pedal to unfreeze and
enter the measure mode. Now you can measure again. In the
main window will display the average after the re-measuring.
If it was difficult to get the waveform or there were too many
disturbing waves, you can adjust the gain by the gain tuner.
The present gain value will appear in the main window. The
gain value set in each measure will be saved automatically for
Pic.7 Auto mode

14
the convenience of next measure.
3. Manual Mode
In measure mode, press the “auto”
to switch to manual
mode. And
“manual” will be shown on the
screen.(See pic.8)
Preparations before measurement
are the same as AUTO mode. Put
the probe perpendicular to the
center of patient’s cornea. Observe the pulse waves and adjust
the gain to make the waveform have four normal pulses. When
the correct waveform appears, step pedal to freeze it.
AUTO mode is the default mode
4. IOL Calculation
After the measure is finished, press IOL to enter the IOL calculation
mode.(see pic.9)
The calculation result is auto displayed on the main window. The
Pic.8 Manual Mode
Pic.9 IOL calculation

15
value between the * is most close to the DR setting value.
Click AC on the left upper part, use small keyboard to revise the
value. It can be used only in the formula HAIGIS-STD.
Click the formula by touch pen to apply it. And the value will change
accordingly.
Press the IOL value, and you could use the small keyboard to adjust
it. Press Enter to display the adjusting result. You can also amend the
case information with the same method.
In the IOL adjusting mode, other operations could not be done. If
you want to do other operations, please press Enter to exit first.
Press Save to save the present result.
5. Print
In IOL mode, after you select the data you need to print, press Print to
print the data. It is including the basic information of patients, setting
values, formula, A constant and IOL calculation table.
6. Case Review
Press “Case” and you could visit the 10
cases you have saved. Click the case
number, then click IOL to review the details
of the selected case. (See pic.10)
7. System Criteria Testing
There is a test block as showed picture. It has 4 steps (acoustic
reflecting surface). It is used to check if the A scan is working normally.
1. Temperature : 25℃
Pic.10 case review

16
Fill the test block with distilled water ( No bubble in the water)
Eye Type: Aphakic Eye
Speed: 1520
2. Gain: adjust the gain to a lower lever, around 50
Put the probe straight against first step, on the edge, move the
probe slightly, make sure the ultrasound can get reflection from
all the 4 steps. See the pic.11
3. Choose Auto mode or Manual mode, observe the waves, when it
has 4 waveforms, see theAL figure, if it is 24.5mm±0.1mm, then
the A scan is working normally.
4. Set back the speed to 1532
Change the Print Paper
Pic.12 Open the printer Pic.13 Take out the roller
xxxx-xxxx
AL
Pic.11 how to calibrate

17
Pic.14 Press S/L Pic.15 Refill roller, see paper end
Pic.16 Press S/L to roller paper Pic.17 Close the cover
Package and Transportation
The packed instrument can be transported by transportation vehicles.
It must not be transported together with goods that are easy to burn,
explode, or corrode. Also it should be protected from shock and
moisture.
The instrument should be stored in the environment with ambient
temperature from –10℃to 40℃, with the relative humidity under 80%,
where there is no corrosive gas, strong mechanical vibration, shock or
magnetic effect. The room in which the instrument stored should be with
good ventilation and avoid direct sun radiation.

18
Daily Maintenance
1. In moist season, if the machine hasn’t been put into use for a long time,
it should be powered up for about one hour each month to drive the
moisture away.
2. When the ambient temperature is under 10℃, the machine should be
warmed up for 5 minute before measuring.
3. Don’t use any causticize cleanser when cleaning the device. Avoid
water or any other liquid running into the keyboard or shell. You can
clean with mild cleaner and soft tissue.
1. The lead and connector of the probe must be checked regularly.Any
disjunction or loose will influence the quality of the image and even
cause the danger of electric leakage.
2. Keep the surface of probe clean. You can wipe the tip by alcohol
tampon, but don’t dip the probe into alcohol or other disinfect liquid
to perform disinfection.
3. The part above the probe line could not touch the liquid. See the
pictures below:
7. The warranty station nearby is responsible for the maintenance of
printer. It is recommended that the printer be sent to the warranty
station for maintenance periodically, for example, every 6 months.
This can make the printer last longer.
Don’
t immerge
XXXX
-
XXXX

19
Trouble Shooting
PHENOMENA REASONS METHODS
Failure of
lightening
the power indicator
Bad connection of
the power plug
Re-insert the plug to
connect
it well with the socket
The mode of the instrument
is not correct.
Choose the mode
again to make the
instrument under
measuring mode.
The amplitude of the
signals is not enough Adjust the gain
Failure of freezing
the waveform
under the status of
measurement The signals are too weak or
there are too many
disturbing waves Adjust the gain
No normal echo
wave under the
status of
measurement
Bad connection of the
probe
with its socket
Shutdown the
instrument and
re-insert the probe to
connect it well with the
socket
The transducer does not
contact the cornea
Adjust the hand with
the probe to the correct
position
No waveform
under the status of
measurement
The surface of the patient’s
cornea is dry
Apply the physiological
saline to the patient’s
eye
No display on the
screen or no echo
wave
Disturbance or problems of
the instrument
Take down the details
of the problem and
contact with us
The displayed
image is
disordered Problems of the instrument
Take down the details
of the problem and
contact with us
Table of contents
Popular Medical Equipment manuals by other brands

steute
steute KF 1PW-MED GP11 quick start guide

Sedecal
Sedecal General Purpose Rad System Operation

Hemochron
Hemochron Response Operator's manual

Nasco Healthcare
Nasco Healthcare Simulaids 100-1296 instruction manual

Invitrogen
Invitrogen iPrep user manual

Spacelabs Healthcare
Spacelabs Healthcare BleaseSirius user manual