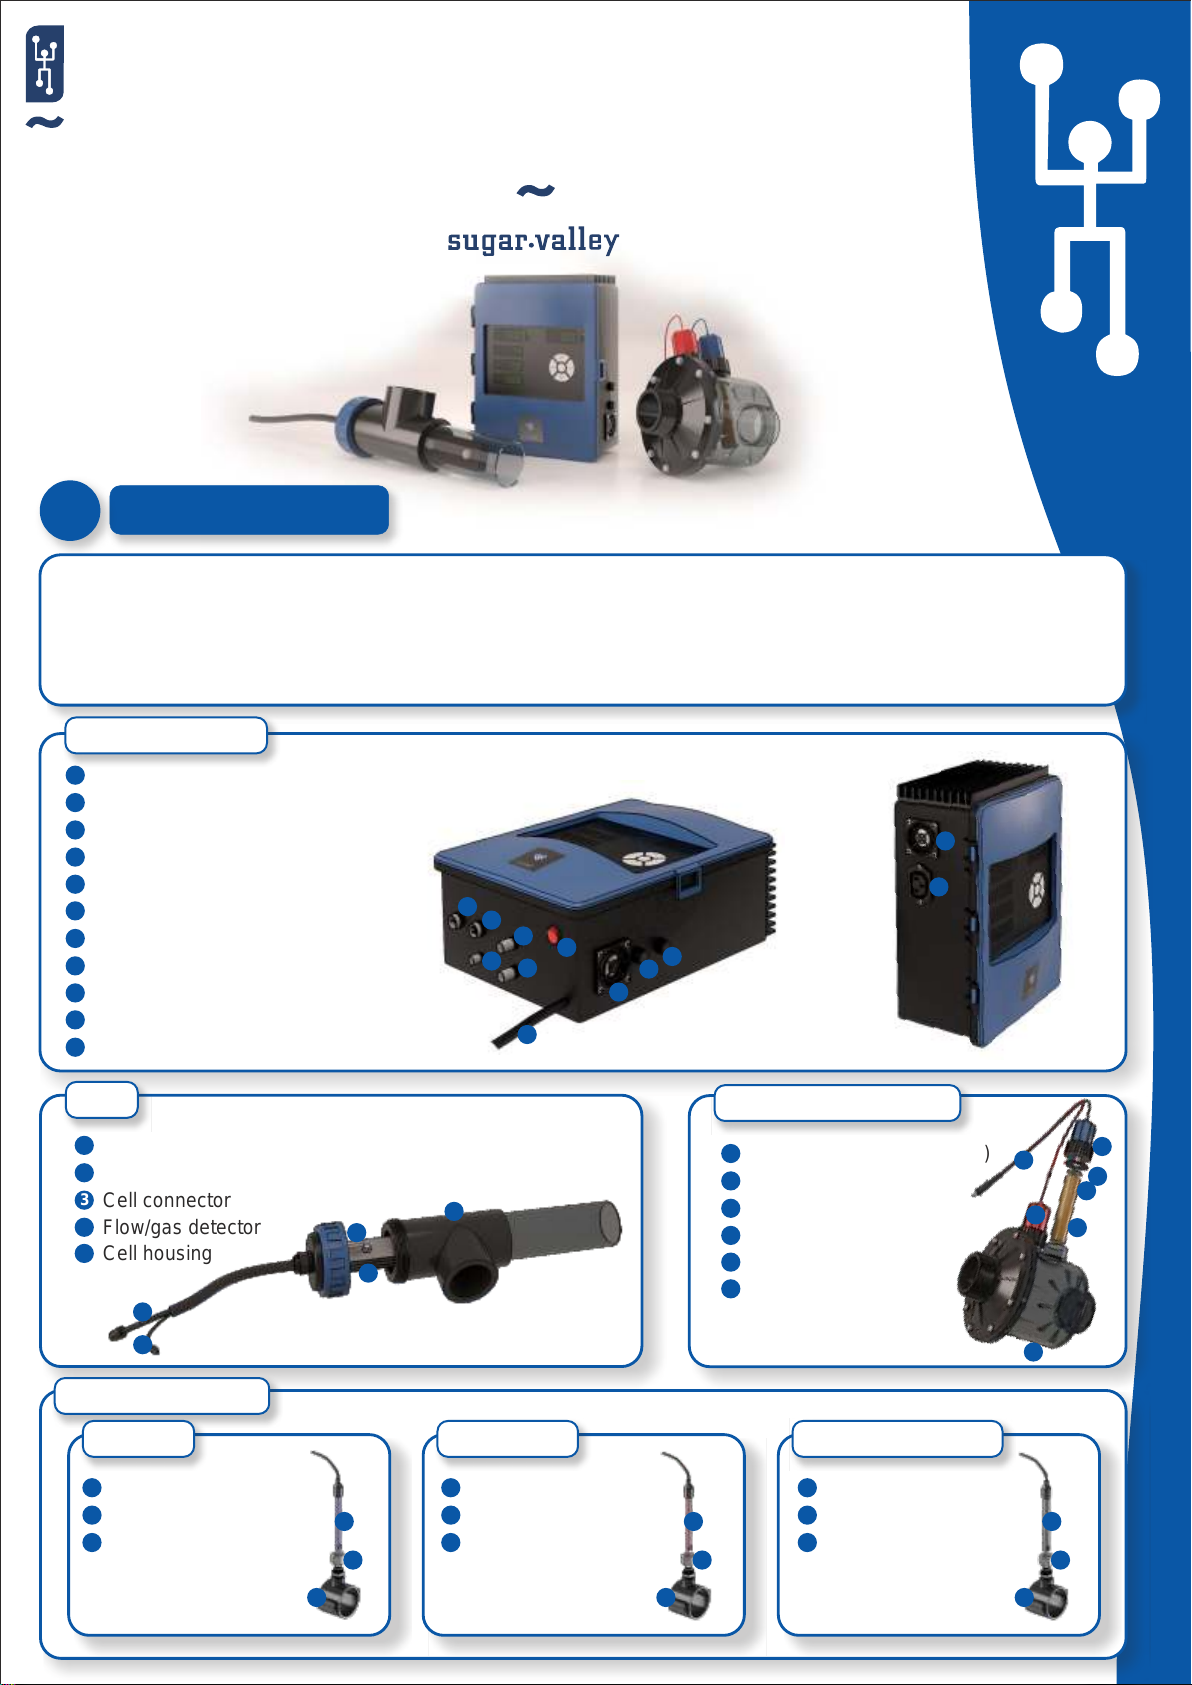
sugar-valley BIONET User manual

BIONET
QUICK INSTALATION GUIDE
Electrolysis
RCA flow detector
pH probe
Redox probe
Ioniser Cu/Ag
Mains connection 220v.
3.15A fuse
250 mA fuse
On-off switch
Air vent
Acid pump connection
1
2
3
4
5
6
7
8
9
10
11
DESCRIPTION
1
Electrode housing
Ionization housing (2/4/6 e)
Copper/silver electrodes
Electrode bolt
Electrode cable
1
2
3
4
Cell
Electrolysis cell
RCA flow detector
Cell connector
Flow/gas detector
1
2
3
Optional extras
pH Probe
Concentric seal
Gasket
5
6
Conductividad ProbeRedox Probe
Cell housing
Probe
Probe casing
Connection housing
1
2
3
Probe
Probe casing
Connection housing
1
2
3
Probe
Probe casing
Connection housing
1
2
3
1
2
3
1
2
3
1
2
3
1
3
3
2
4
56
10
7
8
9
6
12
34
5
11
10
1
45
2
3
5
4
The salt water electrolysis produces Chlorine on the bases of salt water of low salinity (approximately 5g Salt per litre). As the
swimming pool water containing the salt flows through the electrolysis cell, the salt is converted to Sodium-hypo-chloride (liquid
chlorine). Organic mater present in the water is oxidised and eliminated by the chlorine. The Sodium-hypo-chloride reconverts into
saltonitswaybacktotheswimmingpool.
This process is combined with a Copper Silver ionisation which provides us with a constant flocculation and an additional
disinfectant,eliminatingbacteriaandalgae.TheresultisexceptionalclearandtransparentWater.
Electronic unit

INSTALATION
2
System instalation diagram
Electrical housing
1Cu/Ag electrodes casing
2
Filtration pump timer
ASand filter
BRecirculation pump
C
Electrolysis cell (always in vertical position)
3pH probe (Optional, for models with pH control)
4Sonda Redox (opcional - mod. con control de redox)
5Conductivity probe (Optional, for models with conductivity control)
6
11
12
13
10
8
9
15
Electrical consumption
Bio 16
Bio 22
Bio 33
Bio 50
Bio 85
Bio125
180W
228W
600W
1020W
1440W
Protección
recomendada
Consumo
Máximo
BIONETsynchronizedwithFILTRATION
Ensure the electrolysis unit is synchronized with the pool filtration and stops functioning when
watercirculationhasstopped.
TITANIUMCELLconnectionoverheating
Ensure all electrical connections are firmly fixed to avoid false contacts and
subsequent overheating of system components (Especially concerning the
electrolysiscellwithusageabove33A).
10A
10A
16A
16A
25A
A
B
C
1
2
3
4
5
6
15
13 12
11
10
9
8
min. 1m
330W 10A
Chlorine pump
(Optional, for models with redox or free chlorine control + auxiliary chlorine dosage)
Chlorine injector (Optional, for models with redox or free chlorine control)
Chlorine container (Optional, for models with redox or free chlorine control,
not supplied with unit)
Hydrochloric acid container
(optional, for models with PH control, not supplied with unit)
Acid pump (Optional, for models with PH control)
Acid injector (Optional, for models with PH control)
Other pool equipment
(pool heating, heat exchanger, etc,)

Electronic housing display
ALARM
Excessiveincrease or decreasein parameters (+/-15%
fromtheselectedparameters).
CHECKLEVELSINACID/BASECONTAINERS
CHECKPROBECALIBRATION
WORNELECTRODESorlowconductivity
The production level shown presently on screen
corresponds to less than 50% of the preselected level.
Electrodesmaybewornorwaterconductivitylow.
InsufficientFLOWorcelldisconnected
Production halted due to lack of flow, or gas in the
titaniumcelldetector.
ONLY SYSTEMS WITH FREE CHLORINE CONTROL
(ppm's)
INSUFFICIENTFLOWintheCHLORINEdetector.
The rotary sensor detects insufficient flow. CHECK the
rotameter pendel – and solve the system's hydraulic
problem (If there is a preceding filter this must be
cleaned).
Conductivity/Celllife
Lowconductivity(Seesection3)
Titaniumcellincrusted(Seecleaningprocessinsection5)
Cellsurfacecorroded(Seesection7)
ONLYSYSTEMSWITHREDOXORFREECHLORINE
The system has automatically stopped as Redox levels
areabovethechosenvalues(Seesection5)
Timedelay
Periodof non-production whilesystem changespolarity
(0-120sec.)
IONIZATIONINTERVALPROGRAMMER
The system is programmed to ionize for a
predeterminedperiodeachtimeitisstartedup:
Pr-- :Willruncontinually.
Pr30:Willrunfor30min.followingstartup.
Pr60:Willrunfor60min.followingstartup.
Pr90:Willrunfor90min.followingstartup.
Status led's
Electrolysis production
ENTER button
Right button
Left button
START UP
4
INITIAL ADJUSTMENTS
3
Water adjustments
1.Adjustthealkalinitybetween90and110ppm.
2.AdjustthePHbetween7,2and7,4
3.Adjustthechlorinebetween1and1,5ppm.
SHOULD the water be supplied from a well: shock
chlorinate with Tricloroisocyanuric acid (2Kg./50m3
ofwater)
Adding Salt to the Water
Start up
ADD5TO6GRAMMSALT(WITHOUTYOD)FOREACHLITREOFWATER
INYOURSWIMMINGPOOL(5to6kgNaClperm3Water).Openthebottom
valve of your swimming pool and add the Salt directly to your swimming pool
water. Let the circulation pump run during the first 24 hours your BIONET
SYSTEM IS WORKING in order to dissolve the Salt completely. Your
BIONET System will operate without any problems with salt concentrations
from2,5gto50gSaltperlitre.
INPOOLSWHICHRECEIVELARGEAMOUNTSOFSTRONGSUNLIGHT
40gr/m3OFSTABILYSER(Isocyanuricacid)MUSTBEADDED
Up button
Down button
Ionization
pH Probe
Conductivity probe/
water temperature
Free Chlorine/Redox

MAINTENANCE
6
1-Thepoolmustbevacuumedasusualandtheskimmersemptiedwhenevernecessary.
2-Filter backwashing: with Sugar Valley systems the filter requires only occasional backwashing; once every 20 days should be sufficient (providing the filter pressure does
notexceed1bar,inwhichcaseabackwashmaybenecessary).
3-ADDINGNEW WATER:Alwaysthrough theskimmerssothatthenewwater passesthrough theBIONET beforeentering thepool.Remembertoadd thenecessary salt:6
gr.peraddedlitreofwater.
4-InwinterCHANGINGTHEPOOLWATERISNOTRECOMMENDABLE.Werecommendthatthesystemruns2-3timesperweek(2-3hrs.perday).
DOSAGE PUMPS: Check regularly to ensure that the container contains liquid to prevent the dosage pump running dry. The dosage pump requires maintenance
(INSTRUCTIONSONBOX).
PH PROBES/REDOX/CONDUCTIVITY: Probes must be cleaned whenever necessary (check every 5-6 months). To clean the probe insert in distilled water (Clear liquid).
Aftereachcleaningtheprobesmustbecalibrated.
General maintenance
VERY IMPORTANT; Ensure that the Sugar Valley system is turned off during filter backwashing.
FREE chlorine : 1.0 – 2.0 PPM
pH : 7,1 – 7,5
Copper
concentration : 0,3 – 0,5 PPM
Fortnightly checks
TOTAL(TAC)alkalinity :80-120ppm
Saltconcentration :5.000–6.000ppm
Cyanuricacid :30-50ppm
Titaniumcell :Inspecciónvisualparadeterminar
incrustaciones.
Monthly checks
SYSTEMS WITH REDOX CONTROL
5
CLEANING THE TITANIUM CELL: Maintenance of the disinfection system (electrolysis) consists of cleaning the cell or electrode every 2-3 months should it appear
necessary(carryoutavisualinspection)Tocleantheelectrode:
-Removethecellfromitssupport(afterturningoffthefiltrationsystemandclosingoffthenecessaryvalves).
-Placetheelectrodefornomorethan10min.in15%HYDROCHLORICACID(salfumant).
-Oncetheincrustationshavesoftenedremovewithahosetocompletecleaningthecell.
USE NO METALIC OR SHARP OBJECTS TO REMOVE INCRUSTATIONS. Scratching the edges or surface of the cell will make it vulnerable to chemicals, deteriorate the
cellandannultheguarantee.
Titanium cell maintenance
Duringthefirst10-15daysyourpoolsystemwillrequiremoreattentionandthefollowingcare:
1.DuringtheUseoftheIonizeritisimportantnottoexceedcopperconcentrationsofmorethan0,5PPMinthewater.Forthisreasonitismandatorytomeasurecopperlevels
duringtheinitialphase (firstweeks) andtoreadjustcopper productionbetween 20 to50afterestablishing 0,5 ppm copper in the water.Furthermorethetime limitationPr30
(seechapter7menu)hastobeinitiated.
2. CHECK THE PH REMAINS BETWEENTHE IDEALLEVELS (7,2-7,4). If the PH is unusually unstable AND USESA LOTOF ACID check the alkalinity (Recommended
levelsbetween80and125ppm.).
3.Thepoolmustbevacuumedandtheskimmerscleanedwhenevernecessarytoensureperfectwaterconditions.
REMEMBERthattheSugarValleysystemrequiresacertainamountoftimetoadapttoyourswimmingpoolandwillrequireadditionalchemicalsduringthefirst3-5days.
Initial maintenance
The Redox level advises us of the potential oxidization or reduction level and is used to determine the level of water sterilization. The parameters or Set Points are the
minimum/maximumacceptedREDOXlevelsbeforethetitaniumcellisconnected/disconnected.
AdjustingtheidealREDOXlevel(setpoint)isthelaststepintheBIONETstartupsequence.TofindtheoptimumREDOXlevelforyourpoolfollowthesesteps:
1. Connectthepoolfiltrationsystem(Thesaltinthepoolmustbeadequatelydissolved).
2. Addchlorinetothepooltillalevelof1-1,5ppm.Isachieved(Approx.1-1,5gr/m3ofwater).PHlevelsshouldbebetween7,2and7,5.
3. After30min.testthefreechlorinelevelsinthepool(DPD1manualtestkit)Ifthefreechlorinelevelisbetween0,8-1,0ppm.LookattheREDOXscreenandmemorize
thislevelasthesetpointtoCONNECT/DISCONNECTthehydrolysiscell(Tomemorizethesetpointseesection8)
4. Thenextdaycheckfreechlorinelevels(manualDPD1testkit)and REDOX,Raise/lowersetpointifnecessary.

MENU ACCESS
7
q
Accessing user menu
User menu
Displays
5
4
3
2
1
q
DISPLAY 1
DISPLAY 2
DISPLAY 3
DISPLAY 4
DISPLAY 5
12
3
4
5
Conductivity control
Redox / Free chlorine control
pH Control
Hydrolysis level
Ionization level
HOLD FOR 3 SECONDS TO ACCESS EXIT USER
MENU
LEVEL OF Cu/Ag ION PRODUCTION
To modify level
To confirm and change menu screen
RECOMMENDED VALUE BETWEEN 20-50
OXIDATION LEVEL
To modify level
To confirm and change menu
RECOMMENDED CONFIGURATION Pr30
RECOMMENDED LEVEL: MAXIMUM POWER 100%
pH SET POINTS
To modify parameters/maximum pH set point
To LOWER pH - maximum water pH - CONTROLS THEACID PUMP (optional equipment)
To modify parameters/minimum pH set point
To increase pH - minimum water pH - CONTROLS THE base PUMP (optional equipment)
pH PROBE CALIBRATION
Insert probe in pH 7 sample,
wait till reading has stabilized
RECOMMENDED LEVEL: 6,8
RECOMMENDED LEVEL: 7,2 - 7,5
Clean probe in NEUTRAL.
Insert probe in pH 10
sample and wait till reading
is stable.
Calibration correct
Repeat calibration
or change probe
Redox SET POINT
To modify parameters / Redox set point To confirm and change menu
REDOX PROBE CALIBRATION
Insert probe into 465mv sample,
wait till reading is stable.
To modify parameters / conductivity setpoint
CONDUCTIVITY SET POINT
Calibration correct
Repeat calibration or change probe.
Insert the probe in
sample, wait until reading
is stable.
To confirm and change menu
CONDUCTIVITY PROBE CALIBRATION
To change menu and
return to Ion menu.
Change conductivity
reading to match
sample.
Calibration correct
Repeat calibration or
change probe.

TROUBLESHOOTING
8
Display blank
*CheckOn/Offswitchisilluminated.
*Checkexternal250mAfusehasnotfused.
*Checkelectricsupply:210-230V50Hz
*IfproblempersistscontactTECHNICALSERVICE.
EXCESS OXIDATION in water
*LowerHydrolysiscelllevel.
*If your system includesAUTOMATIC REDOX CONTROL check REDOX
SETPOINT.
*CheckREDOXprobeandcalibrateifnecessary.
Electrolysis does not reach maximum intensity
*Checksodiumbromideorcommonsaltconcentrationinwater.
*Checkcellstatus(maybeincrustedorcalcified).
*Cleanelectrodefollowinginstructionsinsection6.
*Cleanflowdetectorsituatedinthecellcasing.
*Check titanium cell is not worn (remember that the cell is guaranteed for 5000-6000
hours(approx.2-3yearsofSummerusage)-seetroubleshootingformoreinformation).
Titanium cell incrusted in less than 1 month
*VeryhardwaterswithahighpHandtotal alkalinity(Balance wateradjusting
pHandtotalalkalinity).
*Checktoensurethesystemautomaticallychangespolarity(LED'salternate
every300min.approx.).
*CONSULT with our technical service to consider ACCELERATING THE
polaritychange(Auto-cleaning)WARNING:acceleratingthepolaritychange
decreasesthecelllifeproportionally.
Free chlorine levels don't reach 0,2ppm. First thing in the morning
*INCREASEFILTRATIONINTERVAL.
*INCREASEhydrolysislevel.
*Checklevelsofsodiumbromideorcommonsaltinthepool(5gr.NaCl/L).
*Checklevelofisocyanuricacidinpool(30-50ppm.)ONLYifusingCOMMONSALT.
*CheckreactiveagentsintestkitarenotTOOOLD.
*Hasthetemperatureoramountofusersrisen(see3.1/3.2seechapter“Watermaintenance”).
*pHisabove7,8andmustbeadjusted.
Hydrolysis display shows LO
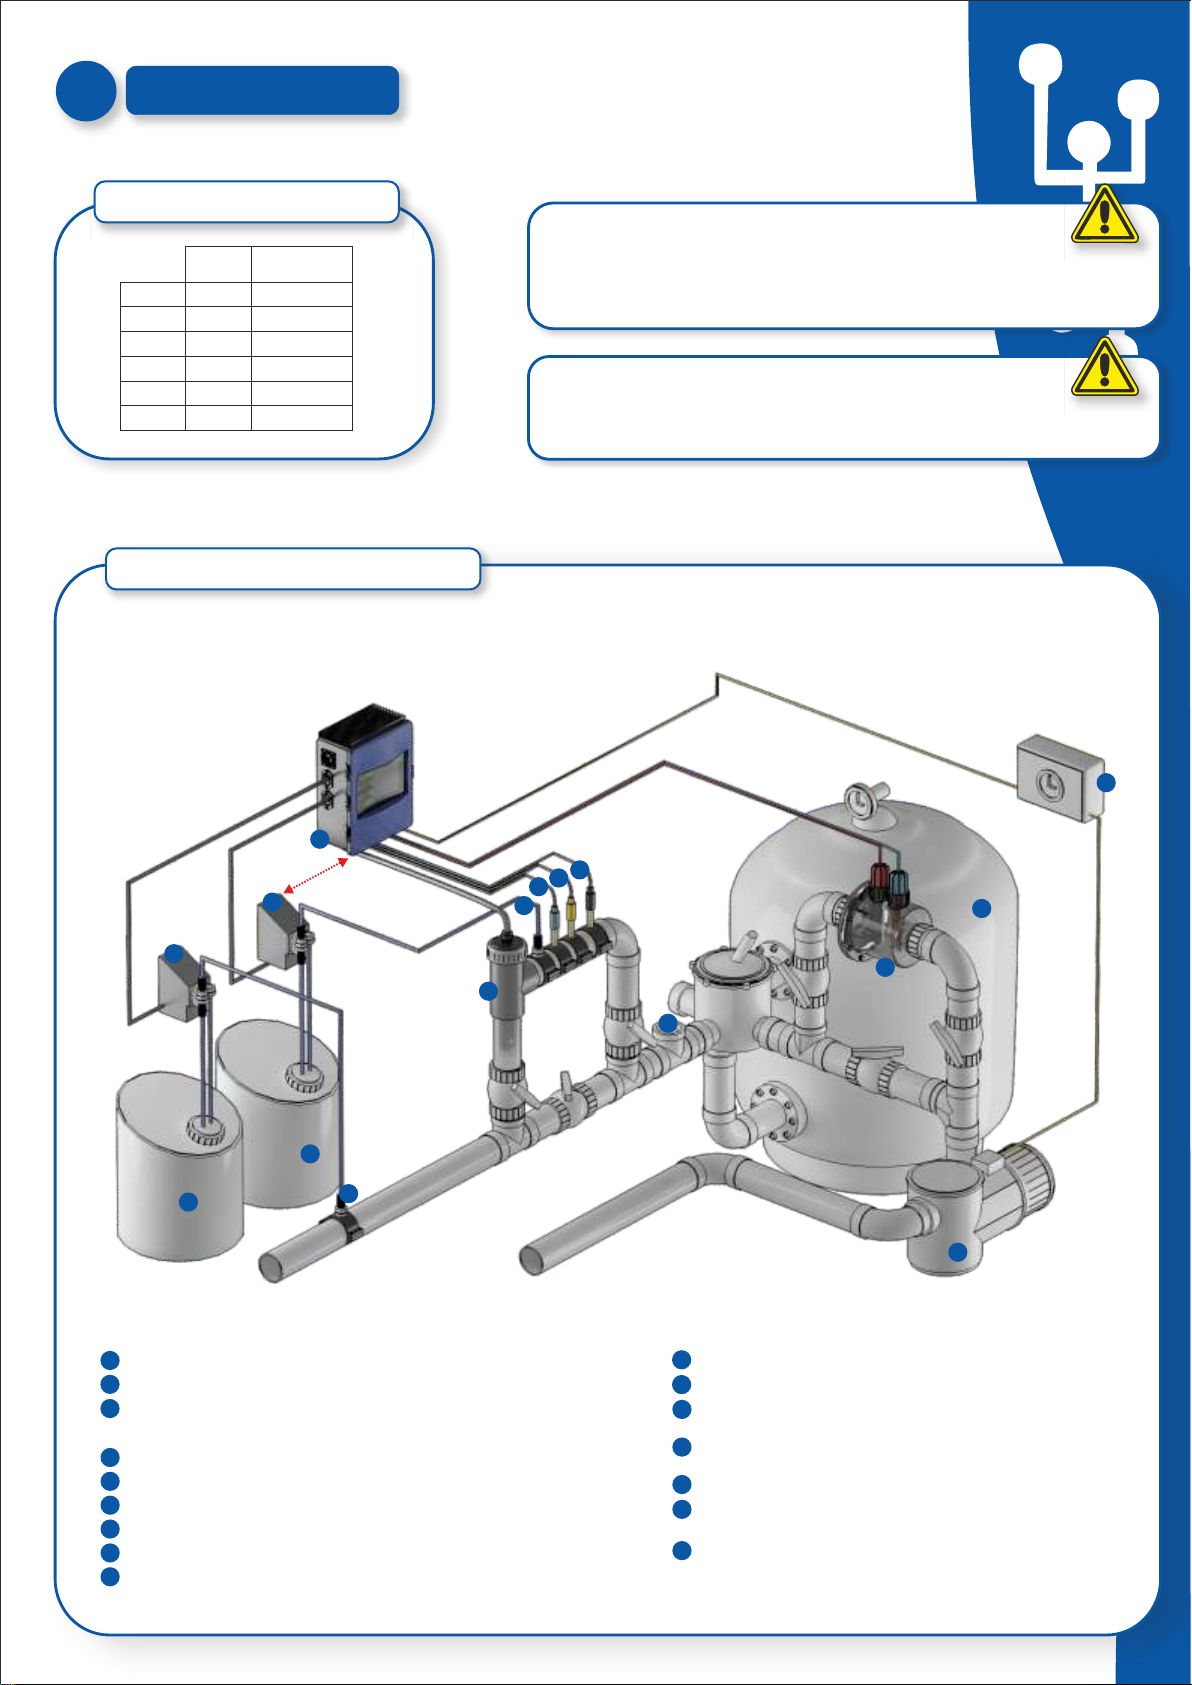
*Waterlacksconductivity(seesection3“waterpreparation”).
*Checkforincrustationsoncell.
*Seetroubleshooting“Hydrolysisdoesnotreachmaximumintensity”.
White flakes in pool
*Thishappensinexcessivelyhardunbalancedwaters.
*Balancethewaterandcheckthecell,proceedingtocleanitifnecessary.
Hydrolysis display shows FL
*Checkflowdetectorcable.
*Cleanincrustationsofflowdetectorattopofcellcasing.
*Checksystemisfreeofair(Probemustbealwayssubmerged).
RUST on metallic components in pool
*Metallic elements lack standardized earth connection. Contact an electrician to
solve.
*Rustedcomponentsarenotstainlesssteel:
minimum304-recommended316.
Polarity 1 reaches max. intensity but polarity 2 (Auto clean) does not
*IFSALTLEVELISCORRECT(5kg./m3) cellisreachingendoflife.Asofthismomentcheckintensityevery15-30days.
*Whenpolarity2 doesnotreach 50%werecommend substitutingcellfor anewoneifduringthesummerormaximumusageperiod.Ifthisshouldhappeninwinterchangebefore
thenextseason(summer).
EARTHING
All metallic components in the pool, such as lamps, ladders, heat exchangers, drains or similar elements within 3.00m. from pool (10feet) must be connected to an earth below
37Ohms.
WERECOMMENDHEATEXCHANGERSBEMADEOFTITANIUM.
CLEANINGFILTER
EnsureAQUASCENICisNOTRUNNINGduringbackwash.
VERYIMPORTANT
REMEMBERthatthesystemneedssometimetoadapttoyourpoolandyouwillhavetoincreasechemicallevelsforthefirst5days.
WARNING
Keepchemicallevelsinpoolasinstructedinthismanual
SECURITY
Toavoidaccidentsthisproductshouldnotbehandledbychildrenunlesssupervisedbyanadult.
Childrenshouldbesupervisedatalltimeswheninornearaspa,poolorJacuzzi.
HANDLINGANDDOSINGDANGEROUSCHEMICALS
Chemicalsshouldbehandledwithextremeprecaution.WhenpreparingACID,ALWAYSADDTHEACIDTOWATER,neveraddwatertoacid!!!VERYdangerousgassesmaybe
produced.
Table of contents
Other sugar-valley Swimming Pool Cleaner manuals
Popular Swimming Pool Cleaner manuals by other brands

Pollet Pool Group
Pollet Pool Group Piranha Go manual

Zodiac
Zodiac Baracuda Pacer Instructions for installation and use

WaterTech
WaterTech Volt Series Operator's manual

Maytronics
Maytronics Dolphin Liberty 200 User instructions

Bestway
Bestway AquaSurge 58649 owner's manual

Zodiac
Zodiac CyclonX Series manual