Kreepy krauly VTX-C User manual

•
P
R
O
U
D
L
Y
A
U
S
T
R
A
L
I
A
N
•
D
E
S
I
G
N
E
D
A
N
D
M
A
D
E
VTX-C
OWNER’S MANUAL
Exclusively for

Congratulations
Your new Kreepy Krauly VTX-C is designed to give you years of reliable
performance. As soon as you complete the final assembly steps,
it’s ready to use. Don’t worry, it doesn’t take long and this guide
will walk you through assembly and installation step-by-step.
This booklet should answer all your questions. However if you
need a little extra help, feel free to call our Customer Service
Department, Mon-Fri 9am-5pm in your local area, or go to
the website for up-to-date information.
1800 777 255
www.kreepykrauly.com.au

1
Contents
2 Components checklist
4 Assembling your VTX-C
6 Installing the VTX-C in your pool
11 Fine-tuning your VTX-C
12 Authorised Kreepy Krauly Accessories
13 Troubleshooting
18 Looking after your VTX-C
19 What should I expect from my VTX-C?
20 Warranty information

2
You will find all the pictured components inside this box.
Components checklist
Male-male hose x1
Male-female hose x9
Hose weights x2
Hose protector sleeve
Smart-Skim
Smart-Skim adaptors used with most vacuum plates
used with Polyplastics 190 & 210 standard
used with Polyplastics SK10 (rectangular)

3
Swivel head assembly
Weighted bumper strap
Main body
Compact Scrubbing seal
Sole
Serial number
VTX-C cleaner unit
Floatation assembly
used with most vacuum plates
used with Polyplastics 190 & 210 standard
used with Polyplastics SK10 (rectangular)
Side leaf scoop

Attach the Seal
Slide the seal onto the groove at the bottom of the main
assembly body so it’s able to rotate freely.
Attach the Slip Rings and Sole
Fit the slip rings and sole to the base of the main body.
Ensure the sole is fitted all the way around.
Assembling your VTX-C
STEP 1
STEP 2
4
TIP: If the seal does not sit in this groove, it
will aect the cleaner’s scrubbing and climbing.

Install the Floatation Assembly
Press the float arms into the grey housing until they click.
STEP 3
5
STEP 4 Attach the Bumper Strap
Insert the bent end of the bumper
into the back of the main body (near the
bottom of the cleaner). Insert the other
end into the swivel head assembly.
bent section down

Prepare your Pool
If your pool is clean, balanced and algae-free, you’re ready to get
started.
a. First, clean the skimmer and pump basket.
b. Check the water level.
c. Brush down the sides of your pool.
d. Next, make sure the return jets are facing downwards.
e. Then, backwash or clean your cartridge filter.
f. Now turn off the pump.
STEP 1
6
Installing the VTX-C in your pool

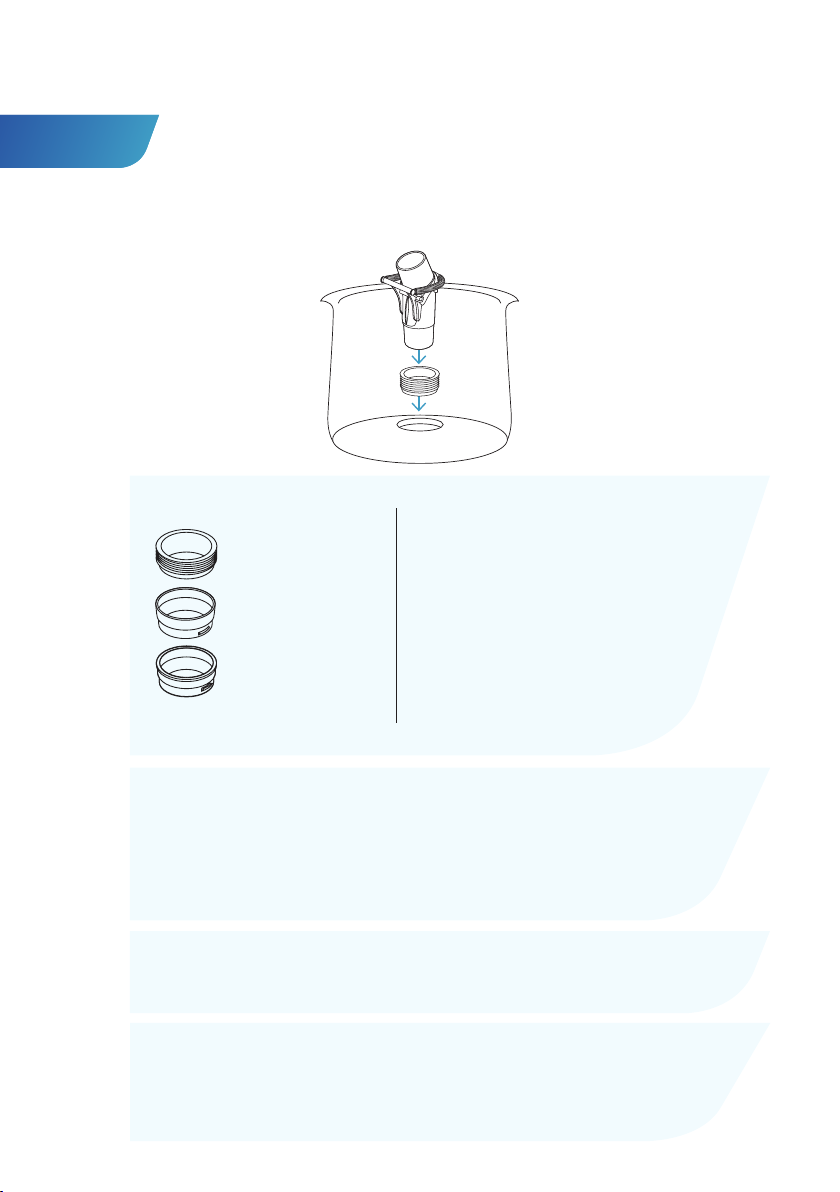
Fit the Smart Skim Valve
Insert one of the supplied adaptor fittings, then
attach to your vacuum plate.
7
STEP 2
STEP 2
TIP: For Poolrite Vacuum Plates, please ensure the first
thread adapter (with the taper top facing up) is screwed in
from the underside of the plate to sit flush with the bottom.
This will ensure the valve can operate eciently.
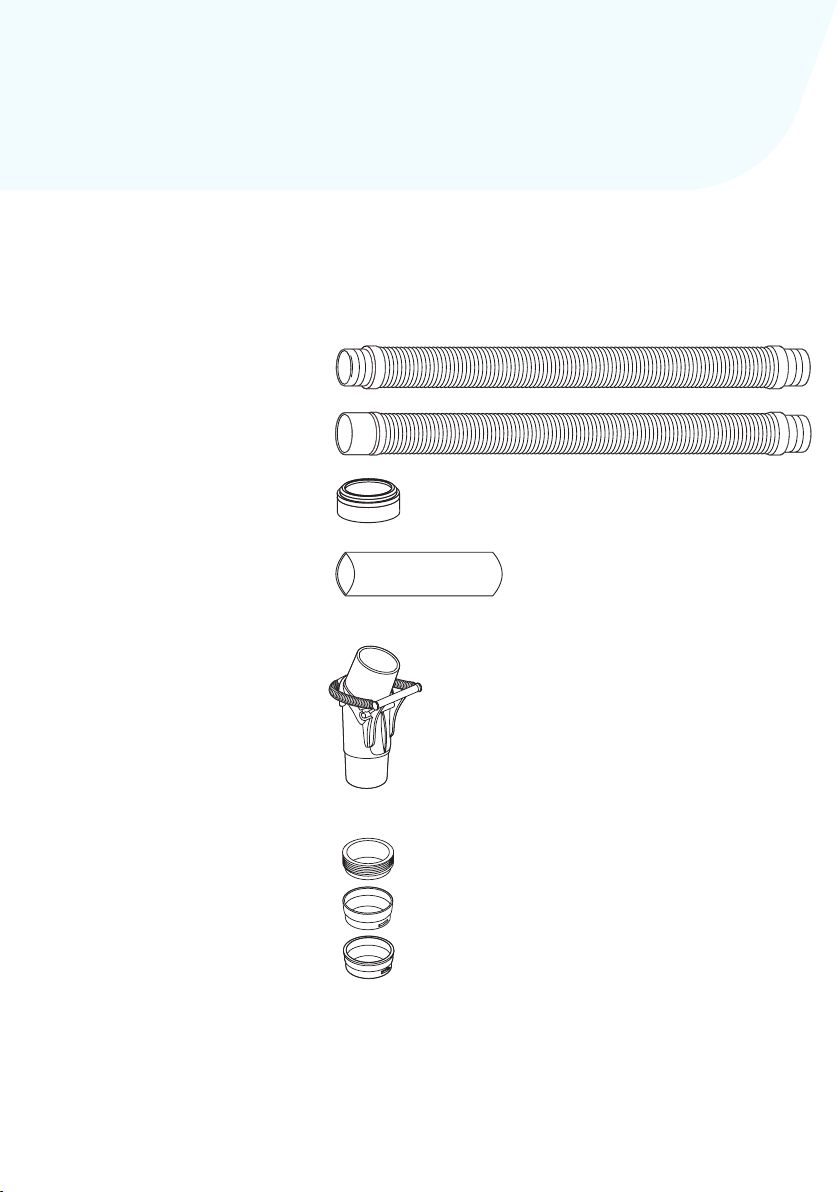
TIP: Depending on your vacuum
plate, you may have to use a
different skim adaptor – we’ve
included three to choose from.
You know you’re using the right
one when there’s a tight fit.
See our website for help.
used with most
vacuum plates
used with Polyplastics
190 & 210 standard
used with Polyplastics
SK1000 (rectangular)
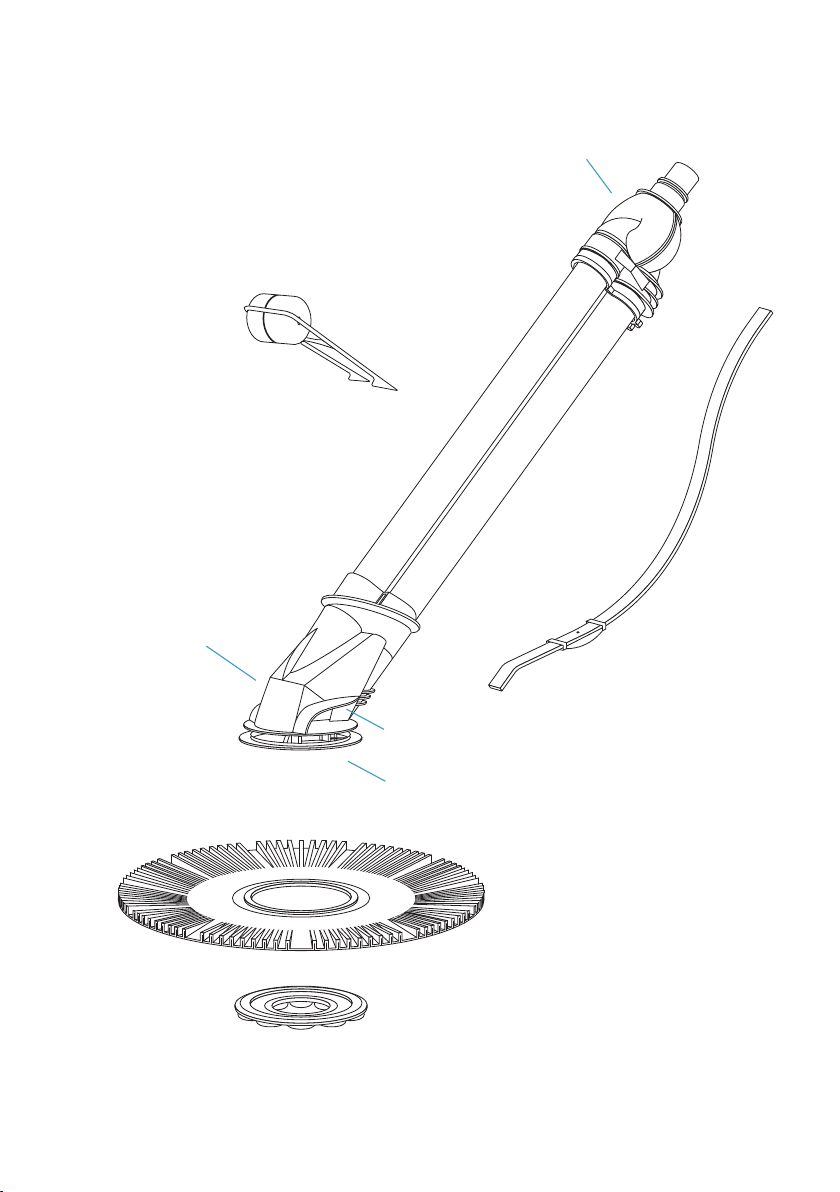
NOTE: To remove, ensure pump is off and grasp from the base of
the Smart-Skim, pulling up. (Note: Not from the hose or spring).
OPTIONAL UPGRADE: For superior vacuum control and surface
skimming, why not try our AutoSkim upgrade with custom vacuum
plate? (see page 12).

8
TIP: For pools deeper than 2m, use an additional
weight at 4m – pull apart the fourth and fifth
hose sections, slide on the weight then reconnect.
Build the Ultra Flex Hose
Start with the male-male hose and twist on a female-male
length. Keep going until the hose is long enough to reach from
your skimmer box to the far corner of your pool plus around
1.5 metres extra
– this will optimise the coverage of your VTX-C.
Attach the Hose Weight
Pull apart the second and third hose sections, slide on the weight
then reconnect the hose. The weight should sit approximately
2m from the end of the hose that connects to the VTX-C.
male male female
STEP 3
STEP 4
2m
TIP: Wetting the hose ends in your pool will
make them easier to connect to each other.
NOTE:
If your cleaner tends to favour a corner
in the pool, remove one length.
male - male length

9
Submerge the Hose
Submerge the assembled hose in your pool to expel all the air
by pushing downwards and feeding the hose into the pool.
Connect the Hose to the VTX-C
Submerge the VTX-C in your pool to expel all air
(rotate to help remove trapped air). Now connect
the weighted end of the submerged hose to
the swivel head assembly of the VTX-C.
STEP 5
NOTE: Please do not use any
other brand of pool cleaner hose
with your
VTX-C or performance
and coverage will be impaired.
STEP 6

Connect Hose to the Skim Valve
Slide the protector sleeve onto the end of the hose. Connect
the hose to the Smart-Skim valve (or Auto Skim valve if using
the upgrade.) There are two options for the path of the hose:
Position the protector sleeve to protect the hose from wear
where it is in contact with the pool edge or skimmer box door.
STEP 7
10
Option 1:
Hose through the
skimmer box door.
Option 2 (improves
surface skimming):
Hose through the top of
the skimmer box, with
the cover removed.
STEP 8 Turn on the Pump
Your VTX-C should now be up and running. You should hear a
gentle ticking – that’s your cue to relax while the VTX-C gets to
work cleaning your pool.
TIP:
For option 2, cover end of hose with palm of hand when
lifting into skimmer box so air is not present in the hose.
NOTE:
Ensure your pump is o when doing this.

11
Fine-tuning your VTX-C
Depending on your pool’s shape and surface, you may need to make some
small tweaks to optimise the performance of your VTX-C.
How to achieve the right incline
VTX-C works best when the main body sits at a 45° incline to the pool surface.
If your cleaner is lifting (greater than 45°), move the hose weight towards
the cleaner. To test if it is sitting correctly turn o the pump, tow the
VTX-C into 1.2 metres of water and observe how it sits when it settles to
the bottom. Adjust the hose weight further if needed.
If your cleaner is sitting lower than 45°, move the hose weight away from
the cleaner. If it still won’t sit correctly, call your pool shop or our Customer
Service Centre for advice.
more than 45°
less than 45°

Authorised Kreepy Krauly Accessories
12
Main Drain Cover
Place over main drain grille to ensure the VTX-3 can move
smoothly. (No screws required.)
Vacuum Plate Clamp
Holds down the vacuum plate when the pool pump is o.
Expanding Plug
Used to block o selected skimmer box pool drain inlets.
Hose Thruster
For use with the hose to steer away from problem steps
and corners. (To be positioned with the opening facing the
cleaner). Ask your local pool professional for setup advice
for your pool.
Auto Skim Upgrade
Provides premium surface skimming and vacuum
regulation. The combined Vacuum Plate, Auto Skim Valve
and Anti-Vortex Disc replaces the Smart-Skim and your
existing vacuum plate. Your pool shop can assist
you in selecting the correct replacement for your pool.
To assemble, place the Auto Skim Valve into
the opening in the new
Vacuum Plate and attach
you hose. If you notice a
slurping sound, attach
the
Anti-Vortex Disc over the
valve inlet.
Placethe entire unit in the skimmer box.
Anti-Vortex Disc
Auto Skim Valve
Vacuum Plate

Authorised Kreepy Krauly Accessories
13
VTX-C pulsates rapidly
but doesn’t move, or travels
very slowly:
•
Check that the sole is fitted correctly.
•
Check i
f the sole tread is worn
away, replace it with a new sole.
• Check that the Vacuum Plate and
Smart-Skim (see page 7) or Auto
Skim valve are fitted correctly.
• Check the markings on the seal to
make sure it hasn’t been installed
upside down.
• Check the Smart-Skim or Auto
Skim valve isn’t jammed. If it is,
remove the valve from the vacuum
plate, submerge the valve in
water – opening and closing until
it moves freely.
• Check Smart-Skim spring is
correctly attached.
• Check for a blockage in the main
body of your VTX-C (see page 19).
VTX-C travels too slowly,
or doesn’t pulsate:
•
Check i
f the filter is blocked.
Backwash or clean it thoroughly,
if required.
•
Check i
f the flow valve at the
bottom of your VTX-C is blocked,
clean out the valve (see page 17).
•
Check i
f the pump or skimmer box
strainer basket is full or blocked,
clean them out.
•
Check i
f the main drain valve is
open, shut it o, or fit an optional
expanding plug.
• Check for damage to the main body.
Troubleshooting

Low vacuum or slow,
faltering hammering sound:
• Check large debris isn’t blocking
your hose or VTX-C (see page 17).
• Check the Smart-Skim or Auto
Skim valve and vacuum plate
is sitting correctly in the
skimmer box. You may need a
dierent adapter for the Smart-
Skim.
• Backwash filter.
• If you have more than one
skimmer box, you’ll need to block
o water flow from the box not
connected to the VTX-C.
• Check if the inlet from the
main drain is leaking, install an
expanding plug.
• Your pool pump and filter system
may be too small to eectively
run your VTX-C. Ask your pool
professional for advice.
• Check for leaks or small holes in
the main body.
• Check flow valve for damage.
• Check if the hose is damaged and
replace damaged section with a
new length of sectional hose. Some
damage can be visually inspected
or a hissing sound can be heard
coming from the hose when raised
out of the water and the pump is
on.
VTX-C stays at one end of
the pool:
• Check that the hose is long enough
to reach the far corner of the pool.
If it isn’t, add extra sections.
• Check that the hose isn’t kinked or
coiled (see page 16).
• Check that the pool outlets aren’t
pushing the VTX-C o course.
Adjust downwards if necessary or
use an eyeball diverter.
• Do you have enough pool weights
on the hose? Additional weights
may improve directional stability.
• Check your hose isn’t too long.
Try removing one length.
VTX-C only travels around
the water line:
• Check the hose is not coiled. If it is
coiled, try to straighten the hose out
(see page 16).
VTX-C travels around the water
line in only one direction:
14

15
• Check that the main body and
swivel head are not out of
alignment. Adjust accordingly.
The VTX-C only climbs part
way up the wall:
• Check the sole isn’t worn and
needs replacing.
VTX-C becomes stuck on the
main drain:
• Fit a main drain cover over the grille
(see page 12).
VTX-C keeps wedging itself
on the steps:
• Shorten the pool hose so
the VTX-C
isn’t in range of the steps and
clean
the missed area manually.
• Check seal and sole for damage.
• Fit a hose thruster (see page 12)
with the wider diameter facing
the cleaner at approximately 2m.
Consult your pool professional or
call our Customer Service Centre for
advice.
VTX-C doesn’t sit at 45° and
has difficulties attaching to
the pool floor:
• Adjust hose weights closer to or
further away from the machine until
the seal is flat on the pool floor.
(see page 11)
• Make sure the bumper strap
isfitted correctly.
• Check for damage to the machine
and missing floats.
You notice bubbles at return
to pool outlets:
• Check if the hose is damaged
by lifting it near the surface and
listening for a hissing sound.
Replace damaged section with a
new length of Sectional hose.
• Reprime the pump.
• Check the Smart-Skim or Auto
Skim valve isn’t jammed.
• Make sure the pool water level is
high enough.
• Check the Smart-Skim or Auto
Skim valve isn’t
sitting above the
waterline. If it is, fit
an anti-vortex
washer on the valve.

VTX-C is always coming
to the surface of the pool,
possibly drawing in air:
• Check that the Smart-Skim (see
page 7) or Auto Skim valve (see
page 12) is installed correctly.
• Check that there are no large
leaves blocking the Smart-Skim
valve and creating excess vacuum.
• Check the hose weights are fitted
correctly and readjust if necessary.
• Check your pump isn’t too large
for your pools needs.
Consult a pool professional.
You may be able to adjust your
pump speed or upgrade your
skimmer box to a combined
Auto Skim and Vacuum Plate.
How to unkink or uncoil
your hose
Option 1
- The easiest method is to lay it
flat by the pool for a few hours on
a hot day (above 28ºC).
Option 2
- If the weather is cooler, lay the
hose out straight and fill it with
warm (50-60ºC) not boiling water.
Roll the water backwards and
forwards until the hose warms up
and uncoils. Empty the warm water
and then pour cold water through
the hose – either manually or by
attaching one end to the pump.
Option 3
- If option 1 or 2 is not possible
simply rotate every 2nd length
180˚ to reduce the kinks.
NOTE: For more detailed troubleshooting advice please don’t
hesitate to contact your helpful local dealer, or check our online
resources for tips and other information: www.kreepykrauly.com.au
16
TIP:
When removing your hose from the pool break it down into
1m or 2m lengths and store flat. This will assist in stopping kinking
and coiing, which impacts performance.

17
How to check the flow valve
• This will need to be periodically
checked or conducted when there
is a blockage.
- Remove the sole and seal.
- Remove the bae plate by
firmly pressing the plastic side
tabs inwards or using a flat head
screwdriver.
- Remove and clear debris from
the flow valve
- Replace flow valve and bae
plate. Ensure prongs on bae
plate are not damaged or
missing. Replace if required
- Refit the seal, slip rings and sole
flow valve
Beware of the pool blanket effect
Pool blankets prevent chlorine evaporating. If you’re using
one, carefully monitor your chlorine or salt water setting to
avoid over chlorinating your pool, which can harm your VTX-C
and void your warranty. If you have any questions, please
call our Customer Service department on 1800 777 255 or talk
to your pool shop pro.

•
IMPORTANT If you are giving the water a shock treatment with chlorine or
other chemicals, remove your VTX-C from the pool for at least 24 hours. If the
chemicals are too strong for people to swim in, they’re too strong for the VTX-C.
• Do not use petrol or solvents to clean your VTX-C as they will damage it.
If needed, use detergent and water.
• Periodically check the suction seal, scrubbing sole and bumper for wear
and tear. If they need replacing, see your pool shop.
Looking after your VTX-C
18
TIPS TO PROTECT YOUR HOSE:
• Never stretch or lift the hose while it is full of water
• Never hang your hose from hooks
•
Always store your hose loosely coiled (minimum 1m diameter)
on a flat surface or, ideally, disassemble and store straight
– particularly if storing long term. This will prevent the hose
from kinking and ensure your VTX-C can move freely
when you return it to the pool.
Table of contents
Other Kreepy krauly Swimming Pool Cleaner manuals