INSTRUCTION MANUAL
Prior to operation read the operating instructions carefully.
LVLP(HLVP) [Lower (High) Volume Low Pressure] spraying equipment has been developed as an
introduction of the environmental protection action. HVLP equipment uses less air (less than 10 psi, 0.69
bar at the cap), but with a higher throughput resulting in more paint staying on the workpiece while less
released into the atmosphere. Most novices to the paint industry will be surprised to learn that HVLP guns
come in a variety of designs concepts.
HVLP showed that high pressure was not necessary to spray paint. Low pressure could work in exactly the
same way -with one major difference - the lower velocity of the air resulted in less overspray and wasted
paint.
OPERATION
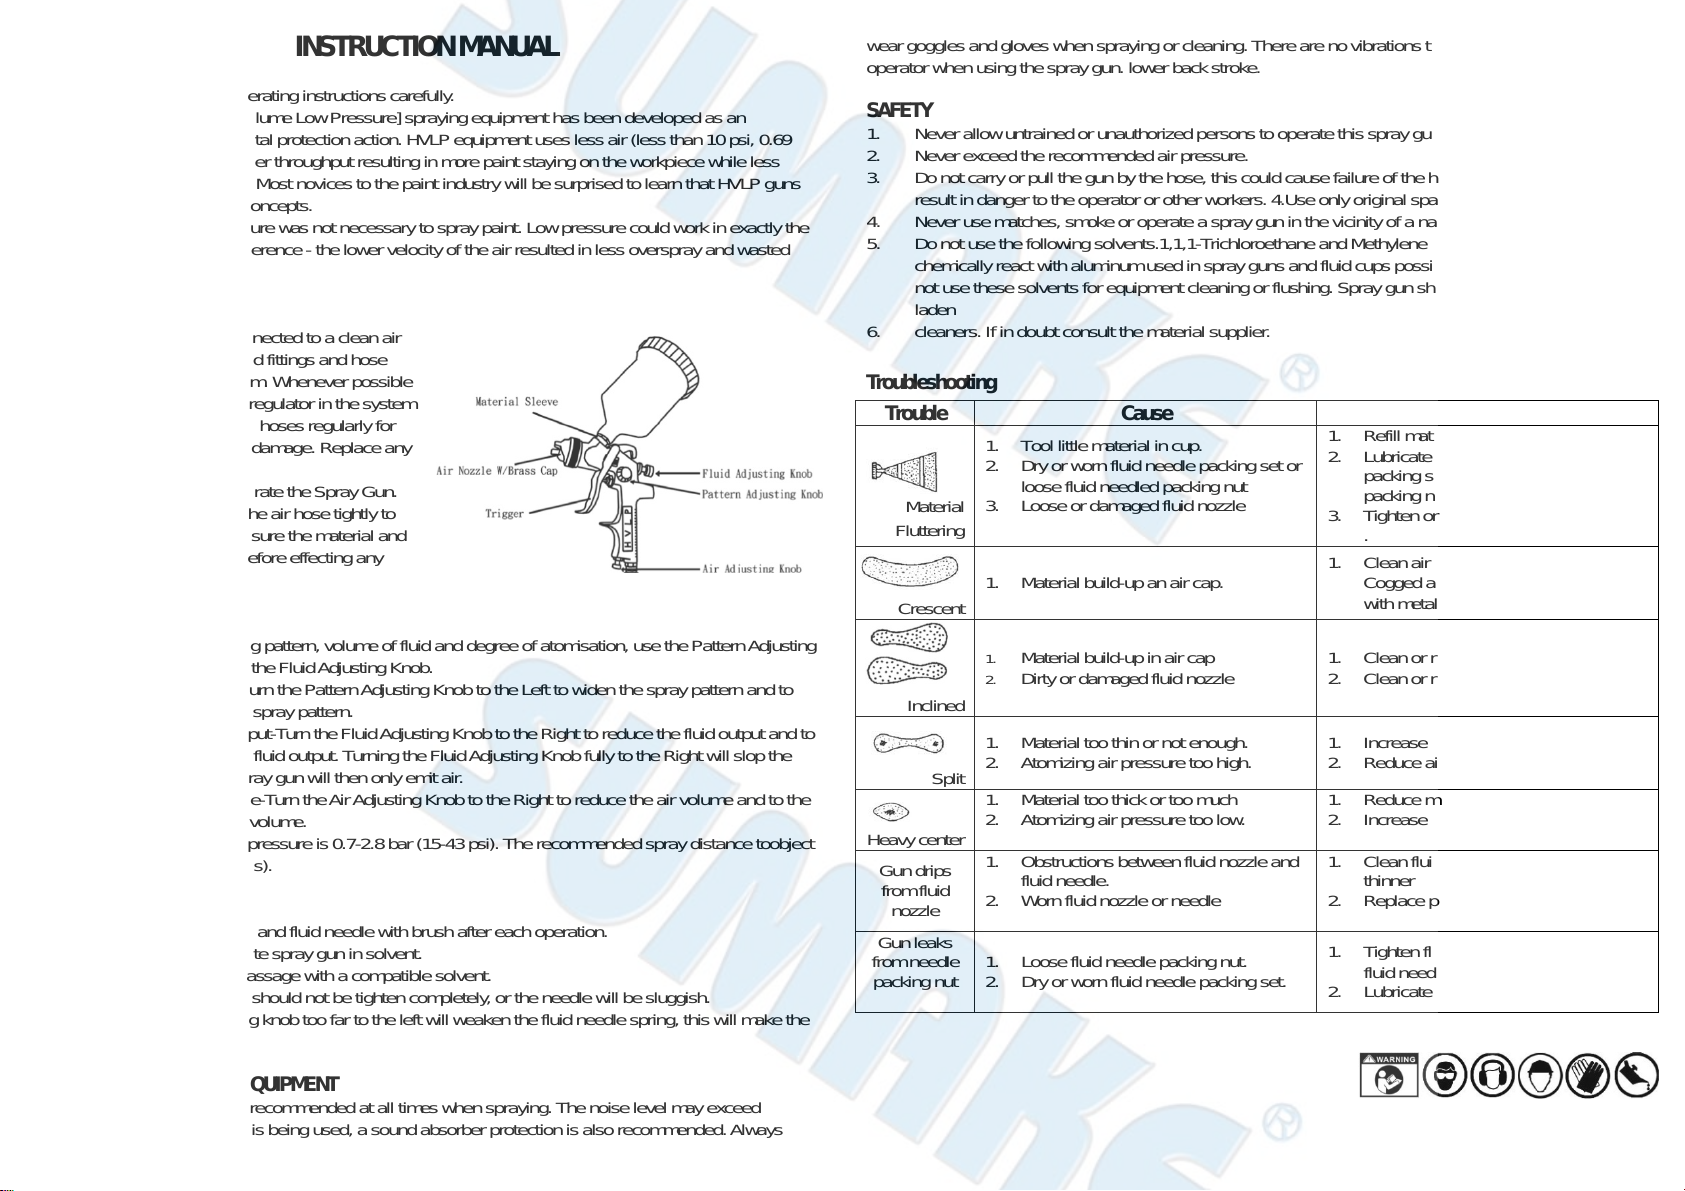
The Spray Gun should be connected to a clean air
supply using the recommended fittings and hose
size as specified in the diagram. Whenever possible
there should be an air filter & regulator in the system
as diagram. Check fittings and hoses regularly for
signs of fraying, or accidental damage. Replace any
worn
items before continuing to operate the Spray Gun.
Always connect the cup and the air hose tightly to
the Spray Gun before use. Ensure the material and
air supply are disconnected before effecting any
work on the Spray Gun.
ADJUSTMENT
To obtain the required spraying pattern, volume of fluid and degree of atomisation, use the PatternAdjusting
Knob,AirAdjusting Knob and the FluidAdjusting Knob.
1. ToAdjust the Pattern-Turn the PatternAdjusting Knob to the Left to widen the spray pattern and to
the Right to narrow the spray pattern.
2. ToAdjust the Fluid Output-Turn the FluidAdjusting Knob to the Right to reduce the fluid output and to
the Left to increase the fluid output. Turning the FluidAdjusting Knob fully to the Right will slop the
fluid completely, the spray gun will then only emit air.
3. ToAdjust the AirVolume-Turn theAirAdjusting Knob to the Right to reduce the air volume and to the
Left to increase the air volume.
4. The recommended air pressure is 0.7-2.8 bar (15-43 psi). Therecommended spray distance toobject
is 15 - 20 cm (6-8 inches).
SERVICING
1. Clean air cap, fluid newly and fluid needle with brush after each operation.
2. Do not submerge complete spray gun in solvent.
3. Flush the gun material passage with a compatible solvent.
4. Fluid needle packing set should not be tighten completely, or the needle will be sluggish.
5. Turning the fluid adjusting knob too far to the left will weaken the fluid needle spring, this will make the
fluid nozzle to lea
PERSONAL PROTECTIVE EQUIPMENT
The use of breathing mask is recommended at all times when spraying. The noise level may exceed
85 dB(A) when the spray gun is being used, a sound absorber protection is also recommended. Always
wear goggles and gloves when spraying or cleaning. There are no vibrations to be transmitted to the
operator when using the spray gun. lower back stroke.
SAFETY
1. Never allow untrained or unauthorized persons to operate this spray gun.
2. Never exceed the recommended air pressure.
3. Do not carry or pull the gun by the hose, this could cause failure of the hose/gun connection and
result in danger to the operator or other workers. 4.Use only original spare parts.
4. Never use matches, smoke or operate a spray gun in the vicinity of a naked flame.
5. Do not use the following solvents.1,1,1-Trichloroethane and Methylene Chloride.These solvents can
chemically react with aluminum used in spray guns and fluid cups possibly causing an explosion. Do
not use these solvents for equipment cleaning or flushing. Spray gun should never be stored in acid
laden
6. cleaners. If in doubt consult the material supplier.
Troubleshooting
Trouble Cause Correction
Material
Fluttering
1. Tool little material in cup.
2. Dry or worn fluid needle packing set or
loose fluid needled packing nut
3. Loose or damaged fluid nozzle
1. Refill material.
2. Lubricate or replace fluid needle
packing set or tighten fluid needle
packing nut
3. Tighten or replace fluid nozzle
.
Crescent 1. Material build-up an air cap. 1. Clean air cap with proper objects.
Cogged air holes must not be cleaned
with metal objects
Inclined
1. Material build-up in air cap
2. Dirty or damaged fluid nozzle 1. Clean or replace air cap.
2. Clean or replace fluid nozzle.
Split
1. Material too thin or not enough.
2. Atomizing air pressure too high. 1. Increase material viscosity.
2. Reduce air pressure.
Heavy center
1. Material too thick or too much
2. Atomizing air pressure too low.
1. Reduce material viscosit
2. Increase air pressure.
Gun drips
from fluid
nozzle
1. Obstructions between fluid nozzle and
fluid needle.
2. Worn fluid nozzle or needle
1. Clean fluid needle and fluid nozzle in
thinner
2. Replace parts
Gun leaks
from needle
packing nut
1. Loose fluid needle packing nut.
2. Dry or worn fluid needle packing set. 1. Tighten fluid needle packing nut ,check
fluid needle for free movement.
2. Lubricate or replace.
SS-1303-I-1905B-GW