Summit Treestands FBFAHS SU18195-B User manual

• READ, FOLLOW AND UNDERSTAND ALL WARNINGS AND INSTRUCTIONS BEFORE USE. INSPECT ALL EXPIRATION TAGS PRIOR TO EACH
USE. IF YOU DON’T COMPLETELY UNDERSTAND SAFE AND PROPER USE OF THE FULL BODY FALL ARREST HARNESS SYSTEM (FBFAHS)
OR TREESTAND, HUNT FROM THE GROUND! FAILURE TO FOLLOW ALL WARNINGS AND INSTRUCTIONS LISTED COULD RESULT IN SERIOUS
INJURY OR DEATH! IT IS REQUIRED THAT YOU WATCH AND UNDERSTAND THE DVD SUPPLIED WITH THIS PRODUCT & SAFETY WARNINGS
AND INSTRUCTIONS AT: www.summitstands.com/safety-videos
• ALWAYS INSPECT THE TREESTAND AND THE FBFAHS FOR ANY SIGN OF DAMAGE OR WEAR PRIOR TO EACH USE! IF ANY SIGN OF DAMAGE OR
WEAR IS PRESENT OR A TAG HAS EXPIRED FROM THE DATE STATED, DISCONTINUE USE IMMEDIATELY AND HUNT FROM THE GROUND.
• ALWAYS WEAR A FBFAHS THAT MEETS STRINGENT, INDUSTRY STANDARDS RECOGNIZED BY THE TMA. WEAR A FBFAHS EVERY TIME YOU
LEAVE THE GROUND, INCLUDING ASCENDING OR DESCENDING. SINGLE BELT STRAPS AND CHEST HARNESSES ARE NO LONGER ALLOWED
AND SHALL NOT BE USED! FAILURE TO USE A FBFAHS COULD RESULT IN SERIOUS INJURY OR DEATH!
• THE LENGTH OF THE HARNESS TETHER SHALL BE MINIMIZED AT ALL TIMES. IT SHALL BE ADJUSTED SO THAT IT IS ABOVE THE HEAD WITH
NO SLACK (OR SNUG) IN THE SEATED POSITION AND YOU SHALL HAVE MINIMUM AMOUNT OF SLACK POSSIBLE WHEN CLIMBING. FAILURE TO
DO SO MAY RESULT IN SUSPENSION WITHOUT THE ABILITY TO RECOVER TO YOUR TREESTAND. BE AWARE OF HAZARDS ASSOCIATED WITH
HANGING SUSPENDED IN A FBFAHS AND THE FACT THAT PROLONGED SUSPENSION IN A HARNESS MAY BE FATAL.
• ALWAYS NOTIFY SOMEONE OF YOUR HUNTING LOCATION IN CASE OF AN EMERGENCY. IF OTHERS ARE NOT AWARE OF YOUR HUNTING
LOCATION AND COMMUNICATION EFFORTS ARE UNSUCCESSFUL, YOU MUST HAVE A PERSONAL PLAN FOR RECOVERY/ESCAPE BEFORE
YOU ASCEND THE TREE - PROLONGED SUSPENSION IN A HARNESS CAN BE FATAL. IT IS IMPORTANT TO EXERCISE THE LEGS BY PUSHING
AGAINST THE TREE OR DOING OTHER FORMS OF CONTINUOUS LEG EXERCISES TO AVOID BLOOD POOLING WHILE BEING SUSPENDED.
HUNTERS WITH VARYING DEGREES OF PHYSICAL FITNESS MAY REQUIRE DIFFERENT PLANS TO RECOVER/ESCAPE TO AVOID EFFECTS
OF PROLONGED SUSPENSION. HAVE A PERSONAL PLAN AND PRACTICE IT IN THE PRESENCE OF A RESPONSIBLE ADULT BEFORE LEAVING
THE GROUND. NO ESCAPE/RECOVERY PLAN WILL WORK FOR EVERY HUNTER ON EVERY TREE IN EVERY CIRCUMSTANCE. ONLY YOU CAN
DETERMINE THE BEST RECOVERY/ESCAPE PLAN FOR YOUR HUNTING SITUATION AND YOU MUST HAVE A RECOVERY/ESCAPE PLAN FOR
YOUR SITUATION BEFORE LEAVING THE GROUND. HUNT FROM GROUND WHEN SELF-RECOVERY/ESCAPE ABILITY IS ABSENT.
• PRACTICE THE USE OF A FBFAHS AT GROUND LEVEL IN THE PRESENCE OF RESPONSIBLE ADULT TO UNDERSTAND PROPER USE AND
EXPERIENCE THE FEELING OF HANGING SUSPENDED BEFORE USING IN A HUNTING ENVIRONMENT.
• IF THERE ARE ANY QUESTIONS OR CONCERNS WITH INSTRUCTION, WARNINGS, OR PROPER USE “STOP” AND CONTACT THE
MANUFACTURER. DO NOT USE UNLESS YOU FULLY UNDERSTAND SAFE AND PROPER USE. MAINTAIN ALL WARNINGS, INSTRUCTIONS, AND
DVD(S) FOR LATER REVIEW AS NEEDED, FOR INSTRUCTION USAGE TO ANYONE BORROWING YOUR STAND/FBFAHS OR TO PASS ON WHEN
SELLING THESE ITEMS. USE ALL SAFETY DEVICES PROVIDED WITH YOUR TREESTAND AND FBFAHS.
• A SUSPENSION RELIEF DEVICE MUST BE WORN ON YOUR PERSON AND READILY ACCESSIBLE WHILE USING A HARNESS. THIS DEVICE WILL
ALLOW THE USER TO RELIEVE THE LOAD ON THE LOWER EXTREMITIES IF SUSPENDED IN A HARNESS TO HELP MAINTAIN CIRCULATION
IN THE LEGS AND HELP MITIGATE SUSPENSION TRAUMA (BLOOD POOLING) OR ALLOW DESCENT TO GROUND. BE SURE TO FOLLOW
MANUFACTURER’S DIRECTIONS ON THE SAFE USE OF ANY SUSPENSION RELIEF DEVICE.
• SEVERAL OPTIONAL PRODUCTS/SYSTEMS ARE AVAILABLE THAT OFFER SELF-RECOVERY OR SELF EXTRACTION FROM A FALL WHEN
SUSPENDED IN A HARNESS. SOME SYSTEMS AUTOMATICALLY DESCEND THE USER WHILE OTHERS ALLOW USER CONTROL. ONE OF THESE
PRODUCTS/SYSTEMS COULD BE CONSIDERED FOR USE AS AN ADDITIONAL SAFETY PRECAUTION AGAINST PROLONGED SUSPENSION AND
SUSPENSION TRAUMA. BE SURE TO FOLLOW MANUFACTURER’S DIRECTIONS ON THE SAFE USE OF THESE PRODUCTS/SYSTEMS.
• THERE IS TIME TO MAKE A CORRECT DECISION ON WHAT ACTION TO TAKE IF A FALL OCCURS WHILE WEARING A FBFAHS. IT IS IMPORTANT TO
REMEMBER TO “DO NOT PANIC”. REMAIN CALM AND IMPLEMENT YOUR PRACTICED RESCUE, RELIEF, AND RECOVERY PLAN.
• NEVER USE THE FBFAHS OR TREESTAND WHILE FEELING ILL, NAUSEOUS OR DIZZY, OR IF YOU HAVE PRIOR MEDICAL CONDITION THAT
COULD CAUSE A PROBLEM, THAT IS, HEART CONDITION, JOINTS THAT LOCK-UP, SPINAL FUSIONS, ETC OR IF YOU ARE NOT WELL RESTED.
• DO NOT USE THE FBFAHS OR TREESTAND IF UNDER THE INFLUENCE OF ALCOHOL OR DRUGS (INCLUDES PRESCRIPTION MEDICATIONS).
THIS INCLUDES OVER-COUNTER MEDICATIONS THAT MAY CLOUD OR ALTER JUDGMENT OR MENTAL STATE. CONSULT WITH YOUR PHYSICIAN
BEFORE USING THIS PRODUCT TO ENSURE SAFE AND PROPER USE.
• NEVER USE TREESTAND OR FBFAHS DURING INCLEMENT WEATHER SUCH AS RAIN, LIGHTNING, WINDSTORMS, SNOW, HAIL, SLEET OR ICY
CONDITIONS. END YOUR HUNT AND RETURN TO THE GROUND IF INCLEMENT CONDITIONS ARISE.
• NEVER USE ON A DEAD, LEANING, DISEASED OR LOOSE BARK TREE, OR UTILITY POLE.
• ALWAYS MAINTAIN THREE (3) POINTS OF CONTACT WHILE CLIMBING A LADDER STAND OR CLIMBING AIDE. NEVER BE DISCONNECTED FROM
THE TREE WHEN TRANSFERRING FROM YOUR CLIMBING AIDE TO THE FIXED POSITION STAND. PRACTICE AT GROUND LEVEL BEFORE USING
AT A ELEVATED POSITION.
WARNING
!
FAILURE TO READ AND FOLLOW ALL MANUFACTURER’S
WARNINGS AND INSTRUCTIONS CONSTITUTES A MISUSE OF THIS
PRODUCT AND COULD RESULT IN SERIOUS INJURY OR DEATH!!
FORM# 18072-16 2/2016 - printed in china
FBFAHS Summit Harness
SU18195-A & SU18195-B
© 2016 Summit Treestands, LLC | 715 Summit Dr. Decatur, AL 35601
PH#: (800) 353-0634 | www.summitstands.com
You MUST also view the safety warnings
and instructional video at
www.summitstands.com/safety-videos
prior to use.
RATED WEIGHT LIMIT (MAX):
350 LBS
USED WITH ALL SUMMIT TREESTAND
MODELS AND PRODUCTS ONLY!
NEVER EXCEED RATED WEIGHT LIMIT!
(Includes user & all gear!!)

PG 2 www.summitstands.com
STAND / COMPONENT WARNING LABELS
1
Located on the Full Body Fall Arrest Harness System (FBFAHS) Tether
Located on the Lineman’s Belt / Tether Strap
WARNING
!
DO NOT REMOVE ANY WARNING LABELS FROM
THE PRODUCT!

USE
4
REPLACE YOUR FULL BODY FALL ARREST HARNESS SYSTEM
(FBFAHS) EVERY FIVE (5) YEARS (OR SOONER) OR:
• IF ANY PART OF THE FBFAHS HAS BEEN SUBJECTED TO ANY TYPE OF
SHOCK LOADING OR AFTER ARRESTING A FALL.
• IF ANY PART OF THE FBFAHS HAS BEEN SUBJECTED TO ANY KIND OF OVERLOAD FOR WHICH IT WAS NOT DESIGNED. HUNT FROM THE
GROUND UNTIL YOU FULLY UNDERSTAND SAFE AND PROPER USE OF THE FBFAHS!!
• IF ANY SIGN OF FRAYING, RIPS, TEARS, CUTS, CORROSION WEAR OR ANY OTHER TYPE OF DAMAGE ON ANY PART OF FBFAHS IS PRESENT.
• IF ANY MANUFACTURED DATE TAG IS EXPIRED.
Call 800-353-0634 or visit www.summitstands.com if you have any questions or concerns. Failure
to do so could result in serious injury or death!
FBFAHS Summit Harness SU18195-A (used with climbers & ladder stands)
• (1) FULL BODY HARNESS (SU18195)
• (1) LINEMAN’S BELT/TETHER STRAP (SU18194)
•• LINEMAN’S BELT / TETHER STRAP MUST BE REPLACED EVERY YEAR
WARNING
!
• Always check to make sure leg straps are secured around legs and buckled correctly before each use!
• Be sure the Tether Strap is attached correctly to the tether of the Full Body Harness!
• TO PREVENT POTENTIAL CHOKING HAZARD, KEEP TETHER AWAY FROM NECK AND PREVENT TETHER FROM
LOOPING UNDER ARMS as shown in figure 1.
• If using harness under hunting clothes, make sure your hunting clothes are not tight around your neck. The
harness will slide up if a fall occurs as shown in figure 2.
• Inspect this harness and all straps for fraying, rips, tears, cuts, corrosion, wear or any other type of damage prior to
each use! If any of this damage or wear is present, discontinue use immediately and hunt from the ground!
• NEVER POSITION THE TETHER STRAP BUCKLE 180 DEGREES (ON BACK SIDE OF TREE) FROM THE TETHER
HOOK-UP POINT.
• Always position Tether Strap Buckle 90 degrees from the tether hook-up point.
WARNING
!
If a fall has occurred, you must replace the harness
immediately by contacting Summit Treestands, LLC.
This FBFAHS has been designed to be used only as a
safety device for hunting from elevated treestands.
Any other use is STRICTLY PROHIBITED!
NEVER ALLOW THE TETHER TO GET
UNDER OR AROUND YOUR NECK!
WARNING
!
1 2
CONTENTS
2
HARNESS REPLACEMENT
3
PG 3
FBFAHS Summit Harness SU18195-B (used with fixed position stands)
• (1) FULL BODY HARNESS (SU18195)
• (2) LINEMAN’S BELT/TETHER STRAP (SU18194)
•• LINEMAN’S BELT / TETHER STRAP MUST BE REPLACED EVERY YEAR

PG 4 www.summitstands.com
2. Slip your arms through the shoulder straps as you would a jacket. Be sure the shoulder straps do not cross each other and are not twisted.
Adjust the 3-bar slide on each shoulder strap until the shoulder straps and waist belt are comfortably snug as shown in figure 6 and figure 7.
3. Bring leg strap BEHIND the leg then between the legs to the front. Leg straps can cross over or under the leg buckle strap as shown in figure 8.
Ensure that the smaller buckle is threaded correctly as shown in figure 3a.
INCORRECT THREADING OR ATTACHING OF THE BUCKLES COULD CAUSE SERIOUS INJURY OR DEATH!!
4. Insert smaller buckle through the larger buckle as shown in figure 9. Adjust leg strap buckle to fit as shown in
figure 10. Leg strap should be comfortably snug. Pull on the leg strap to ensure the buckle is secured with NO slippage.
Ensure that the smaller buckle is threaded correctly as shown in figure 3a.
INCORRECT THREADING OR ATTACHING OF THE BUCKLES COULD CAUSE SERIOUS INJURY OR DEATH!!
1. Attach and adjust the waist buckle figure 3 and 4. The buckle MUST be attached correctly as shown in figure 3a. Ensure the smaller buckle is
threaded correctly on the strap. Incorrect threading or attaching the buckle could result in serious injury or death!
4
3
5
3 BAR
SLIDE
6 7
89 10
3 BAR
SLIDE
LARGE
BUCKLE
FREE END COMPLETELY
THROUGH LARGE BUCKLE
3a
PUTTING ON THE FULL BODY HARNESS

1. Insert the Tether Strap end into the sewn looped end of
the Full Body Harness tether figure 11. Hold the Tether Strap
buckle in one hand and loop the free end completely around
the tree. See figure 12.
2. Thread the free end into the buckle as shown in figure 13
(Buckle Threading Diagram) and figure 14. The strap end
should be brought into the back-side of the buckle.
3. Loop the free end of the Tether Strap over the knurled
metal post on the buckle and route it out the backside as
shown in figure 13 and 15.
4. Orient buckle 90 degrees from tether connection. Pull the
free end snug and cinch down. See figure 16.
WARNING
!
When attaching the Tether Strap to the tree, be sure
the free end is fed completely through the tether
loop on the Full Body Harness as shown in figure 11.
ALWAYS ADJUST THE TETHER STRAP TO MINIMIZE
THE SLACK WHILE YOU ARE CLIMBING.
WARNING
!
NEVER be disconnected from the tree once you leave the
ground until you return safely back to the ground!!
WARNING
!
ALWAYS confirm the Tether Strap buckle has been
threaded properly before each use.
WARNING
!
ALWAYS confirm that the Tether Strap does not slip
when pulling on tether on Full Body Harness! DO NOT
USE if the Tether Strap slips through the buckle!
WARNING
!
DO NOT USE unless the Tether Strap has at least 5”
of free end strap remaining after you have secured
the Tether Strap to the tree!
12
TREE
Buckle Free End
5” of Strap
Remaining
MINIMUM!
BUCKLE
TREE
BUCKLE THREADING DIAGRAM
13
14 15 16
PG 5
11
SEWN TETHER
LOOP
ATTACHING THE TETHER STRAP TO THE FULL BODY HARNESS & TO THE TREE.

Using the Full Body Harness (SU18195) and
Tether Strap (SU18194)
1. Before climbing, position the Tether Strap as high on the
tree as possible while still allowing yourself enough slack to
sit on the treestand climbing bar or seat. The Tether Strap
should be loose enough to provide you with slack but not so
loose that it slides down the tree while climbing. The Tether
Strap will move with you while ascending or descending the
tree. See figure 17.
2. While climbing, adjustments to the Tether Strap to the
tree should be frequent and coordinated with treestand
movement to maintain the least amount of slack in the
Tether Strap that will allow for climbing. Repeat Steps 1 and
2 until you are at your hunting height.
It is unnecessary to
be higher than fifteen (15) feet off the ground.
3. When you achieve your hunting height, position the Tether
Strap so that the tether on Full Body Harness is snug while in
a seated position. See figure 18. Cinch the strap tight to the
tree making sure there are no twists in the webbing. Pull
down on the tether sewn to the Full Body Harness to ensure
the Tether Strap is tight against the tree. See figure 19.
18 19
17
CLIMBING TREESTANDS
5
1. Carefully climb the ladder using three points of contact.
2. Upon arrival to foot platform, secure Tether Strap (previously threaded through tether on Full Body Harness) to the tree. Cinch the strap tight
to the tree making sure there are no twists in the webbing. Pull down on the harness tether to ensure the Tether Strap is tight. Ensure the tether
end of Full Body Harness is snug while in a seated position. figures 18 - 19.
PRACTICE SAFE & PROPER USE AT GROUND LEVEL WITH TREESTAND AND FBFAHS BEFORE USING IN AN ELEVATED POSITION!
LADDER TREESTANDS
6
WARNING
!
USE EXTREME CAUTION while ascending or
descending the ladder. TAKE YOUR TIME and do not
hurry.
Always maintain three points of contact when you
climb the ladder section of this stand. Always lean
forward as you climb.
OTHER CLIMBING OPTIONS FOR LADDER TREESTANDS
When using a ladder treestand, we recommend using the “Safety Line” or secondary safety rope to increase your safety during the ascent and
descent. The climbing system consists of a 30’ rope with prusik knot that enables constant connection between your harness tether and the rope
while you climb the ladder. The prusik knot can be slid up or down the rope as you climb, moving your connection point as you go.
See the Summit Climbing System on the web at: www.summitstands.com
PG 6 www.summitstands.com

FIXED POSITION TREESTANDS (LINEMAN’S BELT USE)
7
If you purchased a Summit fixed position treestand, you
received two (2) Lineman’s Belt Straps/Tether Strap. Both
straps are identical and can either be used as a Lineman’s Belt
or Tether Strap.
Your harness has two loops sewn on the sides of the
harness belt. These loops allow you to use the harness with
a Lineman’s-style climbing belt. This will assist you while
ascending to and descending from your treestand, installing
or removing climbing sticks and installing or removing your
fixed position treestand. THE USE OF A LINEMAN’S BELT IS
REQUIRED WHEN USING, INSTALLING OR REMOVING ANY
FIXED POSITION TREESTAND.
ATTACHING YOUR LINEMAN’S BELT TO YOUR HARNESS
1. Insert the Lineman’s Belt (non-buckle end) through the sewn
loop on the FBFAHS Summit Harness located on the waist belt
as shown in figure 20.
2. Bring the strap around your back and thread it through
the opposite sewn loop on the waist belt. See figure 21.
3. Wrap the Lineman’s Belt around the tree and thread it
through the buckle as shown in figure 22 and in the Buckle
Threading Diagram 13 on Page 6.
USING YOUR LINEMAN’S BELT WHILE CLIMBING
1. Before climbing, insert the Tether Strap end into the sewn
looped end of the Full Body Harness as shown in page 6,
figure 11.
2. As you ascend and descend the tree you will be able to stay attached to your Full Body Harness by
using the second Lineman’s Belt/Tether Strap.
3. To adjust the climbing belt, pull on the loose free end to tighten and lift up on the buckle to
lengthen. See figure 23 and figure 24.
4. If you encounter branches or limbs, you will alternate from Lineman’s Belt to Tether Strap. Stop
below the obstruction. While supporting your weight with the Lineman’s Belt, loop the Harness Tether
Strap around the tree (ensuring that it runs through the Sewn Tether Loop on the harness (page 6,
figure 11) and connect the buckle (figure 13) above the obstruction. NEVER BE DISCONNECTED
FROM THE TREE AT ANY TIME!
5. Orient buckle 90 degrees from tether connection. Pull the free end snug and cinch down. Pull down
on the Full Body Harness tether to ensure the Tether Strap is tight against the tree.
6. Once your Full Body Harness is connected to the Tether Strap, then and only then can you release
your Lineman’s Belt, remove it, relocate it above the obstruction and reattach using the steps above.
7. Repeat this process as often as needed. Alternating between the Lineman’s Belt and Harness Tether
while ALWAYS staying connected to one or the other or both.
TRANSITIONING FROM YOUR LINEMAN’S BELT TO YOUR HARNESS
1. Stay connected to tree at all times!! Upon arrival at the foot platform, secure the second Lineman’s Belt/Tether Strap (which is previously
threaded through the sewn looped tether of the Full Body Harness) to the tree above the fixed stand. Now being connected by the tether of the
Full Body Harness, disconnect Lineman’s Belt and move up the climbing aide. If you need to readjust the Tether strap, re-attach the Lineman’s
Belt to the tree. Step down onto foot platform from your climbing aide. Practice at ground level. NEVER BE DISCONNECTED FROM THE TREE
AT ANY TIME FOR ANY REASON!
2. Position the Tether Strap as high as possible while still allowing you room to sit comfortably in the treestand seat. Cinch the strap tight to
the tree making sure there are no twists in the webbing. Pull down on the Full Body Harness tether to ensure the Tether Strap is tight against
the tree. The length of the harness tether must be minimized at all times. It should be adjusted so that it is above the head with no slack (snug)
in the sitting position. (See figure 18)
OTHER CLIMBING OPTIONS FOR FIXED POSITION STANDS
When using a fixed position stand, we recommend using the “Safety Line” or secondary safety rope to increase your safety during the ascent
and descent. The climbing system consists of a 30’ rope with prusik knot that enables constant connection between your harness tether and the
rope. The prusik knot can be slid up or down the rope as you climb. See the Summit Climbing System on the web at: www.summitstands.com
WARNING
!
The use of a Lineman’s Belt is required when installing,
removing or using any xed position treestand.
SEWN HARNESS
LOOPS
20 21
23
24
22
RUN BELT AROUND BACK
PG 7

SUSPENSION RELIEF STRAP (SRS)
8
Suspension trauma or blood pooling can occur when suspended motionless in a harness for periods of
time. This can lead to unconsciousness and death.
1. Retrieve the Suspension Relief Strap (SRS) from the storage
pouch on the side of the harness. See figure 25.
2. One end of the SRS strap (shown in green) will be pre-
attached to your harness shown in figure 26 position A.
3. Tie the other end of the SRS to the harness belt loop as show in figure 26 position B. Adjust the SRS so the large loop it forms is just above
the ankles - figure 27.
4. Put both feet in the loop and stand up to relieve the pressure from the
harness leg straps. See figure 28 and figure 29. NOTE: Readjust the length of
the loop if considerable pressure is still felt on the leg straps.
Self-extraction may be necessary in the unfortunate situation that
A) No one knows your location B) Your communication efforts are exhausted C)
You’re confident that you have the strength, dexterity and ability to perform self-extraction D) You decide this is your “absolute last resort”.
It is necessary to carry a device to assist with this self-extraction. Simple devices such as screw-in steps or a rope “Tree Descender” (available
from Summit) will allow you to remove the weight from your harness. This may enable you to return to the treestand / ladder / climbing steps
or slowly descend the tree. Practice and review your relief / recovery / escape plans at ground level prior to each hunt. If plans are not in place,
HUNT FROM THE GROUND!!
Several optional products/systems are available that offer self-recovery or self extraction from a fall when suspended in a harness. Returning
to the ground obviously also relieves suspension trauma and some systems automatically descend the user while others allow user control.
If one of these products/systems is selected for use as an additional safety precaution against prolonged suspension, be sure to follow the
manufacturer’s directions for safe use.
WARNING
!
If you have to hang in the tree before help arrives,
you need to exercise your legs by pushing off from
the tree, raising your knees to your chest or by
using the attached Suspension Relief Strap.
WARNING
!
Prolonged harness suspension may be fatal. If
rescue personnel cannot be notified, you must
have a plan to recover / escape before hunting.
It is very important that someone knows your hunting location and time of return. It is also very
important that you carry (on your person) emergency communication device such as a cell phone (that
has cell service from your hunting location), two-way radio, whistle, signal flare or preferably a PLD
(Personal Locator Device - FCC approved July, ‘03). When triggered, a PLD will transmit an emergency
signal to local rescue teams identifying your location via satellite GPS coordinates. PLD’s may be
purchased at Wilderness outfitters or on the internet. If stated device(s) is not present, HUNT FROM THE
GROUND!!
WARNING
!
This Suspension Relief Strap MUST be on your person
and accessible while using your FBFAHS!!! The steps
below assume you are hanging in a FBFAHS after a
fall.
25
2927 28
A
SRS
STRAP
B
26

!
NE PAS LIRE ET NE PAS SUIVRE LES AVERTISSEMENTS ET
LES INSTRUCTIONS DU MANUFACTURIER CONSTITUE UNE
MAUVAISE UTILISATION DU PRODUIT ET PEUT ENTRAÎNER
DE SÉRIEUSES BLESSURES OU LA MORT!!
AVERTISSEMENT
FHARNAIS DE CORPS COMPLET AVEC
SYSTÈME D’ARRÊT DE CHUTE (HCCSAC)
SU18195-A & SU18195-B
© 2016 Summit Treestands, LLC | 715 Summit Dr. Decatur, AL 35601
PH#: (800) 353-0634 | www.summitstands.com
POIDS MAXIMUM:
159 KG
UTILISÉ AVEC TOUS LES MODÈLES SUM-
MIT MIRADOR ET PRODUITS SEULE-
MENT!
N’EXCÉDEZ JAMAIS LA LIMITE DE POIDS
MAXIMALE. CECI INCLUS L’UTILISATEUR
AINSI QUE TOUT L’ÉQUIPEMENT TRANS-
PORTÉ SUR LE MIRADOR.
• LISEZ, SUIVEZ ET COMPRENEZ TOUS LES AVERTISSEMENTS ET TOUTES LES INSTRUCTIONS AVANT L’UTILISATION. VÉRIFIEZ TOUTES LES DATES D’EXPIRATIONS SUR LES
ÉTIQUETTES AVANT CHAQUE UTILISATION. SI VOUS NE COMPRENEZ PAS ENTIÈREMENT L’UTILISATION SÉCURITAIRE ET CORRECTE DU HARNAIS DE CORPS COMPLET
AVEC SYSTÈME D’ARRÊT DE CHUTE (HCCSAC) OU DU MIRADOR, CHASSEZ À PARTIR DU SOL! NE PAS SUIVRE TOUS LES AVERTISSEMENTS ET TOUTES LES INSTRUCTIONS
INDIQUÉS PEUT ENTRAÎNER DE SÉRIEUSES BLESSURES OU LA MORT! IL EST REQUIS DE SURVEILLER ET COMPRENDRE LE DVD FOURNI AVEC CE PRODUIT AINSI QUE LES
AVERTISSEMENTS DE SÉCURITÉ ET LES INSTRUCTIONS AU : www.summitstands.com/safety-videos
• VOUS DEVEZ TOUJOURS VÉRIFIER LE MIRADOR ET LE HCCSAC POUR TOUT DOMMAGE OU USURE AVANT CHAQUE UTILISATION! SI VOUS REMARQUEZ DES DOMMAGES OU
DE L’USURE OU SI L’ÉTIQUETTE INDIQUE UNE DATE D’EXPIRATION EXPIRÉE, ARRÊTEZ L’UTILISATION IMMÉDIATEMENT ET CHASSEZ À PARTIR DU SOL.
• PORTEZ TOUJOURS UN HCCSAC QUI RÉPOND RIGOUREUSEMENTAUX STRANDARDS DE L’INDUSTRIE TELS QUE RECONNUS PAR LE TMA. PORTEZ UN HCCSAC À TOUTES
LES FOIS QUE VOUS QUITTEZ LE SOL, EN MONTANT ET EN DESCENDANT. LES COURROIES À UNE BRETELLE ET LES HARNAIS POUR LE TORSE NE SONT PLUS PERMIS ET
NE DEVRAIENT PAS ÊTRE UTILISÉ! NE PAS UTILISÉ UN HCCSAC PEUT ENTRAÎNER DE SÉRIEUSES BLESSURES OU LA MORT!
• LA LONGUEUR DE LA COURROIE D’ANCRAGE DU HARNAIS DEVRAIT ÊTRE RÉDUITE AU MINIMUM EN TOUT TEMPS. ELLE DEVRAIT ÊTRE AJUSTÉE POUR QU’ELLE SOIT
AU DESSUS DE LA TÊTE SANS EXCÉDENT DANS LA POSITION ASSISE ET UN MINIMUM DE JEU DEVRAIT ÊTRE DISPONIBLE LORS DE L’ASCENSION. NE PAS SUIVRE CES
INSTRUCTIONS POURRAIT ENGENDRER UNE SUSPENSION SANS POSSIBILITÉ DE RÉCUPÉRATION VERS LE MIRADOR. SOYEZ VIGILANT EN CE QUI A TRAIT AUX RISQUES
RELIÉS À UNE SUSPENSION DANS UN HCCSAC ET AU FAIT QU’UNE SUSPENSION PROLONGÉE DANS UN HARNAIS PEUT ÊTRE MORTELLE.
• VEUILLEZ TOUJOURS INFORMER UNE TIERCE PERSONNE DE VOTRE EMPLACEMENT DE CHASSE EN CAS D’URGENCE. SI PERSONNE N’EST AU COURANT DE VOTRE
EMPLACEMENT DE CHASSE ET QUE LA COMMUNICATION EST INFRUCTUEUSE, VOUS DEVEZ AVOIR UN PLAN PERSONNEL POUR RÉCUPÉRER OU VOUS LIBÉRER AVANT
L’ASCENSION DANS L’ARBRE. UNE SUSPENSION PROLONGÉE DANS UN HARNAIS PEUT ÊTRE MORTELLE. IL EST IMPORTANT DE FAIRE DES EXERCICES AVEC LES JAMBES
EN POUSSANT SUR L’ARBRE OU EN FAISANT D’AUTRES GENRES D’EXERCICES AVEC LES JAMBES POUR ÉVITER L’ACCUMULATION DE SANG LORS D’UNE SUSPENSION. LES
CHASSEURS POSSÉDANT DES CONDITIONS PHYSIQUES DIFFÉRENTES AURONT BESOIN DE PLANS DIFFÉRENTS POUR RÉCUPÉRER OU SE LIBÉRER ET AINSI ÉVITER LES
EFFETS D’UNE SUSPENSION PROLONGÉE. AYEZ UN PLAN PERSONNEL ET PRATIQUEZ-LE EN PRÉSENCE D’UN ADULTE RESPONSABLE AVANT DE QUITTER LE SOL. AUCUN
PLAN DE RÉCUPÉRATION OU DE LIBÉRATION NE PEUT FONCTIONNER POUR TOUS LES CHASSEURS, POUR TOUT TYPE D’ARBRE ET DANS TOUTES LES CIRCONSTANCES.
SEUL VOUS POUVEZ DÉTERMINER LE MEILLEUR PLAN POUR VOTRE SITUATION ET VOUS DEVEZ AVOIR CE PLAN AVANT DE QUITTER LE SOL. CHASSEZ À PARTIR DU SOL SI
VOUS N’AVEZ PAS LA POSSIBILITÉ DE RÉCUPÉRER OU DE VOUS LIBÉRER D’UNE SUSPENSION.
• PRATIQUEZ L’UTILISATION D’UN HCCSAC AU NIVEAU DU SOL EN PRÉSENCE D’UN ADULTE RESPONSABLE POUR EN COMPRENDRE SON ULISATION CORRECTE ET POUR
EXPÉRIMENTER LA SENSATION D’ÊTRE SUSPENDU AVANT L’UTILISATION DANS UN ENVIRONNEMENT DE CHASSE.
• SI VOUS AVEZ DES QUESTIONS OU DES INQUIÉTUDES QUANT AUX INSTRUCTIONS, AVERTISSEMENTS OU L’UTILISATION CORRECTE “ARRÊTEZ” ET CONTACTEZ LE
MANUFACTURIER. N’UTILISEZ PAS CE PRODUIT JUSQU’À CE QUE VOUS COMPRENIEZ ENTIÈREMENT SON UTILISATION SÉCURITAIRE ET CORRECTE. GARDEZ TOUS LES
AVERTISSEMENTS, INSTRUCTIONS ET DVD POUR UNE UTILISATION ULTÉRIEURE SI NÉCESSAIRE, POUR TOUTE PERSONNE QUI EMPRUNTRERA VOTRE MIRADOR/HCCSAC
OU POUR TRANSMETTRE À QUICONQUE ACHETERAIT CES PRODUITS. UTILISEZ TOUS LES DISPOSITIFS DE SÉCURITÉ FOURNIS AVEC LE MIRADOR ET LE HCCSAC.
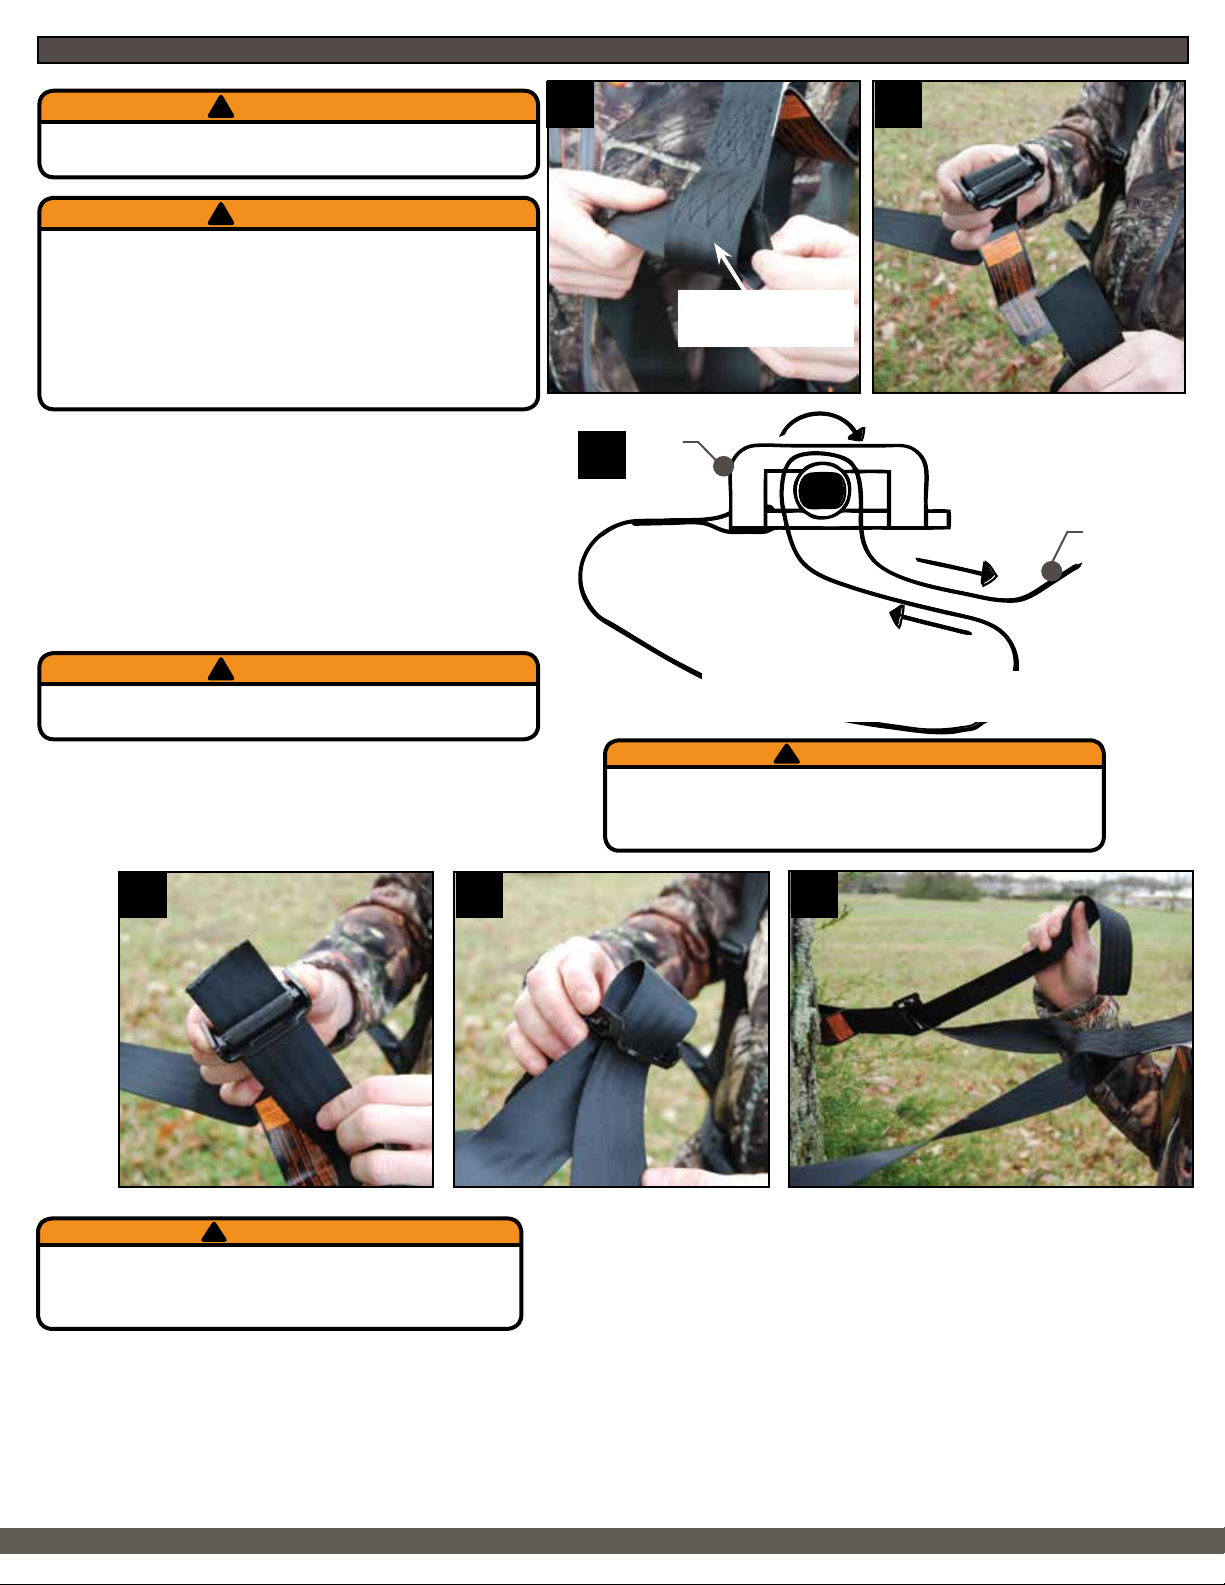
• VOUS DEVEZ PORTER UN DISPOSITIF D’AIDE À LA SUSPENSION EN TOUT TEMPS LORS DE L’UTILISATION DU HARNAIS. CE DISPOSITIF PERMET À L’UTILISATEUR DE
SOULAGER LE POIDS QUI PÈSE SUR LES MEMBRES INFÉRIEURS LORS D’UNE SUSPENSION DANS LE HARNAIS CE QUI AIDERA À LA CIRCULATION DU SANG DANS LES
JAMBES ET ALLÈGERA LE TRAUMA DÛ À LA SUSPENSION (ACCUMULATION DE SANG) OU PERMETTRA LA DESCENTE VERS LE SOL. ASSUREZ-VOUS DE SUIVRE LES
INSTRUCTIONS DU MANUFACTURIER QUANT À L’UTILISATION SÉCURITAIRE D’UN DISPOSITIF D’AIDE À LA SUSPENSION.
• PLUSIEURS PRODUITS/SYSTÈMES OPTIONELS QUI SERVENT À L’AUTO-RÉCUPÉRATION OU À L’AUTO-EXTRACTION LORS D’UNE CHUTE LORSQUE SUSPENDU DANS UN
HARNAIS SONT DISPONIBLES. DES SYSTÈMES DESCENDENT AUTOMATIQUEMENT L’UTILISATEUR TANDIS QUE D’AUTRES PERMETTENT LE CONTRÔLE PAR L’UTILISATEUR.
UN DE CES PRODUITS/SYSTÈMES POURRAIT ÊTRE CONDIDÉRÉ À TITRE DE PRÉCAUTION ADDITIONNELLE POUR PRÉVENIR UNE SUSPENSION PROLONGÉE OU UN
TRAUMATISME LIÉ À UNE SUSPENSION. ASSUREZ-VOUS DE SUIVRE LES INSTRUCTIONS DU MANUFACTURIER SUR L’UTILISATION SÉCURITAIRE DE CES PRODUITS/
SYSTÈMES.
• SI UNE CHUTE SURVIENT LORSQUE VOUS PORTEZ LE HCCSAC, PRENEZ LE TEMPS DE PRENDRE LA BONNE DÉCISION EN CE QUI A TRAIT À L’ACTION REQUISE. IL EST
IMPORTANT DE SE SOUVENIR DE “NE PAS PANIQUER”. RESTEZ CALME ET METTEZ EN OEUVRE VOTRE PLAN DE SAUVETAGE, DE SECOURS ET DE RÉCUPÉRATION TEL QUE
PRATIQUÉ.
• N’UTILISEZ JAMAIS LE HCCSAC OU LE MIRADOR SI VOUS ÊTES MALADE, SI VOUS AVEZ DES NAUSÉES OU SI VOUS ÊTES ÉTOURDI, OU SI VOUS AVEZ UNE CONDITION
MÉDICALE QUI POURRAIT POSER PROBLÈME PAR EXEMPLE UNE MALADIE DU COEUR, DES ARTICULATIONS QUI BLOQUENT, DES VERTÈBRES QUI SE FUSIONNENT ETC OU
SI VOUS ÊTES FATIGUÉ.
• N’UTILISEZ PAS LE HCCSAC OU LE MIRADOR SI VOUS ÊTES SOUS L’INFLUENCE DE L’ALCOOL OU DE DROGUES (INCLUANT UNE PRESCRIPTION). CECI INCLU LES
MÉDICAMENTS ACHETÉS AU COMPTOIR QUI POURRAIENT ALTÉRER VOTRE JUGEMENT, VOTRE ÉTAT MENTAL OU VOTRE BIEN-ÊTRE. CONSULTEZ VOTRE MÉDECIN AVANT
L’UTILISATION DU PRODUIT POUR VOUS ASSURER DE L’UTILISATION SÉCURITAIRE ET CORRECTE.
• N’UTILISEZ JAMAIS UN MIRADOR OU UN HCCSAC PAR MAUVAIS TEMPS, PAR EXEMPLE S’IL PLEUT, S’IL Y A DES ÉCLAIRS, UNE TEMPÊTE DE VENT, DE LA NEIGE, DE LA GRÊLE,
DE LA NEIGE FONDUE OU DES CONDITIONS GLACÉES. TERMINEZ VOTRE CHASSE ET DESCENDEZ AU SOL SI CES CONDITIONS SE PRÉSENTENT.
• N’UTILISEZ JAMAIS UN ARBRE MORT, UN ARBRE PENCHÉ OU MALADE OU UN ARBRE AVEC UNE ÉCORCE QUI SE DÉTACHE, OU UN POTEAU D’UTILITÉ PUBLIQUE.
• AYEZ TOUJOURS TROIS (3) POINTS DE CONTACT LORSQUE VOUS GRIMPEZ DANS UN MIRADOR À ÉCHELLE OU SI VOUS GRIMPEZ AVEC TOUT AIDE À LA MONTÉE. NE VOUS
SÉPAREZ JAMAIS DE L’ARBRE LORSQUE VOUS PASSEZ À L’AIDE À LA MONTÉE JUSQU’AU MIRADOR FIXE. PRATIQUEZ-VOUS AU SOLAVANT L’UTILISATION AU NIVEAU ÉLEVÉ.

PG 10 www.summitstands.com
COMPOSANT AVERTISSEMENTS
1
HARNAIS DE CORPS COMPLET AVEC SYSTÈME D’ARRÊT DE CHUTE
WARNING
!
NE PAS RETIRER MIRADOR AVERTISSEMENTS OU
MIRADOR COMPOSANT AVERTISSEMENTS DE
PRODUITS!
CEINTURE D’ASCENSION / COURROIE D’ANCRAGE

REMPLACEZ VOTRE HARNAIS DE CORPS COMPLET AVEC
SYSTÈME D’ARRÊT DE CHUTE (HCCSAC) À TOUTES LES CINQ
(5) ANNÉES (OU AVANT) OU:
• SI UNE PARTIE DU HCCSAC A ÉTÉ HEURTÉ LORS DU CHARGEMENT OU
APRÈS AVOIR ARRÊTÉ UNE CHUTE.
• SI UNE PARTIE DU HCCSAC A ÉTÉ SOUMIS À
UNE SURCHAGE POUR LAQUELLE IL N’A PAS ÉTÉ CONÇU CHASSEZ À
PARTIR DU SOL JUSQU’À CE QUE VOUS COMPRENIEZ L’UTILISATION
SÉCURITAIRE ET CORRECTE DU HCCSAC!!
• SI VOUS DÉTECTEZ DE L’EFFILOCHAGE, DES DÉCHIRURES, DES FISSURES, DE LA CORROSION OU TOUT AUTRE TYPE DE DOMMAGE SUR
TOUTE PARTIE DU HCCSAC.
• SI LA DATE D’EXPIRATION SUR L’ÉTIQUETTE EST EXPIRÉE.
PG 11
1 2
Appellez le 800-353-0634 ou visitez le site web à l’adresse http://www.summitstands.
com/contactus/ si vous avez des questions.
CONTENUS
2
REMPLACEMENT DU HARNAIS
3
UTILISATION
4
S’il y a eu chute, vous devez remplacer le harnais
immédiatement en contactant Summit Treestands,
LLC.
Ce HCCSAC a été conçu pour être utilisé à titre
de dispositif de sécurité pour la chasse effectué à
partir d’un mirador élevé. Tout autre utilisation est
STRICTEMENT INTERDIT!
!
AVERTISSEMENT
ASSUREZ-VOUS DE NE JAMAIS
PERMETTRE À LA COURROIE DE
L’ENCRAGE D’ÊTRE SOUS VOTRE
MENTON OU AUTOUR DE VOTRE COU!
!
AVERTISSEMENT
HCCSAC Harnais de Summit SU18195-A (utilisé avec les miradors auto-grim-
pant et les miradors à échelle)
• (1) HARNAIS DE CORPS COMPLET (SU18195)
• (1) CEINTURE D’ASCENSION/COURROIE D’ANCRAGE (SU18194)
•• LA CEINTURE D’ASCENSION ET LA COURROIE D’ANCRAGE DOIVENT ÊTRE
CHANGÉES À CHAQUE ANNÉE.
WARNING
!
• Vous devez toujours vérifier que les courroies pour les jambes sont attachées autour des jambes et qu’elles sont bouclées
avant chaque utilisation!
• Assurez-vous que la courroie d’ancrage est attachée correctement à la sangle du harnais de corps complet!
• AFIN DE PRÉVENIR UN DANGER D’ÉTOUFFEMENT, GARDEZ LA SANGLE ÉLOIGNÉE DU COU ET ASSUREZ-VOUS QUE LA
SANGLE NE FASSE PAS UNE BOUCLE SOUS LES BRAS tel qu’illustré à la figure 1.
• Si vous utilisez le harnais sous vos vêtements de chasse, assurez-vous que vos vêtements de chasse ne sont pas serrés autour de
votre cou. Le harnais va glisser vers le haut lors d’une chute, tel qu’illustré à la figure 2.
• Vérifiez ce harnais ainsi que toutes les courroies pour déceler de l’effilochage, des déchirures, des fissures, de la corrosion, de
l’usure ou tout autre type de dommage avant chaque utilisation! Si vous remarquez ces dommages ou de l’usure, arrêtez
l’utilisation immédiatement et chassez à partir du sol!
• NE PLACEZ JAMAIS LA BOUCLE DE LA COURROIE D’ANCRAGE À 180 DEGRÉS (À L’ARRIÈRE DE L’ARBRE) À PARTIR DU POINT
D’ATTACHE DE LA COURROIE D’ANCRAGE.
• Positionnez toujours la boucle de la courroie d’ancrage à 90 degrés à partir du point d’attache de la courroie d’ancrage.
HCCSAC Harnais de Summit SU18195-B (utilisé avec des miradors fixes)
• (1) HARNAIS DE CORPS COMPLET (SU18195)
• (2) CEINTURE D’ASCENSION/COURROIE D’ANCRAGE (SU18194)
•• LA CEINTURE D’ASCENSION ET LA COURROIE D’ANCRAGE DOIVENT ÊTRE
CHANGÉES À CHAQUE ANNÉE.

2. Passez vos bras au travers des courroies d’épaules tel un manteau. Assurez-vous que les courroies d’épaules ne s’entrecroisent pas et qu’elles ne sont pas tordues.
Ajustez les trois glissières sur chaque courroie d’épaule jusqu’à ce que les courroies d’épaules et la ceinture à la taille soient ajustées confortablement tel qu’illustré
aux figures 6 et 7.
3. aites passer la courroie pour les jambes à l’arrière de la jambe et puis entre les jambes jusqu’à l’avant. Les courroies pour les jambes peuvent se croiser par-dessus
et sous la boucle de la courroie pour les jambes tel qu’illustré à la figure 8.
Assurez-vous que la plus petite boucle est enfilée correctement tel qu’illustré à la figure 3a.
UN ENFILAGE OU UNE ATTACHE INCORRECTE DES BOUCLES PEUT ENGENDRER DE SÉRIEUSES BLESSURES OU LA MORT!!
4. Faites passer la plus petite courroie pour les jambes au travers de la plus grosse boucle tel qu’illustré à la figure 9. Ajustez la boucle de la courroie pour les jambes
tel qu’illustré à la figure 10. La courroie pour les jambes devrait être ajustée confortablement. Tirez sur la courroie pour les jambes afin de vous assurer qu’elle est
fixée et qu’elle ne glisse pas.
Assurez-vous que la plus petite boucle est enfilée correctement tel qu’illustré à la figure 3a.
UN ENFILAGE OU UNE ATTACHE INCORRECT DES BOUCLES PEUVENT ENGENDRER DE SÉRIEUSES BLESSURES OU LA MORT!!
PG 12 www.summitstands.com
43
5
LES TROIS
GLISSIÈRES
SUR CHAQUE
COURROIE
6 7
89 10
1. Attachez et ajustez la boucle de ceinture tel qu’illustré aux figures 3 et 4. La boucle DOIT être attachée correctement tel qu’illustré à la figure 3a. Assurez-vous
que la plus petite boucle est enfilée correctement sur la courroie. Une boucle incorrectement enfilée peut engendrer de sérieuses blessures ou la mort!
LES TROIS
GLISSIÈRES
SUR CHAQUE
COURROIE
LA GROSSE
BOUCLE
LIBEREZ LE BOUT ENTIÈREMENT AU
TRAVERS DE LA GROSSE BOUCLE.
3a
METTRE LE HARNAIS

1. Insérez le bout de la courroie d’ancrage dans le bout en
boucle cousu du harnais de corps complet tel qu’illustré à la
figure 11. Tenez la boucle de la courroie d’ancrage dans une
main et faites passer le bout libre autour de l’arbre. Voir la
figure 12.
2. Enfilez le bout libre de la boucle tel qu’illustré à la figure
13 (Diagramme de filetage de la boucle) et figure 14. Le
bout de la courroie devrait être amené à l’endos de la boucle.
3. Faites passer le bout de la courroie d’ancrage par-dessus
puis par derrière le poteau de métal moleté de la boucle tel
qu’illustré aux figures 13 et 15.
4. Orientez la boucle à 90 degrés à partir du point de contact
de l’ancrage. Tirez sur le bout pour l’ajuster et tirez vers le
bas. Voir la figure 16.
PG 13
TREE
Buckle LANIÈRE
RESTANTE
MINIMUM
DE 13 CM
BOUCLE
ARBRE
DIAGRAMME D’ENFILAGE DE LA
BOUCLE
13
Lorsque vous attachez la courroie d’ancrage à l’arbre,
assurez-vous que le bout est entièrement passé au
travers de la boucle du harnais de corps complet tel
qu’illustré à la figure 11.
AJUSTEZ TOUJOURS LA COURROIE D’ANCRAGE
AFIN DE MINIMISER LE JEU DE CELLE-CI TANDIS
QUE VOUS MONTEZ.
!
AVERTISSEMENT
TOUJOURS vous assurer que la boucle de la
courroie de sécurité à été filetée correctement
avant l’utilisation.
!
AVERTISSEMENT
TOUJOURS vous assurez que la courroie d’ancrage
ne glisse pas lorsque vous tirez sur l’ancrage d’un
harnais de corps complet! NE PAS UTILISER si la
courroie d’ancrage glisse sur la boucle!
!
AVERTISSEMENT
NE vous séparez JAMAIS de l’arbre à partir du moment
où vous quittez le sol et ce jusqu’à votre retour
sécuritaire au sol!!
!
AVERTISSEMENT
NE PAS UTILISER si la courroie d’ancrage n’a pas
au moins 13 cm d’excédent suite à l’attache de la
courroie d’ancrage à l’arbre!
!
AVERTISSEMENT
1211
SEWN TETHER
LOOP
14 15 16
ATTACHER LA COURROIE DE SÉCURITÉ DU MIRADOR À L’ARBRE

PG 14 www.summitstands.com
Utilisation d’un harnais de corps complet
(SU18195) et d’une courroie d’ancrage
(SU18194)
1. Avant de monter, placez la courroie d’ancrage le plus haut
possible sur l’arbre tout en vous laissant la possibilité de vous
assoir sur la barre du mirador ou sur le siège. La courroie
d’ancrage doit être désserrée suffisamment pour vous
permettre de grimper dans l’arbre dans glisser. La courroie
d’ancrage se déplacera avec vous lors de l’ascension ou de la
descente. Voir la figure 17.
2. Des ajustements à la courroie d’ancrage devraient être
fréquents lors de l’ascension et devraient être coordonné
avec les mouvements du mirador afin de maintenir le moins
de jeu possible dans la courroie d’ancrage pour permettre
l’ascension. Répétez les étapes 1 et 2 jusqu’à ce que vous
atteignez la hauteur de chasse. Il n’est pas nécessaire d’être
plus haut que 4,6 mètres.
3. Lorsque vous serez à la hauteur de chasse, placez la
courroie d’ancrage de sorte que l’ancrage du harnais de
corps complet est bien ajusté lorsque vous serez assis, voir
la figure 18. TIrez sur la courroie pour qu’elle soit serrée sur
l’arbre tout en vous assurant qu’elle n’est pas tordue dans la
sangle. Tirez sur l’ancrage cousu sur l’arnais de corps complet
pour vous assurer que la courroie d’ancrage est serrée sur
l’arbre. Voir la figure 19.
18 19
17
MIRADOR AUTO-GRIMPANT
5
1. Grimpez prudemment dans l’échelle en utilisant trois points de contact.
2. Lors de l’arrivée sur la plateforme, attachez la courroie d’ancrage (enfilée au travers de l’ancrage du harnais de corps complet) à l’arbre. Tirez
sur la courroie afin qu’elle soit serrée sur l’arbre et assurez-vous qu’elle n’est pas tordue dans la sangle. Tirez sur le harnais vers le bas pour vous
assurer que la courroie d’ancrage est serrée. Assurez-vous que le bout de l’ancrage du harnais de corps complet est ajusté lorsque vous êtes assis.
Voir les figures 18 et 19.
PRATIQUEZ L’UTILISATION SÉCURITAIRE ET CORRECTE AU SOL AVEC LE MIRADOR ET LE HCCSAC AVANT L’UTILISATION À UN NIVEAU
ÉLEVÉ!
MIRADOR À ÉCHELLE
6
WARNING
!
FAITES PREUVE D’UNE PRUDENCE EXTRÊME lors
de l’ascension ou de la descente dans l’échelle. NE
VOUS PRESSEZ PAS.
Veuillez toujours vous assurer que vous avez trois
points de contact lors d’une ascension dans l’échelle.
Penchez vous toujours vers l’avant lors de l’ascension.
AUTRES FAÇON DE GRIMPER DANS UN MIRADOR À ÉCHELLE
Lors de l’utilisation d’un mirador à échelle, nous recommandons l’utilisation d’un ‘’système d’ascension’’ ou d’un câble de sécurité pour augmenter
votre sécurité lors de l’ascension et de la descente. Le système d’ascension est composé d’un câble de 9,2 mètres avec un noeud prusik qui permet
une attache constante entre l’ancrage de votre harnais et le câble lors de l’ascension dans l’échelle. Le noeud prusik peut être glissé vers le haut
ou vers le bas du câble lors de l’ascension tout en modifiant votre point de contact lors de l’ascension.
Voir le système d’ascension de Summit sur le web à l’adresse: www.summitstands.com

PG 15
MIRADOR FIXE (CEINTURES D’ASCENSION)
7
Si vous avez acheté un mirador fixe de Summit, vous avez reçu deux
(2) ceintures d’ascension/courroie d’ancrage. Les deux courroies sont
identiques et peuvent être utilisées à titre de ceinture d’ascension ou
courroie d’ancrage.
Votre harnais possède deux boucles cousues sur les côtés de la
ceinture du harnais. Ces boucles permettent l’utilisation du harnais
avec une ceinture d’ascension. Ceci vous facilitera les ascensions et les
descentes à partir de votre mirador, l’installation et l’enlèvement des
bâtons d’ascension et l’installation et l’enlèvement de votre mirador
fixe. L’UTILISATION D’UNE CEINTURE D’ASCENSION EST REQUISE
POUR L’UTILISATION, L’INSTALLATION OU L’ENLÈVEMENT D’UN
MIRADOR FIXE.
ATTACHÉ VOTRE CEINTURE D’ASCENSION À VOTRE HARNAIS
1. Insérez la ceinture d’ascension (bout sans boucle) au travers de la
boucle cousue sur le HCCSAC de Summit située sur la ceinture de la
taille tel qu’illustré à la figure 20.
2. Faites passer la courroie autour de votre dos et enfilée-la au travers
de la boucle cousue opposée sur la ceinture de la taille. Voir figure 21.
3. Faites passer la ceinture d’ascension autour de l’arbre et enfilez-la au
travers de la boucle tel qu’illustré à la figure 22 et sur le diagramme
13 d’enfilage de la boucle à la page 12.
ATTACHER VOTRE COURROIE D’ANCRAGE DU HARNAIS
1. Avant l’ascension, insérez le bout de la courroie d’ancrage dans la
boucle cousue du harnais de corps complet tel qu’illustré à la page
12, figure 11.
USILISATION DE VOTRE CEINTURE D’ASCENSION LORSQUE VOUS MONTEZ
1. Pour ajuster votre ceinture d’ascension, tirez sur le bout pour serrer et levez la boucle pour agrandir. Voir figure
23 et figure 24.
2. Lors de l’ascension et de la descente de l’arbre, vous serez attaché à l’aide du harnais de corps complet en utilisant
la deuxième ceinture d’ascension/courroie d’ancrage.
3. Si vous rencontrez des branches, vous devez alterner entre la ceinture d’ascension et la courroie d’ancrage.
Arrêtez avant l’obstruction. Pendant que vous supportez votre poids avec la ceinture d’ascension, faites passer
la courroie d’ancrage autour de l’arbre (tout en vous assurant qu’elle passe dans la boucle d’ancrage cousue du
harnais. (page 12, figure 11) et raccordez la boucle (figure 13) au-dessus de l’obstruction. SOYEZ TOUJOURS
ATTACHÉ À L’ARBRE EN TOUT TEMPS!
4. Dirigez la boucle à 90 degrés de la connexion de la sangle. Tirez le bout pour l’ajuster. Tirez sur la sangle du
harnais de corps complet vers le bas pour vous assurer que la courroie d’ancrage est serrée sur l’arbre.
5. Votre harnais de corps complet étant connecté à la courroie d’ancrage, votre ceinture d’ascension peut à ce
moment seulement être détachée puis enlevée. Transférez votre ceinture d’ascension au-dessus de l’obstruction et
attachez-la de nouveau en utilisant les étapes ci-dessus.
6. Répétez ce procédé aussi souvent que requis. Alternez entre la ceinture d’ascension et la sangle du harnais tout
en étant attaché EN TOUT TEMPS à l’un ou l’autre ou au deux.
TRANSITION ENTRE VOTRE CEINTURE D’ASCENSION ET VOTRE HARNAIS
1. Demeurez attaché à l’arbre en tout temps!! À votre arrivée sur la plateforme, fixez la seconde ceinture d’ascensiont/courroie d’ancrage (qui a été préalablement
cousue au travers de la boucle sanglée du harnais de corps complet) à l’arbre au-dessus du mirador fixe. Maintenant que vous êtes attaché à la sangle du harnais de
corps complet, détachez la ceinture d’ascension et montez dans le support de montée. Si vous devez ajuster la courroie d’ancrage, attachez de nouveau la ceinture
d’ascension à l’arbre. Descendez sur la plateforme à partir du support de montée. Pratiquez au niveau du sol. NE SOYEZ JAMAIS DÉTACHÉ DE L’ARBRE EN TOUT
TEMPS ET POUR AUCUNE RAISON.
2. Placez la courroie d’ancrage le plus haut possible tout en étant confortablement assis sur le siège du mirador. Serrez la courroie sans qu’elle soit tordue dans la
sangle. Tirez sur l’ancrage du harnais de corps complet pour vous assurer que la courroie d’ancrage soit serrée sur l’arbre. La longueur de la sangle du harnais doit
être minimisée en tout temps. Elle devrait être ajustée de sorte qu’elle soit plus haute que votre tête sans excédent lorsque vous êtes assis (Voir figure 18).
AUTRES OPTIONS POUR L’ASCENSION POUR LES MIRADORS FIXES
Lors de l’utilisation de mirador fixe, nous recommandons l’utilisation du ‘’système d’ascension’’ ou d’un câble de sécurité afin d’augmenter votre sécurité lors
d’ascension ou de descente. Le système d’ascension inclut un câble de 9,2 mètres avec un noeud prusik qui permet un contact constant entre la courroie d’ancrage
du harnais et le câble. Le noeud prusik peut être glissé vers le haut ou vers le bas du câble lors de l’ascension.
Voir le système d’ascension de Summit sur le web à l’adresse: www.summitstands.com
WARNING
!
L’utilisation d’une ceinture d’ascension est requise lors de
l’installation, de l’enlèvement ou de l’utilisation de tout mirador
xe.
SEWN HARNESS
LOOPS
20 21
23
24
22
RUN BELT AROUND BACK

2927 28
Un traumatisme de suspension ou des problèmes de circulation du sang peuvent survenir lors de suspension sans
mouvement dans un harnais pour une période de temps. Ceci peut engendrer une perte de connaissance ou la mort.
1. Prenez la courroie du système de suspension de secours (SRS) dans
la pochette située sur le côté du harnais. Voir figure 25.
2. Un bout de la courroie SRS sera pré-attaché à votre harnais tel
qu’illustré à l’emplacement A de la figure 26.
3. Attachez le bout de la courroie (SRS) à la boucle de la ceinture du
harnais tel qu’illustré à la figure 26 position B. Ajustez le SRS de sorte
que la boucle formée soit juste au-dessus des chevilles - figure 27.
4. Placez chaque pied dans la boucle et levez-vous pour enlever la
pression des courroies de jambes du harnais. Voir figure 28 et 29.
NOTE: Ajustez de nouveau la longueur de la boucle si une forte pression est ressentie dans les courroies de jambes.
Une auto-extraction sera peut-être nécessaire advenant une des situations malheureuses
suivantes A) Personne ne connaît votre localisation, B) Vous avez épuisé tous vos moyens
de communication, C) Vous avez confiance en votre capacité physique, votre dextérité et
votre habileté pour vous libérer et D) vous décidez que ceci est votre dernier recours. Il
est nécessaire d’avoir en votre possession un dispositif pour aider à l’auto-extraction. Des
dispositifs simples tels des marches vissées ou une corde ‘’Tree Descender’’ (disponible
chez Summit) vous permettra de retirer le poids sur votre harnais. Ceci vous pourrait vous
permettre de revenir au mirador, à l’échelle ou aux marches vissées ou vous permettra de
descendre lentement de l’arbre.
Plusieurs produits/systèmes optionnels sont disponibles et permettent une auto-récupération ou auto-extraction suite à une chute lorsque suspendu dans un
harnais. Le retour au sol enlève évidemment le traumatisme de suspension et d’autres systèmes descendent l’utilisateur automatiquement tandis que d’autres
donnent le contrôle à l’utilisateur. Si un de ces produits/systèmes est choisi pour utilisation à titre de système de précaution additionnel de sécurité contre une
suspension prolongée, assurez-vous de suivre les directions du manufacturier pour l’utilisation sécuritaire.
Il est nécessaire et très important que quelqu’un connaisse l’endroit où vous chassez et l’heure de votre retour. Il est
aussi très important que vous ayez (en votre possession) un dispositif de communication d’urgence tel un téléphone
cellulaire, une radio bidirectionnelle, un sifflet, une fusée de signalisation ou préférablement un DLP (Dispositif de
localisation personnel - approuvé par le FCC juillet, 2003). Lorsqu’enclenché, ce DLP transmettra un signal d’urgence
à l’équipe de secours locale et précisera votre position via des coordonnées GPS satellite. Un dispositif DLP peut être
acheté dans un magasin de plein air ou sur internet.
Si vous devez vous suspendre à l’arbre en attendant les
secours, vous devez exercer vos jambes en poussant sur
l’arbre, en montant vos genoux jusqu’à votre poitrine
ou en utilisant la courroie de suspension de secours
incluses.
!
AVERTISSEMENT
Cette courroie de suspension de secours DOIT être sur votre
personne et DOIT être accessible lors de l’utilisation de
votre harnais!! Les étapes suivantes suppose que vous êtes
suspendu à votre courroie d’encrage après une chute.
!
AVERTISSEMENT
Une suspension prolongée dans un harnais peut être
fatale. Si l’équipe de secours ne peut être contactée,
vous devez avoir un plan pour vous libérer avant de
chasser.
!
AVERTISSEMENT
SUSPENSION AVEC UN HARNAIS
6
25
A
SRS
STRAP
B
26
This manual suits for next models
1
Table of contents
Languages:
Other Summit Treestands Security Sensor manuals