Summit Treestands Seat-O-The Pants User manual

Seat-O-The Pants Harness
Instruction Booklet - 2008
WHEN TO REPLACE YOUR SAFETY ROPE / HARNESS:
AFTER 5 (FIVE) YEARS FROM MANUFACTURE DATE (LOCATED ON HARNESS WARNING LABEL).
THE SAFETY ROPE / HARNESS HAS BEEN SUBJECTED TO SEVERE SHOCK LOADING.
THE SAFETY ROPE / HARNESS HAS BEEN SUBJECTED TO THE KIND OF OVERLOAD FOR WHICH IT WAS NOT DESIGNED,
SUCH AS TOWING A VEHICLE.
THE SAFETY ROPE / HARNESS SHOWS SIGNS OF FRAYING FROM SUBSTANTIAL USE.
THE SAFETY ROPE / HARNESS WAS USED IN PREVENTING A FALL.
•
•
•
•
•
SOP Harness [All Models] - 2008 Instructions - PN 10847
Please read carefully BEFORE using your new Summit Safety Harness.
Congratulations! You have purchased the nest commercially available hunting harness on the market today. Summit Harnesses are designed and built to
provide years of trouble-free, successful hunting with a minimum of maintenance and care. They are certied to meet the requirements of the Treestand
Manufacturers Association (TMA) Standards. This booklet is provided to you to outline the recommended use, care and maintenance of your Summit Safety
Harness.
You MUST also view the enclosed DVD
BEFORE using your new harness!!
WEIGHT LIMIT: 300 LBS.
CUB: 200 LBS.
BEFORE USING ANY TREESTAND, BE SURE YOU MAINTAIN FULL BODY SAFETY HARNESS ATTACHMENT TO THE TREE AT ALL TIMES
AFTER LEAVING THE GROUND!!!
READ AND UNDERSTAND THE MANUFACTURER’S WARNINGS, EXPIRATION DATE AND INSTRUCTIONS ON HOW TO USE AND HOW TO
PROPERLY ADJUST THE HARNESS.
PRACTICE THE USE OF A FULL BODY HARNESS AT GROUND LEVEL IN THE PRESENCE OF A RESPONSIBLE ADULT TO EXPERIENCE THE
FEELING OF HANGING SUSPENDED BEFORE USING IN A HUNTING ENVIRONMENT.
THE LENGTH OF THE HARNESS TETHER MUST BE MINIMIZED AT ALL TIMES. IT SHOULD BE ADJUSTED SO THAT IT IS ABOVE THE HEAD
WITH NO SLACK (SNUG) IN THE SITTING POSITION AND YOU SHOULD HAVE THE MINIMUM AMOUNT OF SLACK POSSIBLE WHEN
CLIMBING.
A FALL CAN OCCUR AT ANY TIME AFTER LEAVING THE GROUND! IF THE HUNTING LOCATION IS UNKNOWN BY ANYONE AND
COMMUNICATION EFFORTS ARE UNSUCCESSFUL, YOU MUST HAVE A PERSONAL PLAN FOR RECOVERY/ESCAPE BECAUSE PROLONGED
SUSPENSION IN A HARNESS CAN BE FATAL. IT IS IMPORTANT TO EXERCISE THE LEGS BY PUSHING AGAINST THE TREE OR DOING
OTHER FORMS OF CONTINUOUS LEG EXERCISES TO AVOID BLOOD POOLING WHILE BEING SUSPENDED. HUNTERS WITH VARYING
DEGREES OF PHYSICAL FITNESS MAY REQUIRE DIFFERENT PLANS TO RECOVER/ESCAPE THE EFFECTS OF PROLONGED SUSPENSION.
HAVE A PERSONAL PLAN AND PRACTICE IT IN THE PRESENCE OF A RESPONSIBLE ADULT BEFORE LEAVING THE GROUND. NO ONE
ESCAPE/RESCUE PLAN WILL WORK FOR EVERY HUNTER ON EVERY TREE IN EVERY CIRCUMSTANCE. ONLY YOU CAN DETERMINE THE BEST
RECOVERY/ESCAPE PLAN FOR YOUR HUNTING SITUATION AND YOU MUST HAVE A RECOVERY/ESCAPE PLAN FOR YOUR SITUATION
BEFORE LEAVING THE GROUND.
HUNT FROM THE GROUND WHEN SELF-RECOVERY/ESCAPE ABILITY IS ABSENT.
IN THE EVENT OF A FALL - DON’T PANIC!! - THERE IS TIME TO MAKE A CORRECT DECISION ON WHAT ACTION TO TAKE IF A FALL
OCCURS WHILE WEARING A FULL BODY HARNESS.
•
•
•
•
•
•
•
IF YOU HAVE ANY QUESTIONS ABOUT THIS FALL ARREST SYSTEM OR ITS USE, CALL OR
E-MAIL US BEFORE USE! (256) 353-0634 -- WWW.SUMMITSTANDS.COM
WARNING
!
2 1/2” Tail Minimum
MAKE SURE YOUR PRUSSIC HITCH LOOKS LIKE
THIS PICTURE BEFORE USING!
DO NOT USE unless your prussic hitch has 6 (six) loops!
DO NOT USE unless your prussic hitch has a 2 1/2” long
tail (minimum) beyond the knot end!
Pull on the knot end of the prussic hitch and make sure
it locks to the safety rope. DO NOT USE your harness
unless your prussic hitch looks like the one pictured here. In
addition, MAKE SURE the hitch locks to the safety rope
when you pull on the knot end.
You must fully read, understand and follow these warnings,
expiration date and instructions! Failure to follow these
instructions may cause serious injury or death!!

Figure 2
Harness Packaging:
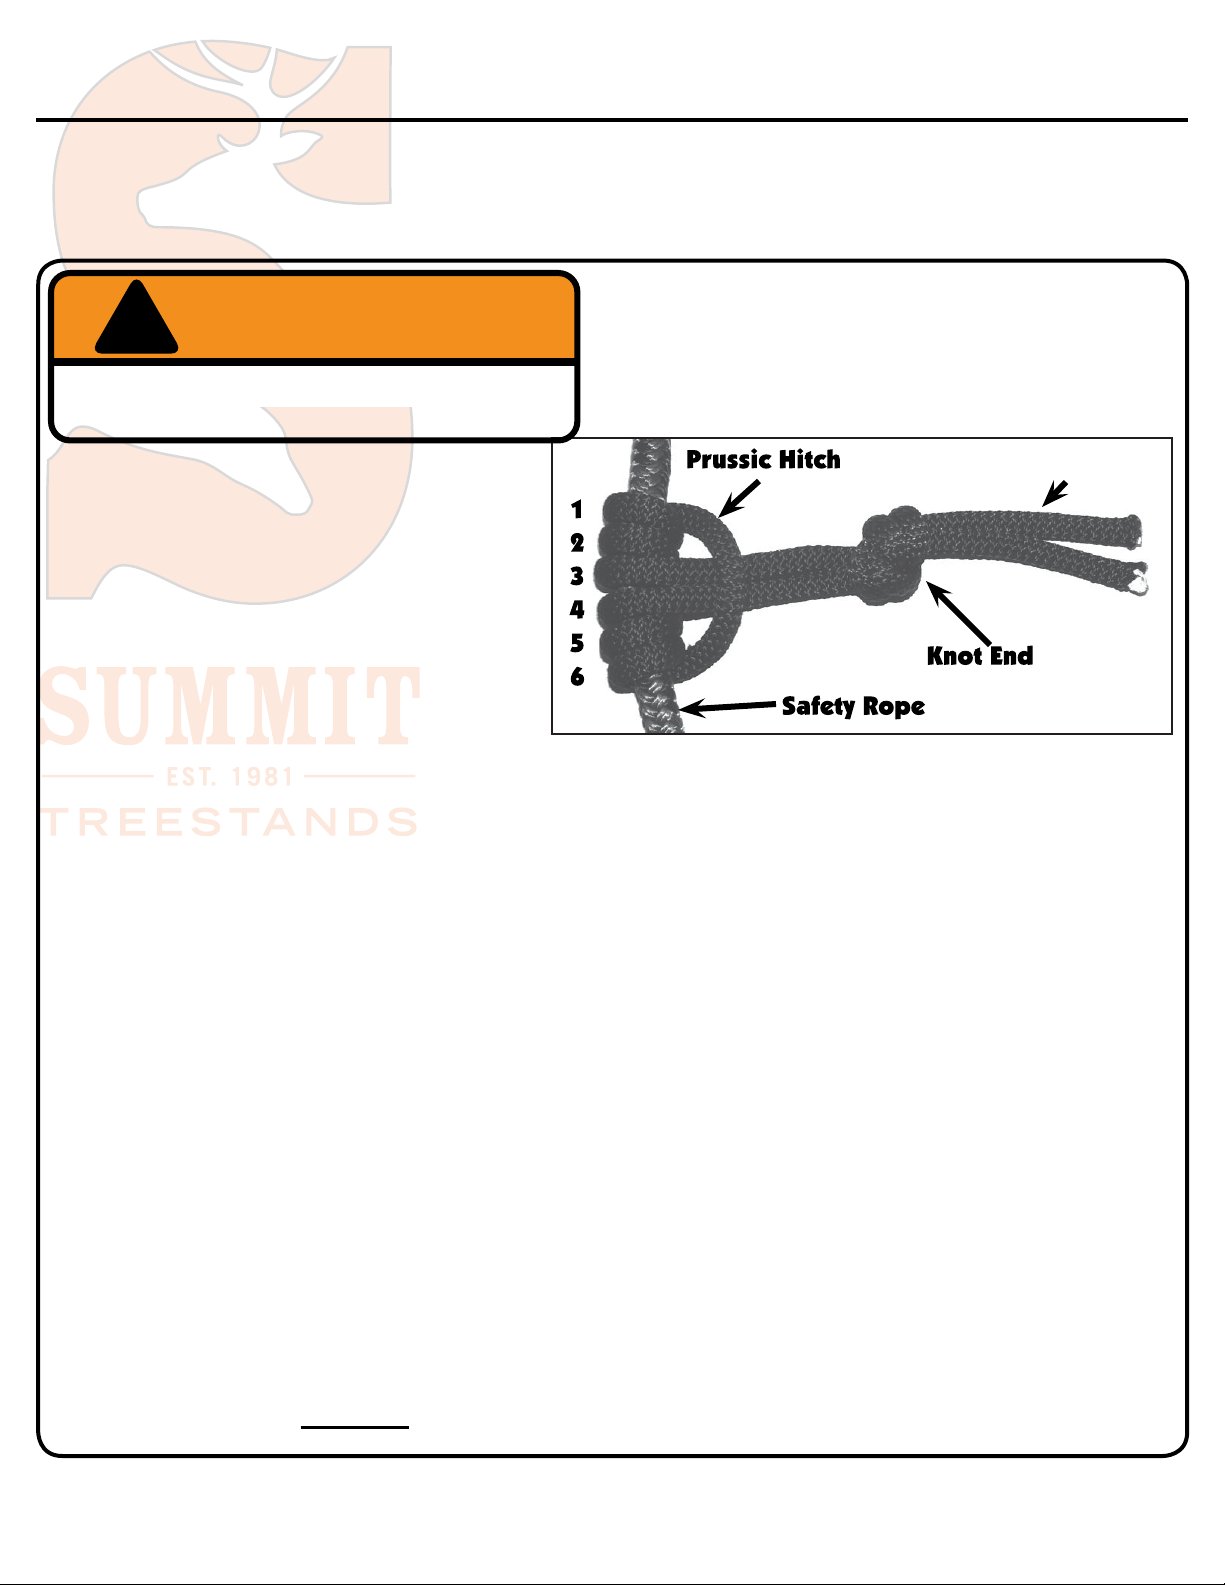
The harness package contains one (1) harness, one (1) Treestand
Safety Rope, one (1) Attached pouch with Suspension Relief
Strap, one (1) locking clip, one (1) lineman’s clip, instructions
and DVD. The Cub comes with a 30’ safety rope.
Always check to make sure leg straps are secure
around legs and buckled before climbing the
tree!!!
Be sure the harness tether strap is attached to safety
rope!!
NEVER ALLOW THE TETHER STRAP TO GET
UNDER OR AROUND YOUR NECK as shown in
Figure 1.
If wearing harness under hunting clothes, make sure
your hunting clothes are not tight around your neck.
The harness will slip up if you fall as shown in Figure
2.
Always check harness webbing and hardware before
every use for any damaged or worn stitching, webbing
or hardware. If you nd a problem, DO NOT use
the harness until the problem has been resolved by
Summit Treestands, LLC.
If you fall, you must replace the harness by
contacting Summit Treestands, LLC.
This harness has been designed to be used only as a
safety device for hunting from elevated treestands and
ladder stands. Any other use is PROHIBITED!
Section 1 - Harness Instructions:
Part 1. Putting on the Harness:
Step 1. If you have the SOP Supreme, Fastback Deluxe or
Fastback Lite, simply put the harness on like a jacket. D-Rings
should be facing out on both sides. Slip your arms through the
shoulder straps. With the SOP Fastback and Fastback Lite,
pick the harness up by the tether strap to put it on.
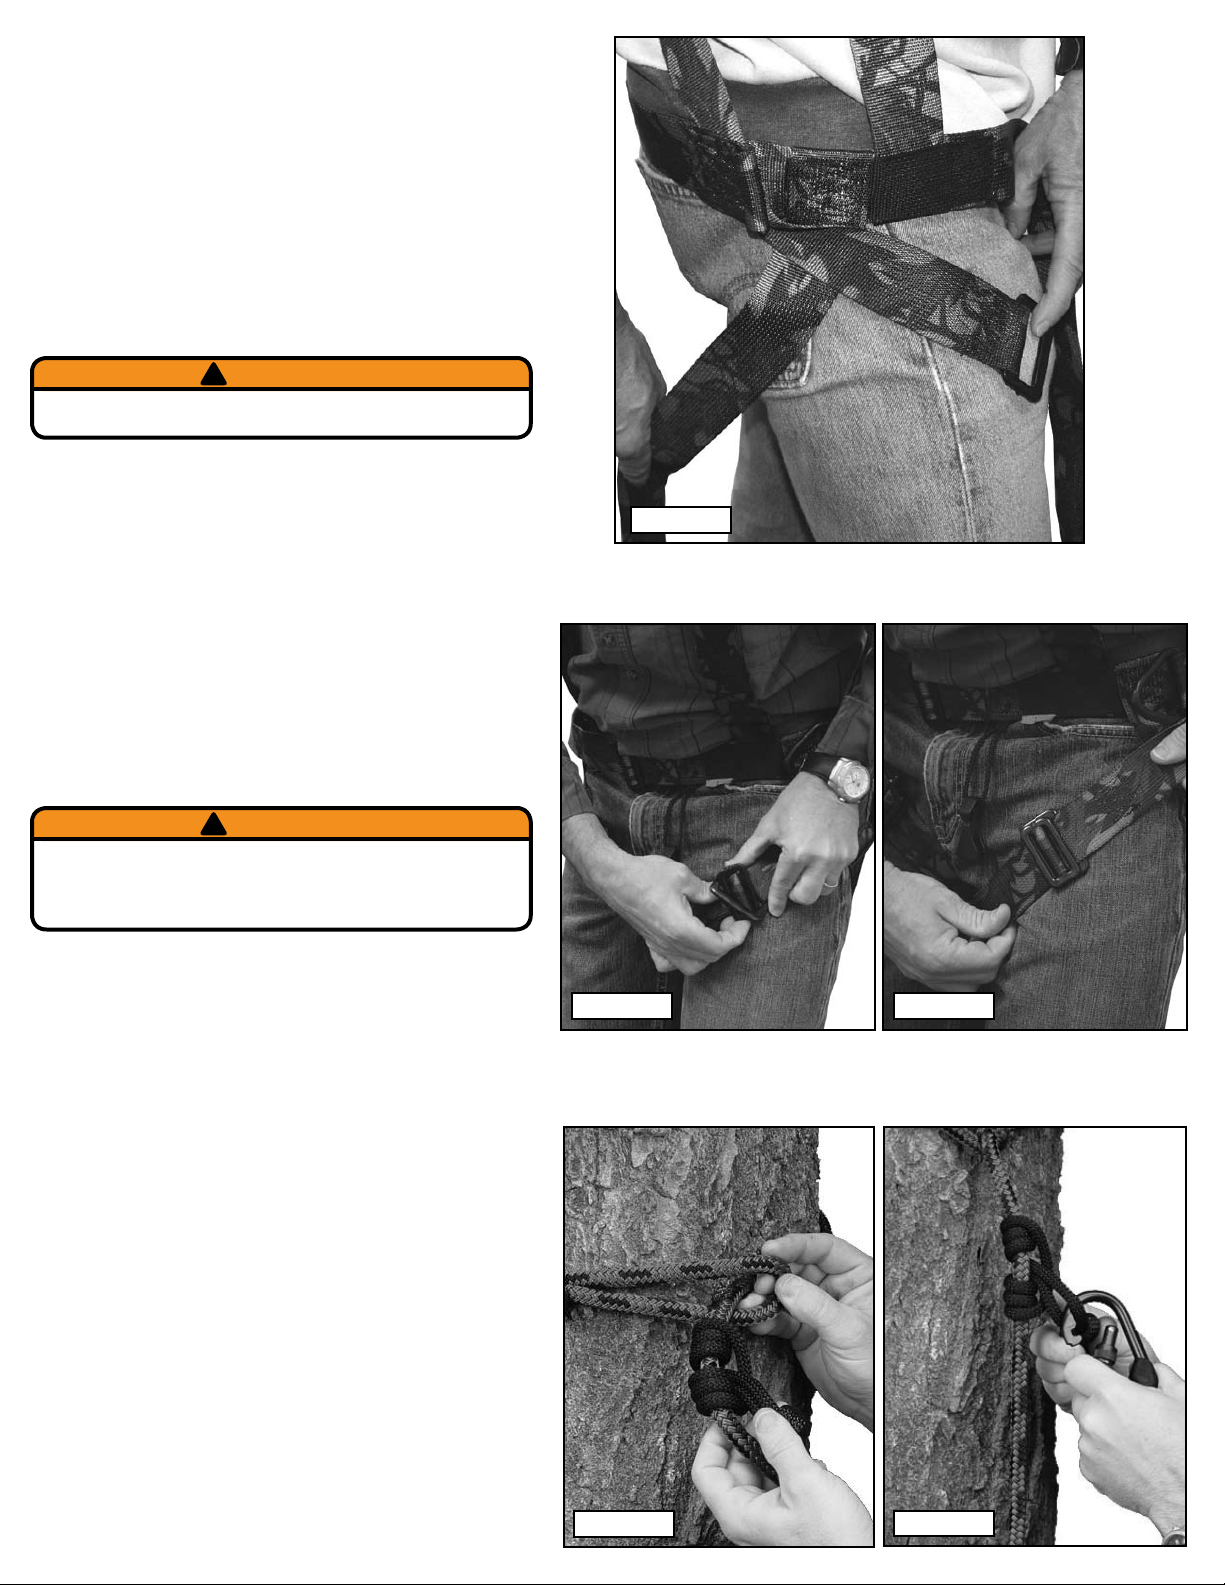
Step 2. For all SOP harnesses - buckle the main belt around
your waist. Thread the buckle as shown in Figure 3 - Steps
1-4. Adjust belt strap by pulling on tag end until comfortably
snug as shown in Figure 4 and Figure 5.
Step 3. For the SOP Original, rotate the pouch to your front.
Unsnap the pouch and pull out the black tether strap (this strap
will act as a pull cord to pull out the shoulder straps). Once
the straps are out, rotate the pouch back behind you. Slip your
arms through the shoulder straps as you would a jacket. Be
sure the shoulder straps do not cross each other and that they
are not twisted.
Step 4. For all SOP models adjust the 3-bar slide on each
shoulder strap until the shoulder straps and waist belt are
comfortably snug as shown in Figure 6 and Figure 7.
Step 5. It is easier to adjust the leg straps before they are
•
•
•
•
•
WARNING
!
WARNING
!
Figure 1
NEVER ALLOW THE TETHER STRAP TO
GET UNDER OR AROUND YOUR NECK!
WARNING
!
PAGE 2
Figure 4
Figure 3
Step 1
Step 4
Step 1Step 1Step 2
Step 3
WARNING FOR CUB HARNESS USERS!!
If you purchased the Fastback Cub harness, you MUST to read this warning section!
THE CUB HARNESS IS NOT A TOY!
THE CUB HARNESS SHOULD BE THOROUGHLY INSPECTED EVERY TIME IT IS USED.
THE HARNESS INSTRUCTIONS MUST BE READ AND UNDERSTOOD FULLY.
THE CUB HARNESS SHOULD NEVER BE USED WITHOUT ADULT SUPERVISION!
THE CUB HARNESS IS DESIGNED FOR TREESTAND USE AND SHOULD NEVER BE USED FOR ANY OTHER APPLICATION.
IT IS IMPORTANT FOR THE ADULT AND YOUTH TO LEARN HOW TO USE THE CUB HARNESS PROPERLY.
THE CUB HARNESS WILL NOT COME WITH THE STANDARD SAFETY LINE, IT WILL HAVE THE SOP CLIMBING SYSTEM. THE CLIMBING SYSTEM
WILL ALLOW THE YOUTH TO ALWAYS BE ATTACHED TO THE HARNESS. THE INSTRUCTIONS FOR THE SOP CLIMBING SYSTEM ARE INCLUDED
IN THE PACKAGE.
•
•
•
•
•
•
•

buckled. The adjustable, non rubber coated 3 bar slide closest
to the waist strap controls the overall length of your leg straps.
(See Figure 8.) Slide this 3 bar slide up or down the webbing
and then pull the slack through the rubber coated buckle as
shown in Figure 9.
Step 6. For all SOP models, bring leg strap BEHIND the leg
then between the legs to the front. Leg straps can cross over
or under the leg buckle strap as shown in Figure 10.
Step 7. Thread the male part of the leg buckles through the
female part as show in Figure 11. If the leg straps are loose
you must unbuckle and readjust the strap length. Leg strap
should be comfortably snug (see Figure 12). You should
only have to adjust the strap length once as you initially t
the harness.
Part 2. Attaching the Treestand Safety Rope to the
Tree.
When attaching the safety rope to the tree, be sure
the adjustable prussic hitch has been completely fed
through the loop at the end of the safety rope as shown
in Figure 13. Do this BEFORE you begin to climb with a
climbing treestand.
ALWAYS ADJUST THE SAFETY ROPE TO MINIMIZE THE
SLACK WHILE YOU ARE CLIMBING.
NEVER disconnect from your safety harness or your
safety line once you are off the ground!
The adjustable prussic hitch should be snug to the safety
rope. It should be tight when sliding it on the safety rope.
If necessary, gently pull on the prussic loop to increase the
tension of the prussic on the safety rope.
Step 1. Put the loop end of the safety rope around the tree.
Step 2. Thread the knot end and the adjustable prussic hitch
all the way through the loop end of the safety rope (See
Figure 13 again).
Step 3. Open the prussic hitch loop and insert the harness
tether safety clip through this loop as shown in Figure 14.
Be sure the knot at the end of the prussic hitch is tight and
that it has at least 2 1/2” of rope as a tail (See Diagram on
rst page of this instruction book.) Screw the locking collar
COMPLETELY closed to secure the safety clip.
Step 4. Pull on the end of the prussic hitch to secure it to the
safety rope. See Figure 15.
Step 5. Tie an overhand knot in the safety rope approximately
one foot under the prussic hitch as shown in Figure 16. This
will help maintain your position on the safety rope in the
event of a fall.
Step 6. Slide the prussic hitch up the safety rope to a
comfortable hunting position as shown in Figure 17.
NEVER allow more than 24 inches total combined slack
in the rope and tether strap (See Figure 17 again).
ALWAYS conrm the carabiner locking collar has been
completely screwed closed to secure the safety clip
WARNING
!
WARNING
!
WARNING
!
PAGE 3
Figure 5
Figure 4
Figure 7
Figure 6
WARNING
!
WARNING
!
Figure 8
Figure 9

Part 4. Using the Harness with a Climbing
Treestand:
Step 1. Attach the safety rope to the tree, follow “Attaching
Safety Rope to Tree” in Section 1, Part 2 of these
instructions.
Step 2. Slide the safety rope up the tree as you climb. While
climbing, adjustments to the harness attachment to the tree
(tether/tree belt) should be frequent and coordinated with
treestand movement to maintain the least amount of slack in
the tether that will allow for climbing.
Step 3. When you are at your hunting height, position safety
rope above your head (See Figure 17).
NEVER disconnect your harness system from the tree
after leaving the ground!
Part 5. Converting the Safety Rope to a Climbing Belt:
Step 1. Clip the locking safety clip to the loop end of the
safety rope.
Step 2. Clip the extra snap clip to the adjustable prussic hitch
on the safety rope.
Step 3. Attach one of the clips to one of the D-Rings on the
waist belt. Put the safety rope around the tree and attach the
other clip to the other D-Ring. The lineman style belt should
now look like Figure 18.
Step 4. To adjust the climbing belt, simply slide the adjustable
prussic hitch forward or backward. NOTE: To slide the
hitch forward you will need to hold onto the tag end of the
rope as shown in Figure 19.
When using a xed position stand, DO NOT DISCONNECT
YOUR LINEMAN’S BELT UNTIL YOU HAVE SECURELY
CONNECTED THE REAR TETHER SYSTEM TO THE
TREE!”
When using a xed position stand, we recommend using
the “Climbing System” or secondary safety rope to increase
your safety during the ascend and descent. You can see the
Summit Climbing System (Summit PN 83014) in our catalog
or on the web at www.summitstands.com.
WARNING
!
WARNING
!
PAGE 4
Figure 10
Figure 13
Figure 12
Figure 14
Figure 11

Limited Warranty
(A) Warranty
Summit Treestands, LLC (Summit) warrants to the original retail purchaser that all products manufactured by it are free from defects in
material and manufacture at the time of shipment for sixty (60) months from the date of purchase. Summit will repair or replace any part
found defective if the unit claimed to be defective shall be returned to Summit, postage prepaid, within the warranty period.
This warranty shall not apply to any product which has been subjected to misuse; misapplication; neglect (including but not limited to
improper maintenance); accident; improper installation; modication (including but not limited to use of unauthorized parts or attachments);
adjustment or repair. THE FOREGOING IS IN LIEU OF ALL OTHER WARRANTIES, WHETHER EXPRESS OR IMPLIED
(INCLUDING THOSE OF MERCHANTABILITY AND FITNESS OF ANY PRODUCT FOR A PARTICULAR PURPOSE), AND OF ANY
OTHER OBLIGATION OF LIABILITY ON THE PART OF THE COMPANY.
(B) Limitation of Liability
It is expressly understood that Summit’s liability for its products, whether due to breach of warranty, negligence, strict liability, or otherwise,
is limited to the repair of the product, as stated above, and Summit will not be liable for any other injury, loss, damage, or expense, whether
direct or consequential, including but not limited to loss of use, income, prot, or damage to material, arising in connection with the sale,
installation, use of, inability to use, or the repair or replacement of Summit’s products.
Summit reserves the right to make alterations or modications in its products at any time, which in its opinion, may improve the performance
and efciency of the product. It shall not be obligated to make such alterations or modications to products already in service.
PAGE 5
Figure 15 Figure 16 Figure 17
Figure 18 Figure 19
Minimize Tether Length

Figure 21
A
B
Section 2 - Harness Suspension / Use of Suspension
Relief Strap:
It is necessary and very important that someone knows
your hunting location and time of return. It is also very
important that you carry (on your person) emergency
communication devices such as a cell phone, two-way radio,
whistle, signal are or preferably a PLD (Personal Locator
Device - FCC approved July, ‘03). When triggered, a PLD
will transmit an emergency signal to local rescue teams
identifying your location via satellite GPS coordinates.
PLD’s may be purchased at Wilderness outtters or on the
internet.
Suspension trauma or blood pooling can occur when
suspended motionless in a harness for periods of time. This
can lead to unconsciousness and death.
If you fall and are suspended in your harness before
help arrives, you need to exercise your legs by
pushing off from the tree and relieve pressure by
using the attached suspension relief strap.
Use of the Suspension Relief Strap:
Warning!
This Suspension Relief Strap MUST be on your person and
accessible while using your harness!!! The steps below
assume you are hanging by your tether line after a fall.
Step 1. Retrieve the Suspension Relief Strap (SRS) from
the storage pouch on the side of the harness. See Figure 20.
Step 2. Tie one end of the SRS to one of the triangular
Climbing Strap metal loops sewn into each side of the
harness belt. See Figure 21 position A.
Step 3. Tie the other end of the SRS to the opposite harness
belt loop as show in Figure 21 position B. Adjust the SRS
so the large loop it forms is just above the ankles - Figure
22.
Step 4. Put both feet in the loop and stand up to relieve
the pressure from the harness leg straps. See Figure 23
and Figure 24. NOTE: Readjust the length of the loop if
considerable pressure is still felt on the leg straps.
Self extraction may be necessary in the unfortunate situation
that A) No one knows your location, B) Your communication
efforts are exhausted, C) You are condent that you have
the strength, dexterity and ability to perform self-extraction
and D) You decide this is your “absolute last resort”. It is
necessary to carry a device to assist with this self-extraction.
Simple devices such as screw-in steps or a rope “Tree
Descender” (available from Summit) will allow you to
remove the weight from your harness. This may enable you
to return to the treestand/ladder/climbing steps or slowly
descend the tree.
Prolonged harness suspension may be fatal. If
rescue personnel cannot be notied, you must
have a plan to recover / escape before hunting.
Figure 24
Figure 22
Figure 23
WARNING
!
WARNING
!
PAGE 6
© 2008 STLLC
Figure 20
Table of contents
Other Summit Treestands Security Sensor manuals
Popular Security Sensor manuals by other brands

CareRay
CareRay CareView 1500C Quick installation guide

Pepperl+Fuchs
Pepperl+Fuchs NBN15-30GS50-Z4L-V1-3G-3D instruction manual

SD3
SD3 ALPHA 2 Operating & installation manual

Zircon
Zircon Leak Alert + LED! instructions

ITALIANA SENSORI
ITALIANA SENSORI 8003-ISR002 manual

Innotech
Innotech BEF 401-12 Instructions for installation and use

Etlin-Daniels
Etlin-Daniels SENPIR-CM-02 installation manual

Gewiss
Gewiss Chorus GW 90 787 manual

Safe Traffic System
Safe Traffic System RideSafer Dual Tether instruction manual

Gemtor
Gemtor FLW Series owner's manual

Bogen
Bogen AFDS2 Installation and use manual

SKYLOTEC
SKYLOTEC MILAN AGR 2001 Instructions for use