manuals.online logo
Brands
  1. Home
  2. •
  3. Brands
  4. •
  5. HIK VISION
  6. •
  7. Security Sensor
  8. •
  9. HIK VISION DS-PD2-T12P-WEL User manual

HIK VISION DS-PD2-T12P-WEL User manual

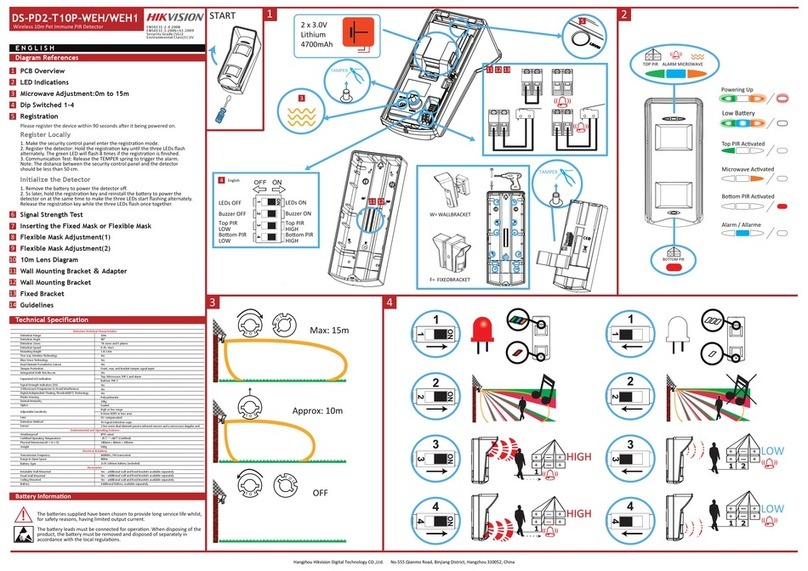
Installation
Ensure that the detector is installed away from reflected sunlight and large objects.
Switches
If you disable the detector’s LEDs, you can remotely enable them in walk tests.
Microwave range and angle of detection
Use the highlighted dials to change the microwave range and angle of detecon.
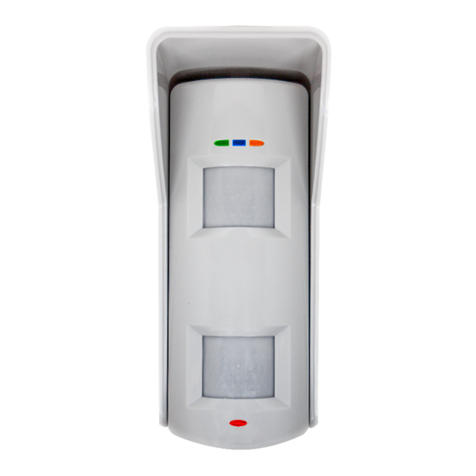
LEDs
Four LEDs show the status of the detector.
Lens inserts
Use lens inserts to control the coverage area.
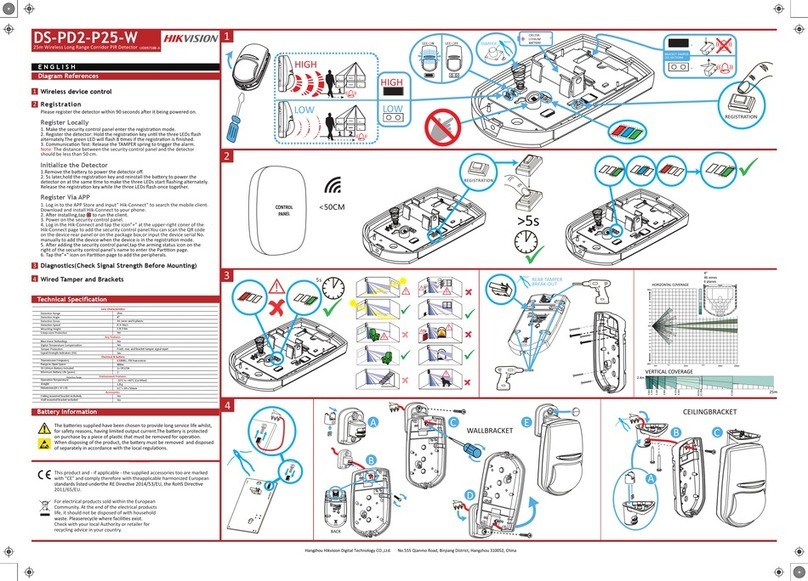
Registration procedure
Aer powering up and aer registraon,there is a 10 minute mer that allows
a walk test of the PIR and microwave sensors.You can set up the sensivity and
microwave range without using the control panel to perform a walk test.Aer
10 minutes,the detector enters sleep mode. Please register the device within
90 seconds aer it being powered on.
Register Locally
1. Make the security control panel enter the registraon mode.
2. Register the detector: Hold the registraon key unl the three LEDs flash
alternately. The green LED will flash 8 mes if the registraon is finished.
3. Communicaon Test: Release the TEMPER spring to trigger the alarm.
Note: The distance between the security control panel and the detector should
be less than 50 cm.
Initialize the Detector
1. Remove the baery to power the detector off.
2. 5s later, hold the registraon key and reinstall the baery to power the
detector on at the same me to make the three LEDs start flashing alternately.
Release the registraon key while the three LEDs flash once together.
Register Via APP
1. Log in to the APP Store and input “Hik-Connect” to search the mobile client.
Download and install Hik-Connect to your phone.
2. Aer installing, tap to run the client.
3. Power on the security control panel.
4. Log in the Hik-Connect and tap the icon “+” at the upper-right coner of the
Hik-Connect page to add the security control panel. You can scan the QR code
on the device rear panel or on the package box, or on the package box, or input
the device serial No. manually to add the device when the device is in the
registraon mode.
5. Aer adding the security control panel, tap the arming status icon on the
right of the security control panel's name to enter the Paron page.
6. Tap the “+” icon on Paron page to add the peripherals.
Signal strength test
Enter the signal checking mode by operang on the control panel
Indicator turns green:Strong Signal.
Indicator turns red:Weak Signal.
Bracket tamper signal input
DS-PD2-T12P-WEL
12m Wireless Outdoor Detector
DS-PD2-T12P-WEL/WEL1
Diagram References
ENGLISH
1
2
3
4
5
6
7
8
The baeries supplied with this product have been chosen to provide long service life whilst, for safety
reasons, having limited output current.The baery leads must be connected for operaon. When disposing
of the product, remove the baeries and disposed of separately in accordance with the local regulaons.
Detectors Technical Characteriscs
12m
90°
2x22 zones
0.25–2.5m/s
1-1.5m
Yes
Yes
Yes
Front, rear, and bracket tamper signal input
Yes
Top: Microwave, PIR 1 and alarm
Boom: PIR 2
Yes
Yes
Yes
3mm polycarbonate
Up to 24kg
Dual-vision sealed opcs
High or low range
UV compensated
Tri-Signal Detecon Logic
2 low noise dual element passive infrared sensors and a microwave doppler unit
IP55 rated
-25℃ to +60℃(Cerfied)
118mm x 77mm x 84mm
0.3kg
2x3V 4700mAh Lithium baery packs
Up to 3 years
4700mAh
Yes – addional wall and fixed brackets available separately
Yes – addional baery available separately
Electrical & baery
Environmental and Operang Features
Accessories
Technical Specification
Battery Information
1
2
45
3
ON posion
1 LEDs on
2 Buzzer on
3 Top PIR high sensivity
4 Boom PIR high sensivity
OFF posion
LEDs off
Buzzer off
Top PIR low sensivity
Boom PIR low sensivity
Baery Informaon
Detecon Range
Detecon Angle
Detecon Zones
Detecon Speed
Mounng Height
Two-way Wireless Technology
Blue Wave Technology
Dual Element Pyroelectric Sensor
Tamper Protecon
Intergrated Walk Test Buzzer
Separated LED Indicaon:
Orange(Microwave),Blue(Alarm),Green(PIR)
Signal Strength Indicators (SSI)
3 Microwave Frequencies to Avoid Interference
Digital Independent Floang Threshold(IFT) Technology
Plasc Housing
Animal Immunity
Opcs
Adjustable Sensivity
Lens
Detecon Method
Sensor
Weatherproof
Cerfied Operang Temperature
Physical Dimensions(H x W x D)
Weight
Baery Type
Baery Life
Baery Capacity
Rotatable Wall Mounted
Fixed Wall Mounted
Ceiling Mounted
Baery
UD15579B
User Manual
COPYRIGHT ©2019 Hangzhou Hikvision Digital Technology Co.,Ltd.
ALL RIGHTS RESERVED.
Any and all informaon, including, among others, wordings, pictures,
graphs are the properes of Hangzhou Hikvision Digital Technology
Co., Ltd. or its subsidiaries (hereinaer referred to be “Hikvision”).
This user manual (hereinaer referred to be “the Manual”) cannot
be reproduced, changed, translated, or distributed, parally or
wholly, by any means, without the prior wrien permission of
Hikvision. Unless otherwise spulated, Hikvision does not make any
warranes, guarantees or representaons, express or implied,
regarding to the Manual.
About this Manual
This manual is applicable to detector.
The Manual includes instrucons for using and managing the
product. Pictures, charts, images and all other informaon
hereinaer are for descripon and explanaon only. The informaon
contained in the Manual is subject to change, without noce, due to
firmware updates or other reasons.
Please find the latest version in the company website
(hp://overseas.hikvision.com/en/).
Please use this user manual under the guidance of professionals.
Trademarks Acknowledgement
and other Hikvision’s trademarks and logos are the
properes of Hikvision in various jurisdicons. Other trademarks
and logos menoned below are the properes of their respecve
owners.
This product and - if applicable - the supplied accessories
too are marked with“CE”and comply therefore with the
applicable harmonized European standards listed under
the RE Direcve 2014/53/EU, the RoHS Direcve 2011/65/EU.
For electrical products sold within the European Community.
At the end of the electrical products life,it should not be
disposed of with household waste. Please recycle where
facilies exist. Check with your local Authority or retailer for
recycling advice in your country.
This product operates in a European non-harmonised
frequency band
678
Product Information Please take aenon that changes or modificaon not expressly
approved by the party responsible for compliance could void the
user’s authority to operate the equipment.
FCC compliance: This equipment has been tested and found to
comply with the limits for a Class B digital device, pursuant to part
15 of the FCC Rules. These limits are designed to provide reasonable
protecon against harmful interference in a residenal installaon.
This equipment generates, uses and can radiate radio frequency energy
and, if not installed and used in accordance with the instrucons, may
cause harmful interference to radio communicaons. However, there is
no guarantee that interference will not occur in a parcular installaon.
If this equipment does cause harmful interference to radio or television
recepon, which can be determined by turning the equipment off and on,
the user is encouraged to try to correct the interference by one or more
of the following measures:
-Reorient or relocate the receiving antenna.
-Increase the separaon between the equipment and receiver.
-Connect the equipment into an outlet on a circuit different from that to
which the receiver is connected.
-Consult the dealer or an experienced radio/TV technician for help.
This equipment should be installed and operated with a minimum distance
20cm between the radiator and your body.
FCC Condions
This device complies with part 15 of the FCC Rules. Operaon is subject to
the following two condions:
1. This device may not cause harmful interference.
2. This device must accept any interference received, including interference
that may cause undesired operaon.
FCC Information
FRANÇAIS
ESPAÑOL
P O RTUGUÊS
I T A L IANO
Procedura di registrazione
All'accensione e dopo la registrazione, c'è un mer di 10 minu che permee un walk test del PIR e
dei sensori a microonde. È possibile impostare l'intervallo delle microonde e la sensibilità senza usare
il pannello di controllo per eseguire un walk test. Dopo 10 minu, i rilevatori entrano in modalità di
sospensione. Registrare il disposivo entro 90 secondi dopo l'accensione.
Registrazione locale
1. Entrare in modalità di registrazione del pannello di controllo di sicurezza.
2. Registrazione del rilevatore: tenere premuto il tasto di registrazione fino a che i tre LED non
lampeggiano alternavamente. Il LED verde lampeggia 8 volte al termine della registrazione.
3. Test di comunicazione: rilasciare la molla MANOMISSIONE per avare l'allarme.
Nota: la distanza tra il pannello di controllo di sicurezza e il rilevatore deve essere meno di 50 cm.
Inizializzazione del rilevatore
1. imuovere la baeria per spegnere il rilevatore.
2. Dopo 5 secondi, premere il tasto di registrazione e reinstallare la baeria allo stesso tempo per
accendere il rilevatore e far lampeggiare alternavamente i tre LED. Rilasciare il tasto di
registrazione mentre i tre LED lampeggiano insieme una volta.
Registrazione tramite APP
1. Accedere all'APP Store e inserire “Hik-Connect” per effeuare la ricerca del client mobile. Scaricare
e installare Hik-Connect sul telefono.
2. Dopo l'installazione, toccare per avviare il client.
3. Accendere il pannello di controllo di sicurezza.
4. Accedere a Hik-Connect e toccare l'icona “+” nell'angolo in alto a destra della pagina di
Hik-Connect per aggiungere il pannello di controllo. È possibile aggiungere il disposivo quando è
in modalità di registrazione, effeuando la scansione del codice QR situato sul pannello posteriore
del disposivo o sulla scatola della confezione, o inserendo manualmente il numero di serie del
disposivo.
5. Dopo aver aggiunto il pannello di controllo di sicurezza, toccare l'icona dello stato di inserimento,
situata a destra del nome del pannello di controllo, per accedere alla pagina Parzioni.
6. Toccare l'icona “+” sulla pagina delle Parzioni per aggiungere le periferiche.
Installation
Assurez-vous que le détecteur est installé à distance de la lumière solaire réfléchie et d’objets volumineux.
Commutateurs
Posion ACTIVÉ
1 Voyants allumés
2 Buzzer acvé
3 Haute sensibilité du PIR supérieur
4 Haute sensibilité du PIR inférieur
Posion DÉSACTIVÉ
DEL désacvé
Buzzer désacvé
Faible sensibilité du PIR supérieur
Faible sensibilité du PIR inférieur
Si vous désacvez les voyants du détecteur, vous pouvez les acver à distance lors de tests de fonconnement.
Portée des micro-ondes et angle de la détection
Ulisez les cadrans en surbrillance pour modifier la portée des micro-ondes et l’angle de détecon.
LED
Quatre voyants indiquent l’état du détecteur.
Inserts de la lentille
Ulisez les inserts de la lenlle pour contrôler la zone de couverture.
Procédure d’inscription
Après la mise en route et après l’inscripon, une minuterie de 10 minutes permet un test de
fonconnement du PIR et des capteurs à micro-ondes. Vous pouvez configurer la sensibilité et la portée des
micro-ondes sans uliser le panneau de commande pour exécuter un test de fonconnement. Après
10 minutes, le détecteur passe en mode sommeil. Veuillez inscrire l’appareil dans un délai de 90 secondes
après sa mise en route.
Inscription locale
1. Accéder au mode inscripon sur le panneau de commande de sécurité.
2. Inscripon du détecteur : Maintenez enfoncée la touche d’inscripon jusqu’à ce que les trois voyants
clignotent en alternance. Le voyant vert clignotera 8 fois si l’inscripon est terminée.
3. Test de communicaon : Relâchez le ressort an-sabotage pour déclencher l’alarme.
Remarque : La distance entre le panneau de commande sécurité et le détecteur doit être inférieure à
50 cm.
Initialisation du détecteur
1. Rerez la baerie pour éteindre le détecteur.
2. 5 secondes plus tard, maintenez enfoncée la touche d’inscripon et réinstallez la baerie pour mere en
route le détecteur en même temps pour que les trois voyants commencent à clignoter en alternance.
Relâchez la touche d’inscripon pendant que les trois voyants clignotent une fois ensemble.
Inscription sur l’application
1. Connectez-vous à l’App Store et saisissez « Hik-Connect » pour rechercher le client mobile. Téléchargez
et installez Hik-Connect sur votre téléphone.
2. Après l’installaon, appuyez sur pour exécuter le client.
3. Allumez le panneau de commande de sécurité.
4. Connectez-vous à Hik-Connect et appuyez sur l’icône « + » dans le coin supérieur droit de la page
Hik-Connect pour ajouter le panneau de commande de sécurité. Vous pouvez scanner le code QR sur la
paroi arrière de l’appareil ou sur la boîte de l’appareil, ou saisir manuellement le numéro de série de
l’appareil pour ajouter l’appareil lorsque l’appareil est en mode inscripon.
5. Après avoir ajouté le panneau de commande de sécurité, appuyez sur l’icône d’état d’armement à droite
du nom du panneau de commande de sécurité pour accéder à la page Paron.
6. Appuyez sur l’icône « + » dans la page Paron pour ajouter les périphériques.
1
2
33
34
35
1
2
3
4
5
3
6
6
38
39
7
8
Test de force du signal
Accédez au mode de vérificaon du signal à parr du panneau de commande.
Le voyant devient vert : Signal fort.
Le voyant devient rouge : Signal faible.
Entrée du signal du support anti-sabotage
Caractérisques techniques du détecteur
Portée de détecon : 12 m
Angle de détecon : 90°
Zones de détecon : 2x22 zones
Vitesse de détecon : 0,25-2,5 m/s
Hauteur de fixaon : 1–1,5 m
Technologie bidireconnelle sans fil
Technologie Blue Wave
Capteur pyroélectrique à deux éléments
Protecon an-sabotage Entrée du signal
ansabotage avant, arrière et support
Aversseur de test de fonconnement intégré
Indicaon lumineuse séparée Orange (micro-ondes),
bleu (alarme), vert (PIR) ; Supérieur : Micro-ondes, PIR
1 et alarme | Pare inférieure : PIR 2
Indicateurs de puissance du signal (SSI)
3 fréquences micro-ondes pour éviter les
interférences
Technologie à seuils floants indépendants
numériques (IFT)
Boîer en plasque : Polycarbonate de 3 mm
Immunité aux animaux : Jusqu’à 24 kg
Opques : Opques scellées double vision
Sensibilité réglable : Élevée ou faible
Lenlle : UV compensé
Méthode de détecon : Logique de détecon à trois
signaux
Capteur : 2 capteurs infrarouges passifs à deux
éléments faible bruit et 1 capteur Doppler à
micro-ondes
Caractérisques environnementales et de
fonconnement
Résistant aux intempéries : Classé IP55
Température de fonconnement cerfiée :
-25 °C à +60 °C (cerfiée)
Dimensions physiques (H x L x P) :
118 mm x 77 mm x 84 mm
Poids : 0,3 kg
Caractérisques électriques et baerie
Type de baerie : 2 blocs de baerie 3 V, 4 700 mAh,
au lithium
Autonomie de la baerie : 3 ans max
Capacité de la baerie : 4 700 mAh
Accessoires
Supports fixes et muraux supplémentaires disponibles
séparément
Piles : Baerie supplémentaire disponible séparément
PIR supérieur acvé
PIR inférieur acvé
Micro-ondes acvées
Alarme
Mise sous tension
Baerie faible
Spécifications techniques
Références du schéma
Instalação
Garanta que o detector esteja instalado longe de luz solar refleda e de objetos grandes.
Chaves
Posição LIGADO
1 LEDs ligados
2 Campainha ligada
3 Sensibilidade alta do PIR superior
4 Sensibilidade alta do PIR inferior
Posição DESLIGADO
LEDs desligados
Campainha desligada
Sensibilidade baixa do PIR superior
Sensibilidade baixa do PIR inferior
Se você desabilitar os LEDs do detector, poderá habilitá-los remotamente em testes de caminhada.
Faixa de micro-ondas e ângulo de detecção
Use os botões destacados para alterar o alcance do micro-ondas e o ângulo de detecção.
LEDs
Quatro LEDs mostram o status do detector.
Lentes introduzidas
Use lentes introduzidas para controlar a área de cobertura.
Procedimento de registro
Depois de ligar e após o registro, existe um temporizador de 10 minutos que permirá um teste de
caminhada dos sensores PIR e de micro-ondas. Você pode configurar a sensibilidade e a faixa de
micro-ondas sem usar o painel de controle para realizar um teste de caminhada. Após 10 minutos, o
detector entrará no modo dormente. Registre o disposivo dentro de 90 segundos depois de ele ser
ligado.
Registrar localmente
1. Coloque o painel de controle de segurança no modo de registro.
2. Registre o detector: mantenha pressionada a tecla de registro até que os três LEDs pisquem
alternadamente. O LED verde piscará 8 vezes quando o registro for concluído.
3. Teste de comunicação: solte a mola de VIOLAÇÃO para acionar o alarme.
Observação: a distância entre o painel de controle de segurança e o detector deve ser menor do que
50 cm.
Inicializar o detector
1. Remova a bateria para desligar o detector.
2. Cinco segundos depois, mantenha pressionada a tecla de registro e, ao mesmo tempo, reinstale a
bateria para ligar o detector, o que fará com que os três LEDs comecem a piscar alternadamente. Solte
a tecla de registro quando os três LEDs piscarem juntos ao mesmo tempo.
Registrar pelo app
1. Entre na loja de aplicavos e digite “Hik-Connect” para pesquisar o app para celular. Baixe e instale o
Hik-Connect no seu telefone.
2. Após a instalação, toque em para executar o app.
3. Ligue o painel de controle de segurança.
4. Faça o login no Hik-Connect e toque no ícone “+” no canto superior direito da página do Hik-Connect
para adicionar o painel de controle de segurança. Você pode escanear o código QR no painel traseiro do
disposivo ou na caixa da embalagem, ou inserir o número de série do disposivo manualmente para
adicioná-lo quando ele esver no modo de registro.
5. Depois de adicionar o painel de controle de segurança, toque no ícone de status do alarme à direita do
nome do painel para entrar na página Parção.
6. Toque no ícone “+” na página Parção para adicionar os periféricos.
1
2
33
34
35
1
2
3
4
5
3
6
6
38
39
7
8
Teste de intensidade do sinal
Entre no modo de verificação de sinal operando pelo painel de controle.
O indicador fica verde: sinal forte.
O indicador fica vermelho: sinal fraco.
Entrada de sinal de violação do suporte
Caracteríscas técnicas do detector
Faixa de detecção: 12 m
Ângulo de detecção: 90°
Zonas de detecção: 2 x 22 zonas
Velocidade de detecção: 0,25 a 2,5 m/s
Altura de montagem: 1 a 1,5 m
Tecnologia bidirecional sem fio
Tecnologia Blue Wave
Sensor piroelétrico de elemento duplo
Proteção anviolação: entrada de sinal de violação
frontal, traseira e do suporte
Campainha integrada de teste de caminhada
Indicações de LED separadas: laranja (micro-ondas),
azul (alarme), verde (PIR); superior: micro-ondas, PIR
1 e alarme; inferior: PIR 2
Indicadores de intensidade de sinal (SSI)
Três frequências de micro-ondas para evitar
interferências
Tecnologia de limite flutuante independente (IFT)
digital
Invólucro plásco: policarbonato de 3 mm
Imunidade a animais: até 24 kg
Ópca: ópca selada de visão dupla
Sensibilidade ajustável: faixa alta ou baixa
Lente: compensação UV
Método de detecção: lógica de detecção de três sinais
Sensor: dois sensores infravermelhos passivos de
duplo elemento e baixo ruído e uma unidade doppler
de micro-ondas
Caracteríscas ambientais e operacionais
Exposição ao tempo: classificação IP55
Temperatura cerficada de operação: -25 °C a +60 °C
(cerficado)
Dimensões sicas (A x L x P): 118 mm x 77 mm x 84 mm
Peso: 0,3 kg
Componentes elétricos e bateria
Tipo de bateria: 2 x baterias de lío de 3 V e 4700 mAh
Duração da bateria: até 3 anos
Capacidade da bateria: 4700 mAh
Acessórios
Suportes adicionais de parede e fixo disponíveis
separadamente
Bateria: Bateria adicional disponível separadamente
PIR superior avado
PIR inferior avado
Micro-ondas avado
Alarme
Ligando
Bateria fraca
Especificação técnica
Referências do diagrama
Instalación
Compruebe que el detector esté instalado lejos de los reflejos de la luz solar y de objetos grandes.
Interruptores
Posición de encendido
1 Ledes encendidos
2 Timbre encendido
3 PIR superior de alta sensibilidad
4 PIR inferior de alta sensibilidad
Posición de apagado
Ledes apagados
Timbre apagado
PIR superior de baja sensibilidad
PIR inferior de baja sensibilidad
Si desacva los ledes del detector, puede acvarlos de forma remota caminando para hacer pruebas.
Alcance de microondas y ángulo de detección
Ulice las ruedas resaltadas para cambiar el alcance de microondas y el ángulo de detección.
Ledes
Cuatro ledes muestran el estado del detector.
Insertos de lente
Ulice los insertos de lente para controlar el área de cobertura.
Procedimiento de registro
Después de encender y registrar el disposivo, un temporizador de 10 minutos le permite hacer una
prueba caminando de los sensores PIR y de microondas. Puede ajustar la sensibilidad y el alcance de
microondas sin ulizar el panel de control para realizar una prueba caminando. Después de 10 minutos,
el detector entra en modo de suspensión. Registre el disposivo en un plazo de 90 segundos después de
encenderlo.
Registrar localmente
1. Asegúrese de que el panel de control de seguridad acceda al modo de registro.
2. Registro del detector: Mantenga pulsado el botón de registro hasta que los tres ledes parpadeen
alternavamente. El led verde parpadeará 8 veces una vez finalizado el registro.
3. Prueba de comunicación: Suelte el muelle de MANIPULACIÓN para disparar la alarma.
Nota: La distancia entre el panel de control de seguridad y el detector debe ser menor de 50 cm.
Inicializar el detector
1. Rere la pila para apagar el detector.
2. 5 s después, mantenga pulsado el botón de registro y vuelva a insertar la pila para encender el
detector al mismo empo para que los tres ledes empiecen a parpadear alternavamente. Suelte el
botón de registro cuando los tres LED parpadeen a la vez.
Registrar a través de la aplicación
1. Inicie sesión en la App Store y escriba “Hik-Connect” para buscar el cliente móvil. Descargue e instale
Hik-Connect en su teléfono.
2. Después de instalarlo, pulse para ejecutar el cliente.
3. Encienda el panel de control de seguridad.
4. Inicie sesión en Hik-Connect y pulse el icono “+” en la esquina superior derecha de la página de
Hik-Connect para añadir el panel de control de seguridad. Puede escanear el código QR del panel
trasero del disposivo o del embalaje, o introducir manualmente el número de serie del disposivo
para añadirlo en modo de registro.
5. Después de añadir el panel de control de seguridad, pulse el icono de estado de armado a la derecha
del nombre del panel de control de seguridad para acceder a la página de parción.
6. Pulse el icono “+” de la página de parción para añadir los periféricos.
1
2
33
34
35
1
2
3
4
5
3
6
6
38
39
7
8
Prueba de intensidad de señal
Acceda al modo de comprobación de señal ulizando el panel de control.
El indicador se vuelve de color verde: Señal intensa.
El indicador se vuelve de color rojo: Señal débil.
Entrada de señal de manipulación de soporte
Caracteríscas técnicas de los detectores
Campo de detección: 12 m
Ángulo de detección: 90°
Zonas de detección: 2 x 22 zonas
Velocidad de detección: 0,25–2,5 m/s
Altura de montaje: 1-1,5 m
Tecnología inalámbrica bidireccional
Tecnología Blue Wave
Sensor piroeléctrico de elemento dual
Protección contra manipulación: Frontal, trasera y
entrada de señal de manipulación de soporte
Timbre de prueba integrado
Indicación led separada: Naranja (microondas), azul
(alarma), verde (PIR); superior: Microondas, PIR 1 y
alarma; Inferior: PIR 2
Indicadores de fuerza de señal (SSI, de sus siglas en
inglés)
3 frecuencias de microondas para evitar interferencias
Tecnología digital de límite flotante independiente
(IFT)
Carcasa de plásco: Policarbonato de 3 mm
Inmunidad contra mascotas: Hasta 24 kg
Ópca: Ópca sellada de doble visión
Sensibilidad ajustable: Largo o corto alcance
Lentes: Compensación UV
Método de detección: Lógica de detección de señal
triple
Sensor: 2 sensores infrarrojos pasivos de doble
elemento y bajo ruido y una unidad Doppler
microondas
Caracteríscas ambientales y de funcionamiento
Impermeabilidad: Calificación IP55
Temperatura de funcionamiento cerficada:
-25 °C a +60 °C (cerficada)
Dimensiones sicas (alto x ancho x profundidad):
118 mm × 77 mm × 84 mm
Peso: 0,3 kg
Electricidad y pila
Tipo de batería: 2 baterías de lio de 3 V y 4700 mAh
Duración de la pila: Hasta 3 años
Capacidad de la batería: 4700 mAh
Accesorios
Soportes de pared y fijos adicionales disponibles por
separado
Batería: Pila adicional disponible por separado
PIR superior acvado
PIR inferior acvado
Microondas acvado
Alarma
Encendido
Batería baja
Especificaciones técnicas
Referencias del diagrama
Installazione
Assicurarsi che il rilevatore sia installato lontano dalla luce solare riflessa e da grandi ogge.
Interruttori
Posizione ACCESO
1 LED accesi
2 Suoneria ava
3 Alta sensibilità PIR superiore
4 Alta sensibilità PIR inferiore
Posizione SPENTO
LED disavo
Cicalino disavo
Bassa sensibilità PIR superiore
Bassa sensibilità PIR inferiore
Disabilitando i LED del rilevatore, è possibile avarli da remoto nei walk test.
Intervallo microonde e angolo di rilevamento
Usare i comandi evidenzia per modificare la banda delle microonde e l'angolo di rilevamento.
LED
Quaro LED mostrano lo stato del rilevatore.
Innesti obiettivo
Usare gli innes dell'obievo per controllare l'area di copertura.
1
2
33
34
35
1
2
3
4
5
3
6
6
38
39
7
8
Test di potenza del segnale
Entrare in modalità di controllo del segnale agendo sul pannello di controllo.
L'indicatore diventa verde: segnale forte.
L'indicatore diventa rosso: segnale debole.
Ingresso segnale di manomissione staffa
Caraerische tecniche del rilevatore
Area di copertura: 12 m
Angolo di rilevamento: 90°
Zone di rilevamento: 2 x 22 zone
Velocità di rilevamento: 0,25 - 2,5 m/s
Altezza di montaggio: 1 - 1,5 m
Tecnologia wireless bidirezionale
Tecnologia Blue Wave
Sensore piroelerico a due elemen
Protezione da manomissioni: ingresso segnale di
manomissione anteriore, posteriore e staffa
Suoneria di walk test integrata
Indicatori LED disn: arancione (microonde), blu
(allarme), verde (PIR); superiore: microonde, PIR 1 e
allarme; inferiore: PIR 2
Indicatore potenza segnale (SSI)
3 frequenze a microonde per evitare interferenze
Tecnologia IFT (Soglia variabile digitale indipendente)
Custodia di plasca: policarbonato 3 mm
Immunità agli animali: fino a 24 kg
Componen oci: componen oci sigilla a visione
doppia
Sensibilità regolabile: intervalli eleva o bassi
Obievo: con compensazione UV
Metodo di rilevazione: logica di rilevamento a tre segnali
Sensore: 2 sensori agli infrarossi passivi a doppio
elemento e basso rumore e un'unità doppler a
microonde
Funzionalità operave e ambientali
Resistenza agen atmosferici: cerficato livello IP55
Temperatura di esercizio cerficata: Da -25 °C a +60 °C
(Cerficata)
Dimensioni fisiche (A x L x P): 118 mm x 77 mm x 84 mm
Peso: 0,3 kg
Elericità e baeria
Tipo di baeria: 2 baerie al lio da 3 V e 4700 mAh
Durata della baeria: fino a 3 anni
Capacità della baeria: 4700 mAh
Accessori
Staffe da parete o fisse supplementari disponibili a
parte
Baeria: baeria supplementare disponibile a parte
PIR superiore avato
PIR inferiore avato
Microonde avato
Allarme
Accensione
Baeria scarica
Specifiche tecniche
Riferimento schemi
Р У ССКИЙ
Установка
Удостоверьтесь, что датчик устанавливается вдали от отраженных солнечных лучей и крупных объектов.
Переключатели
Положение "ВКЛ."
1. Светодиоды включены
2. Зуммер включен
3. Высокая чувствительность верхнего пассивного ИК-датчика
4. Высокая чувствительность нижнего пассивного ИК-датчика
Положение "ВЫКЛ."
Светодиодная индикация выкл.
Зуммер выкл.
Низкая чувствительность верхнего пассивного ИК-датчика
Низкая чувствительность нижнего пассивного ИК-датчика
Вы можете отключить светодиоды датчика, а затем удаленно включить их в тестах ходьбой.
Дальность и угол обнаружения микроволнового излучения
Для изменения дальности и угла обнаружения микроволнового излучения используйте выделенные ручки.
Светодиодные индикаторы
Для определения состояния датчика используются 4 светодиода.
Вставки объектива
Используйте вставки объектива для изменения зоны обзора.
Процедура регистрации
После включения и регистрации активируется 10-минутный таймер, который позволяет выполнить тест
ходьбой для проверки пассивных инфракрасных и микроволновых датчиков. Для выполнения теста
ходьбой вы можете настроить чувствительность и дальность обнаружения микроволнового излучения, не
используя панель управления. По истечении 10 минут датчик переключается в режим ожидания.
Зарегистрируйте устройство в течение
90 секунд после включения питания.
Локальная регистрация
1. Включите режим регистрации на панели управления системой безопасности.
2. Регистрация датчика: Нажмите и удерживайте кнопку регистрации, пока три светодиода не начнут
мигать поочередно. Когда регистрация будет выполнена, зеленый светодиод мигнет 8 раз.
3. Тестирование связи: Отпустите пружину датчика ВЗЛОМА для активации сигнала тревоги.
Примечание. Расстояние между панелью управления системой безопасности и датчиком должно быть
менее 50 см.
Инициализация датчика
1. Извлеките батарею для выключения датчика.
2. Через 5 секунд нажмите кнопку регистрации и, удерживая ее, вставьте батарею на место. После этого
три светодиода начнут мигать поочередно. Отпустите кнопку регистрации, когда все три светодиода
мигнут один раз одновременно.
Регистрация с помощью приложения
1. Откройте App Store и введите "Hik-Connect" для поиска мобильного клиента. Скачайте приложение
Hik-Connect и установите его на свой телефон.
2. После установки нажмите для запуска клиента.
3. Включите панель управления системой безопасности.
4. Чтобы добавить панель управления системой безопасности, войдите в Hik-Connect и нажмите значок
"+" в верхнем правом углу страницы. Когда устройство находится в режиме регистрации, вы можете
отсканировать QR-код, который указан на задней панели устройства и на упаковочной коробке, или
ввести серийный номер устройства вручную, чтобы добавить это устройство.
5. После добавления панели управления системой безопасности нажмите значок состояния постановки
на охрану справа от названия панели, чтобы открыть страницу распределения.
6. Для добавления периферийных устройств нажмите значок "+" на странице распределения.
1
2
33
34
35
1
2
3
4
5
3
6
6
38
7Проверка уровня сигнала
Включите режим проверки уровня сигнала на панели управления.
Индикатор светится зеленым цветом: мощный сигнал.
Индикатор светится красным цветом: слабый сигнал.
39
8Ввод сигнала взлома кронштейна
Технические характеристики датчиков
Диапазон обнаружения: 12 м
Угол обнаружения: 90°
Зоны обнаружения: 2x22 зоны
Скорость обнаружения: 0,25–2,5 м/с
Монтажная высота: 1–1,5 м
Двунаправленная беспроводная технология
Технология Blue Wave
Двойной элемент пироэлектрического датчика
Защита от взлома: вход сигнала датчиков взлома
(переднего, заднего и кронштейна)
Встроенный зуммер теста ходьбой
Отдельные светодиоды: оранжевый
(микроволновый датчик), синий (сигнал тревоги),
зеленый (пассивный ИК-датчик); верх:
микроволновый датчик, пассивный ИК-датчик 1,
сигнал тревоги; низ: пассивный ИК-датчик 2
Индикаторы уровня сигнала (SSI)
3 частоты микроволнового излучения для
предотвращения помех
Технология цифровых независимых плавающих
порогов
Пластиковый корпус: поликарбонат толщиной 3 мм
Отсутствие ложных срабатываний при
обнаружении домашних животных: до 24 кг
Оптика: бифокальная герметичная оптическая
система
Регулируемая чувствительность: высокий/низкий
уровень
Линза: компенсация ультрафиолетового излучения
Способ обнаружения: логика распознавания
тройным сигналом
Датчик: 2 малошумных пассивных инфракрасных
датчика с двойным элементом и микроволновый
доплеровский датчик
Эксплуатационные характеристики и
характеристики среды
Защита от погодных условий: уровень защиты IP55
Сертифицированная рабочая температура:
от -25 до +60 °C (сертифицировано)
Физические размеры (В x Ш x Г): 118 x 77 x 84 мм
Масса: 0,3 кг
Электропитание и батарея
Тип батареи: 2 литиевые батареи, 3 В, 4700 мА·ч
Срок службы батареи: до 3 лет
Емкость батареи: 4700 мА·ч
Вспомогательное оборудование
Дополнительные настенные и фиксированные
кронштейны поставляются отдельно
Батарея: Дополнительную батарею можно
приобрести отдельно
Активирован верхний пассивный ИК-датчик
Активирован нижний пассивный ИК-датчик
Активирован микроволновый датчик
Тревога
Включение питания
Батарея разряжена
Технические характеристики
Ссылки на рисунки
Installation
Vergewissern Sie sich, dass der Melder nicht in der Nähe von reflekertem Sonnenlicht und großen Objekten
installiert ist.
Schalter
EIN
1. LEDs ein
2. Summer ein
3. PIR oben hohe Empfindlichkeit
4. PIR unten hohe Empfindlichkeit
AUS
LEDs aus
Summer aus
PIR oben geringe Empfindlichkeit
PIR unten geringe Empfindlichkeit
Wenn Sie die LEDs der Melder deakvieren, können Sie sie für Gehtests aus der Ferne akvieren.
Mikrowellenbereich und Erfassungswinkel
Verwenden Sie die hervorgehobenen Skalen, um den Mikrowellenbereich und den Erfassungswinkel zu ändern.
LEDs
Vier LEDs zeigen den Status des Melders an.
Objektiveinsätze
Verwenden Sie Objekveinsätze, um den Erfassungsbereich zu steuern.
Registrierung
Nach dem Einschalten und der Registrierung gibt es einen 10-Minuten-Timer, der einen Gehtest der PIR- und
Mikrowellensensoren ermöglicht. Sie können die Empfindlichkeit und den Mikrowellenbereich einstellen, ohne
die Alarmzentrale zu verwenden, um einen Gehtest durchzuführen. Nach 10 Minuten schaltet der Melder in den
Ruhezustand um. Registrieren Sie den Melder innerhalb von 90 Sekunden nach dem Einschalten.
Lokale Registrierung
1. Rufen Sie an der Alarmzentrale den Registriermodus auf.
2. Den Melder registrieren: Halten Sie die Registrierungstaste gedrückt, bis die drei LEDs abwechselnd blinken.
Die grüne LED blinkt 8-mal, wenn die Registrierung abgeschlossen ist.
3. Kommunikaonstest: Lassen Sie den SABOTAGE-Kontakt los, um den Alarm auszulösen.
Hinweis: Der Abstand zwischen Alarmzentrale und Melder sollte unter 50 cm liegen.
Melder initialisieren
1. Nehmen Sie die Baerie heraus, um den Melder abzuschalten.
2. Halten Sie nach 5 Sekunden die Registrierungstaste gedrückt und setzen Sie die Baerie wieder ein. Damit
wird der Melder gleichzeig wieder eingeschaltet und die drei LEDs blinken abwechselnd. Lassen Sie die
Registrierungstaste los, während die drei LEDs einmal gemeinsam aulinken.
Über APP registrieren
1. Melden Sie sich im App Store an und geben Sie „Hik-Connect“ ein, um den mobilen Client zu suchen wird.
Laden Sie „Hik-Connect“ herunter und installieren Sie die App auf Ihrem Mobiltelefon.
2. Tippen Sie nach der Installaon auf , um den Client ablaufen zu lassen.
3. Schalten Sie die Alarmzentrale ein.
4. Melden Sie sich bei Hik-Connect an und ppen Sie auf das Symbol „+“ im rechten oberen Bereich der
Hik-Connect-Seite, um die Alarmzentrale hinzuzufügen. Scannen Sie zum Hinzufügen eines Geräts den
QR-Code auf der Geräterückseite oder auf der Verpackung. Sie können auch die Geräteseriennummer
manuell eingeben, wenn sich das Gerät im Registriermodus befindet.
5. Nachdem Sie die Alarmzentrale hinzugefügt haben, ppen Sie auf das Scharfschaltstatussymbol rechts neben
dem Namen der Alarmzentrale. So gelangen Sie auf die Paronsseite.
6. Tippen Sie zum Hinzufügen der Peripheriegeräte auf das Symbol „+“ auf der Paronsseite.
1
2
33
34
35
1
2
3
4
5
3
6
6
38
7Signalstärketest
Rufen Sie den Signalprüfmodus an der Alarmzentrale auf.
Anzeige leuchtet grün: Starkes Signal.
Anzeige leuchtet rot: Schwaches Signal.
39
8Eingang für das Sabotagesignal der Halterung
Melder technische Daten
Erkennungsbereich: 12 m
Erkennungswinkel: 90°
Erkennungsbereiche: 2 x 22 Zonen
Erfassungsgeschwindigkeit: 0.25–2.5m/s
Befesgungshöhe: 1 - 1,5 m
Zweiwege-Drahtlostechnologie
Blue-Wave-Technik
Pyroelektrischer Dual-Element-Sensor
Sabotageschutz: Eingang für das Sabotagesignal
vorne, hinten und an der Halterung
Integrierter Gehtest-Summer
Getrennte LED-Anzeige: Orange (Mikrowelle), Blau
(Alarm), Grün (PIR); oben: Mikrowelle, PIR 1 und
Alarm; unten: PIR 2
Signalstärkeanzeigen (SSI)
3 Mikrowellenfrequenzen zur Vermeidung von
Störungen
Digitale unabhängige
Fließende-Schwellen-Technologie („Floang
Threshold“, IFT)
Kunststoffgehäuse: 3 mm Polycarbonat
Unempfindlichkeit gegen Tiere: Bis zu 24 kg
Opk: Versiegelte Dual-Vision-Opk
Einstellbare Empfindlichkeit: Hoher oder niedriger
Bereich
Objekv: UV-kompensiert
Erkennungsmethode: Drei-Signal-Erkennungslogik
Sensor: 2 rauscharme
Dual-Element-Passiv-Infrarot-Melder und eine
Mikrowellen-Doppler-Einheit
Umwelt- und Betriebsmerkmale
Weerfest: Schutzart IP55
Zerfizierte Betriebstemperatur: -25 °C bis +60 °C
(zerfiziert)
Abmessungen (H x B x T): 118 mm x 77 mm x 84 mm
Gewicht: 0,3 kg
Elektrische Spezifikaonen und Baerie
Baerietyp: 2 x 3-V-/4700-mAh-Lithium-Baerie
Baerielaufzeit: Bis zu 3 Jahre
Baeriekapazität: 4700 mAh
Zubehör
Zusätzliche Wand- und starre Halterungen separat
erhältlich
Baerie: Zusätzliche Baerie separat erhältlich
PIR oben akviert
PIR unten akviert
Mikrowelle akviert
Alarm
Hochfahren
Baerie schwach
Technische Daten
Schaubilder
Deutsch Polski
Instalacja
Upewnij się, że czujnik jest zainstalowany z dala od odbitego światła słonecznego i dużych obiektów.
Przełączniki
Pozycja WŁ.
1. WŁ. LED-y
2. Brzęczyk włączony
3. Wysoka czułość górnego czujnika PIR
4. Wysoka czułość dolnego czujnika PIR
Pozycja WYŁ.
WYŁ. LED-y
Brzęczyk wyłączony
Niska czułość górnego czujnika PIR
Niska czułość dolnego czujnika PIR
Jeśli wyłączysz diody LED czujnika, możesz zdalnie włączyć je w testach.
Zasięg mikrofal i kąt detekcji
Korzystając z elementów regulacyjnych, można zmienić zasięg mikrofal i kąt detekcji.
Wskaźniki
Cztery wskaźniki informują o stanie detektora.
Przesłony obiektywu
Użyj ustawień obiektywu, aby ustalić kontrolowany obszar.
Proces rejestracji
Po włączeniu i rejestracji przewidziano 10 minut na przeprowadzenie testu czujników PIR i
mikrofalowych. Na potrzeby testu możesz ustawić czułość i zasięg mikrofal bez użycia panelu
sterowania. Po 10 minutach czujnik przechodzi w tryb uśpienia. Zarejestruj urządzenie do 90 sekund
od jego włączenia.
Rejestrowanie lokalnie
1. Przełącz centralę alarmową do trybu rejestracji.
2. Zarejestruj detektor: Naciśnij przycisk rejestracji i przytrzymaj go do chwili, gdy trzy wskaźniki
zaczną migać na przemian. Zielony wskaźnik zamiga 8 razy po zakończeniu rejestracji.
3. Test komunikacji: Zwolnij sprężynę TAMPER, aby aktywować alarm.
Uwaga: Odległość centrali alarmowej od detektora powinna być mniejsza niż 50 cm.
Inicjowanie detektora
1. Wyjmij baterię, aby wyłączyć zasilanie detektora.
2. Po upływie 5 sekund naciśnij i przytrzymaj przycisk rejestracji, ponownie zainstaluj baterię, aby
włączyć zasilanie detektora, i upewnij się, że trzy wskaźniki zaczną migać na przemian. Zwolnij
przycisk rejestracji, gdy trzy wskaźniki migną równocześnie.
Rejestracja przy użyciu aplikacji
1. Zaloguj się do witryny APP Store i wprowadź „Hik-Connect”, aby wyszukać aplikację Mobile Client.
Pobierz i zainstaluj aplikację Hik-Connect w telefonie.
2. Po instalacji naciśnij ikonę , aby uruchomić klienta.
3. Włącz zasilanie centrali alarmowej.
4. Zaloguj się do aplikacji Hik-Connect i naciśnij ikonę „+” w prawym górnym rogu strony aplikacji
Hik-Connect, aby dodać centralę alarmową. Można zeskanować kod QR na tylnym panelu
urządzenia lub opakowaniu albo ręcznie wprowadzić numer seryjny urządzenia, aby dodać je
wówczas, gdy jest przełączone do trybu rejestracji.
5. Po dodaniu centrali alarmowej naciśnij ikonę stanu uzbrojenia po prawej stronie obok nazwy
centrali, aby wyświetlić stronę Partycja.
6. Naciśnij ikonę „+” na stronie Partycja, aby dodać urządzenia zewnętrzne.
1
2
33
34
35
1
2
3
4
5
3
6
6
38
39
7
8
Test siły sygnału
Za pomocą panelu sterowania przejdź do trybu sprawdzania sygnału.
Wskaźnik świeci na zielono: Sygnał jest silny.
Wskaźnik świeci na czerwono: Sygnał jest słaby.
Wejście sygnału sabotażu zaczepu
Specyfikacje techniczne detektorów
Zasięg detekcji: 12 m
Kąt detekcji: 90°
Strefy detekcji: 2 x 22 strefy
Szybkość detekcji: 0,25-2,5 m/s
Wysokość montażu: 1–1,5 m
Dwukierunkowa komunikacja bezprzewodowa
Technologia Blue Wave
Dwuczęściowy czujnik pyroelektryczny
Zabezpieczenie antysabotażowe: Sygnał wejściowy
sabotażu panelu przedniego i tylnego oraz uchwytu
Zintegrowany brzęczyk testu przejścia
Wskaźniki LED: Pomarańczowa (mikrofale), niebieska
(alarm), zielona (PIR); Góra: Mikrofale, PIR 1 i alarm,
Dolny: PIR 2
Wskaźniki siły sygnału (SSI)
Trzy częstotliwości w zakresie mikrofal pozwalają
uniknąć zakłóceń
Technologia Digital Independent Floang Threshold (IFT)
Plaskowa obudowa: Poliwęglan 3 mm
Niereagowanie na zwierzęta: Maks. 24 kg
Układ optyczny: Dualny hermetyczny układ optyczny
Regulacja czułości: Duży lub mały zasięg
Obiektyw: Kompensacja UV
Metoda detekcji: Algorytm detekcji Tri-Signal
Czujnik: Dwa niskoszumowe dwuelementowe
pasywne czujniki podczerwieni i mikrofalowy czujnik
Dopplera
Warunki otoczenia i użytkowania
Odporność na warunki atmosferyczne: Stopień
ochrony IP55
Certyfikowany zakres temperatur działania:
od -25°C do +60°C (certyfikat)
Wymiary (W x S x G): 118mm x 77mm x 84mm
Waga: 0,3kg
Zasilanie elektryczne i baterie
Typ baterii: Zestawy baterii litowych 2x3V 4700mAh
Żywotność baterii: Maksymalnie 3 lata
Pojemność baterii: 4700 mAh
Akcesoria
Dodatkowe zaczepy do montażu na ścianie i stałe
dostępne oddzielnie
Bateria: Dodatkowe baterie dostępne oddzielnie
Aktywacja górnego czujnika PIR
Aktywacja dolnego czujnika PIR
Aktywacja czujnika mikrofalowego
Alarm
Włączanie zasilania
Niski poziom baterii
Specyfikacje techniczne
Opis diagramu

Other manuals for DS-PD2-T12P-WEL

2

This manual suits for next models

1

Other HIK VISION Security Sensor manuals

HIK VISION DS-PDQP15AM-LM-WE User manual

HIK VISION

HIK VISION DS-PDQP15AM-LM-WE User manual

HIK VISION DS-PD2-T10P-WEH User manual

HIK VISION

HIK VISION DS-PD2-T10P-WEH User manual

HIK VISION DS-PDD12-EG2 User manual

HIK VISION

HIK VISION DS-PDD12-EG2 User manual

HIK VISION DS-PDMCK-EG2-WE User manual

HIK VISION

HIK VISION DS-PDMCK-EG2-WE User manual

HIK VISION Baseline DS-PDC10AM-EG2-WB User manual

HIK VISION

HIK VISION Baseline DS-PDC10AM-EG2-WB User manual

HIK VISION DS-PDP18-EG2 User manual

HIK VISION

HIK VISION DS-PDP18-EG2 User manual

HIK VISION DS-PD2-D10P-W1 User manual

HIK VISION

HIK VISION DS-PD2-D10P-W1 User manual

HIK VISION DS-PDTT15AM-LM-WB User manual

HIK VISION

HIK VISION DS-PDTT15AM-LM-WB User manual

HIK VISION DS-TDSB00-EKT/POE/4M User manual

HIK VISION

HIK VISION DS-TDSB00-EKT/POE/4M User manual

HIK VISION DS-PDP18-HM-WE User manual

HIK VISION

HIK VISION DS-PDP18-HM-WE User manual

HIK VISION DS-PDMC-EG2-WB User manual

HIK VISION

HIK VISION DS-PDMC-EG2-WB User manual

HIK VISION DS-PDCL12-EG2-WB User manual

HIK VISION

HIK VISION DS-PDCL12-EG2-WB User manual

HIK VISION DS-PD2-P15C-W User manual

HIK VISION

HIK VISION DS-PD2-P15C-W User manual

HIK VISION DS-PDC10DM-EG2-WB User manual

HIK VISION

HIK VISION DS-PDC10DM-EG2-WB User manual

HIK VISION TurboHD DS-2CE11D8T-PERL User manual

HIK VISION

HIK VISION TurboHD DS-2CE11D8T-PERL User manual

HIK VISION DS-PDBG12-EG2-WB User manual

HIK VISION

HIK VISION DS-PDBG12-EG2-WB User manual

HIK VISION DS-PDMCS-EG2-WB User manual

HIK VISION

HIK VISION DS-PDMCS-EG2-WB User manual

HIK VISION DS-PDP15P-EG2-WB User manual

HIK VISION

HIK VISION DS-PDP15P-EG2-WB User manual

HIK VISION DS-PDMCX-E-WB User manual

HIK VISION

HIK VISION DS-PDMCX-E-WB User manual

HIK VISION DS-PD2-P25-W User manual

HIK VISION

HIK VISION DS-PD2-P25-W User manual

HIK VISION DS-PDTT15AM-LM-WA User manual

HIK VISION

HIK VISION DS-PDTT15AM-LM-WA User manual

HIK VISION DS-PDC15-EG2-WE User manual

HIK VISION

HIK VISION DS-PDC15-EG2-WE User manual

HIK VISION DS-PDP15P-EG2-WE User manual

HIK VISION

HIK VISION DS-PDP15P-EG2-WE User manual

HIK VISION DS-PDSMK-S-WB User manual

HIK VISION

HIK VISION DS-PDSMK-S-WB User manual

Popular Security Sensor manuals by other brands

Mustang Survival MD0451 owner's manual

Mustang Survival

Mustang Survival MD0451 owner's manual

schmersal BNS 16 operating instructions

schmersal

schmersal BNS 16 operating instructions

Macurco RD-VRF User instructions

Macurco

Macurco RD-VRF User instructions

Honeywell Satronic IRD 1020 manual

Honeywell

Honeywell Satronic IRD 1020 manual

CLAS OE 3010 manual

CLAS

CLAS OE 3010 manual

Guardall SecuRam BASIC OPERATING AND CHANGING INSTRUCTIONS

Guardall

Guardall SecuRam BASIC OPERATING AND CHANGING INSTRUCTIONS

Aritech Mini 6920P Installation sheet

Aritech

Aritech Mini 6920P Installation sheet

DATACOM TEXTRON FiberLive R Series user manual

DATACOM TEXTRON

DATACOM TEXTRON FiberLive R Series user manual

jablotron JA-160PC quick start guide

jablotron

jablotron JA-160PC quick start guide

Satronic DKO 974 Technical data

Satronic

Satronic DKO 974 Technical data

Eclipse 902-592 owner's manual

Eclipse

Eclipse 902-592 owner's manual

ORTEC Detective X user manual

ORTEC

ORTEC Detective X user manual

Ecolink CS-732 installation instructions

Ecolink

Ecolink CS-732 installation instructions

AECO SC30P-RE25 T AD3 operating instructions

AECO

AECO SC30P-RE25 T AD3 operating instructions

Challenger Smart Force ASFP2 instructions

Challenger

Challenger Smart Force ASFP2 instructions

DMP Electronics 1127W installation guide

DMP Electronics

DMP Electronics 1127W installation guide

B.E.G. LUXOMAT PD2-M-2C-24V Installation and operating instruction

B.E.G.

B.E.G. LUXOMAT PD2-M-2C-24V Installation and operating instruction

Siemens S7-1500F manual

Siemens

Siemens S7-1500F manual

manuals.online logo
manuals.online logoBrands
  • About & Mission
  • Contact us
  • Privacy Policy
  • Terms and Conditions

Copyright 2025 Manuals.Online. All Rights Reserved.