Sumner Clamp Champ User manual

Operator’s Manual
Clamp Champ
September 2010 Copyright 2010 Sumner Manufacturing Co., Inc.
US
7514 Alabonson Road
Houston, TX 77088
phone: 281.999.6900
fax: 281.999.6966
UK
Unit A6, Haybrook Industrial Estate
Halesfield 9
Telford, Shropshire TF7 4QW
phone: +44 (0) 1952 586517
fax: +44 (0) 1952 588920
Canada
470 Collier MacMillan Drive, Unit 2 & 3
CDambridge, ON N1R 5Y7
phone: 519.623.2300
fax: 519.623.0744
WARNING!
Before using this tool, read and
understand this Operator’s Manual.
Become familiar with the
potential hazards of this unit.
Call SUMNER if you
have any questions.
ARCWELDINGSUPPLIES-078477870

Clamp Champ General Assembly
OWNER’S RESPONSIBILITIES
Throughout this publication, the words WARNING, CAUTION and IMPORTANT
will be used to alert the user to special instructions concerning a particular operation
that may be hazardous if performed incorrectlyor carelessly.
OBSERVE THEM CAREFULLY!
WARNING Hazards or unsafe practices which could result in severe
personal injury or death.
CAUTION Hazards or unsafe practices which could result in minor
personal injury, product or property damage.
IMPORTANT Indicates information or instructions that are
necessary for proper operation and/or maintenance.
3
Sumner Clamp Champ, Operator’s Manual
LEVELING &
SUPPORTING DEVICE
“C” CLAMP
FITTING
ATTACHMENT
SCREW
JACK SCREW
CHAIN
ATTACHMENT
SCREW
MAIN BLOCK
CHAIN ADJUSTMENT
HANDLE
JACK BAR
CHAIN
ARCWELDINGSUPPLIES-078477870

4
OPERATOR SAFETY INSTRUCTIONS
IMPORTANT
Read and understand this instruction manual prior to
operating or performing maintenance on this tool.
3. Wear proper clothing. Hard hat, protective
eye covering, safety shoes and gloves should
be worn as a precaution while operating this
equipment.
4. Keep work areas clean. Always keep floor in
work area clear of clutter.
5. Keep alert. Avoid horseplay around equipment
and keep bystanders at a safe distance. Do not
allow children to operate this tool and always
keep them out of work areas.
6. Do not misuse tool. Perform only the function
for which the tool is designed. Never attempt to
operate the equipment for more than the recom-
mended function.
WARNING - Using the Clamp Champ as a
reforming tool on pipe unit greater than 1" or
25mm may result in operator injury or
damages to the tool.
7. Use only factory recommended
accessories.
CAUTION - Use of improper accessories
may be hazardous.
WARNING - The Clamp Champ is not to be
used in fitting applications.
To accomplish each of the functions safely requires
dexterity and mechanical skills, as well as sound
safety habits.
Although the Clamp Champ is manufactured for
safe, dependable operation, it is impossible to
anticipate those combinations of circumstances
which could result in an accident. The following
instructions are recommended for safe operation of
this tool.
1. Read and understand the Operator's
Manual. Before operating this tool, read the
Operator's Manual carefully. Become familiar
with the tool operation, applications and limita-
tions. Always contact the factory if in doubt. Be
particularly aware of its specific hazards. Store
the Operator's Manual in a clean area and
always at a readily available location. Additional
copies are available at no charge by request at
sumner.com.
2. Inspect the equipment. Prior to suing the
Clamp Champ, check all parts to ensure that
they are in proper operating condition.
IMPORTANT - Make any necessary repairs
before attempting to operate the unit.
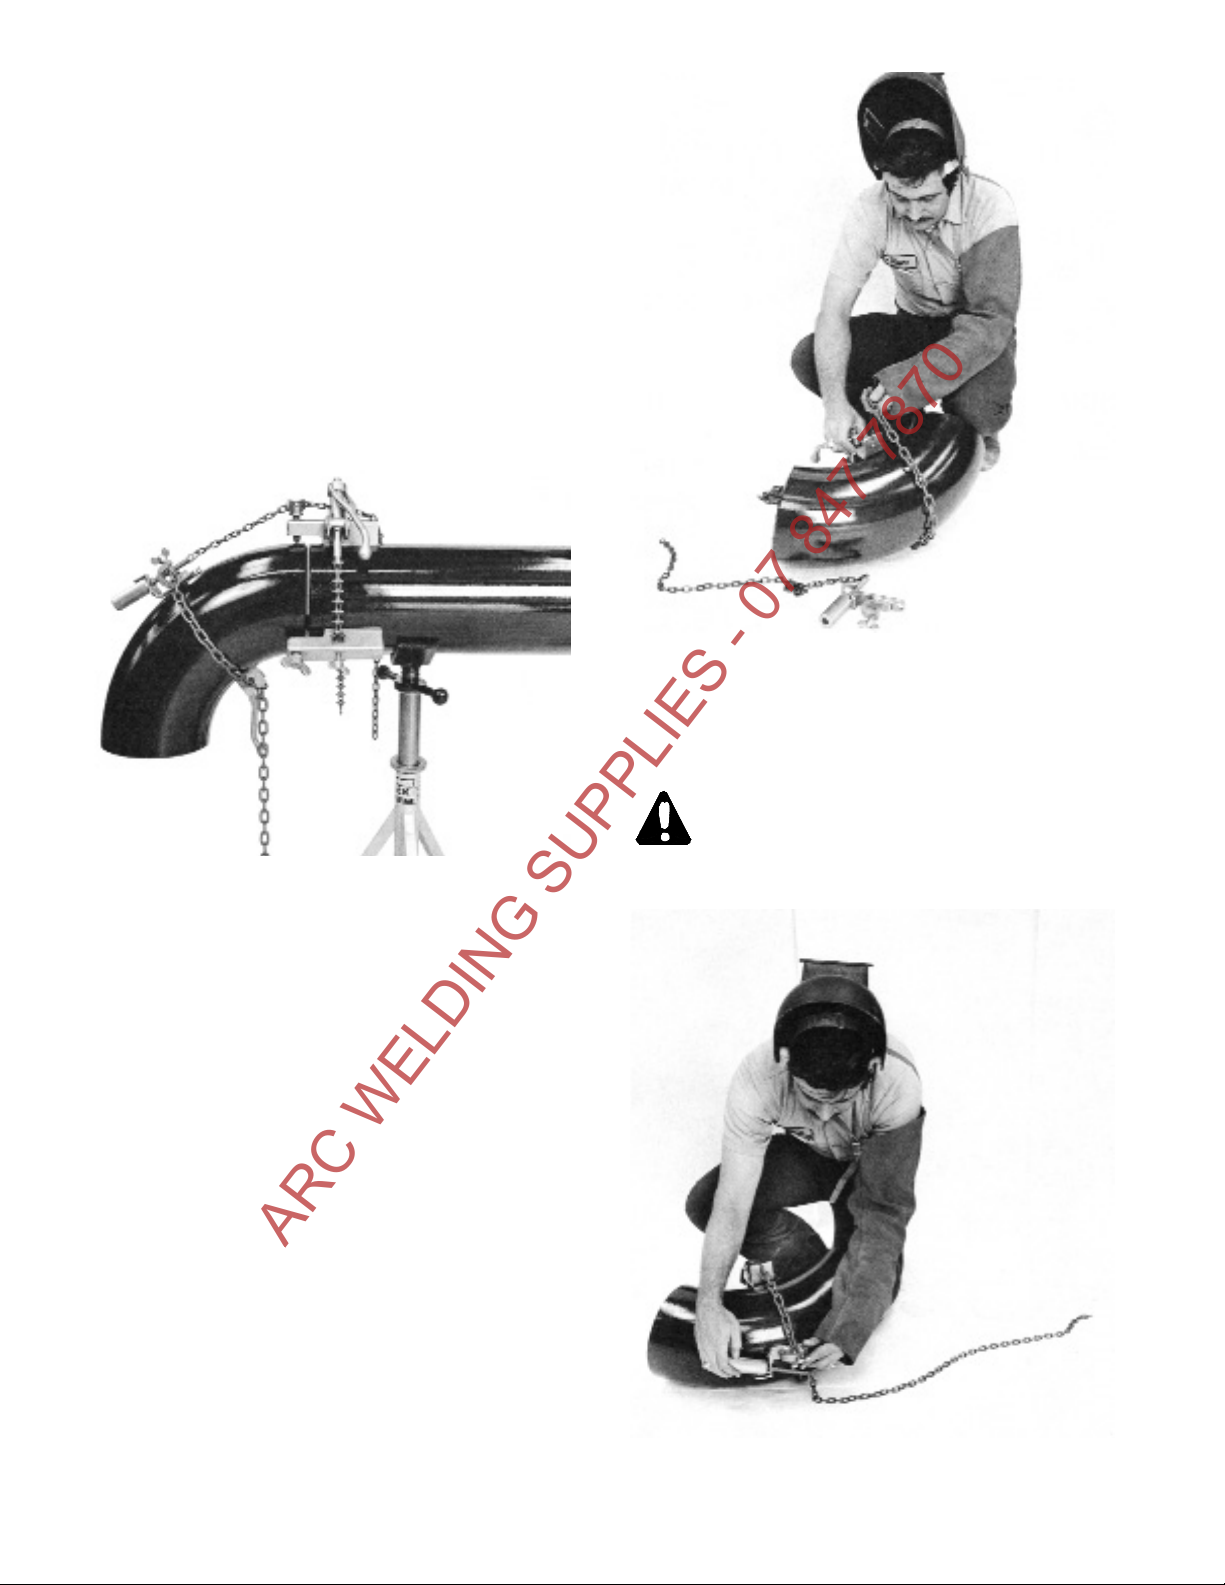
The Sumner Clamp Champ is designed for positioning and aligning pipe and fittings in the
range of 1-10", 1-16" and 10-36" Additional pipe sizes can be achieved using Clamp
Champ extension kits.
Sumner Clamp Champ, Operator’s Manual
ARCWELDINGSUPPLIES-078477870

Mounting the Clamp Champ
1. The Clamp Champ comes complete with
three to nine jack bars. Depending on pipe
size and the fit-up, two jack bars and the
main block may be adequate for most fit-up
jobs.
2. Remove Clamp Champ from carrying case
and spread out on a table. To add jack
bars, slide the chain through the opening in
jack bars and loosely tighten chain attach-
ment screw.
NOTE - Jack bars should be facing same
direction as the main block.
3. Estimate location of jack bars to fit on the
pipe in a 4, 8 and 12 o'clock position (if
using 2 jack bars and the main block) or 3,
6, 9 and 12 o'clock position when using
three jack bars. Before mounting tool,
make sure there is ample thread length on
the chain adjustment shaft so that slack can
be taken out of the chain.
4. While holding main block and chain adjust-
ment handle in one hand and the end of the
chain with the other, wrap the pipe end with
the Clamp Champ. The main block should
be located at the top of the pipe.
(See photo top right)
5
Step 4
5. Attach the chain to the main block and
remove slack by tightening the chain
adjustment. (See below)
Step 5
OPERATING PROCEDURES
Sumner Clamp Champ, Operator’s Manual
ARCWELDINGSUPPLIES-078477870

6
6. Tighten chain enough so that jack bars can
be positioned. By loosening the chain
attachment screws move jack bars to the
desired location. The body of the jack bars
should be about an inch (25mm) from the
pipe end.
Step 6
7. Once jack bars are in the correct position,
tighten the chain attachment screws and the
chain adjustment handles.
Step 7
Fitting an Elbow in the “Up” Position
1. Mount the Clamp Champ onto the pipe end
as shown in the earlier section. Position the
jack screws so that the ball is even with the
surface of the pipe.
2. Rotate the adjustment knob on the leveling
and supporting devices so that approxi-
mately 2 inches (50mm) of threaded shaft is
extended.
3. Attach the "C" clamp portion of the leveling
and supporting device onto the inside of the
elbow. The fitting attachment screw should
be on the inside of the fitting while the flat
portion should be on the outside. Center
the "C" clamp and tighten securely the
fitting attachment screw.
4. Pick up fitting with both hands and rest the
bottom of the fitting onto the lower jack
bars.
CAUTION - Do not lift fitting by leveling
and supporting devices. If the fitting is
too heavy to flit, use a crane or Roust-A-
Bout.
5. Once fitting is resting on jack bar, hook
leveling and supporting device chain onto
notch located behind the main block. Allow
space between pipe and fitting for
adjustment.
6. Remove high-lows by adjusting the jack bar
screws on the high spots.
Sumner Clamp Champ, Operator’s Manual
ARCWELDINGSUPPLIES-078477870

7
7. Check alignment of the pipe by first placing
a level on top of the fitting opening in the
direction opposite the run of the pipe. After
rotating the pipe until level. place level
parallel to the pipe. Using support and
leveling device knob, adjust fitting until
level. Once spaced and leveled, tack fitting
onto pipe and remove clamp.
Fitting an Elbow in the “Down” Position
(Requires the Sumner Hold Down Device,
Part No. 781050)
1. Mount the Clamp Champ onto the pipe end
as shown in the previous section. Position
the jack screws so that the ball is even with
the surface of the pipe.
2. Wrap the Sumner Hold Down Device
around the middle of the fitting and loosely
tighten chain. Slide flat portion of the level-
ing and supporting device under chain on
the back side of the fitting until chain fits
into "C" clamp. Tighten fitting attachment
screw and Hold Down Device. (See Photo
Top Right)
3. Rotate the adjustment knob on the leveling
and supporting devices so that approxi-
mately 2 inches (50mm) of threaded shaft is
extended.
Step 2
4. Pick up fitting with both hands and rest the
fitting onto the two lower jack bars.
CAUTION - Do not lift fitting by leveling
and supporting devices. If the fitting is
too heavy to lift, use a crane or Roust-A-
Bout.
Step 4
Sumner Clamp Champ, Operator’s Manual
ARCWELDINGSUPPLIES-078477870

5. Once fitting is resting on jack bar, hook
leveling and supporting device chain onto
notch located behind the main block. Allow
space between pipe and fitting for adjust-
ment.
6. Check for high-lows by adjusting jack
screws.
7. To square pipe, place level on the fitting
opening positioned at a right angle to the
run of the pipe. After rotating pipe until
level, place level so that it is parallel with
pipe. Adjust leveling and supporting device
knob until square.
8. Tack weld and remove Clamp Champ.
Fitting Up A Flange
1. Mount the Clamp Champ onto the pipe end
as shown in earlier section. Position the
jack screws so that the ball is even with the
surface of the pipe.
2. The leveling and supporting device must be
bolted onto the flange. Place the flat por-
tion onto the face of the flange and attach
with the nut and bolt provided in Clamp
Champ kit. Bolt need only be hand tight.
(See Photos Top Right)
Step 2
Step 2 Continued
3. Rotate the adjustment know on the leveling
and supporting device so that approximately
2 inches (50mm) of threaded shaft is
extended.
4. Pick up the flange so that the leveling and
supporting device is on top. (See Photo
Next Page Top Left)
8
Sumner Clamp Champ, Operator’s Manual
ARCWELDINGSUPPLIES-078477870

Using the Sumner flange pins
Fitting up a "T" perpendicular to
the pipe and in line with the pipe
1. Mount the Clamp Champ onto the pipe as
shown in the earlier section. Position the
jack screws so that the ball is even with the
surface of the pipe.
Step 1
2. Rotate the adjustment knob on the leveling
and supporting device so that approximately
2 inches (50mm) of threaded shaft is
extended.
CAUTION - Do not lift fitting by leveling
and supporting devices. If the fitting is
too heavy to lift, use a crane or Roust-A-
Bout.
Step 4
5. Once flange is resting on jack bars, hook
leveling and supporting device chain onto
notch located behind the main block. Allow
spaces between pipe and flange for
adjustment.
6. Check for high-lows by adjusting jack
screws.
7. Face up flange by using the level and sup-
porting device.
8. For two-holing, use Sumner Flange Pins
(Sumner PN 780430) which can be mount
ed in two flange holes. Using a torpedo
level resting on the Sumner flange pins,
rotate fitting until level.
9
Sumner Clamp Champ, Operator’s Manual
ARCWELDINGSUPPLIES-078477870

Step 2
3. Attach the "C" clamp portion of the leveling
and supporting device onto the inside of the
elbow. Center the "C" clamp and tighten
securely the fitting attachment screw.
Step 3
4. Pick up fitting with both hands and rest
bottom of fitting onto the two lower jack
bars.
10
Sumner Clamp Champ, Operator’s Manual
CAUTION - Do not lift fitting by leveling
and supporting device. If the fitting is
too heavy to lift, use a crane or Roust-A-
Bout.
5. Once fitting is resting on jack bar, hook
leveling and supporting device chain onto
notch located behind the main block. Allow
space between pipe and fitting for
adjustment.
6. Remove high-lows by adjusting the jack bar
screws on the high spots.
7. Check alignment by first placing a level on
the fitting opening. Level should be 90
degrees from the run of the pipe. After
rotating the fitting until level, place the
level so that it is in line with the pipe.
Using the support and leveling devices
knob, adjust fitting until level. Once
spaced and leveled, tack fitting onto pipe
and remove clamp.
ARCWELDINGSUPPLIES-078477870

11
Sumner Clamp Champ, Operator’s Manual
Fitting up a "T" crosswise
(Requires use of Sumner
Hold Down Device No. 780150)
1. Mount the Clamp Champ onto the pipe end
as shown in previous sections. Position the
jack screws so that the ball is even with the
surface of the pipe.
2. Wrap the Sumner Hold Down device
through the "T" and loosely tighten chain.
slide flat portion of the leveling and support-
ing device under chain until chain fits into
"C" clamp. Tighten fitting attachment screw
and Hold Down Device.
3. Rotate the adjustment knob on the leveling
and supporting device so that approximately
2 inches (50mm) of threaded shaft is
extended.
4. Pick up fitting with both hands and rest the
fitting onto the two lower jack bars.
CAUTION - Do not lift fitting by leveling
and supporting devices. If the fitting is
too heavy to lift, use a crane or Roust-A-
Bout.
5. Once fitting is resting on jack bar, hook
leveling and supporting device chain onto
notch located behind the main block. Allow
space between pipe and fitting for
adjustment.
6. Check for high-lows by adjusting jack
screws.
7. Check alignment by first placing a level on
the fitting opening. Level should be 90
degrees from the run of the pipe. After
rotating the fitting until level, square the fit-
ting by adjusting support and leveling
device. Once spaced and leveled, back
fitting onto pipe and remove clamp.
ARCWELDINGSUPPLIES-078477870

Fitting up reducers and 45's
Follow fit-up instructions for elbows when
working with reducers and 45's.
Maintenance and Care
1. Always keep Clamp Champ clean and free
of dirt.
2. Apply light oil on chain and threaded parts.
3. Replace worn parts.
4. Use only Sumner replacement parts.
12
Sumner Clamp Champ, Operator’s Manual
ARCWELDINGSUPPLIES-078477870

- NOT SHOWN
11
4
6
7
5
8
4
310
8
2
9
3
4
1
ITEM PART NO. DESCRIPTION CLAMP
CHAMP
CLAMP
CHAMP II ITEM PART NO. DESCRIPTION CLAMP
CHAMP
CLAMP
CHAMP II
1 781215 JACK BAR W/SCREWS-CC 9 - 1 781205 JACK BAR W/SCREWS-CC 9 -
2 781255 JACK BAR W/SCREWS-CCII - 9 2 781254 JACK BAR W/SCREWS-CCII - 9
3 776026 CHAIN ATTACHMENT SCREW 18 18 3 776028 CHAIN ATTACHMENT SCREW 18 18
4 781224 JACK SCREW 10 20 4 781210 JACK SCREW 10 20
5 781261 MAIN BLOCK - CCII 0 1 5 781258 MAIN BLOCK - CCII 0 1
6 781009 ADJUSTMENT NUT & HANDLE 2 2 6 781009 ADJUSTMENT NUT & HANDLE 2 2
7 781011 ADJUSTMENT ROD 2 2 7 781001 ADJUSTMENT ROD 2 2
8 779306 WRENCH CHAIN - 12" LONG 2 2 8 779306 WRENCH CHAIN - 12" LONG 2 2
9 781223 JACK BAR WELDMENT-CC 9 - 9 781207 JACK BAR WELDMENT-CC 9 -
10 781257 JACK BAR WELDMENT-CCII - 9 10 781256 JACK BAR WELDMENT-CCII - 9
11 781221 MAIN BLOCK - CC 1 - 11 781202 MAIN BLOCK - CC 1 -
STAINLESS STEEL MODELS STANDARD MODELS
ARCWELDINGSUPPLIES-078477870

1-10” Pipe
Quick Reference Chart
These photographs illustrate various welding fit-ups using the
Sumner Clamp Champ
These two fit-ups require
the use of the optional
Hold Down Device
ARCWELDINGSUPPLIES-078477870
This manual suits for next models
1
Table of contents