Sunless Mystic Tan KYSS MT-6500 Operating manual

Mystic Tan Kyss™ Maintenance Guide
2
SAVE THIS INFORMATION FOR YOUR RECORDS
Please find your serial number and record it below. The serial number is located by the power
inlet, near the power on/off switch and on your touch screen. Please use this serial number when
calling for service or replacement parts
Serial Number: __________________
Installation Date: ____ / ____ / ______
Mystic 6500
Sunless, Inc.
8909 S Freeway Drive
Macedonia, OH 44056
Tech Support: (855) 450-3500
For Support with Sales, Solutions, Lotions, and Products: (888) 974-9977
©Copyright 2016 Sunless, Inc. All Rights Reserved

Mystic Tan Kyss™ Maintenance Guide
3
Table of Contents
Maintenance Schedule for the Mystic Kyss.................................................................................... 4
Daily Maintenance..................................................................................................................... 4
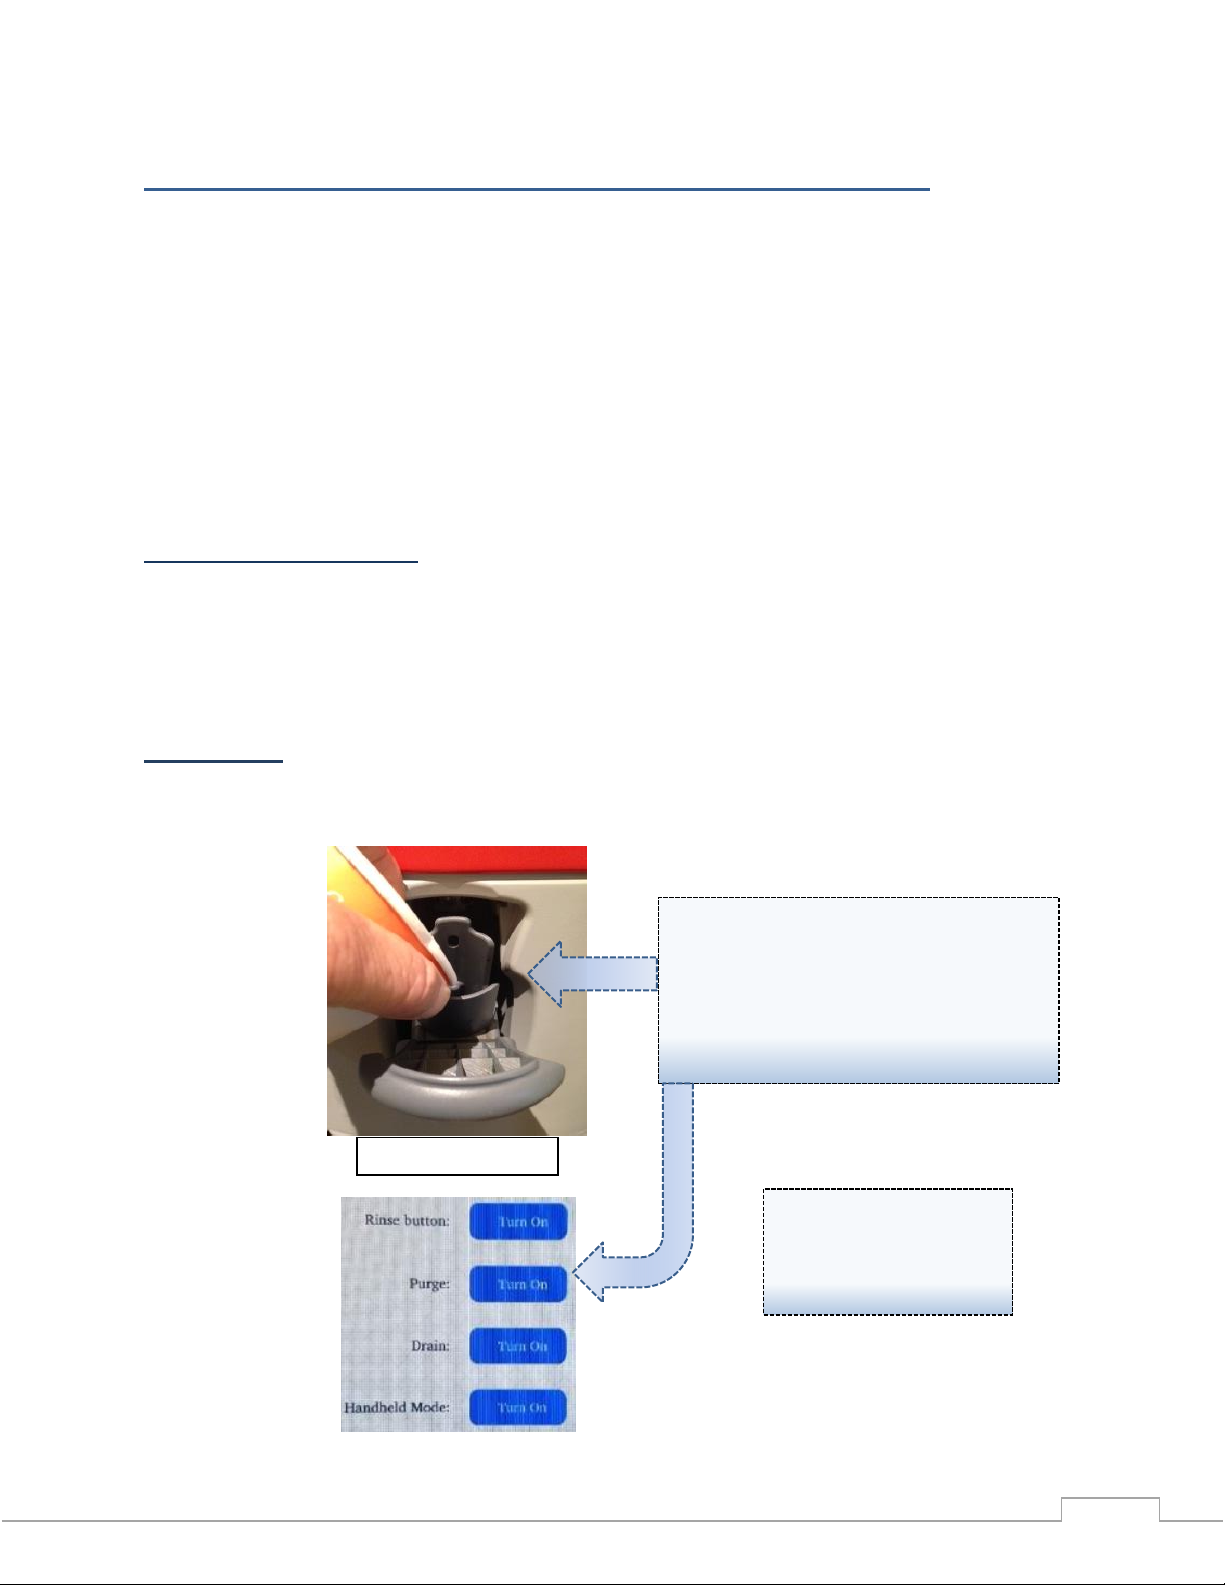
Line Purge .............................................................................................................................. 4
Clean Exhaust Filter .............................................................................................................. 5
Clean the Drain Filter............................................................................................................ 6
End of Day Maintenance ....................................................................................................... 7
Daily Maintenance Checklist ................................................................................................ 7
Daily Inspection Checklist .................................................................................................... 8
Weekly Maintenance................................................................................................................. 9
Clean Top Exhaust Filter....................................................................................................... 9
Weekly Maintenance Checklist .......................................................................................... 10
Monthly Maintenance ............................................................................................................. 10
Clean Float Switch Plate and Sump Basin ......................................................................... 11
Clean Heater and Compressor Filters................................................................................ 12
Run a Test Session............................................................................................................... 12
Perform Diagnostic Output Check ..................................................................................... 12
Monthly Maintenance Checklist......................................................................................... 13
Appendix 1: Adjusting the Air Pressure....................................................................................... 14
Appendix 2: Diagnostic Output Tolerances.................................................................................. 15
Appendix 3: Quick Start Staff Guide............................................................................................ 17
Select a Solution and Myxes ................................................................................................... 17
Prepare the Booth ................................................................................................................... 18
Start the Session............................................................................................................................ 20

Mystic Tan Kyss™ Maintenance Guide
4
Maintenance Schedule for the Mystic Kyss
Every machine and complex piece of equipment requires maintenance to perform properly. Just
like your car needs an oil change to keep the engine running smoothly, the Mystic Kyss is a
complex piece of equipment with a multitude of different systems working together. Proper
maintenance is a vitally important aspect of keeping your investment running and looking like
new.
The maintenance schedule is divided into Daily, Weekly, and Monthly maintenance operations
to ensure your booth stays in good working order. Along with normal maintenance procedures,
there is also an inspection list to review with each scheduled maintenance. Routine inspections
can help to identify issues before they become problems.
Daily Maintenance
Take the following actions on a daily basis to ensure the booth maintains a comfortable and
inviting environment. These steps will help to provide optimum performance and avoid any
issues with booth hygiene. Repeatedly neglecting these steps can lead to an accumulation of
tanning solution on surfaces and in the filters and clogging in the lines.
Line Purge
Purge the lines with ¼ cup of clean, warm water. This step ensures that no solution
accumulates in the lines of the booth, which can lead to clogging.
Staff > Tools Screen
Open the cartridge receptacle pour in ¼ cup
of warm clean water into the reservoir. On the
touchscreen, go to Staff > Tools and select
Purge. Inspect the air pressure value
displayed. If the value is not in the range of
18.3 –20 PSI see T5. Adjusting Air Pressure.
Note: The default purge
time is 90 seconds. This
should be sufficient to
purge the lines.

Mystic Tan Kyss™ Maintenance Guide
5
Clean Exhaust Filter
Clean the inner exhaust filter, as well as the inside and outside of the filter housing. Make
sure to have the spare filter clean, dry, and ready to insert. Avoid any abrasive clothes or
cleaners. Repeatedly failing to clean the exhaust vent can lead to clogged filters and
reduced ventilation due to an excess accumulation of spray tanning solution particles. If
the exhaust filter becomes clogged, this could reduce the effectiveness of the exhaust vent
and lead to a visible accumulation of excess solutions.
1. Open the two (2)
Exhaust Latches by
pressing inward.
2. Remove the existing
filter and clean, using
warm water. Have spare
filter on-hand.
3. Wipe the interior and
exterior of the exhaust
housing with a soft, damp
towel. Insert the dry spare
filter into the housing and
close, making sure both
latches click.
EXHAUST RECAP: Use the latches to open the filter housing (1). Remove the inner filter (2). Rinse the inside
filter and let this filter dry overnight (to be used the next day). Wipe off all inside and outside surfaces with a
soft towel, avoiding any abrasive clothes or cleaning products. Replace with clean, dry filter (3). Also remove
and clean the small blue filter, replacing with the dry spare (4).
4. Remove and clean
the smaller blue filter,
using warm water and
replace with the spare
filter while drying.

Mystic Tan Kyss™ Maintenance Guide
6
Clean the Drain Filter
Clean the drain filter and sump basin to remove excess sediment and ensure no
obstructions form. The drain filter cover will simply snap off, providing access to the
filter and sump basin. Regularly neglecting the drain filter can lead to clogging of the
sump and failure to drain properly.
The cover will snap off easily (do not apply excessive force). Remove
the filter and wash in sink to dispel any sediment that may have
accumulated from bodies or surfaces. You may need a soft bristled
brush to brush away lint or sediments from the filter. Clean the sump
basin of any sediment, then replace the filter and slide the cover back
into place. Now, move to the touchscreen.
After hand washing the drain filter, go to
the touchscreen and select Staff > Tools and
start a manual Rinse. Make sure both doors
are closed. This rinse will run for 20 seconds.
After running the manual Rinse, in the
touchscreen go to Staff > Tools and select
the Drain activation to clear any remaining
water from the sump. This will drain for 20
seconds, but you can use again if water
remains in the drain.

Mystic Tan Kyss™ Maintenance Guide
7
End of Day Maintenance
After purging the lines, cleaning the exhaust filter, and the drain filter, take the time to
close the booth down correctly.
Wipe down the booth with clean, warm water and a soft, nonabrasive cloth. If
there are any stains, simply use a few drops of Dawn or other mild cleaner in
warm water to remove. Feel free to run a Rinse session from the Staff > Tools
screen when finished.
Run a manual Drain setting from the Staff > Tools screen menu to clear any
excess water.
LEAVE THE DOORS TO THE BOOTH OPEN AT THE END OF DAY.
TURN OFF THE WATER SUPPLY TO THE BOOTH AT THE END OF
DAY. The installation agreement requires the salon to provide a cutoff valve on
the water supply to the booth so that the supply may be stopped quickly in the
event of a leak or ruptured hose. Use the cutoff valve to close the water supply.
Make sure you have finished rinsing the booth before cutting off the water supply.
Power the booth OFF using the white switch directly above the power cord
on the booth.
Daily Maintenance Checklist
A Daily Inspection checklist is provided below. Use this at the end of each day to ensure
that no maintenance steps have been missed and that no problems may be silently
forming. Prevention is always preferable to repair.
Booth ON/ OFF Switch
located directly above the
booth power cord.

Mystic Tan Kyss™ Maintenance Guide
8
Daily Inspection Checklist
Perform the Line Purge process in the Staff > Tools screen using clean, warm water until
the line runs empty of water.
Check the Air Pressure value displayed by the Purge function. If the PSI value is outside
the range of 18.5 –20.5 PSI, see Appendix 1: Adjusting the Air Pressure.
Remove the Exhaust Filter and replace with clean, dry spare filter. Clean the removed
filter and let dry for the next day. Clean the interior and exterior of exhaust housing.
Ensure that the two (2) latches on exhaust filter are closed securely.
Remove drain filter cover and clean drain filter in a sink as sediment may have
accumulated from bodies, tracked in on feet pads, or other surfaces.
Wipe the sump reservoir out (with drain filter cover removed) and remove any sediment
that accumulated. Reinsert the drain filter and the drain filter cover.
Use the manual Rinse feature from the Staff > Tools screen to rinse the booth after
washing filter.
Wipe down the booth using only warm water and a soft, nonabrasive cloth. If any stains
are apparent, add a couple of drops of Dawn® or other mild cleaner to warm water to
clean.
Purge any remaining water using the Purge feature in the Staff > Tools screen.
Turn the water off the booth. The connection should be equipped with a cutoff valve
where the hose connects to water source.
Visually inspect for any unaccounted for leaks or puddles from the intake or sewer drain.
Make sure all connections are secure and the power cord does not present a trip hazard.
Leave the booth doors open after the end of day until the next opening.
Turn the white power switch to the booth OFF (located above power cord). The screen
should go blank.

Mystic Tan Kyss™ Maintenance Guide
9
Weekly Maintenance
The following actions are only suggested once per week to keep the booth operating like new.
Repeatedly neglecting the weekly maintenance can lead to a visible accumulation of solution
particles and a reduced ability to properly filter the booth.
Clean Top Exhaust Filter
Clean the top exhaust filter to avoid saturation with solution and to ensure proper
evacuation and filtration of solution particles during the spray session. Routine failure to
clean the top exhaust filter can lead to a reduction in air flow, less solution being filtered
out during the session, and a sticky buildup of solution in the filter.
The top exhaust filter is located
on the ceiling of the booth (upper
left side if facing the booth). Please
use a stepladder to reach safely.
Follow all directions on the
ladder to avoid a fall.
Top exhaust filter handle
To remove the top exhaust
filter, take hold of the
handle and pull out. The
filter and filter housing
will slide out.

Mystic Tan Kyss™ Maintenance Guide
10
Weekly Maintenance Checklist
Remove top exhaust filter and clean thoroughly.
Ensure the top exhaust filter is fully dry and reinsert filter and housing.
Inspect all filters for holes, tears, or signs of excessive wear.
Perform all daily checklist activities.
Check for puddles or leaks around the water intake and outtake. Inspect area around
booth for evidence of leaks, cracks in hoses, and damage to any connections.
Monthly Maintenance
The following actions are suggested to be performed on a monthly basis. These actions help to
identify issues before an actual problem arises and help to maintain like-new performance.
Regular failure to perform these actions could lead to downtime from a component failure or
unplanned maintenance at an inconvenient time.
Once the top exhaust filter is
removed, take it to a sink
and wash with warm water.
Only once the filter has been
allowed to fully dry should
it be reinserted into the
ceiling. Do not run the booth
with the top exhaust filter
removed.
To reinsert the top exhaust
filter, hold by the handle
and slide back into place
firmly. Make sure the
filter is fully dry before
reinserting.

Mystic Tan Kyss™ Maintenance Guide
11
Clean Float Switch Plate and Sump Basin
An in-depth cleaning of the float switch plate and sump basin should be performed
monthly and extends beyond rinsing the filter. Repeated failure to perform this action
could lead to clogging of the sump basin and sticking float sensors, which could register
as a booth fault and cause problems when trying to run a session.
Carefully remove the bottom
panel by pulling out on the
handle. If the panel has an
accumulation of solution, clean
with warm water and Dawn or
other mild detergent.
Clean the sump basin and remove any
debris. Use a nonabrasive cloth and
warm water to clear any sediment that
may have accumulated.
Once the sump basin and float switch plate have been cleaned,
carefully reassemble the components back into place. Go to
the Staff > Tools page and run a manual rinse followed by a
manual drain and verify that the water drains properly.
Being careful not to damage the float sensors
in any way, lift up the float switch plate and
carefully clean both floats. Do not use
excessive force on the floats.
Drain Float
Emergency
Float

Mystic Tan Kyss™ Maintenance Guide
12
Clean Heater and Compressor Filters
Clean the intake filters to ensure the air coming into the booth is properly filtered, both
for comfort and to avoid particles entering the booth. Repeatedly neglecting this
maintenance can lead to reduced air intake and particles being introduced through the air
vents. All three (3) intake filters are located on the end of the booth with the ON/ OFF
switch and power cord. There are two larger circular vents for the heated air and a
smaller filter for the air compressor.
Run a Test Session
Now run a test session to ensure that the booth is operating properly and no errors occur.
While the session runs, watch the Status Indicator under the Mystic Tan logo on the
Home screen. Ensure that each stage of the tan completes, including the rinse cycle.
Make sure the door has been opened and closed (to simulate the user exiting the booth) at
the end of the session for the rinse cycle to begin. Giving close attention to a test session
may reveal any issues that typical users might be overlooking.
Perform Diagnostic Output Check
After running the test session, proceed to the Technical > Diagnostic Outputs page. Start
function beginning at the top, and compare the displayed values to the recommended
tolerances found below. If the displayed value is a deviation from the recommended
specs, refer to Appendix 2: Diagnostic Output Tolerances. Checking the diagnostics
may reveal a potential problem with a component before it affects the booth’s operation
and causes downtime for repairs.
Air compressor filter
and lower heater filter in
relation to the ON/ OFF
switch and power cord.
Circular Heater Filter-
two per booth, one upper
and one lower.
From the back column, remove all three filters by hand. Two are circular heater filters, and the third is a smaller
air compressor filter. Clean all three filters in warm water and allow to dry completely before reinserting.

Mystic Tan Kyss™ Maintenance Guide
13
Monthly Maintenance Checklist
Perform all daily checklist activities.
Perform all weekly checklist activities.
Remove bottom plate by pulling up on the handle. Clean any residue from the panels.
Use a nonabrasive cloth and Dawn or other mild detergent/ cleaner for all components.
Carefully remove the float switch plate without damaging the floats.
Gently clean the floats and sump basin. Remove any debris.
Remove and clean the two heater filters and the one compressor filter. Let dry and
reinsert.
Run a test session to check for any inconsistencies.
Perform a diagnostic output check from the Technical > Diagnostic Outputs page.
Compare the values displayed to the spec ranges shown in Appendix 2.
From the Staff > Tools page, run a manual rinse followed by a manual drain to remove
any remnants following the cleaning.

Mystic Tan Kyss™ Maintenance Guide
14
Appendix 1: Adjusting the Air Pressure
There are two main reasons you may notice a deviation in the recommended compressor PSI:
inefficient tanning results from too much or too little air pressure or from performing regular
maintenance and inspections of your unit. In either regard, proceed to the Technical > Diagnostic
Outputs page and enter your Technical screen password.
Press the Turn On button for the compressor and
check the specs displayed to the right. The PSI value
is ideally 19.5 PSI, but in the range of 18.5 to 20.5 is
acceptable. See Appendix 2 for more on tolerances.
If the compressor PSI deviates from the specified tolerance,
the bleed-off valve will need to be adjusted accordingly.
The compressor (shown at left) is located toward
the base of the booth in the same column as the
touchscreen. Remove the panel to access the
compressor.
External
Compressor Filter
Bleed-off Valve
Compressor
Regulate the PSI
here using the
black cap. The
silver locknut
holds the cap in
position.
Adjust the bleed-off valve to regulate the
compressor PSI. If the pressure is HIGH (above
20.5 PSI), open the valve more to reduce the
pressure and allow more to escape.
If the pressure is LOW (below 18.5 PSI), close
the valve more to increase pressure. Adjust in
increments so you do not over compensate.
Check the Technical > Diagnostic Outputs page
again, and adjust until the compressor PSI is
within the tolerance range.

Mystic Tan Kyss™ Maintenance Guide
15
Appendix 2: Diagnostic Output Tolerances
The Technical > Diagnostic outputs screen provides significant data about the various booth
systems during operation. Below are the recommended range tolerances for the various systems.
If a displayed value deviates from the range shown, there could be a problem with the
component. Remember that the Drain Pump and the Exhaust Fan cannot run at the same time.
The target value is the ideal operating value. Values within the low to high range are acceptable.
Compressor Specs
Low Value
Target Value
High Value
Compressor Amperage
2.2 A
2.7 A
3.1 A
Air Pressure PSI
18.5
19.5
20.5
Top Heater Specs*
Low Value
Target Value
High Value
Top Heater CT A
2.2
2.6
3.0
Bottom Heater Specs*
Low Value
Target Value
High Value
Bottom Heater CT A
2.2
2.7
3.0
Heater Fan (spike)*
Low Value
Target Value
High Value
Fan Amperage
0.35
0.42
0.48
Heater Fan (operating)*
Low Value
Target Value
High Value
Fan Amperage
0.25
0.30
0.34
To adjust the air compressor, open either the Staff >
Tools > Purge option OR the Technical > Diagnostic
Outputs > Compressor option (both show PSI value).
Use this to monitor the current PSI output from the
compressor. To alter the PSI, adjust the black cap with
your fingers, allowing the silver locknut to move
freely. While adjusting the black cap, trigger the
touchscreen to view the PSI output using either screen
mentioned above. Once it is within the target range
(18.5-20.5, ideally 19.5), firmly hold the black cap to
retain its position and hand tighten the silver locknut
down to the base (as shown in image).
Black Cap- hold
in position while
tightening silver
locknut
Silver Locknut-
hand tighten
down to base to
retain position
*NOTE ON FAN VALUES: Fan Heaters spike in the first moment of operation, and then
level out to a constant value. The spike value accounts for the first seconds of operation, and
should then drop to the operating value.

Mystic Tan Kyss™ Maintenance Guide
16
Exhaust Fan- Value is either OFF (0) or ON (1). During ON the Exhaust Fan should run.
Wash Solenoid- Value is either OFF (0) or ON (1). Activation should toggle between states.
Start Lamp- Value is either OFF (0) or ON (1). During ON the start sensor should illuminate. In
the ON state, the start sensor does not blink.
Drain Pump- Value is either OFF (0) or ON (1). During ON the Drin Pump should run.
Vertical Motor (spike)**
Low Value
Target Value
High Value
Vertical Motor mA
0.06
0.08
0.09
Vertical Motor (operating)**
Low Value
Target Value
High Value
Vertical Motor mA
0.04
0.05
0.06
Swivel Motor (spike)**
Low Value
Target Value
High Value
Swivel Motor mA
0.12
0.16
0.19
Swivel Motor (operating)**
Low Range
Target Range
High Range
Swivel Motor mA
0.05-0.11
0.07-0.14
0.08-0.16
**NOTE ON MOTOR VALUES: Motor values will spike in the first moment of operation,
and then level out to a constant value. The spike value accounts for the first seconds of
operation, and should then drop to the operating value.
The swivel motor has a much larger operating range than the vertical range and will vary
during operation. This is denoted by a low, target, and high range as opposed to a set value.

Mystic Tan Kyss™ Maintenance Guide
17
Appendix 3: Quick Start Staff Guide
A familiarity with the features and operations is essential for long term sustainability of the unit,
but if you just want to run a quick session, this is the section to get you started.
Select a Solution and Myxes
Familiarize yourself with the differing Solutions and Myxes that are available, so that you will be
able to explain the different benefits of each product to the customer.Also, be sure to refer to the
Mystic website for more information.
Select a solution to be applied. For
more information on the best solution
for a particular skin type, or any other
questions on solutions, lotions, or
additives, visit
http://mystictan.com/in-salon/ or call
(888) 974-9977 for more information.
Choose from an extensive list of
additives that may be added
directly into the cartridge.
Unscrew the black plastic lid,
open the additive pouch and pour
it into the cartridge. Screw the
black lid back onto the cartridge
and you are ready to go.

Mystic Tan Kyss™ Maintenance Guide
18
Prepare the Booth
While preparing the solution, or after it is prepared, start the booth to begin the warm up cycle so
the tanner has a comfortable and inviting environment when entering.
There is a wide selection of Myxer additives to enhance your tan. Accelerators help to boost the time it takes
for the tan to fully develop by balancing the skin’s pH levels. Bronzers provide an immediate color to the tan,
without having to wait on the effects of DHA. Scents allow you to customize the aroma of your spray tan. A
small sample is below, but be on the look-out for new varieties and limited edition specials at
http://mystictan.com/in-salon/ or find more options online at http://sunlessinc.com/ for any sunless need.
If the booth is
powered off, press
the white start
switch located next
to the power cord
on the booth to turn
it ON.
Once the booth is
powered ON,
press the “Get
Started” button to
begin the warm-
up cycle.

Mystic Tan Kyss™ Maintenance Guide
19
While the booth is preparing, place the sealed cartridge into the receptacle upside-down. The back of the
cartridge with the groove will face toward the back, and the front graphic will face toward the front. Once
inserted, push the receptacle closed. The black cap will be punctured and a flow vent will be pierced in the side.
DO NOT PLACE HANDS IN THE
CARTRIDGE RECEPTACLE!
The cartridge receptacle has an
internal needle which can pierce skin.
As the cartridge empties, the solution will
flow toward the solution reservoir. The
solution level indicator on the Home screen
will also fill to reflect the volume in the
reservoir.
The barcode reader will identify
the solution in the receptacle and
display the solution name to the
right of the solution level
indicator.
Insert cartridge
as shown.
Notice the
label faces
forward.
The indented slot
on the cartridge
faces the back.

Mystic Tan Kyss™ Maintenance Guide
20
Start the Session
Once the session begins, the voice prompts will guide the user through the tanning process.
The process has only two stances: a front spray and a back spray. During both stances, the
user will stand on the designated foot pads and follow the prompts.
The first stance will be facing toward the spray nozzle with arms extended out.
After the front stance, the booth will prompt the user that a dry cycle is beginning.
The user will turn around and face away from the spray nozzle for the back session.
After the back spray, the voice prompt will inform the user of the final drying session.
After drying, the user should exit the booth and shut both doors.
Once the booth has reached temperature, the solution cartridge is added, and solution is in
the reservoir start switch will begin flashing green inside the booth. The user simply needs
to enter the booth, close the door, stand on the two footpads, and wave a hand in front of
the flashing sensor.
*NOTE: The flashing start
sensor will time out after 16
minutes of inactivity and the
session will be cancelled.
Don’t panic. Simply press the
“Get Started” button to pick up
where you left off.
Once the booth is ready to tan, the
touchscreen will display the message
saying “You’re ready to Mystic Tan!”
*IMPORTANT NOTE ON THE RINSE CYCLE: Following the spray session, the booth will begin an
automatic rinse cycle (see page 18 on The Admin System Page if this feature is not activated). The rinse cycle
features a safety condition to ensure a user is not in the booth when the rinse cycle begins. The door must be
OPENED and CLOSED (signifying an individual exiting the booth) for the rinse cycle to begin. If the door is
not closed after exiting, the rinse will not begin.
Table of contents
Popular Personal Care Product manuals by other brands

Balance
Balance KH 8070 operating instructions

Eurotec
Eurotec Fleximate instructions

Thermrup
Thermrup HG618B instruction manual

CareCo
CareCo BA09039 Usage and maintenance instructions

bort medical
bort medical Capener Splint Extension manual

Hans Grohe
Hans Grohe Logis Universal 73570 Series Instructions for use/assembly instructions