SunSetter EasyScreen User manual

Do Not Discard,
Retain for Future Reference


1. Do not use the EasyScreen near an open flame.
2. Depending on location of install, fully extending the EasyScreen may form an enclosed space.
If an enclosed space is formed, the user must comply with any safety warnings related to the use of
heating sources (e.g. gas, propane, or wood re pits) within an enclosed space.
If the EasyScreen is installed on a garage door, do not run vehicles, generators, or other gas powered
equipment while Screen is fully extended.
1. Always retract the EasyScreen during periods of snow or heavy rain. Never leave the EasyScreen
extended and unattended in heavy winds.
2. Do not retract the EasyScreen while wet.
3. Do not permit the Remote to get wet, as this can affect its proper operation. It is recommended to
keep the Remote indoors when the EasyScreen is not in use or if rain is expected.
4. During an electrical outage, you will not have the ability to operate your EasyScreen.


Your Installer has programmed your EasyScreen(s) to operate on one or more channel(s) of your Remote.
Test the operation of your EasyScreen by using the UP and DOWN buttons on the Remote.
• Press and release the UP button. The EasyScreen will roll up to the Cassette Hood and stop on its
own. The UPPER stop limit should stop the EasyScreen automatically, before the Hem Bar reaches the
Hood. See Appendix A to adjust the UPPER stop limit.
• Press and release the DOWN button. The EasyScreen will unroll from the Cassette Hood and stop on
its own. The LOWER stop limit should stop the EasyScreen automatically, before the Hem Bar reaches
the physical limit of the ground/deck. See Appendix A to adjust the LOWER stop limit.
Your EasyScreen Motor has an obstacle detection feature. If an obstacle is detected during movement, the
Motor will stop automatically. Check to make sure there are no obstacles while the Screen is opening that
may be causing the Motor to stop. Once obstacles are removed, press the UP button briefly, followed by the
DOWN button. The Screen should now open fully to its lower stop limit.
High winds can apply enough tension to the Screen to activate the obstacle detection feature. If the Screen
continues to stop while lowering, wait for the wind to settle down, and try lowering again.
Depenidng on Remote model(s) ordered, you may have one or more Single Channel Remote(s) or Multi-
Channel Remote(s). If you own more than one Remote and/or EasyScreen, it is recommended to label the
Remotes and/or EasyScreens to prevent mix-ups.
Each Remote and each Channel (if applicable) of each Remote has its own unique ID.
If you have ordered a Multi-Channel Remote, it is recommended to use Channel 1 (the rst light from the left)
of the Remote to control the EasyScreen. Channel 1 of each Remote is unique from Channel 1 of every other
Remote.
To control multiple EasyScreens with one or more Remotes or Channels, or to mix and match Remotes with
more than one EasyScreen, see Appendix C.
Each LED light represents a separate
Channel with its own unique ID, which
operates as a unique Remote.
Channel 1 is the rst light on the left. Channel Selector Button
Press and release; the active Channel LED
will blink.
Press while the active Channel LED blinks,
next Channel selected and blinks.

Once installation is complete, my
EasyScreen will not function.
1. Use the Remote that came with this EasyScreen. Each
Remote is uniquely different.
For details, see pg. 4.
2. For a Multi-Channel Remote, conrm you are on the
Channel that has been programmed to the EasyScreen.
3. Test the power receptacle by plugging in a small appliance.
If Motor is hard-wired into the home, conrm there is power
to the circuit.
4. Visually inspect the Power Cord for possible damage.
5. Listen to the Motor. Press the UP or DOWN button on the
Remote and listen for the sound of the Motor turning.
a. If the Motor turns, the problem could be mechanical
with the Fabric Panel. The Motor may turn, but the
Fabric Panel may be stuck inside the Hood. Try tugging
on the Hem Bar and see if it unrolls from inside of the
Cassette Hood.
b. If the Motor does not turn, the problem could be related
to the Remote. Go to Step 6.
6. Perform self test on the Remote:
a. Press and hold the UP or DOWN button for 5 to 10
seconds. If the LED light blinks for at least 5 seconds,
the Remote works.
b. If the LED does not blink, remove and replace the
battery. For battery replacement instructions, see the
instruction sheet included with your Remote.
c. If the Remote got wet, it may need to be replaced.
7. If power is good and the Remote is good, try Additional
Motor Troubleshooting on pg. 7.
My EasyScreen retracts but will not fully
close up to the Cassette Hood.
Adjust the UPPER stop limit on your EasyScreen Motor. See
Appendix A, Adjusting the UPPER and LOWER stop position
limits of the Motor.
If the Fabric Panel has been replaced, new UPPER and LOWER
stop position limits may need to be set for the Motor. If so,
see Appendix B, Programming the EasyScreen’s Stop Position
Settings.
The EasyScreen only operates while the
UP or DOWN button is being pressed.
The Motor is in Programming Mode. Complete the
Programming procedure using the “Additional Motor
Troubleshooting” section on pg. 7.
If the problem persists, please call Customer Service for
assistance at 800-670-7071.

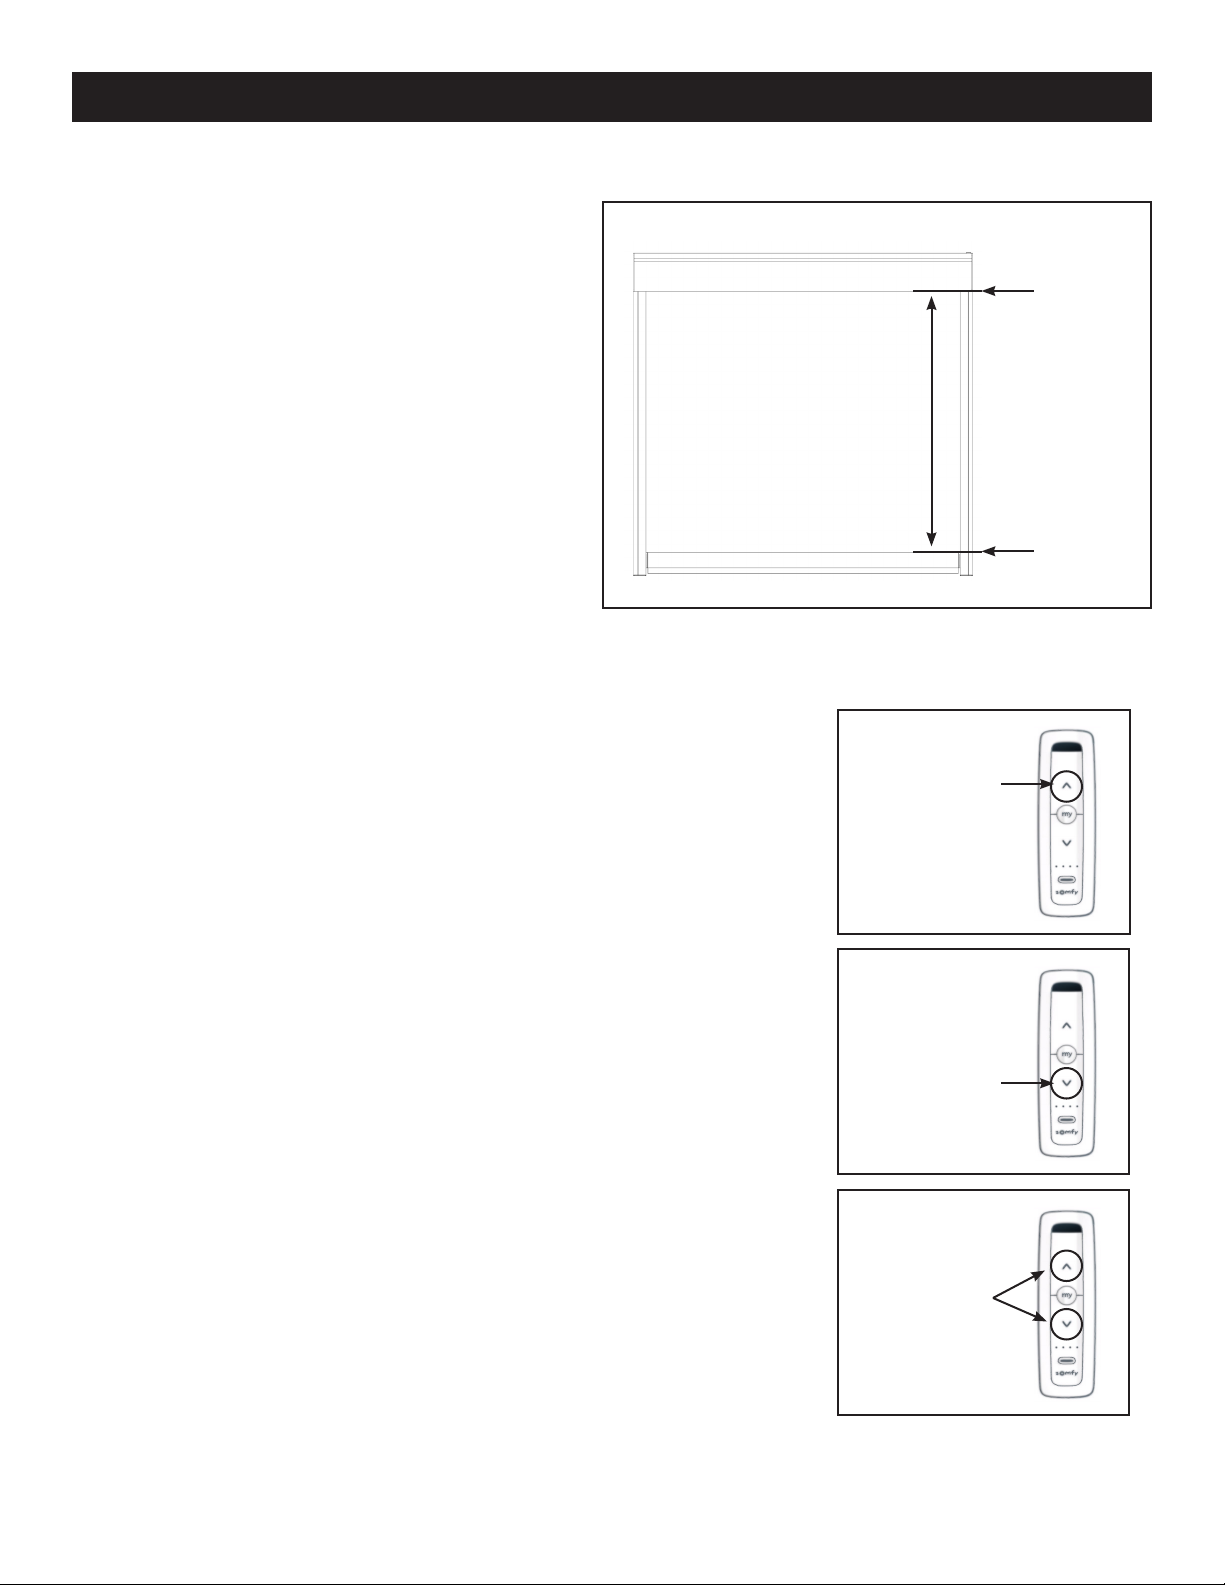
Fabric rolls up unevenly or pulls to one
side when the EasyScreen is being closed.
1. Check the Cassette Hood to ensure it is mounted level on
the mounting surface.
2. It is necessary to have the Side Channels or Guiding
Cables completely plumb, up and down, in order for the
EasyScreen to open and close smoothly and evenly.
For installation concerns, please contact your SunSetter
Dealer.
My EasyScreen rolls out and keeps going
until the Fabric Panel begins to sag.
• If the Motor stops on its own at a programmed Stop
Position, then adjust the LOWER position stop limit
according to instructions in Appendix A.
• If the Motor will not stop on its own and you must press
the “MY” button to stop the motor, then set new UPPER and
LOWER Stop Position Limits, according to instructions in
Appendix B.
Can I program multiple EasyScreens to
operate on one master Remote?
Yes, each Channel on the Remote can control one or more
EasyScreens.
See Appendix C, Programming Instructions - Multi Channel
Remote.
Can I use more than one Remote to control
one EasyScreen?
Yes, see Appendix C, Programming Instructions - Multi
Channel Remote, to mix and match multiple EasyScreens with
multiple Multi-Channel Remotes.
It is recommended to always unplug all EasyScreens except
the one you are currently programming, to simplify the
process.
What if I lose my Remote, or it becomes
damaged?
Do I need to reprogram my Motor?
The original Remote shipped with your EasyScreen can
be easily replaced. Please call Customer Service at 800-670-
7071 to purchase a replacement.
The Programmed UPPER and LOWER stop limits are
permanently stored in the Motor. These settings do not need to
be reset or changed due to the addition or removal of Remote.
Instructions for replacing the Remote are included with the
replacement Remote.
The EasyScreen stops in a position it was
not programmed for.
1. The EasyScreen Motor has an obstacle detection feature.
Check to make sure there are no obstacles while the Screen
is opening or closing that may be causing the Motor to
stop.
To change obstacle detection settings, see Appendix D.
2. Adjust the UPPER or LOWER stop limit on the EasyScreen
Motor. See Appendix A, Adjusting the UPPER and LOWER
stop position limits of the Motor.
If the Fabric Panel has been replaced, new UPPER
and LOWER stop position limits may need to be set
for the Motor. If so, see Appendix B, Programming the
EasyScreen’s Stop Position Settings.

Problems:
Motor does not respond to Remote
(Plug/Outlet has power and Remote passes Self Test.)
OR
Motor only runs while holding down the UP or DOWN button on the Remote.
Solution:
1. Unplug Motor,
2. Wait two seconds,
3. Plug in Motor,
4. If the Motor DOES jog, go to Group A.
5. If the Motor DOES NOT jog, go to Group B.
GROUP A GROUP B
1. Press and hold the UP and DOWN buttons
together, until the Motor jogs or moves.
2. Press and hold the PROGRAMMING button on
the back of the Remote, until the Motor jogs or
moves.
3. Test for normal operation.
1. Press and hold the UP and DOWN buttons
together, until the Motor jogs or moves.
2. Perform Steps 8 - 17 in Appendix B.
3. Test for normal operation.
If GROUP A or B (above) does not x the problem, then . . .
Perform Steps 1 - 17 in Appendix B, or call Technical Support at 800-670-7071.

Follow these instructions to change the
position where the EasyScreen stops. This is
for both the UPPER and LOWER stop positions.
See Figure 4.
NOTE: Do not exceed the physical lower limit
(bottom of Zipper Track Side Channels or Cable
Guide Brackets) as this will cause the Fabric
Panel to become loose.
1. Move the EasyScreen to its current UPPER (see Figure 4)
position and let it stop on its own.
2. Press and hold the UP and DOWN buttons (see Figure 7)
together, until the Motor jogs or moves.
3. Adjust to a new UPPER stop position.
4. Press and hold the MY button until the Motor jogs or moves.
5. Check the new UPPER position.
1. Move the EasyScreen to its current LOWER (see Figure 4)
position and let it stop on its own.
2. Press and hold the UP and DOWN buttons (see Figure 7)
together, until the Motor jogs or moves.
3. Adjust to a new LOWER stop position.
4. Press and hold the MY button until the Motor jogs or moves.
5. Check the new LOWER position.

This procedure describes the actions needed to reset the communication between the Motor and the primary
Remote used to control your EasyScreen.
This procedure programs the EasyScreen Motor to accept commands from one primary Remote.
This procedure overwrites the previously set UPPER and LOWER stop limit positions with new UPPER and
LOWER positions.
NOTE: To ONLY change the UPPER and/or LOWER preset positions, follow the basic procedure in Appendix A.
Tools needed: A pen or similar pointing device is needed to press and hold the Programming Button.
PREPARE MOTOR
1. Read these instructions FIRST, completely and thoroughly.
2. Disconnect power (at the wall outlet) for 5 full seconds.
3. Connect power (at the wall outlet) for 10 full seconds.
4. Disconnect power (at the wall outlet) for 5 full seconds.
5. Connect power (at the wall outlet). Your EasyScreen should move then stop on its own.
6. Press and hold the PROGRAMMING button on the back of the remote for at least 10 seconds, watching for
two SEPARATE jogs back and forth, several seconds apart.
NOTE: A single jog is a quick two-direction movement of the Motor.
7. Press and hold the UP and DOWN buttons together, until the Motor jogs.
NOTE: The EasyScreen now moves ONLY while holding down the UP or DOWN button.
SET PROPER DIRECTION OF MOTOR ROTATION
8. Press the DOWN button to check the direction of the Motor.
The Screen should roll out of the Cassette Hood, from the side closest to the house.
9. If the direction is incorrect, change direction by holding the MY button until the Motor jogs.
Press the DOWN button again to check for the correct direction of the Motor rotation.
SET THE UP AND DOWN POSITIONS
10. Move the EasyScreen to the desired UPPER position.
11. Press and hold the MY and DOWN buttons together; release when the EasyScreen begins to move.
12. Press the MY button to stop the EasyScreen at the desired LOWER position.
13. Make desired adjustments to the LOWER position.
14. Press and hold the MY and UP buttons together; release them when the EasyScreen begins to move up.
Let the EasyScreen stop on its own at the UPPER position set in step 11.
15. Press and hold the MY button, release when the Motor jogs. This step stores the UPPER and LOWER
position limits.
16. Press and hold the PROGRAMMING button, until the Motor jogs. This exits the Programming Mode.
17. Process complete. Test the new UPPER and LOWER stop position limits.
Note: If steps 7 -15 fail, unplug the power, plug back in, then begin again from step 7. If that fails to help, go
to Additional Motor Troubleshooting on pg. 7.

To ADD an additional Remote for controlling this particular EasyScreen.
• Press the PROGRAMMING button on the back of the Remote that was supplied with the EasyScreen,
until the Motor “jogs”.
• On the additional Remote, press the PROGRAMMING button until the Motor “jogs”, then release.
To DELETE a Control Device, repeat the two steps listed above; the additional Control Device is removed.
NOTE: Each EasyScreen operates on Channel 1 of the Remote that came with it.
Every Channel on every Remote is different, but you can mix and match them.
For model-specic instructions, please see the instruction sheet included with the Remote.
How to use the Multi-Channel Remote (see Figure 8):
• To identify the currently selected Channel, press and release the Channel
Selector Button once. The currently selected Channel Indicator Light will blink.
• To select the next Channel, press and release the Channel Selector Button
while the Channel Indicator Light blinks. The next Channel is selected and that
Channel Indicator Light blinks. All 4 lights blinking means Channel 5 is selected.
One EasyScreen can
run on any Channel.
See Figure 9.
Add each Channel to
the EasyScreen, using
STEP 1, then STEP 2 in
Figure 11.
One Channel can run
multiple EasyScreens.
See Figure 10.
Add that Channel
to each EasyScreen,
using STEP 1, then
STEP 2 in Figure 11.
How to program the EasyScreen to work with any Channel (see Figures 9 & 10):
Unwanted Channels can be removed from an EasyScreen using STEP 1, then STEP 2 in Figure 11.

NOTE: It is recommended all EasyScreens be unplugged from the power source except for the
one EasyScreen being programmed. This simplies the process and reduces errors.
Select a Channel that
currently controls the
EasyScreen being
programmed.
Hold the
Programming button
on this remote until
the EasyScreen jogs
or moves a little bit.
Select a Channel to
ADD to, or DELETE
from the EasyScreen
being programmed.
Hold the
Programming button
on this remote until
the EasyScreen jogs
or moves a little bit.
Programming
button
Programming
button
NOTE: When programming, all button presses must be completed within 2 seconds of the previous press.
This function gives the possibility to deactivate the obstacle detection or increase the sensitivity up from the
default level during the downward movement.
ENTER THE OBSTACLE SETTING MODE:
1. Move Screen to half-way position.
2. Press MY and UP buttons together briefly.
3. Press and HOLD MY and UP buttons together until the Screen jogs.
CHANGE THE OBSTACLE DETECTION LEVEL:
NOTE: If the Motor goes back to USER MODE (short jog) repeat Steps 1-3.
To Deactivate:
4. Press UP button briefly (within 2 seconds)
5. Press UP briefly again.
The Sceen will jog SLOWLY and obstacle
detection is now deactivated.
IF THE JOG IS SHORT, YOU’VE REACHED THE
DEFAULT SETTING. TO DEACTIVATE, PRESS
UP AGAIN.
To Increase Sensitivity:
4. Press DOWN briefly (within 2 seconds)
5. Press DOWN briefly again. The Sceen will jog
SLOWLY and is now more sensitive.
IF THE JOG IS SHORT, YOU’VE REACHED
THE DEFAULT SETTING. TO INCREASE
SENSITIVITY, PRESS DOWN AGAIN.
CONFIRM THE NEW SETTING & EXIT THE SETTING MODE:
5. Press MY/STOP button until the Screen jogs to conrm the new setting.
NOTE: The registered level of obstacle detection will be reached when entering Step 1 again.

To clean the EasyScreen, sponge the fabric with a solution of 1 cup of mild detergent, 1 cup of liquid bleach
to 3 gallons of warm water. Protect furnishings, trims, and plant materials that could be damaged or harmed
by the soap or bleach. Rinse Screen thoroughly with clear clean water and allow to air dry completely before
raising the Screen. Treat stains as soon as possible. Do not use abrasive household cleaners, or solvent or
petroleum based cleaners.
Regularly use a soft brush to remove dirt and cobwebs. Hose, using neutral soap or mild detergent and water
when necessary, then rinse off with clean water. Never use abrasive or solvent based cleaners and never roll
up a Screen which is wet.
To clean the EasyScreen, sponge the fabric with a solution of 1 cup of mild detergent to 3 gallons of warm
water. Protect furnishings, trims, and plant materials that could be damaged or harmed by the soap. Rinse
Screen thoroughly with clear clean water and allow to air dry completely before raising the Screen. Treat
stains as soon as possible. Do not use abrasive household cleaners, or solvent or petroleum based cleaners.
Wash outside of the Cassette Hood and Side Channels, as needed, with a soft brush and mild detergent. Rinse
and allow to dry completely before raising the Screen. Do not spray water into the Cassette Hood or on the
Roller Assembly as this may damage the Motor. Pressure washers are not recommended.
Lubrication is not needed on your EasyScreen. We do not recommend the use of oil or silicone-based
lubricants as they may stain the fabric or trap dirt.
You can view our Limited Warranty at www.sunsetter.com by clicking the link to Warranty Information at the
bottom of the page.
You may also request a copy of our Limited Warranty by emailing us at contactus@sunsetter.com, writing us
at 7945 Graber Rd Middleton, WI 53562, and/or calling us Toll Free at 800-670-7071.

Thank you for choosing SunSetter
Table of contents