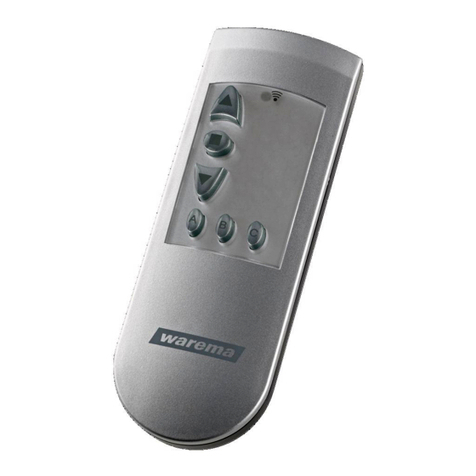
WAREMA WMS Hand-held transmitter comfort User manual

1
warema_890374_alhb_en_v6•2022-11-01 We reserve the right to make technical modifications
General information
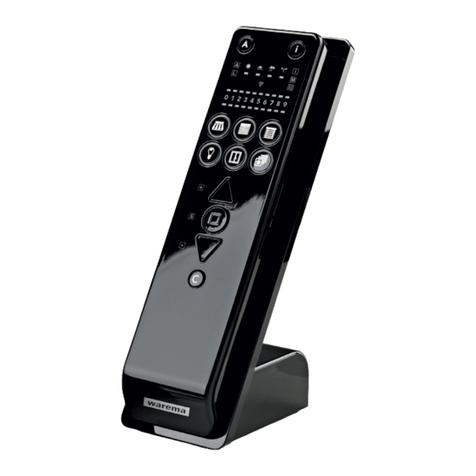
Fig. 1 WMS Hand-held transmitter comfort
The WMS Hand-held transmitter comfort is used for the
remote control of WAREMA WMS receivers. The receivers
send confirmation of the received commands, and
the hand-held transmitter indicates that it received the
confirmation.
The WMS Hand-held transmitter comfort supports 5
different product types. Ten channels are available per
product type and up to 10 receivers can be learned into
each channel.
To operate different products simultaneously and to recall
specifically defined states, up to 10 different scenarios can
be defined. A scenario can be used to operate up to 200
receivers with a single command.
The comfort control functions can be switched on and
off via the WMS Hand-held transmitter comfort. The
parameters of the control functions that are stored in the
receiver can be displayed and changed.
When the WMS Hand-held transmitter comfort operates a
product, it indicates whether this product was previously
operated by an automatic control mode. If a control
function is preventing operation of the product (e.g. a
wind alarm), this is also displayed on the WMS Hand-held
transmitter comfort.
Intended use
The WMS Hand-held transmitter comfort was developed
to control WMS receivers. Any use other than the purpose
described in these instructions requires approval from the
manufacturer.
Safety instructions
AUTIONC
The hand-held transmitter is for indoor use
only. It is not water-proof. Do not leave the
hand-held transmitter outdoors!
AUTIONC
Never activate buttons on your transmitter
arbitrarily unless you have a line of sight to
the sun shading product. Children must not
play with this product – remote controls or
transmitters must not get into the hands of
children!
Follow the steps below in the order shown to ensure
problem-free operation:
Please read these instructions carefully
Insert the batteries
Learn the hand-held transmitter into the receivers
Check that the system is functioning correctly
Further information and aids such as video
guides and the WMS practical manual can
be found on our support site.
www.warema.com/radio-systems-support
Insert the supplied batteries into the battery
compartment as described in the "Maintenance"
section. The device is then ready for operation.
Commissioning can also be carried out using the
WMS studio pro PC software.
Before WMS receivers can be operated via a hand-
held transmitter, the hand-held transmitter or the
receiver must be included as a device in a radio
network.
Operating and installation instructions
WMS Hand-held transmitter
comfort
Valid from
1st November 2022
Keep for future use.

warema_890374_alhb_en_v6•2022-11-01We reserve the right to make technical modifications
2
Operating elements and displays
Fig. 2 Operating panel of the WMS Hand-held transmitter comfor
t
Pos. Function Result
Front
AControl button Switching the comfort control functions on or off.
Product buttons Select the product type, or switch between product channels.
The currently selected product type flashes.
Info button
Information displays on the currently selected product channel.
Every press on changes to the next mode:
1. Allocation of channel and receivers (display only)
2. Sun control
3. Dawn/dusk control
4. Precipitation monitoring
5. Wind monitoring
6. Leave the info mode.
Move commands cannot be sent while the info mode is active ( lights up).
Control display
If a control function was the reason for the last movement, the corresponding symbol
lights up for 2s when you operate the product the next time.
The LEDs below the symbols show the current state of the control modes.
5Special function display
Control mode, Learn mode active, Store button, Info mode
6Transmission LED
flashes green = The WMS Hand-held transmitter comfort is
transmitting
flashes red = The WMS Hand-held transmitter comfort has not
received a response from the receiver
flashes orange: = Change the batteries
Number display
The number display block indicates a variety of information that depends on the
state of the hand-held transmitter.
upper row of LEDs: scanned receivers or parameter values
numbers: channel numbers, parameter levels
lower row of LEDs: active channel
Scenario button Save and call up scenarios
Buttons Send move or switch commands to the selected receiver.
Comfort button Save and recall comfort positions
Back
Batteries The hand-held transmitter requires two AAA batteries (IEC LR03, "Micro")
Learn button Activates or ends learn mode
Fig. 3 Back of the WMS Hand-held transmitter comfort

3
warema_890374_alhb_en_v6•2022-11-01 We reserve the right to make technical modifications
Learning in receivers
xampleE Channel 1 = Receiver 1, learn into the receiver as an external venetian blind on channel 1
Learn in receivers
Wake up
transmitter
Briefly press the product button Product button flashes, e.g. external venetian blind.
Start scan
process
5s
Press the L button for approx. 5 s
+ +
L LED lights up green, transmission LED flashes, red running
light under the row of numbers 0-9.
Select
receiver
Briefly press the up or down arrow button
e.g. LED 1 flashes.
LED red = new receiver
LED green = receiver already belongs to the network.
Identify
receiver
Briefly press the i button
Product waves, repeat the previous step if necessary until the
desired product waves.
Set
product type
Briefly press the product button Product button flashes, e.g. external venetian blind.
Set
channel
Press the product button multiple times (e.g. twice)
Channel 2 is selected.
Save
allocation
Briefly press the stop button
+
L LED briefly flashes multiple times as confirmation
LED 1 flashes green.
Complete
process
Briefly press the L button Process is completed

warema_890374_alhb_en_v6•2022-11-01We reserve the right to make technical modifications
4
Operating products
When the button is pressed again while the sun shading product is being lowered, it always moves to 100%
(lower limit position) and the "Position DOWN" value is ignored.
Operate products
External venetian blind
Press and briefly hold the up or down arrow button
The external venetian blind moves in the selected direction e.g.
up
Briefly press the up or down arrow button
The external venetian blind turns in the selected direction e.g.
slats tilt up
Press stop button
or keystroke in opposite direction Product stops
Roller shutter
Press the up or down arrow button The roller shutter moves in the selected direction, e.g. up
Press stop button
or keystroke in opposite direction Product stops
Awning
Press the up or down arrow button
The awning moves in the selected direction e.g. up
Press stop button
or keystroke in opposite direction Product stops

5
warema_890374_alhb_en_v6•2022-11-01 We reserve the right to make technical modifications
Operate products
Awning with valance roller blind
Briefly press the up or down arrow button once
The awning moves in the selected direction e.g. up
Press and briefly hold the up or down arrow button
once
The valance roller blind moves in the selected direction e.g. up
Awning position does not change
Briefly press the up arrow button twice
Valance roller blind moves up , then the awning moves up
Briefly press the down arrow button twice
Awning moves down , then the valance roller blind moves
down
Press stop button
or keystroke in opposite direction Product stops
Window
Press the up or down arrow button
Window moves in the selected direction
Press stop button
or keystroke in opposite direction Product stops
Light
Press the up or down arrow button
Light is switched On ( ) or Off ( )
Press stop button
or keystroke in opposite direction
Switch product
(ON→OFF, OFF→ON)

warema_890374_alhb_en_v6•2022-11-01We reserve the right to make technical modifications
6
Comfort position
If a product is already in the comfort position or if a comfort position has not been stored, the selected product
does not respond when the comfort button is pressed.
If the unit does not move to the comfort position correctly, the run time in the receiver has to be adjusted.
Comfort position
Learn
Select desired product, e.g. external venetian blind
Press the up or down arrow button
Move to desired position (in this case, e.g. external venetian
blind up)
5s
Press the comfort button for 5 s
Transmission LED lights up green for 2s = Comfort position
saved
Transmission LED lights up red for 2s = Command not
confirmed
Repeat process
Move
Select desired product, e.g. external venetian blind
Press the comfort button briefly
The unit moves to the comfort position (e.g. up)
Comfort control modes
Channel
selection
Select desired product, e.g. external venetian blind
Channel 1
Switch on / off
Press the control mode button briefly
+
The A LED lights up red and transmission LED lights up green
for 2 s
+ or +
Control mode symbols e.g. sun and dawn/dusk light up red,
LED underneath shows switch command:
Sun red = control mode OFF, Sun green = control mode ON

7
warema_890374_alhb_en_v6•2022-11-01 We reserve the right to make technical modifications
Deleting learned-in products (receivers) from the WMS network
Devices that do not need to be deleted must be de-energised. If you delete a receiver from the network, it can no longer
be operated via other transmitters. It must be learned into a network again.
Wake up
transmitter
Briefly press the product button Product button flashes, e.g. external venetian blind.
Start
scan procedure
5s
Press the L button for approx. 5 s
+ +
The L LED lights up green and
transmission LED flashes, red running light under the row of
numbers 0-9.
Select
receiver
Briefly press the up or down arrow button
e.g. LED 1 flashes.
LED green = receiver already belongs to the network.
Identify
receiver
Briefly press the i button
Product waves, repeat the previous step if necessary until the
desired product waves.
Delete
receiver
+
Briefly press stop button and C button
simultaneously
Running light under row of numbers lights up.
Product waves.
Confirm dele-
te command
Briefly press the L button
LED 1 flashes red, receiver is in factory setting again.
Complete
process
kurz
Briefly press the L button Process is completed

warema_890374_alhb_en_v6•2022-11-01We reserve the right to make technical modifications
8
Maintenance and cleaning
Replacing the batteries
Replace the batteries if the transmission LED lights up
orange after the hand-held transmitter is activated. If the
batteries are fully depleted, the hand-held transmitter can
no longer be activated.
In order to replace the batteries (type AAA, IEC LR03,
"Micro"), open the battery compartment (Fig. 3) and
insert the new batteries. Ensure the correct polarity: The
plus (+) and minus (-) poles of the batteries must match
up with the markings in the battery compartment.
Only use new batteries of the same type and always
replace both batteries. Use high-grade batteries –
inexpensive batteries may leak and damage the device.
If the device is not to be used for an extended period,
please remove the batteries. Do not use rechargeable
batteries!
Cleaning
Clean the housing with a soft, dry cloth. Do not use
detergents, cleaning agents, solvents, abrasive substances
or steam cleaners!
Liability
Failure to comply with the product information in these
instructions and any use of the device other than its
intended use may result in the manufacturer refusing to
honour warranty claims for product damage. In this case,
liability for secondary harm to persons or damage to
property will also be excluded. Observe the information
in the operating instructions for your sun shading system.
Liability is also excluded for damage to the sun shading
system resulting from operation under icy conditions.
Obligations for the disposal of electrical
devices
A marking with this symbol indicates the following
obligations under the scope of legal regulations:
The owner of this electrical device must dispose of it
separately from unsorted municipal waste for further
recycling.
Used batteries and accumulators that are not enclosed
in the old device, as well as lamps/bulbs that can be
removed from the old device without breaking, must be
disposed of separately.
Distributors of electrical devices and disposal
companies are obliged to take back the equipment free
of charge.
The owner must take it upon themselves to delete any
personal data contained in the electrical device prior to
disposal.
Technical data
WMS Hand-held transmitter
comfort min. typ. max. Unit
Supply
Battery type 2 x AAA (IEC LR03, "Micro")
Operating voltage 2.4 3.0 3.2 VDC
HF transceiver
Transmission frequency 2.40 2.48 GHz
Transmission power 10 dBm
Reception sensitivity -95 dBm
Operating range
(environment without
interference)
30 m
Housing
Dimensions (L×W×H in mm) 200 × 50 × 20
Degree of protection IP30
Safety class III
Miscellaneous
Conformity Specified under
www.warema.de/ce
This device complies with the EMC directives for use in
residential and commercial areas.
WAREMA Renkhoff SE declares herewith that the radio system
type WMS Hand-held transmitter comfort is in compliance with
the 2014/53/EU guideline.
Ambient conditions
Operating temperature 0 50 °C
Storage temperature 0 70 °C
Humidity
(not condensing)
10 40 85 %Hrel
Degree of soiling 2
Article numbers
WMS Hand-held transmitter
comfort
1002767
Wall support/table stand for
WMS Hand-held transmitter
comfort
1002768
WAREMA Renkhoff SE
Hans-Wilhelm-Renkhoff-Str. 2
97828 Marktheidenfeld
Germany
Table of contents
Other WAREMA Transmitter manuals

WAREMA
WAREMA WMS User manual

WAREMA
WAREMA WMS User manual

WAREMA
WAREMA WMS User manual

WAREMA
WAREMA WMS User manual

WAREMA
WAREMA WMS Wall-mounted transmitter plus User manual

WAREMA
WAREMA EWFS User manual

WAREMA
WAREMA EWFS User manual

WAREMA
WAREMA WMS plus User manual

WAREMA
WAREMA EWFS Wall-mounted transmitter plus User manual

WAREMA
WAREMA WMS User manual
Popular Transmitter manuals by other brands

Endress+Hauser
Endress+Hauser Prosonic S FMU90 technical information

Crestron
Crestron DM Lite HD-TX-4KZ-101 quick start guide

Miratron
Miratron T-6 operating guide

Siemens
Siemens SITRANS LR Quick start manual

Scosche
Scosche TUNEIN FMT4-RP user manual

Dwyer Instruments
Dwyer Instruments AVUL Series Installation and operating instructions