SUPER-CAN MY LITE X3 ILDA User manual

My Lite X3 - 3000mw RGB Laser - Instruction Manual Ver:2019.04.18
1/ 16
Instruction Manual
3000mw RGB Laser
ITEM NO.:
□MY LITE X3 ILDA (only back panel different: ILDA port only)
□MY LITE X3 SD (only back panel different: ILDA input & SD card player & DMX-512)
□MY LITE X3 FB (only back panel different: ILDA input & Pangolin FB4 & DMX-512)
Update: 2019.04.18
This product manual contains important information about
the safe installation and use of this product. Please read and
follow these instruction carefully and keep this manual in a
safe place for future reference.

My Lite X3 - 3000mw RGB Laser - Instruction Manual Ver:2019.04.18
2/ 16
Legal notice
Thank you for purchasing this product.
Due to continual product developments and technical improvements the manufacturer reserve the
right to make modifications to its products.
This manual and its content have been made with due care but the manufacturer cannot however,
take any responsibility for any errors, omissions or any resulting damages forthwith.
The brands and product names mentioned in this manual are trademarks or registered trade
marks of their respective owners.
Contents
Latest file to download........................................................................................................................................ 3
Safety warning..................................................................................................................................................... 3
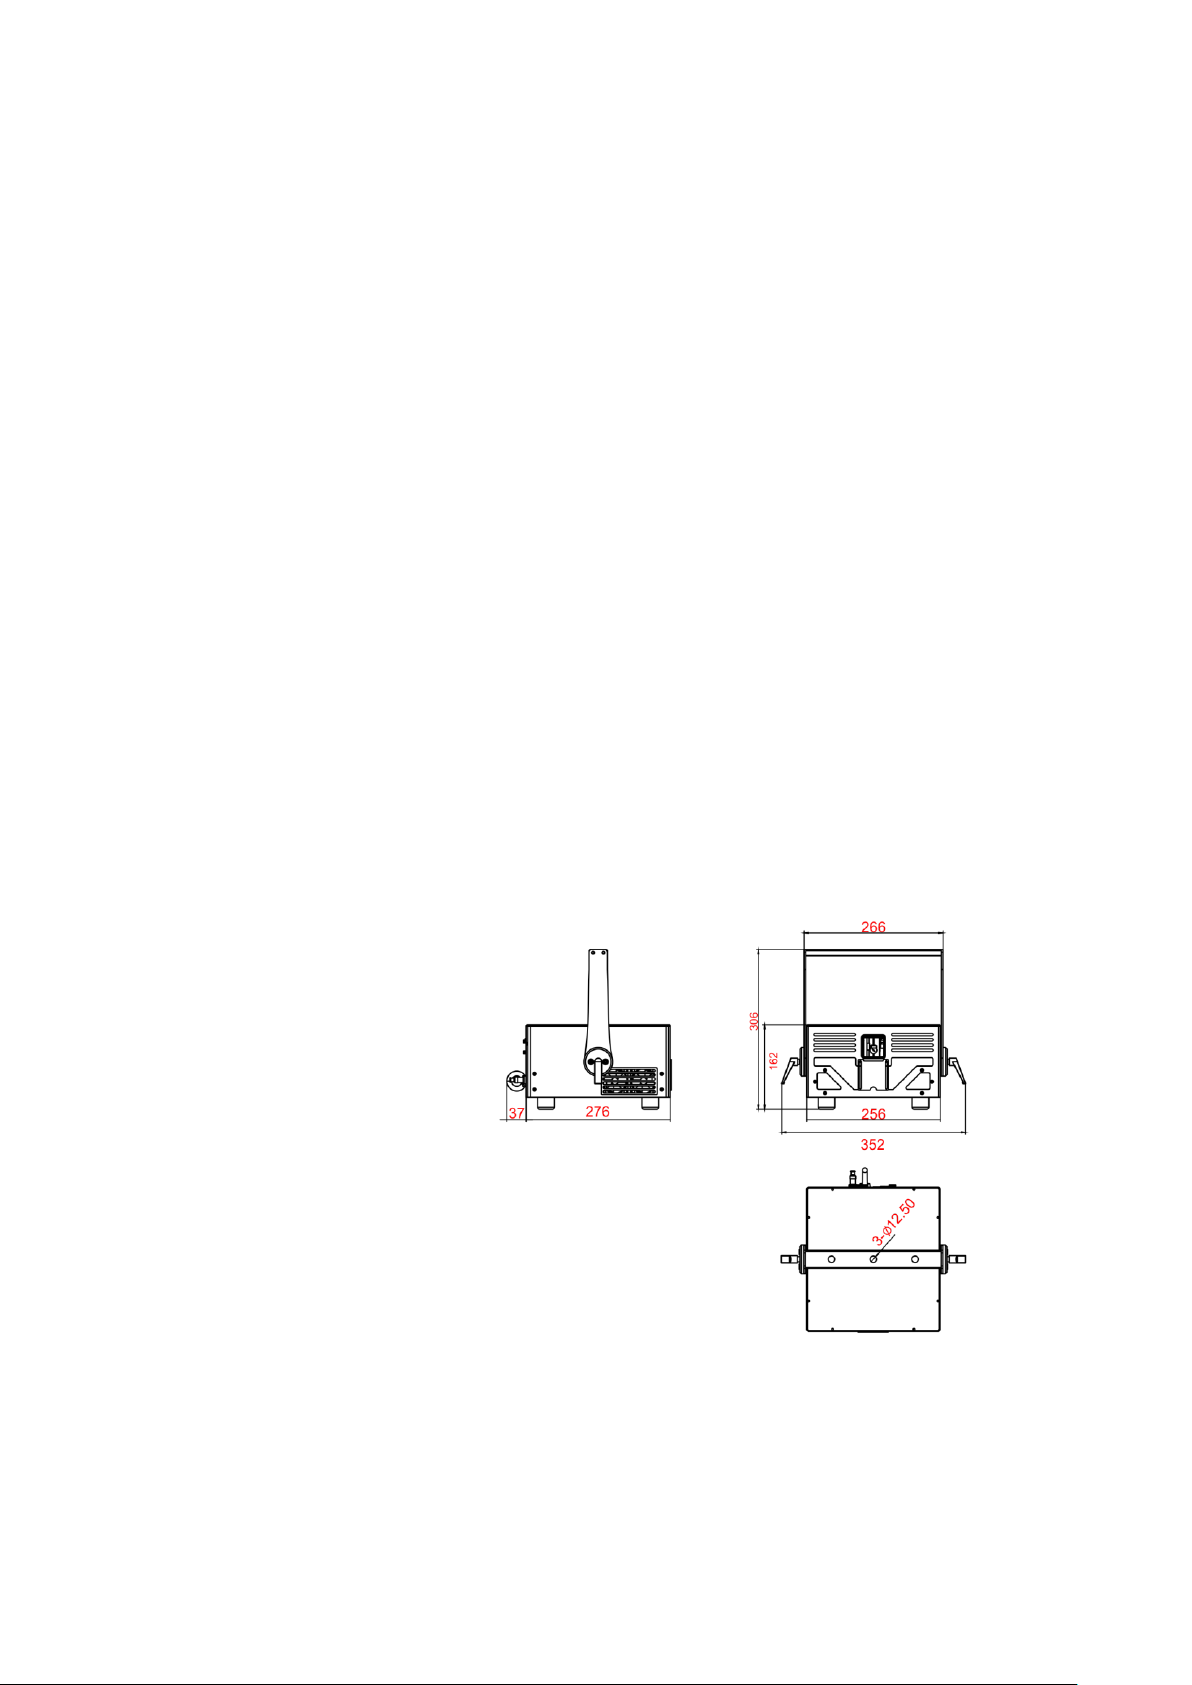
Product technical parameters............................................................................................................................. 4
Product packing list ............................................................................................................................................. 5
Power Connections Method................................................................................................................................ 5
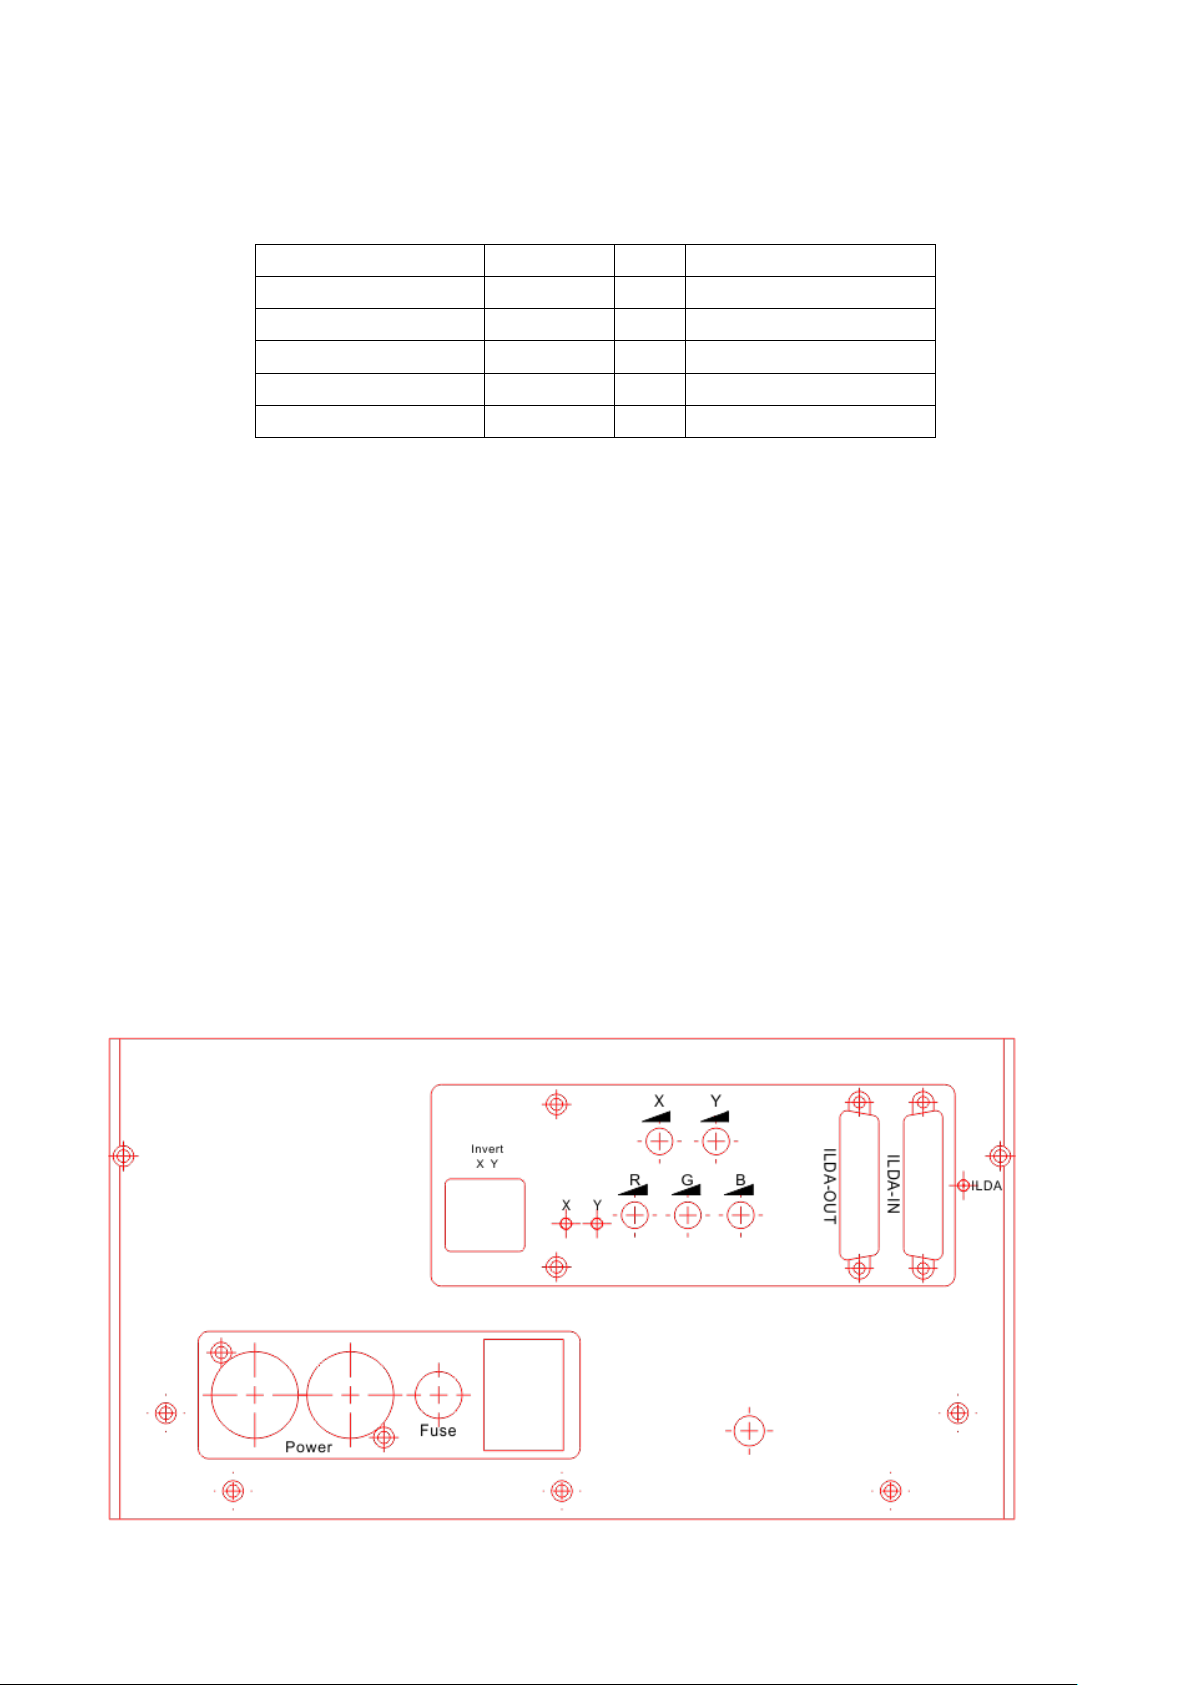
Back panel ILDA version ...................................................................................................................................... 5
Back panel SD version.......................................................................................................................................... 6
Back panel FB version.......................................................................................................................................... 7
Lighting Fixture's DMX and IP function set-up method ...................................................................................... 7
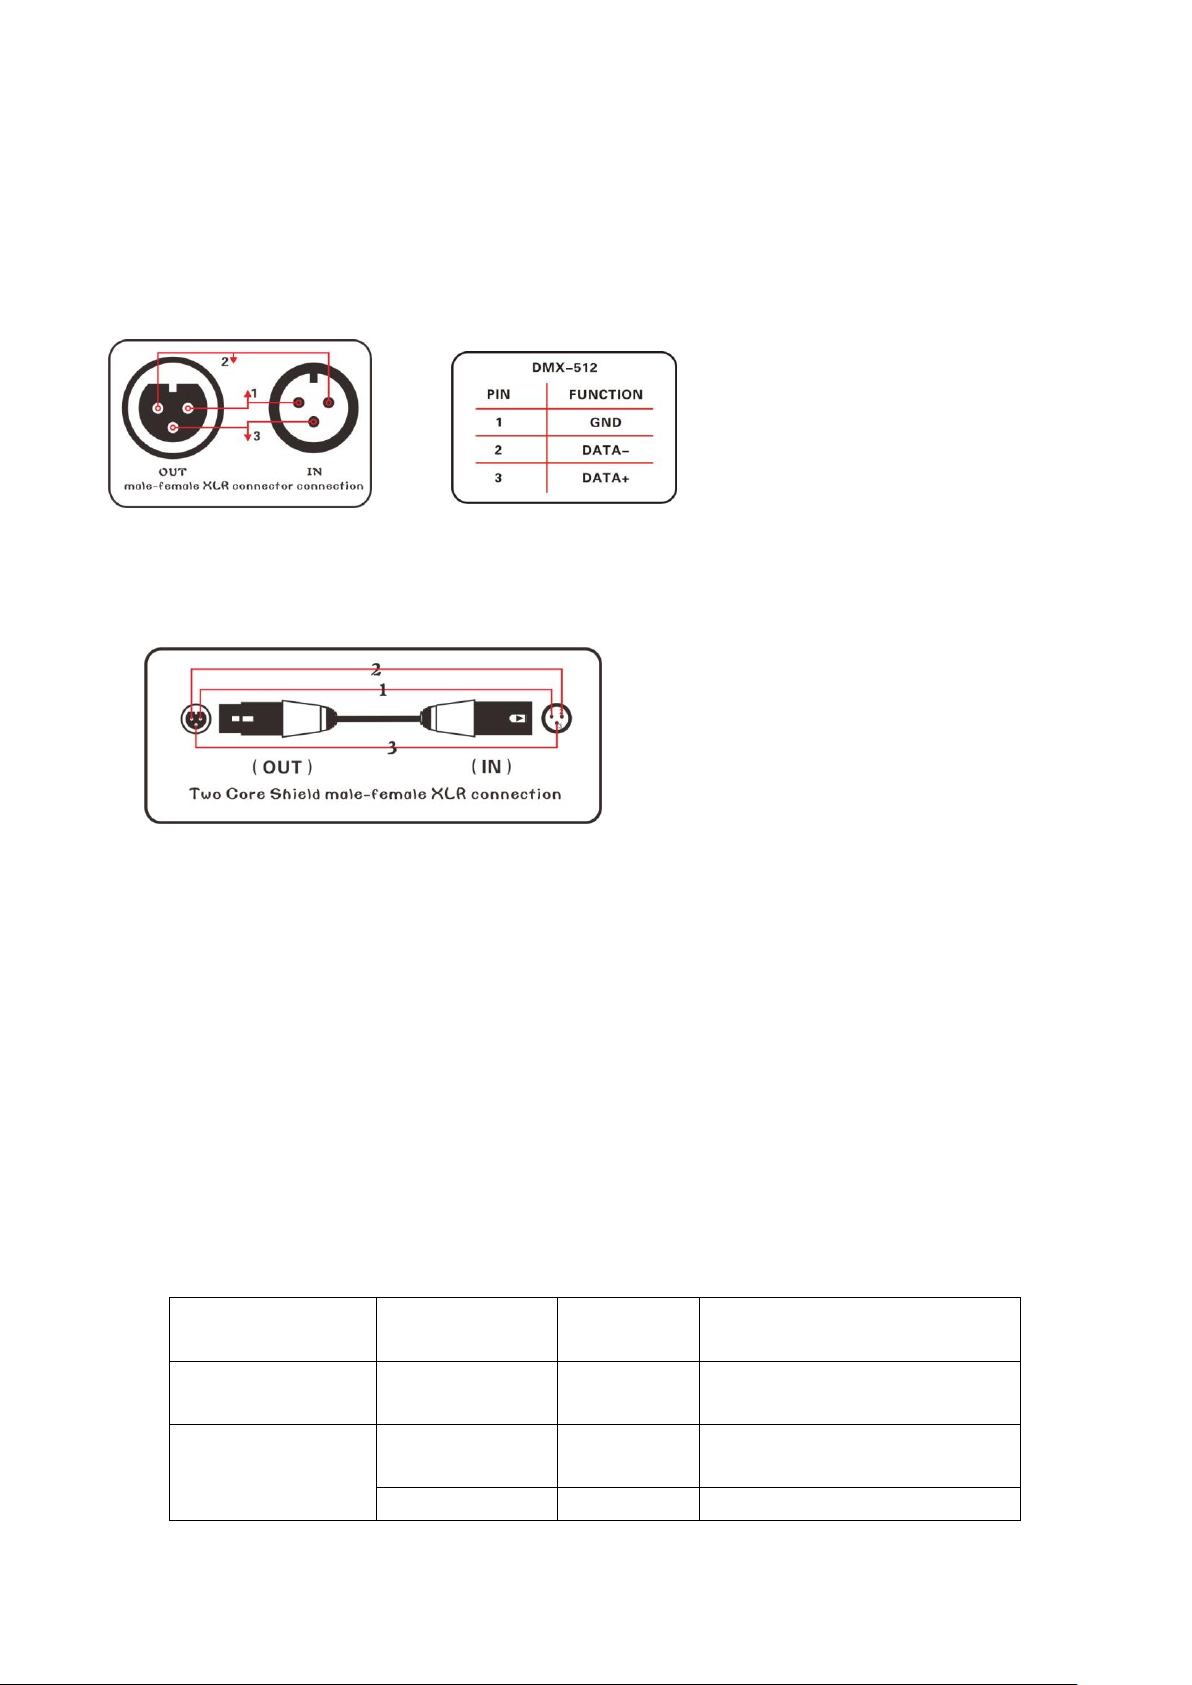
DMX Connection method.................................................................................................................................... 8
LCD menu ............................................................................................................................................................ 8
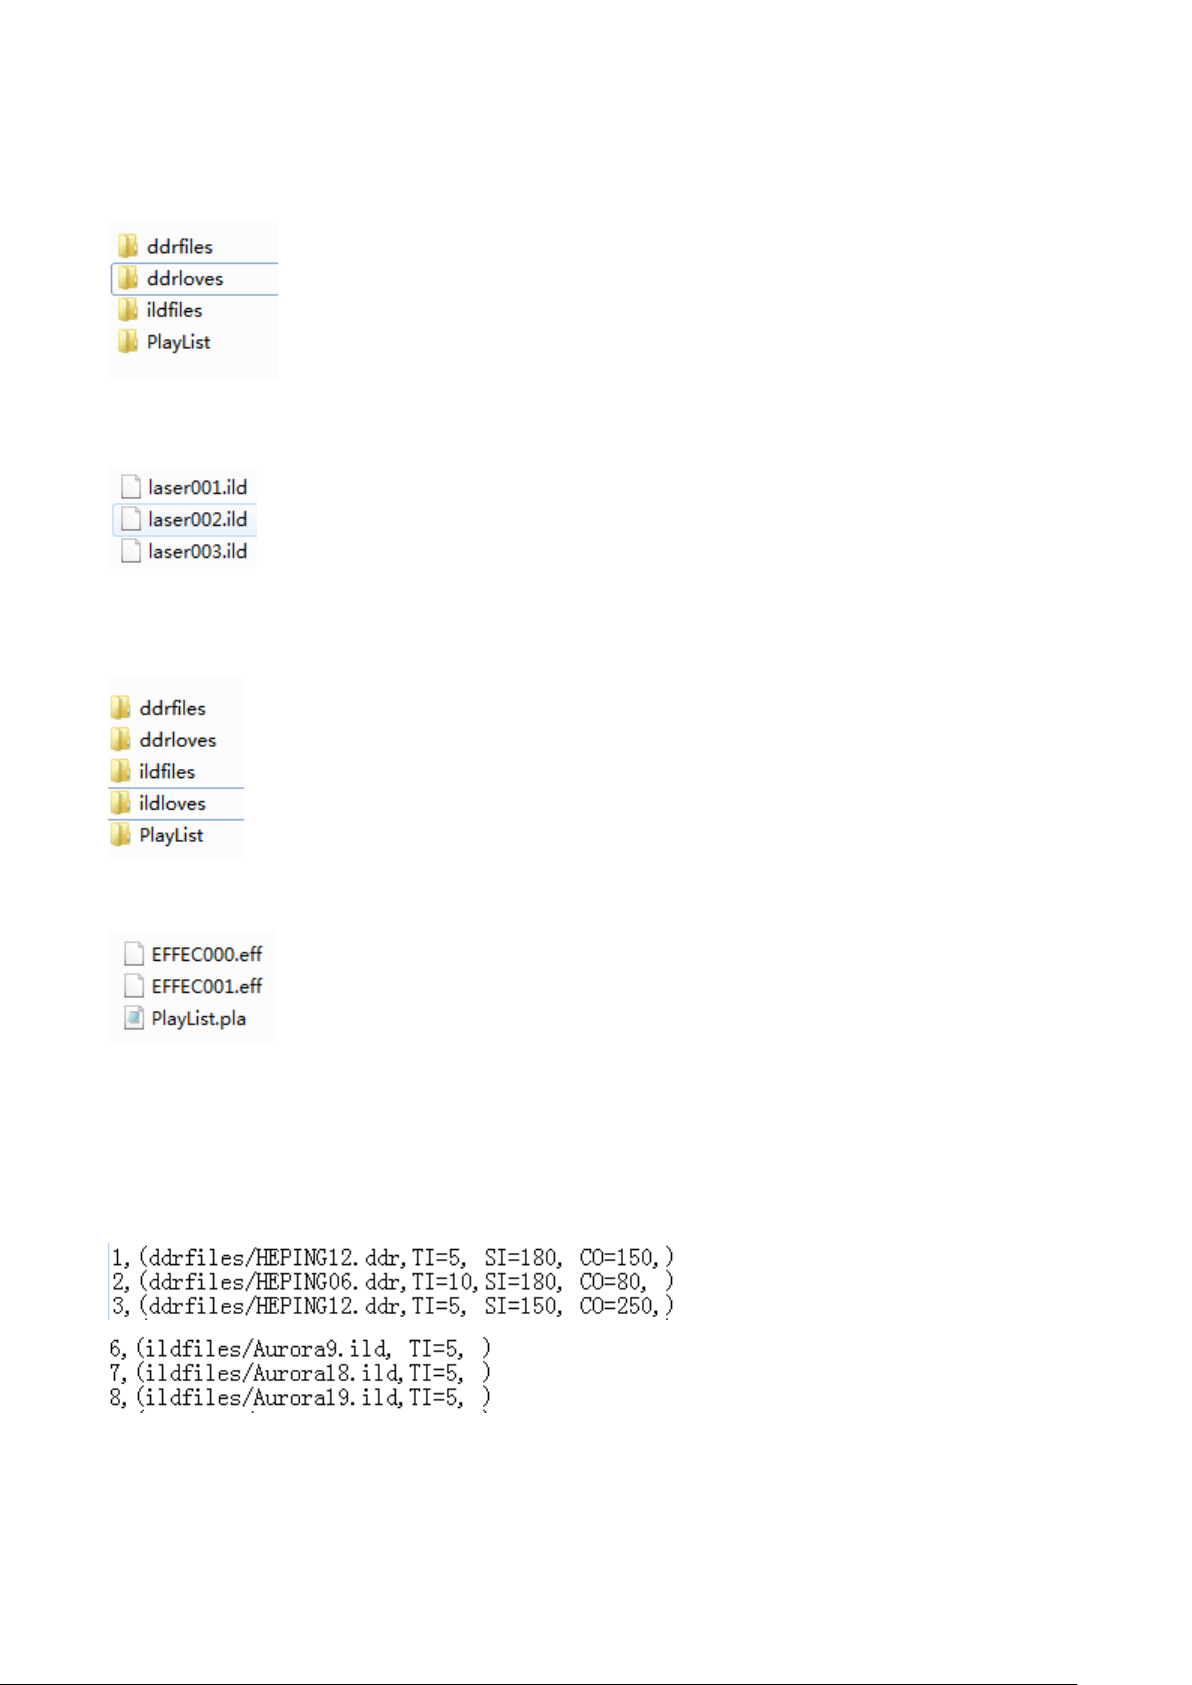
SD-Card files manufacturing process .................................................................................................................. 9
SD-Card effects programming: .......................................................................................................................... 10
DMX Channel Function...................................................................................................................................... 11
Maintenance...................................................................................................................................................... 15
Troubleshooting ................................................................................................................................................ 16

My Lite X3 - 3000mw RGB Laser - Instruction Manual Ver:2019.04.18
3/ 16
Latest file to download
Safety warning
When unpacking and before disposing of the carton, check if there is any transportation
damage before using the product. Should there be any damage caused by transportation,
consult your dealer and do not use the apparatus.
This equipment is not waterproof, keep it from rain, moisture and liquids.
Do not install the product or project the beam onto inflammable surfaces. Minimum distance
is 5 M
The product is only intended for installation, operation and maintenance by qualified
personnel.
Product should install in a cool place. Keep away from the wall 50cm
Avoid direct exposure to the light from the lamp. The light is harmful to eyes.
Keep the optical system clean. Do not touch the laser reflect lens with bare hands. Do not use
any alcohol liquid or any other liquid to clean the optical system. Use medicinal absorbent
cotton to clean it.
Please do not attempt to dismantle and/or modify the product inner structure. Otherwise,
would not provide 1 year of free warranty.
Electrical connection must only be carried out by qualified personnel.
Before installation, ensure that the voltage and frequency of power supply match the power
requirement of the product.
It is essential that each product is correctly earthed and that electrical installation conforms to
all relevant standards.
Do not connect this device to any other types of dimmer apparatus.
Make sure that the power-cord is never crimped or damaged by sharp edges. Never let the
power-cord come into contact with other cables. Only handle the power-cord by the plug.
Never pull out the plug by tugging the power-cord
There is no user serviceable parts inside the product, do not open the housing and never
operate the product with the cover removed.
If you have any questions, don't hesitate to consult our dealer or manufacturer.
Webpage
Latest Datasheet
Cad Drawing
3D Module

My Lite X3 - 3000mw RGB Laser - Instruction Manual Ver:2019.04.18
4/ 16
Product technical parameters
Voltage: AC90~240V 50~60HZ±10% (Mean Well PSU EPP-400-24)
Power consumption: 400W
Laser source: Semi-conductor laser diode.
Laser power /wavelength:
R680mw 637nm, G1,000mw 520nm, B1,600mw 445nm
Colors: Full color
Laser diode life span: ≥10,000hours
Laser beam diameter: 3.5X4.5mm
Laser beam divergence: <0.8mrad
Laser diode modulation: 0-5V analogue modulation signal, up to 100kHz TTL
Scanner system: DT-30 Scanner, ILDA Standard 30Kpps@8 °Max.60Deg.
Scanning angle: ±30 degrees
DMX Channel:
MY LITE X3 ILDA version without DMX-512 Control
MY LITE X3 SD version 3 modes of channels(13CH/14CH/25CH)
MY LITE X3 FB version using Pangolin FB4 Controller, please check more information in
http://www.pangolin.com
Control signal: DMX-512 or ILDA (MY LITE X3 ILDA version without DMX-512)
Control mode:
MY LITE X3 ILDA version: ILDA, Back Panel
MY LITE X3 SD version: Sound-activated, Stand-Alone, master-slave, DMX-512, ILDA,
SD-card display, Back Panel
MY LITE X3 FB version: Stand-Alone, DMX-512, Art-Net, Pangolin Beyond or Quick show, ILDA,
Back Panel
Cooling system: fan
Operation environment: Indoor
Operation temperature: 10°C~35°C
Size: 352x389x306mm
N.W.: 8.9kg
Housing Color: Black

My Lite X3 - 3000mw RGB Laser - Instruction Manual Ver:2019.04.18
5/ 16
Product packing list
These items are packed together with the lighting fixture. Upon unpack, please check:
Name
quantity
Unit
Note
Laser projector
1
set
Power cable
1
pc
Bracket(Hanger)
1
pc
Hanger screw
2
pcs
Product manual
1
pc
Power Connections Method
Please connect power as following :
L(live wire)=brown wire
E(earth wire)=yellow/green double color wire
N(null line)=blue wire
When connecting, ensure that the voltage and frequency of power supply match the power
requirement of the product.
This product is Class 1 protection equipment. The yellow-green double colors wire must be earthed
by qualified personnel. Before installation, ensure that the voltage and frequency of power supply
match the power requirements of product. In power supply and voltage fluctuation large areas, we
suggest you to use 110V or 220V or use voltage regulator to supply power. After electrical
connection, this product will have a few seconds self-check action, self-check finished can be used.
Important: It is essential that Yellow/green double color wire is correctly earthed and that
electrical installation conforms to all relevant standards
Back panel ILDA version(MY LITE X3 SD version only)

My Lite X3 - 3000mw RGB Laser - Instruction Manual Ver:2019.04.18
6/ 16
1. Invert X/Y: Pattern’s X/Y axis mirror switch
2. Inver X/Y state.
3. X/Y Size adjusts.
4. R/G/B Brightness adjusts.
5. ILDA IN/ILDA OUT: ILDA signal connectors
6. ILDA state: When the ILDA connector was connected, this LED will ON.
7. Power-Con in & out.
8. Fuse: 220V/3A
Back panel SD version(MY LITE X3 SD version only)
1. Menu Key: to return back to previous menu.
2. ENTER Key: to confirm the function you choose
3. UP/DOWN Key: to go up or down the menu
4. Invert X/Y: X/Y axis switch
5. Safety key: Turn ON/OFF the laser diode.
6. Inver X/Y state.
7. X/Y Size adjusts.
8. R/G/B Brightness adjusts.
9. ILDA IN/ILDA OUT: ILDA signal connectors
10. ILDA state: When the ILDA connector was connected, this LED will ON.
11. Power-Con in & out.
12. Fuse: 220V/3A
13. REMOTE: emergency-stop button connector
14. DMX-512 IN/DMX-512 OUT: DMX-512 signal connectors with 3pins XLR

My Lite X3 - 3000mw RGB Laser - Instruction Manual Ver:2019.04.18
7/ 16
Back panel FB version(MY LITE X3 FB version only)
1. Pangolin FB4 Panel.
2. Invert X/Y: Pattern’s X/Y axis mirror switch
3. X/Y Size adjusts.
4. R/G/B Brightness adjusts.
5. ILDA IN/ILDA OUT: ILDA signal connectors.
6. DMX-512 IN/DMX-512 OUT: DMX-512 signal connectors with 3pins XLR
7. Fuse: 220V/3A
8. Power-Con in & out.
Lighting Fixture's DMX and IP function set-up method
(MY LITE X3 SD & MY LITE X3 FB version only)
When using DMX-512 Controller to control several pieces lighting fixtures, each lighting fixture
must be given a DMX start address so that the correct lighting can respond to correct signals. If we

My Lite X3 - 3000mw RGB Laser - Instruction Manual Ver:2019.04.18
8/ 16
choose 13CH mode DMX-512 control Channels, then we set the No.1 lighting DMX start address as
001,No.2 lighting address as 014,No.3 lighting address as 027,No.4 lighting address as 040,and so
on.
DMX Connection method
DMX control signal connection must be made with a two core-screened cable, with each core
having at least a 0.5mm diameter. Please use the product's signal cable OUT and IN as connection.
The signal OUT and IN cables connection shown as above picture.
Note: Please do not connect the signal cable OUT and IN in other way except above shown.
This product accepts digital control signals in protocol DMX512(1990).The amount of lighting
fixtures connected in parallel is no more than 32.Connect the DMX controller's Output to the first
lighting fixture's Input cable with a 2 core XLR signal cable(Shown as above ),connect the first
lighting fixture's Output cable to the second lighting fixture's Input cable and connect the rest
light fixtures in the same way. Eventually, connect the last lighting fixture's Output cable to a DMX
terminator
Under DMX-512 signal control mode, the last lighting fixture's DMX Output must be connected with
a DMX terminator. This prevents electrical noise from disturbing and corrupting the DMX control
signals. The DMX terminator is simply an XLR connector with a 120Ω(ohm) resistor connected
across pins 2 and 3,which is then plugged into the output socket on the last projector in the chain.
Then connections are illustrated above.
LCD menu(MY LITE X3 SD version only)
Level 1 menu
Level 2 menu
Level 3
menu
Functions
DMX-512
Address /
001~512
Set DMX DIP code
Iplay
Build-in display
mode
Show
Show~001
Choose the performance
effects
Music
OFF / ON
Sound-active function

My Lite X3 - 3000mw RGB Laser - Instruction Manual Ver:2019.04.18
9/ 16
SDplay
Play
001 ild
SD-card display mode
functions
FileName
List
001 eff
ListName
Mode
PlayOne
PlayAll
Music
OFF / ON
Testing
Scan
Scan
30KPPS
Scanner speed setting
Color
Single1-7
RGY
RBP
GBA
RGB
6WYAP
Color setting
Setting
Light
ON / ON 5S
Background light of the LCD
setting
OneBeam
OFF / ON
One point laser safety setting
Master
OFF / ON
Master laser setting
Channel
13CH /
25CH
Channel mode setting
TTLMode
OFF / ON
Change the modulation to TTL
or not
Default
Yes / No
Restitution
SD-Card files manufacturing process
Prepare the SD-Card files(MY LITE X3 SD version only)
Create a new PESLASER folder in the SD card root directory, go to the PESLASER folder and create
three new folders as following( ddrfiles / ildfiles/ playlist)
1, Ddrfiles folder stores DDR files and DDR files are generated by IHSOW software. Remark: The
folder cannot be in Chinese, the length of the file cannot be greater than 8, the reference is as
follows:
Remark: Storage of DDR files can also create a new folder, but the folder cannot be in Chinese, and

My Lite X3 - 3000mw RGB Laser - Instruction Manual Ver:2019.04.18
10 / 16
the length of the file cannot be greater than 8, the reference is as follows, create a new “ddrloves”
folder to store new DDR files:
2, The ildfiles folder holds the standard files, the file name cannot be used in Chinese, the file
length cannot be greater than 8, the reference is as follows
Remark: Storage of ILD files can also create a new folder, but the folder cannot be in Chinese, and
the length of the file cannot be greater than 8, the reference is as follows, create a new “ildloves”
folder to store new ILD files:
3, The PlayList folder contains the effects file- “eff” file, the list file- “pla” file, which can be opened
in notepad and read as follows.
SD-Card effects programming:
1, First of all, you should put the newly designed files and DDR files into ddrfiles and ildfiles of SD
card
2, To duplicate an effect file, EFFEC000. Eff, rename to loves001. Eff, open with notepad, as
follows:

My Lite X3 - 3000mw RGB Laser - Instruction Manual Ver:2019.04.18
11 / 16
There are four parts: effect number, + (file path, + time, + effect,) :
Effect number
File path
Time
Effect
1,
ddrfiles/heping12.
ddr,
TI=5,
SI=180,
CO=150,
2,
ddrfiles/heping06.
ddr,
TI=10,
SI=180, CO=80,
3,
ddrfiles/heping12.
ddr,
TI=5,
SI=150,
CO=250,
6,
ildfiles/Aurora9.ild,
TI=5,
7,
ildfiles/Aurora18.il
d,
TI=5,
8,
ildfiles/Aurora19.il
d,
TI=5,
The TIME unit is seconds: for example: TI = 5, the playback TIME is 5 seconds, TI is
capital letter, it is called TIME
There are nine effects: RO, HR, VR, HB, VB, SI, DR, BE, CO. they are DMX channels:
The RO is CH6, HR is CH7, VR is CH8, HB is CH9, VB is CH10, SI is CH11, DR is CH12, BE
is CH13, and CO is CH14
The effect value is the channel value, so that the effect can be adjusted by DMX, then the
effect file will be written and saved, and will be played through the laser.
Remark: The interval comma, the parentheses (), the two symbols cannot be reduced,
otherwise the effect of the lamp will be different from your design:
Finally, add the effect file to the playlist.pla and save it.
Insert the SD card into the laser to view the editing effect.
DMX Channel Function(MY LITE X3 SD version only)
IPLAY MODE CH13:
CH
Function of each
channel
DMX Data
Control function
CH1
Laser on/off
0~29
Switch light of laser
I PLAY mode
30~59
Automatic by manual control
60~89
Automatic display
90~119
Sound-active display by manual control
120~149
Sound-active display
SD play mode
150~255
Invalid when in I PLAY mode
CH2
Pattern selection
0~255
Select a pattern for every three values

My Lite X3 - 3000mw RGB Laser - Instruction Manual Ver:2019.04.18
12 / 16
CH3
Pattern rotation
1~127
Angle adjustment of pattern rotation
128~159
30 degrees rotating speed selection
160~191
180 degrees rotating speed selection
192~223
Reverse rotation speed selection Horizontal
rotating position selection
224~255
Forward rotation speed selection Vertical rotating
speed selection
CH4
Horizontal flip of
laser pattern
1~127
Horizontal flip position selection
128~255
Horizontal flip speed selection
CH5
Vertical flip of
laser pattern
1~127
Vertical flip position selection
128~255
Vertical flip speed selection
CH6
Horizontal
movement of
laser pattern
1~127
Horizontal moving position selection
128~255
Horizontal moving speed selection
CH7
Vertical
movement of
laser pattern
1~127
Vertical moving position selection
128~255
Vertical moving speed selection
CH8
Pattern zoom-in
&zoom out
1~127
Pattern size selection
128~159
zoom out speed selection
160~191
zoom-in speed selection
192~255
Zooming speed selection
CH9
Pattern size
1~255
Pattern zooming size selection
CH10
Pattern gradually
painting
1~255
Gradually painting speed selection
CH11
Scanning speed
Spot effects
1~255
Scanning speed selection
CH12
Color selection
0~63
Fixed color selection
64~127
Color change speed selection
128~223
Speed selection of flow speed
224~255
Gradually painting speed selection
CH13
Full color
1~255
255 colors selection
IPLAY MODE CH25:
CH
Function of each
channel
DMX Data
Control function
CH1
Laser on/off
0~29
Switch light of laser
I PLAY mode
30~59
Automatic by manual control
60~89
Automatic display
90~119
Sound-active display by manual control
120~149
Sound-active display
SD play mode
150~255
Invalid when in I PLAY mode
CH2
Pattern A
selection
0~255
Select a pattern for every three values

My Lite X3 - 3000mw RGB Laser - Instruction Manual Ver:2019.04.18
13 / 16
CH3
Pattern A
rotation
1~127
Angle adjustment of pattern rotation
128~159
30 degrees rotating speed selection
160~191
180 degrees rotating speed selection
192~223
Reverse rotation speed selection Horizontal rotating
position selection
224~255
Forward rotation speed selection Vertical rotating
speed selection
CH4
Pattern A
Horizontal
rotating
1~127
Horizontal flip position selection
128~255
Horizontal flip speed selection
CH5
Pattern A Vertical
rotating
1~127
Vertical flip position selection
128~255
Vertical flip speed selection
CH6
Pattern A
Horizontal
movement
0~127
Horizontal moving position selection
128~255
Horizontal moving speed selection
CH7
Pattern A Vertical
movement
1~127
Vertical moving position selection
128~255
Vertical moving speed selection
CH8
Pattern A zoom-in
&zoom out
1~127
Pattern size selection
128~159
zoom out speed selection
160~191
zoom-in speed selection
192~255
Zooming speed selection
CH9
Pattern A size
1~255
Pattern zooming size selection
CH10
Pattern A
gradually painting
1~255
Gradually painting speed selection
CH11
Pattern A
Spot effects
1~255
Scanning speed selection
CH12
Pattern A color
0~63
Fixed color selection
64~127
Color change speed selection
128~223
Speed selection of flow speed
224~255
Gradually painting speed selection
CH13
Pattern A full color
1~255
CH14
Pattern B
selection
0~255
Select a pattern for every three values
CH15
Pattern B
rotation
1~127
Angle adjustment of pattern rotation
128~159
30 degrees rotating speed selection
160~191
180 degrees rotating speed selection
192~223
Reverse rotation speed selection Horizontal rotating
position selection
224~255
Forward rotation speed selection Vertical rotating
speed selection
CH16
Pattern B
Horizontal flip
0~127
Horizontal flip position selection
128~255
Horizontal flip speed selection
CH17
Pattern B Vertical
0~127
Vertical flip position selection

My Lite X3 - 3000mw RGB Laser - Instruction Manual Ver:2019.04.18
14 / 16
flip
128~255
Vertical flip speed selection
CH18
Pattern B
Horizontal
movement
0~127
Horizontal moving position selection
128~255
Horizontal moving speed selection
CH19
Pattern B Vertical
movement
1~127
Vertical moving position selection
128~255
Vertical moving speed selection
CH20
Pattern B zoom-in
&zoom out
1~127
Pattern size selection
128~159
zoom out speed selection
160~191
zoom-in speed selection
192~255
Zooming speed selection
CH21
Pattern B size
1~255
Pattern zooming size selection
CH22
Pattern B
gradually painting
1~255
Gradually painting speed selection
CH23
Pattern B
Spot effects
1~255
Scanning speed selection
CH24
Pattern B color
0~63
Fixed color selection
64~127
Color change speed selection
128~223
Speed selection of flow speed
224~255
Gradually painting speed selection
CH25
Pattern B full color
1~255
255 colors selection
SD PLAY MODE CH14:
CH
Function of
each channel
DMX Data
Control function
CH1
Laser on/off
0~29
Switch light of laser
I PLAY mode
30~149
SD PLAY mode, this function is invalid
SD PLAY mode
150~179
Automatic under manual control, CH7-CH14 are
effective
180~209
Automatic display built-in patterns, CH7-CH14 are
invalid
210~239
Sound-active under manual control,CH2-CH10 are
effective
240~255
Sound-active display built-in patterns, CH7-CH14 are
invalid
CH2
Effects list
0~255
Select one effect list library for each 28 values
CH3
0~255
Select one effect list library for each 10 values
CH4
Pattern
Selection
0~255
Select one pattern library for each 28 values
CH5
0~255
Select one pattern library for each 10 values
CH6
Display control
1~127
The whole cycle display from the auto&sound-active
control
128~255
The cycle display of the auto or sound-active control
Pattern RO
rotation
1~127
Angle adjustment of pattern rotation
128~159
30 degrees rotating speed selection

My Lite X3 - 3000mw RGB Laser - Instruction Manual Ver:2019.04.18
15 / 16
160~191
180 degrees rotating speed selection
192~223
Reverse rotation speed selection Horizontal rotating
position selection
224~255
Forward rotation speed selection Vertical rotating
speed selection
CH7
Pattern HR
Horizontal
rotating
0~127
Horizontal flip Angle selection
128~255
Horizontal flip speed selection
CH8
Pattern VR
Vertical flip
1~127
Vertical flip angle selection
128~255
Vertical flip speed selection
CH9
Pattern HB
Horizontal
movement
1~127
Horizontal moving position selection
128~255
Horizontal moving speed selection
CH10
Pattern VB
Vertical moving
1~127
Vertical moving position selection
128~255
Vertical moving speed selection
CH11
SI pattern
zooming
1~127
Pattern size selection
128~159
Zoom out speed selection
160~191
Zoom in speed selection
192~255
Zooming speed selection
CH12
Pattern DR
gradually
painting
1~255
Gradually painting speed selection
CH13
Pattern BE Spot
effects
1~255
Scanning speed selection
CH14
Pattern CO
color
0~63
Fixed color selection
64~127
Color change speed selection
128~223
Speed selection of flow speed
224~255
Gradually painting speed selection
Maintenance
To prolong the life of the product, it is very important to do maintenance work. The environment is
hash outdoors, or if the product is idle for a long time, damp, smoke or particularly dirty
surroundings can cause greater accumulation of dirt on its cover and housing. So it should be
cleaned to maintain an optimum light output and at the same time to prevent it from corrupted by
acid gas.
Cleaning frequency depends on the environment in which the fixture operates. Soft cloth and
typical glass cleaning products should be used for cleaning. It is recommended to clean product at
least once every 20 days.
Friendly notice: Do not use any organic solvent, e.g. alcohol to clean housing of the apparatus.

My Lite X3 - 3000mw RGB Laser - Instruction Manual Ver:2019.04.18
16 / 16
Troubleshooting
Problems
Action
The product
doesn't switch on
Power connection is not correct. Re-connect the power.
Power supply is damaged or abnormal. Call a qualified
personnel to fix it.
Connection of control board is not correct. Call a qualified
personnel to fix it.
The product can
turn on, but no
light coming out.
Control mode is wrongly setting up. Resetting it according to
instruction book
Control section is damaged. Call a qualified personnel to fix it.
The beam appears
dim
The product is too hot. Take ventilation measures to make it
cool.
Note: This product is under warranty for 1 year (From the date of delivery), 1 years after can
provide paid maintenance services. But if it is because of natural disasters or user's operation not
according to manual. We won't provide warranty.
This manual suits for next models
2
Table of contents
Other SUPER-CAN Dj Equipment manuals
Popular Dj Equipment manuals by other brands

Gemini
Gemini CNTRL-7 Operation manual

Inter-m
Inter-m PX-1650 operating manual

Philips
Philips 71361 Installation & operation guide

Reloop
Reloop ADM-5 Operation manual

Chauvet DJ
Chauvet DJ Hurricane Bubble Haze X2 Q6 Quick reference guide

Denon
Denon DN-HC5000 - Serato ITCH Hardware/Software... operating instructions