Supore RMK-700 User manual

REV.20161109
RMK-700
AUTO REFRACTOMETER

RMK-700 Operating Manual
1
Preface
Introduction
Auto Ref/Keratometer RMK-700 is the precise instrument to measure
objectively the parameter of diopter and corneal curvature, suitable for patient
measurement of Spherical, Cylindrical, Axis, PD and Corneal Radius of
Curvature .
Main Features
1、 More accurate Measurement.
The RMK-700 foggy method of the eye fixation target(15mm*15mm) locked
inside makes examinee's eye more comfortable and measurement data more
accurate.
2、 Classification
Classification of product: 2nd Grade Medical Instrument
Resistance against electric shock: Class I (earthed)
Protection class against electric: Type B
3、 Type
(1) Resistance against electric shock: Class I
(2) Degree of Resistance against electric shock: Type B Applied Part;
(3) NOT Type AP equipment, NOT type APG equipment
(4) Mode of operation : Continuous
(5) Not suitable for use in the presence of a flammable anesthetics mixture
with air or with oxygen or with nitrous oxide.
Co.,Ltd. reserves the right to make changes in its products or product
specifications at any time and without prior notice, and is not required to update
this documentation to reflect such changes.
Under copyright laws, this manual may not be copied, in whole or in part,
without the prior written consent of Co.,Ltd.

RMK-700 Operating Manual
2
Safety symbol and instructions
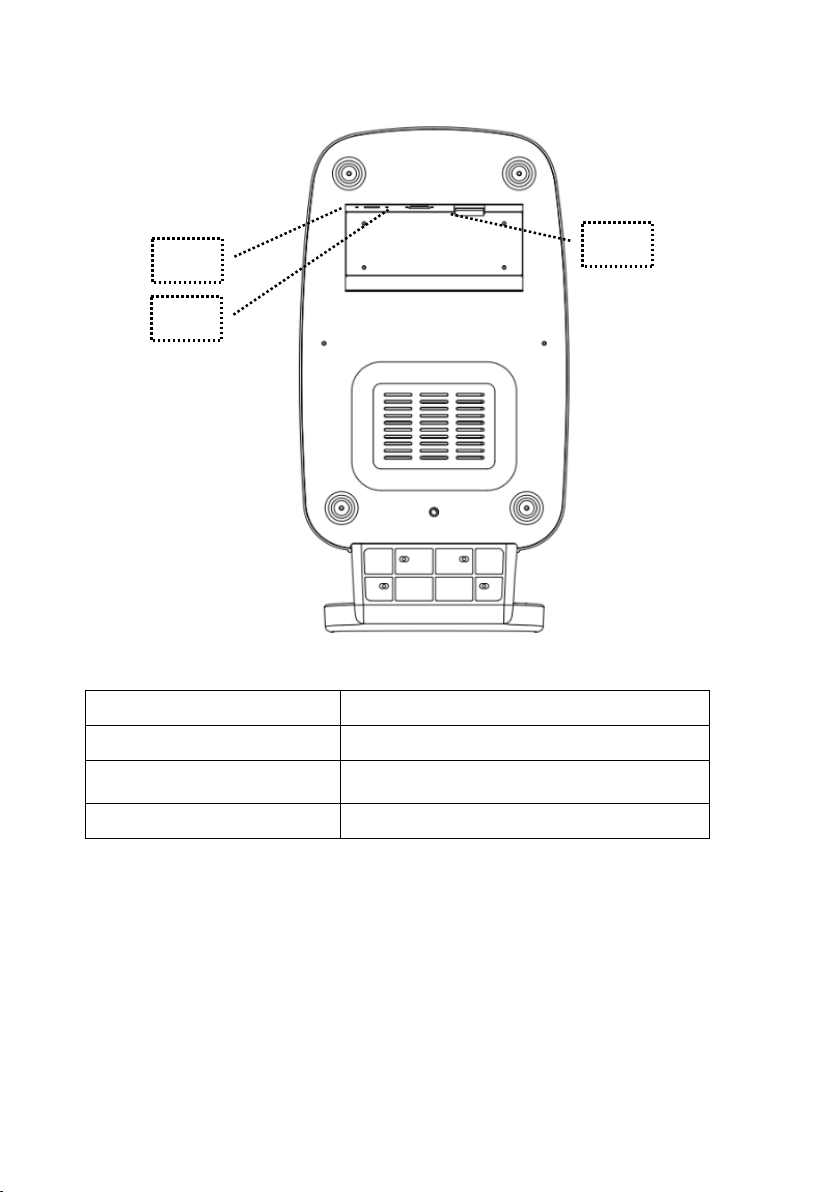
Note: Twist screws here before installation
Working condition :
1、 No hard light shoot directly
2、 No electromagnetic field of strong interference
3、 Temp e ra t ure : +5℃ ~ +40℃
4、 Relative Humidity : 30% ~ 75% RH
5、 Atmospheric pressure range : 700hpa~1060hpa
Working environment
1、 Do not hit or drop the instrument. The impact may cause damage to the function of this
instrument. Please handle with care.
2、 An exposure to the direct sunlight or bright indoor lights may influence the result of the
measurement. Please use the URK-800 in an appropriate optometry room.
3、 Please contact your dealer while connecting this to other associated equipment.
4、 A sudden heating will cause condensation on the protective glass in the monitor screen
and on optical parts inside the instrument. In this case, wait until condensation
disappears before performing measurements.
5、 Keep the objective glass on the examinee side clean. If smudged, it may cause an
ERROR or inaccurate measurements.
6、 In case there is smoke, strange odor or noise during operation, disconnect the power
supply and consult the distributor.
7、 Don’t use organic solvents such as alcohol, paint thinner, benzene, etc. to clean the
surface of this instrument. It may damage the instrument.
8、 When moving the RMK-700, Fix the stage by using stage holding knob and clamping
bolt, disconnect the power cable, and then lift the bottom of the unit with both hands.
9、 When the system is not in use for a longer period of time, disconnect the power supply
and cover with the dust cover.
10、 Some material using instructions touched directly with skin:when operating the
instrument, the customers need to use medical non-woven
fabrics(Specification:8cm*8cm)to separate the touching part between instruments and
patients, to avoid patients touch directly instrument surface.
11、 Don’t open the enclosure until our company agree.

RMK-700 Operating Manual
3
Using Attention
Dismounting packing container, and get rid of the packing material used for
transportation. Saving the packing container and packing material well to
repackage the auto refractometer when needing in the future.
Attention: Make sure to lose or rotate tightly the instrument pedestal lock when
dismounting or packing the instrument. Losing the instrument pedestal lock
when using, or refractometer body can’t be moved, which influences the use.
Machine base lock is below part of pedestal
Dismounting Matters need attention
Check the items in the package box
Should include articles as followings:
RMK-700 Refractometer
·RMK-700 User Manual
·Refer to packing list for Others
Frame Lock

RMK-700 Operating Manual
4
Index
Introductions............................................................................................... 1
Main Features ............................................................................................. 1
Safety Symbol and Instructions ................................................................... 2
Working environtion ................................................................................... 2
Using Attention........................................................................................... 3
Dismounting Matters Need Attention........................................................... 3
1. Introduction of instrument............................................................... 5
1.1 Host Machine.......................................................................... 5
1.2 Operation Panel ...................................................................... 8
2. Instrument ......................................... Error! Bookmark not defined.
2.1 Intallation ............................................................................... 9
2.2 Calibration .............................................................................. 9
2.3 Measurment .......................................................................... 10
2.4 Operation method.................................................................. 11
3. Maintenance........................................ Error! Bookmark not defined.
3.1 Daily maintenance.................... Error! Bookmark not defined.
3.2 Replace Supplies...................... Error! Bookmark not defined.
3.3 Cleaning .................................. Error! Bookmark not defined.
3.4 Instrument of moving Matters Need Attention ....................... 20
3.5 Service Information............................................................... 20
3.6 Packing , shipping and storing................................................. 21
4. Simple fault phenomenon and eliminating......................................... 21
4.1 As the power switch is on...................................................... 21
4.2 Messages during measurement .............................................. 22
4.3 Message as printing............................................................... 22
5. Performance Parameter..................................................................... 22
5.1 Refractometer .......................... Error! Bookmark not defined.
5.2 Keratometer ............................. Error! Bookmark not defined.
5.3 Environmental Requirement..... Error! Bookmark not defined.
5.4 Others .................................... Error! Bookmark not defined.
6. Packing List ..................................... Error! Bookmark not defined.

RMK-700 Operating Manual
5
1. Introduction of Instrument
1.1 Host Machine
Name
Function
(1)LCD Display
Monitor that displays Measurement.
(2) User Key
There are various function keys
(3) Measurement button
Press this button for manual
measurement
(4) Chin Rest
Up/Down Button
For regulating height of chin rest
(5) Operation Joystick
Adjusting the focus by moving to the
directions of forward/backward,
left/right, up and down.
(6) Printer
Prints the measured results
(7) Stage Holding Knob
Holds the movement of stage.
(1)
1
(2)
1
(3)
1
(4)
1
(5)
1
(6)
1
(7)
1

RMK-700 Operating Manual
6
Name
Function
(8) Head Rest
Place the examinee's forehead against
this rest
(9)Measurement
window
Window for the examinee to look at for
measurement
(10) Chin Rest
Place the examinee's chin on the rest
(11) Power Switch
Switch for turning power ON and OFF.
(8)
1
(9)
1
(10)
1
(11)
1

RMK-700 Operating Manual
7
Name
Function
(12)USB Port
Upgrading the instrument
(13)RS-232 Port
Executing Online function with external
devices
(14) Power Supply Socket
Connecting the power cord
(12)
1
(13)
1
(14)
1

RMK-700 Operating Manual
8
1.2 Operation Panel
Name
Function
MODE
Change the measurement mode
DISP
A switch to indicate the measured results
on the monitor
AUTO
A switch to begin to perform the
measurement manually or
VERTEX DISTANCE
To change the VD(Vertex Distance)
value.
PUPIL SIZE
To measure size of pupil.
PRINT
To print the data of measurement

RMK-700 Operating Manual
9
2. Instrument Using
2.1 Installation
Installation location In your workplace, install the RMK-700 Refractometer
in a flat place without direct sunlight and adjust it to appropriate height. The
operating environment temperature is between + 5 ° C and + 40 ° C and the
relative humidity is between 30% and 75%.
In order to avoid damaging the refractometer, it is forbidden to place it on the
following places:
●where particularly hot and particularly cold;
●where the humidity changes tremendously;
●where there is a lot of dust;
●Near electromagnetic equipment of Strong interference.
Installation
●Put it softly on the table;
●Connect the power cord to the socket;
●Ground the earthing terminal in the socket reliably.
Note: The Operation desk should be placed on a flat place during installation and
can be configured by the actual situation.
2.2 Calibration
●Pull the handle, the host should be able to move on the base smoothly and
flexibly;
●Turn on the power switch, and the power indicator light is brighten, then
the screen starts displaying;
●Place the standard model eye on the head rest and fix it with the dowel pin;
●Adjust the height lifting knob so that the standard eye height is roughly
same as the measuring window;
●Pull and turn the joystick to make sure the internal collimation point is at
the center of the corneal ring;
●adjust the joystick front and back to keep the corneal ring focus clearest,
meanwhile internal alignment ring is locked in the internal collimation point;
●Press the measurement key, for a moment the measurement results will be
displayed on the screen. The results should be consistent with the standard
eye;
●Press the print key, the measurement result should be printed out;
●If the above measurement results are consistent with the standard eye
(±0.25m-1 deviation is still normal), and each function keys are working

RMK-700 Operating Manual
10
properly, which indicates that the instrument can be measured normally.
2.3 Measurement
Measure the Model eye before measuring the patient
Measurement Procedure
(1) Turn ON the power
(2) Set the model eye on
Remove the model eye and align the holes of the model eye with the
the chin rest, and insert pins.
(3) Release stage lock
Loose the stage solid bolt downward.
(4) Adjust height of Test Model Eye
Adjust the height of the chin rest by rotating Height Adjustment Knob
so that The Test Mode Eye is aligned with the Height Adjustment Mark on
the headrest.
(5) Enter K﹠R or REF Mode
Press MODE button until either one is displayed.
(6) Adjust the position and focus on the Model Eye.
Note: The Model eye is developed by the National Institute of Metrology, so the
customers configure it according to their own needs.
● Height adjustment: rotate Joystick and Height Lifting Knob of chin rest
to adjust height;
● Focus adjustment: Move the joystick all around, and focus when the
center becomes a cross.
(1) Measurement
● Manual measurement: Press the measurement button. If measurement is

RMK-700 Operating Manual
11
REF Mode
failed with message like TRY AGAIN on the top left corner of the
screen, press the button again;
● Automatic measurement: Push AUTO button at the bottom of monitor.
2.4 Operation method
DIOPTER\REF mode
In the REF Mode, Diopter measurement is performed only.
(1) Enter Mode
Enter REF mode automatically when starting up
(2) Adjust height of examinee's eye
● Have the examinee sit and adjust chair or Refractometer height to make
examinee comfortable;
● Place his/her chin and forehead against the chin rest and forehead rest.
● Adjust the height of the chin by rotating the height adjustment knob so
that the eye of the examinee is aligned with the height adjustment mark
on the headrest.
(3) Perform Focusing
● Slide the operation joystick to the left so that the right eye of the
examinee is displayed on the monitor.
● Ask the examinee to look at the red balloon in the center of the scene
(eye fixation target).
● Looking at the monitor, make certain Focusing Clear Mark can be
observed, if the mark “十” doesn’t appear, instruct the examinee to keep
his/her eye opened wide until measurement ends.
Looking at the monitor, rotate the Fine Adjustment Joystick all around so the

RMK-700 Operating Manual
12
focusing alignment mark“十”is displayed clearly on the bright point
(4) Measurement
● Press the Measurement button
● The newest measured result will be displayed on the monitor.
(5) Repeated measurement
● Measurement could be repeatedly performed if necessary(there is error
when continuous multimetering) ;
● The newest result will be displayed on the monitor whenever measured.
● CAUTION: before starting the new measurement you have to press
CLEAR button to remove previous data in DISP screen.
(6) Measure the other eye
● Slide the stage to the right side and measure the left eye.
● After both eyes are measured, pupil distance (PD) will be displayed on
monitor.
(7) Print
● Press the PRINT button
● The measured results will be printed.
When “TRY AGAIN” appears
,
refer to the following solutions, please.
Cause
Solution
Alignment of the eye is improper
Measure after aligning the pupil and the
alignment mark properly.
Eyelid or eyelashes are covering the
pupil.
Instruct the examinee to open his or her eyes
wide, or lift up the eyelid lightly with your
fingers and measure again.
When the pupil is smaller than the
Alignment Ring.
The minimum pupil diameter that can be
measured is 2.0 mm. Don’t expose examinee’s
eyes to direct sunlight or too bright indoor
lights to prevent contraction of the pupil.
When the examinee has some illness
like cataract.
Impossible to measure.
When the Mire Ring is oddly shaped
because of tears.
Instruct the examinee to open and close his or
her eyes several times and measure again.

RMK-700 Operating Manual
13
Keratometry (KER Mode)
Only the radius of curvature of the cornea can be measured in KER Mode.
(1) Enter the KER Mode
Press the MODE button until "KER" is displayed in the top of the display.
(2) Operatin is the same as REF
Keratometry and Refractometry\K&R mode
Both refractometry and the radius of curvature of the cornea can be
performed in the K&R mode
(1) Enter Mode
(2) Press the MODE button until "K&R" is displayed in the top of the
display.
(3) The measurement is the same as REF mode.
Data was out of valid measuring range.
Impossible to measure
KER mode

RMK-700 Operating Manual
14
Diverse Indications
Kind
Name
Meaning of
Signs
Measures
Measure
ment of
Refractio
n
#
Indicati
ng low
reliabilit
y
Measured
value of low
reliability
Measure
again
+
OUT
Exceed
ing
measur
able
range
SPH exceeds
+15 m-1
Impossible
to measure
- OUT
Exceed
ing
measur
able
range
SPHexceeds
–15 m-1
C
OUT
Exceed
ing
measur
able
range
CYL
exceeds
±10 m-1
K&RMode

RMK-700 Operating Manual
15
Measurement of Contact Lens Base Curve(CLBC Mode)
It is the mode to measure base curve of contact lens (concave surface).
(1) Enter the Mode
In K&R mode, press the MODE button until "CLBC MODE" is displayed
in the top of the display.。
(2) Attach Contact Lens
Put water in the concave section of contact lens holder at backside of the
TEST Model Eye and place the contact lens on the holder with the
concave surface facing upward. Take care that the contact lens not drop
(3) Attach the test Model Eye
Remove the chin rest paper. Fix the Model Eye attached with contact lens
using fixation pin.
(4) Perform Focusing
Looking at he monitor, incline the operation joystick to right or left, and
turn the operation joystick so there is“+” in the screen.
(5) Measurement
Measure
ment of
Curvatur
e
#
Indicati
ng low
reliabilit
y
Measured
value of low
reliability
Measure
again
+
OUT
Exceed
ing
measur
able
range
Radius of
curvature
exceeds
9.4mm
Impossible
to measure
- OUT
Exceed
ing
measur
able
range
Radius of
curvature
is less than
6.5mm

RMK-700 Operating Manual
16
Press the Measurement button, as you keep pushing the measurement button, the
measurement is to be performed consecutively.
● The newest measured result will be displayed on the monitor.
(6) Repeated measurement
● Measurement could be repeatedly performed if necessary;
● The newest result will be displayed on the monitor whenever
measured.;
● CAUTION: before starting the new measurement you have to press
CLEAR button to remove previous data.
(7) Print
● Press the PRINT button;
● The selected data will be printed。
Measurement of Corneal Radius(SIZE Mode)
Diameter of cornea can be measured in the SIZE mode.
(1) Enter the Mode
A. Press MODE button until "SIZE MODE" is displayed in the top of the
display.
(2) Adjust height of examinee's eye
● Let the examinee sit down, and adjust the height of the chair.
● Place examinee’s chin and forehead against the chin

RMK-700 Operating Manual
17
● Adjust the height of the chin by rotating the height adjustment knob so
that the eye of the examinee is aligned with the height adjustment mark
on the headrest.
(3) Perform Focusing
● Slide the operation joystick to the left so that the right eye of the
examinee is displayed on the monitor.
● Ask the examinee to look at the red icon in the center of the scene(eye
fixation target).
● Looking at the monitor, check that image of the ARRAY RING is not
obscured by the upper eyelid, if it is covering the ring, instruct the
examinee to keep his/her eye opened widely until measurement ends.
● Looking at the monitor, incline the operation joystick to right or left,
and turn the operation joystick so the pupil is centered with the inner
alignment mark and focus on the ARRAY RING.
(4) Measurement
● Übutton and Þbutton in the center is to adjust the movement of left
bar, and Þbutton and Übutton in right side is to adjust the movement
of right bar
● The measured value shall be indicated on the screen of monitor;
● Store the measured value by pushing the measurement button.
● Repetition of Measurement
● Repeat the measurement in the entry of measured value as many times
CLBCMode
eDe

RMK-700 Operating Manual
18
as you need. Repeat the procedure of 2~4 as performing the
measurement again;
● No matter When you measure, the newest date can be appeared on the
screen.
● Measurement of the other eye
● Measure the other eye in the same way while holding the operation
lever and pushing the stage to the counter direction;
● Repeat the above step, can get the size data of another eye.
DISPLAY Mode
You can see the measured results (Max ten(10) units of data) stored in
memory in this mode.
(1) Enter the mode
- As pushing DISPLAY mode in the measurement mode, it changes to
DISPLAY Mode. It returns to the measurement mode as pushing E
XIT button again.
(2) Measured Result of Refractometry
- It indicates the latest measured result of max amount of ten(10) time
s(refractive power of left/right eyes). As pushing CLEAR button, the
stored data is to be removed.
(3) Measured Result of Keratometry
It indicates the latest measured result of max amount of ten(10) ti
mes(refractive power of left/right eyes). As pushing CLEAR button, the
stored data is to be removed.

RMK-700 Operating Manual
19
3. Maintenance
3.1 Daily Maintenance
(1)Don’t put machine under sunshine;
(2)Don’t put heavy part on machine, which will damage to machine;
(3)To keep clean both machine and air around;
(4)To keep machine clean. Don’t use the organic solution like volatile
liquid, diluent or benzol to machine;
(5)No operation for long time, to cut off power supply and pull out the
plug;
(6)To put on the dust cover when not use the machine.
3.2 Replacement
3.2.1 Printer paper
● As red line appears on the paper, immediately change the print paper
with new one.
● Confirm the material of paper and size (material :
thermo-sensitive paper,size:width58mm,diameter 50mm);
● Open the printer cover.
● Take out printer stick.
● Take out the the printer paper.
● install the printer paper.
● install the printer stick.
● Close the printer cover.
3.2.2 Chin rest paper
● Pull two(2) pins out of the chin-rest.
● Push the pins into the holes of chin-rest paper. You can put 50 sheets of
it on.
● Insert the pins into each one of two(2) holes in the chin-rest.
3.3 Cleaning
(1) The equipment should be kept as clean basically. Do not use the solvents
such as strongly volatile substance, thinner, benzene, etc.
(2) Put some soapy water to the soft cloth, and twist the water out of the cloth.
Table of contents
Other Supore Laboratory Equipment manuals