Supra LYTHAM LIFT 2 User manual

GB-1/8
WOOD STOVE
LYTHAM LIFT 2
I
NSTRUCTIONS FOR INSTALLATION AND USE 08-16 38884
Illustrations non-contractual; pipe not supplied.
Page
1. TECHNICAL CHARACTERISTICS 3
2. INSTALLATION 4
3. USE 5
4. MAINTENANCE 7
5. AFTER SALES SERVICE 7
RCS Saverne B 675 880 710 - SIRET 675 880 710 00032
B.P. 22 - 67216 OBERNAI
www.supra.fr

GB-2/8 38884-08-16
- IMPORTANT ASSEMBLYINFORMATION -
Your chimney “draws well” but you do not know the degree of negative pressure! The negative pressure or draught in a chimney is measured
in Pascals (Pa). All inserts, fireboxes and stoves are designed, optimised and manufactured according to standards NF EN 13240 (or NF
EN 13240) to operate connected to a chimney flue with a draught of 12 Pa. Very often (more than one chimney in two), the draught is too
strong (over 20 Pa) due to the chimney being too high or an installation with tubing. The appliances then operate in abnormal conditions,
leading to:
- Excessive wood consumption: this may be 3 times more than for a fire operating with a draught of 12 Pa.
- Afire that does not last, burning too fast and giving off very little heat.
- The rapid and irremediable deterioration of the appliance (cracks in the cast iron plates or firebricks).
- The invalidation of the warranty.
To avoid all these problems, there is only one solution.
Have the flue’s draught checked (with the appliance in operation) by a professional, and if it is over 20 Pa, install a draught regulator on the
fire’s connection pipe.
- WARNING -
- This appliance is intended to burn wood, on no account may it be used as an incinerator or to burn liquid fuels, coal or derivatives.
- All local or national regulations, as well as the European standards(3)must be respected when installing and using the appliance.
- The heating appliance is hot when it is in use, particularly the glass front. It stays hot for a long time, even if the flames are no longer visible.
Take precautions to avoid any contact with the appliance (and particularly to prevent young children touching it).
- Before accessing the electrical connections, all the supply circuits must be switched off.
- This appliance must be installed in accordance with the specifications of the standards(3) in force. Installation by a qualified professional is recommended.
- The instructions in this booklet must be followed scrupulously. Keep these instructions in a safe place.
- The manufacturer’s liability is limited to the supply of the appliance. It may not be held liable in the event of any failure to comply with these instructions.
- The following are especially prohibited:
- The installation of materials that may be affected or damaged by the heat (furniture, wallpaper, woodwork...) too close to the appliance.
- The installation of any type of heat regenerator.
- The use of any fuel other than natural wood and lignite.
- Any modification of the appliance or the installation not provided for by the manufacturer, which would release it from its liability and cancel the warranty.
Use exclusively spare parts recommended by the manufacturer.
- Any failure to comply with these indications is entirely the responsibility of the person who carries out the work and assembles the fire.
- Installations in public places are subject to departmental sanitary regulations, which can be obtained from the Prefecture of your region.
- The manufacturer reserves the right to modify, without prior warning, the presentation and the dimensions of its models as well as the design of the
assembly if necessary. The diagrams and texts contained in this document are the property of the manufacturer and may not be reproduced without
the latter’s written permission.
(1) Nominal output in use with the door closed, burning wood or lignite; based on tests in accordance with EN 13240.
(2) Documentation on request from your dealer.
(3) DTU 24.1 dealing with smoke flues, DTU 24.2 dealing with chimneys equipped with a closed stove: NF EN 13240 dealing with stoves burning solid fuel. (available from AFNOR).
-IMPORT
-IMPORTANT
ANT-
-
You have just bought a wood burning heating appliance from our range and we congratulate you on your choice. This fire has been designed with
care. To get best out of it, as you are entitled to expect, you should contact a Supra specialist. He will install it in accordance with the code of good
practice and guarantee optimum operation and safety and will be fully liable for the final installation. Before using your stove for the first time, read
carefully these instructions for installation and use . This document must be kept safely along with the warranty (indicating the model and serial nos.).
The person responsible for assembly and installation will be liable for any failure to comply with the instructions in these two documents.

GB-3/8 38884-08-16
1.
1. TECHNICAL
TECHNICAL CHARACTERISTICS
CHARACTERISTICS
STOVE LYTHAM LIFT 2
Category of stove Intermittent
Rated heating output(1) 5.5 kW
Operation with door closed only
Type of connection vertical
Efficiency 80 %
Average temperature of smoke with the door closed 270°C
CO rate (13% O2)0.14 %
CO2 rate (13% O2)10.3 %
Dust level (13% O2)31 mg/Nm3
FUEL firewood
Log size 25 cm / 33 cm
Nominal hourly load 1.6 kg/hr
Reloading interval 45 min
Alternative fuel lignite
Prohibited fuels all others, including coal and derivatives
Mass flow of smoke 4.6 g/s
Nominal diameter of smoke outlet 125 mm
CHARACTERISTICS OF THE SMOKE FLUE
Minimum dimensions of chimney block 20 x20 cm
MIN Ø tubing or insulated metal flue 125 mm
Min. height of flue above appliance 4 m
Ventilation of the room 1.2 dm²
DRAUGHT (10 PA= 1 MM CE)
Nominal speed 12 Pa ± 2 Pa
reduced speed (min. admissible) 6 Pa ± 1 Pa
Max. admissible 20 Pa
Approx. basic net/gross weight 86/106 kg
Manufacturer’s plate on the back of the appliance
ACCESSORIES PROVIDED
Insulated glove
1 LYTHAM LIFT 2 DIMENSIONS

GB-4/8 38884-08-16
2.
2. INST
INSTALLA
ALLATION
TION
2.1. DEFINITION
Wood-burning heating appliance intended for installation near a wall; may
be moved without further building work. Connect the stove to an individual
smoke flue with pipes compliant with the relevant standard (in France NFD
35-302) and made of enamelled sheet or stainless steel.
2.2. INSTALLATION DISTANCES (FIG. 2.1)
Respect the safety distances indicated between the wall and the sides or
back of the appliance.
2.3. INSTALLATION OF THE APPLIANCE (FIG. 2.2)
Unpacking the appliance: remove the 3 screws and nuts holding it on the pallet.
LYTHAM LIFT 2: Remove the tie.
Install the stove on a floor with sufficient bearing capacity. If the existing
floor is unsatisfactory, it must be reinforced so that it can take the weight
of the appliance (e.g. install a load distribution plate). Place the stove in its
final position and adjust the level. In the loading zone, we recommend that
tiling (for example) be laid to facilitate cleaning.
2.4. SMOKE BAFFLE (FIG. 2.3)
The smoke baffle consists of a stainless steel part (the top) and a vermi-
culite part (underneath). It improves the exchange of heat and facilitates
the recovery of soot after the chimney has been swept. It is supplied fitted
inside the appliance. Before finally installing the wood burning stove, fit
and remove the baffle several times, in order to familiarise yourself with
this operation.
1. Introduce the smoke baffle (metal part facing downwards) diagonally
into the fire and position it almost vertically.
2. Raise the back of the baffle, so that you can place it on the anchoring
lugs situated in the heating body, at the top at the front. Centre the
baffle between the 2 anchoring lugs.
3. Lower the back of the baffle and block it in the hearth plate.
2.5. CONNECTION
2.5.1. Air inlet
An exterior air inlet positioned facing the prevailing winds is necessary for
correct combustion, particularly if the house is exceptionally well insulated
and/or equipped with a controlled mechanical ventilation. This air inlet,
which must be closeable if the appliance is not in use, must have a minimum
free cross section of: 1.2 dm².
In an old house without sweeping ventilation (natural or mechanical
ventilation, in accordance with the Order of March 1982 (F)), the air inlet
must not be closeable.
2.5.2. Smoke flue
Connection to a shared flue is forbidden. Provide access to the connection
pipe and smoke flues for cleaning.
If the smoke flue already exists:
- have it swept by mechanical means (flue brush),
- have the physical state of the flue (stability, airtightness, compatibility of
the materials, cross section...) checked by a qualified professional.
If the flue is not compatible (old, cracked, choked up):
- contact a specialist to recondition it in compliance with current regulations
(cf. DTU 24.1).
2.5.3. Connection
Use T450 pipes, enamelled or stainless steel 316 (available from your
dealer), with no reduction along their length.
Connection to the flue must be inside the room where the stove is installed.
Provide access for chimney sweeping and cleaning the connection pipe.
The pipe must not be too long inside the flue. The connections will be
dismountable and airtight.
Ensure the safety distance is respected between the connecting pipe and
the supporting wall (cf. DTU 24.1).
Avoid having too long a horizontal section before the flue. If this is
unavoidable, make sure its slopes upwards 5 cm per metre.
If necessary, install an anti-condensation connection, available in the shops.
To facilitate the control of the stove if the draught is too strong,
installation of a draught regulator is recommended
Vermiculite
Plaque d'âtre
Inox
2.3
400 mm
200 mm
2 m
2 m
3 x D
D
2.1
2.2

GB-5/8 38884-08-16
-
+
Glass air
control
3.1 CONTROLS
(INDICATIVE DIAGRAM)
-
+
Combustion air
control

GB-6/8 38884-08-16
3.
3. USE
USE
3.1. FUELS
3.1.1. Wood
Burn only firewood, in log form, air-dried (2 to 3 years storage in a well
ventilated, sheltered place) with 15 to 20 % humidity maximum.
- Choose hard deciduous woods if possible (birch, hornbeam, beech...),
- Avoid soft woods (lime, chestnut, willow, poplar)
- Never use coniferous woods (pine, fir,...) for permanent use, or treated
used woods (railway sleepers, joiners’ cut-offs...) and domestic waste
(vegetable materials or plastics).
- Never make a blaze with bundles of kindling, crates, small logs or vine
shoots, which can cause sudden overheating.
3.1.2. Lignite
Used for nominal (daytime) operation or for slow burning (night), alone or
with logs, the lignite briquette is an economical fuel. Place the briquettes in
a layer on a bed of embers, covering only the surface of the grate.
3.2. DRAUGHT
The negative pressure in the smoke flue when hot must never exceed 20 Pa.
If the draught is greater, install a draught regulator. Consult your dealer in
order to have the draught measured when the appliance is installed.
The presence of a controlled mechanical ventilation system may have an effect
on the draught, and even reverse it. For this reason, the mechanical ventilation
must be in operation when the draught is measured.
3.3. FIRST LIGHTING
Remove the self-adhesive labels (except for the manufacturer’s details),
any packaging cardboard and ensure there is nothing left in the ashpan.
Start with a small fire, then, in stages, increase the load. The progressive
rise in temperature allows the materials to dilate slowly and stabilise.
Astrong smell and smoke will be given off at first, due to the paint, but this
will fade in time. Proceed in this way for a few days before beginning normal
use. Open the windows the first few times you heat the stove.
During the first heating, check the draught against the table of characteristics.
3.4. OPERATION
3.4.1. Lighting
Spread some crumpled paper on the bottom of the fire, cover with kindling
and split logs. Position the controls as shown in table 3.A (lighting the fire).
Light and close the loading door. Wait for embers to form. When the fire
has started to burn well, load 2 logs and place the controls on the “nominal
speed” position (table 3.A). It is preferable to load in several goes, rather
than too much one at once.
On lighting, a “thermal plug” may form in the smoke flue. The latter must
be heated up gradually before obtaining a normal draught.
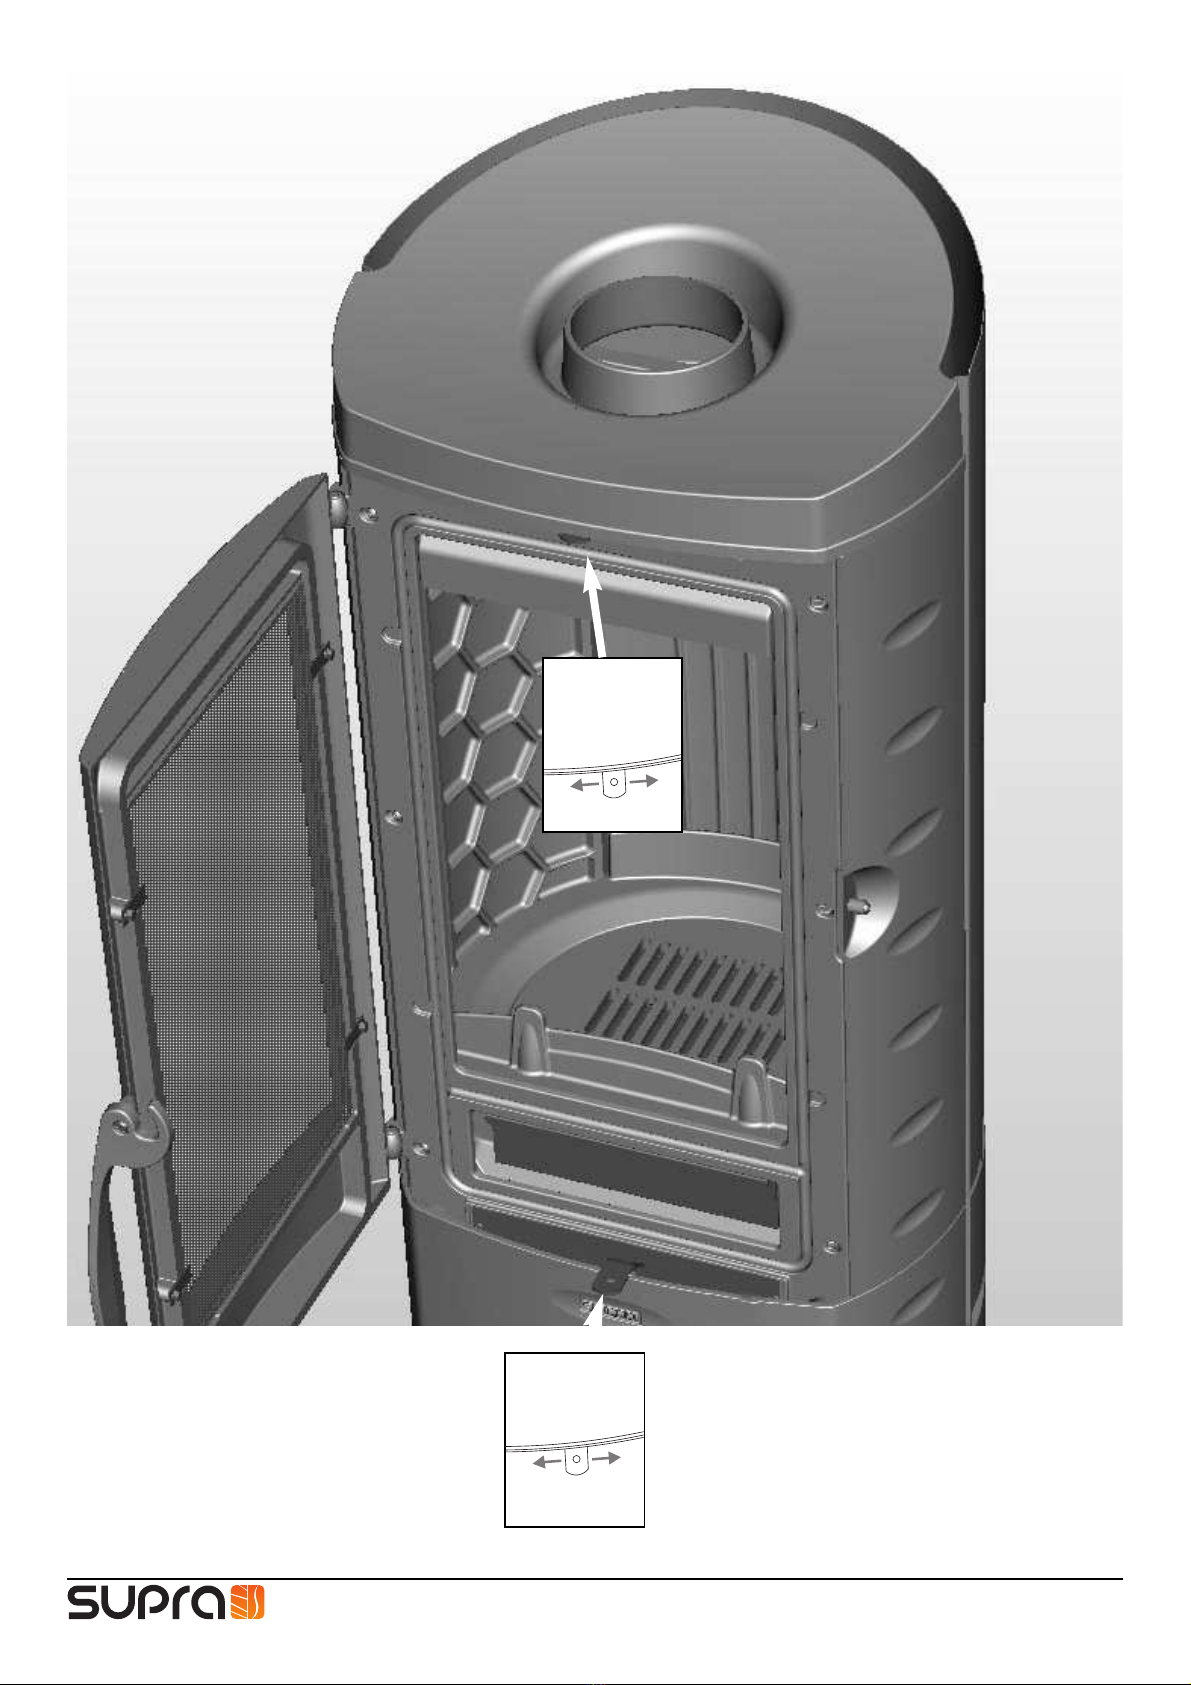
Table 3.A Combustion air Glass air
Lighting (cf. § 3.4.1) leftleft
Nominal speed (cf. § 3.4.3) middle middle
Reduced speed (cf. § 3.4.5) adjust to be adjusted
Slow burning speed (cf. § 3.4.4) right right
3.4.2. Reloading
Reload the stove when there is nothing left but a bed of embers, no flames.
Open the door slowly (using the insulated glove) so as to avoid smoke
billowing into the room and embers falling out. Reload and close the door.
It is preferable to load in several goes, rather than too much one at once.
Place the wood towards the back of the firebox, to avoid embers falling out.
2 to 3 logs (about 1.6 kg per hour) are enough to reach nominal burning
speed.
3.4.3. Nominal speed
Set the controls as shown in table 3.A. The quantity of fuel determines the
intensity of the fire. The correct operation of the stove depends on there
being a sufficient supply of fresh air. To reduce maintenance, use the fire
at nominal speed whenever possible.
3.4.4. Slow burning speed
Spread the embers evenly, load 2 or 3 logs, let the fire start to burn, then
close all the controls so that the logs are consumed slowly. The length of
time the fire lasts will depend on the quality of the wood and the draught.
If possible, keep the glass air control open. After using the stove on slow
burning speed, make a strong fire to heat up the flue and dry out the conden-
sation caused by the slow combustion.
Avoid using the stove on slow burning speed for long periods. The tempe-
rature of the smoke is not high enough, and the latter cannot be evacuated
before it condenses in the flue. More creosote will then build up in the flue
and the appliance itself (inner walls, glass).
3.4.5. Adjusting reduced output
To adjust the output of the appliance, reduce the quantity of wood used
(2 logs; 1 to 1.5 kg/hour) rather than reducing/closing off the combustion air.
3.5. INCIDENTS
In the event of an incident in the house (chimney fire, a fire starting in the
house, very high winds,..), quickly close the loading door and all the controls
on the stove. Do not pour water on the stove. Call the fire service.
W
WARNING
ARNING
- This wood-burning stove is designed to operate with the door
closed. The door must remain closed at all times, except when
loading.
- To avoid any risk of burns, do not touch the appliance and use
the insulated glove to operate the different controls.
- The heat radiated through the glass front requires the removal
of any material that may be damaged by the heat (furniture,
wallpaper, woodwork,…). Adistance of 2 m will avoid any risk.
-
+
3.3
-
+
3.2 Glass air
control
Combustion air
control
W
WARNING
ARNING
!
Never use petrol, alcohol or heating oil...
W
WARNING!
ARNING! The use, even occasional, of coal or any coal
derivative is strictly prohibited. This appliance must not be used
to burn domestic waste!

GB-7/8 38884-08-16
4.
4. MAINTENANCE - RECOMMENDA
MAINTENANCE - RECOMMENDATIONS
TIONS
4.1. ASH REMOVAL
Keep the access free for cleaning the stove and the flue. Wait until the
appliance has cooled.
- Clean the removable firebox grate.
- Empty the ashpan regularly. Accumulated ash limits the air entering under
the grate, risks deforming the latter and interferes with combustion.
- Put back the ashpan and grate before reloading.
4.2. CLEANING THE STOVE FRONT AND SIDES
To freshen up the appearance of the stove, use only a soft cloth and hot
soapy water (do not use alcohol or any even slightly abrasive product),
rinse. Wipe and dry immediately.
4.3. CLEANING THE WINDOW
Clean the window when cold, using a damp cloth dipped in wood ash.
There is a system that circulates air along the window to keep it as clean
as possible. Nevertheless, in normal operation, a slight blackening may
appear in certain areas of the glass. When operating at reduced speed,
the “clean glass” system is less effective.
4.4. OBLIGATORYCHIMNEY SWEEPING
The law requires that the chimney be swept twice a year (including once
during the period of use) using mechanical means (flue brush). Have the
chimney sweeping book filled out by the company that does the job and
keep the bill. Remove the connecting pipes from the connecting collars to
clean them.
After the flue has been swept, re-place the smoke baffle (fig. 2.3).
Before using the fire again, check that all the parts are correctly in place.
4.5. ANNUAL SERVICE
Before each heating season, clean the stove completely and check that all
the moving parts of the appliance are working properly. Check the condition
of the seals and parts in contact with the flames.
5.
5. AFTER SALES SER
AFTER SALES SERVICE
VICE
The appliance includes wear parts which must be checked during its annual
service. Your dealer is able to supply the spare parts necessary.
For any information or spare parts, please give the item number and serial
number of the appliance, which can be found on the manufacturer’s plate
Use exclusively spare parts recommended by the manufacturer.

GB-8/8 38884-08-16
RCS Saverne B 675 880 710 - SIRET 675 880 710 00032
BP 22 - 67216 OBERNAI Cedex- FRANCE
www.supra.fr
Table of contents
Other Supra Wood Stove manuals
Popular Wood Stove manuals by other brands

Lacunza
Lacunza LEVANTE Instruction book

Drolet
Drolet LEGEND III owner's manual

Jøtul
Jøtul F 400 Castine Installation and operation instructions

Jøtul
Jøtul I 520 F Installation and operating instructions

Tiger
Tiger Cub Installation and operating instructions

Panadero
Panadero HARMONIE Usage and maintenance instructions

Nibe
Nibe Contura 690AG Style manual

Dovre
Dovre Sense 100 Installation instructions and operating manual

Crighton Engineering
Crighton Engineering Magnum p100 Maintenance Guide

RIKA
RIKA X-Back instruction manual

Empire Comfort Systems
Empire Comfort Systems GATEWAY 1700 Installation and operation manual

KASTOR
KASTOR SAGA 20 Installation and usage manual