Surewerx STRONGARM 216-1 User manual
030319-INST-1222
WARNING:
IMPORTANT: READ THESE INSTRUCTIONS AND ALL
WARNINGS PRIOR TO USING THIS EQUIPMENT. UNDERSTAND
ALL OPERATING PROCEDURES, SAFETY WARNINGS AND
MAINTENANCE REQUIREMENTS. FAILURE TO DO SO COULD
CAUSE AN ACCIDENT RESULTING IN SERIOUS OR FATAL
INJURY AND/OR PERSONAL PROPERTY DAMAGE.
!
!
PROD. NO. 030319
MOD. NO. 216-1
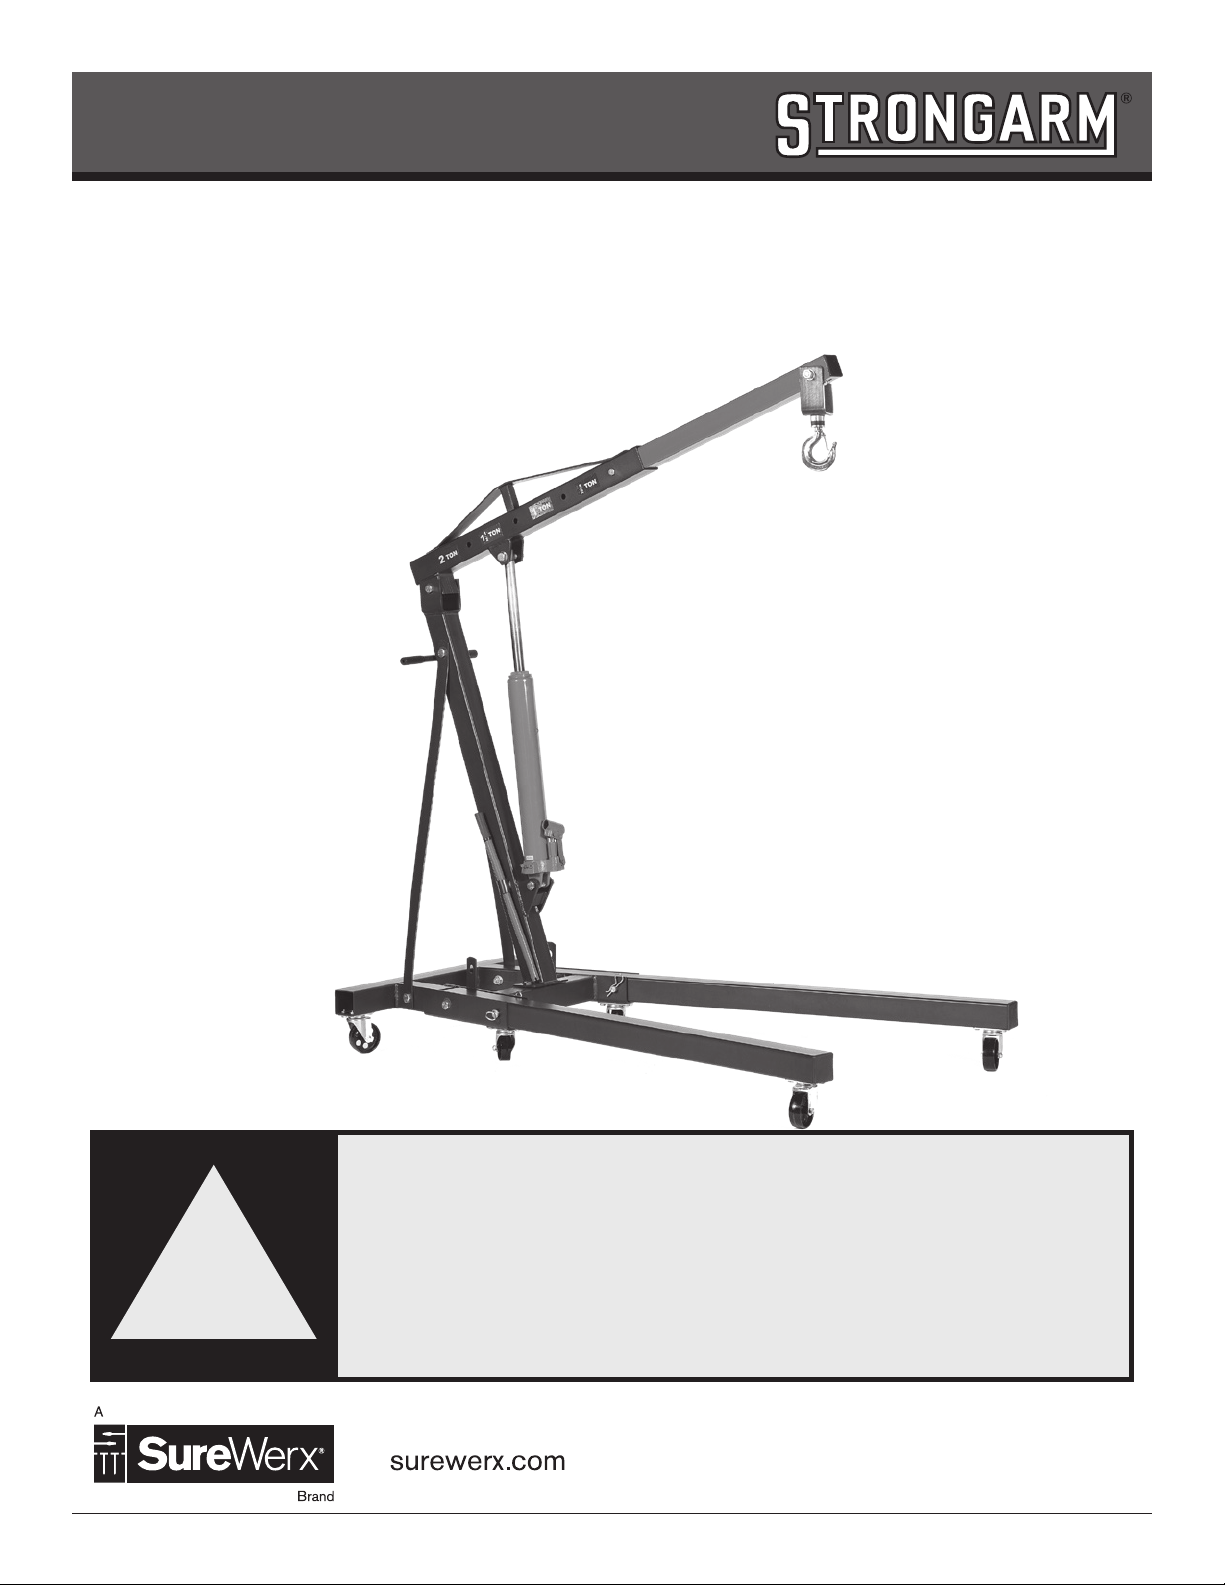
OPERATOR’S MANUAL
2-Ton Folding Engine Crane
2surewerx.com
This is the safety alert symbol. It is used to alert you to potential personal injury hazards. Obey all safety messages that follow this
symbol to avoid possible injury or death.
Save these instructions. For your safety, read, understand, and follow the information provided with and on this product
before using. The owner and/or operator of this equipment shall have an understanding of safe use/operating procedures
before attempting to use. The owner and/or operator shall be aware that the use of this product may require special
skills and knowledge. Instructions and safety information shall be conveyed in the operator’s native language before use
of this device is authorized. If any doubt exists as to the safe and proper use of this product as outlined in this factory-
authorized manual, remove from service immediately.
Inspect before each use. Do not use if broken, bent, cracked, or damaged parts (including labels) are noted. If the product
appears damaged in any way, operates abnormally or is missing parts, it should be removed from service immediately and the
manufacturer notified. If you suspect that the product was subjected to a shock load (a load suddenly dropped unexpectedly
upon it), immediately discontinue use until product has been checked by a factory-authorized service center (contact distributor
or manufacturer). It is recommended that an annual inspection be done by qualified personnel. Labels and owner’s manuals
are available from the manufacturer.
Keep this manual for the safety warnings and precautions, assembly, operating, inspection, maintenance, and cleaning
procedures. Write the product’s serial number in the back of the manual near the assembly diagram (or month and year of
purchase if product has no number). Keep this manual and the receipt in a safe and dry place for future reference.
PACKAGE CONTENTS
SAFETY INFORMATION
SAVE THIS MANUAL
WARNING: Indicates a hazardous situation which, if not avoided, could result in death or serious injury
BOX 1
REF DESCRIPTION QTY
1Base Assembly 1
2 Swivel Caster 3” 2
3Assembly
Hardware
Lot
BOX 2
REF DESCRIPTION QTY REF DESCRIPTION QTY
4Front Leg 2 9 Hydraulic Ram 1
5Boom 110 Pump Handle 1
6Boom Extension 111 Swivel Caster 3-1/2" 4
7 Main Support Post 1 12 Handle 1
8Support Strap 213 Connect Plate 2

3
surewerx.com
WARNING INFORMATION
• Study, understand, and follow all instructions before operating this device.
• Do not exceed 2-ton rated capacity for the engine crane.
• Use only on hard, level surfaces.
• Before moving, lower the load to the lowest possible point.
• Use only sling or chains with a rated capacity greater than the weight of the load being lifted.
• Do not allow load to swing or drop violently while lowering or moving.
• Do not make any alterations or modifications to engine crane.
• Do not adjust safety valve.
• Properly extend leg extensions and secure boom in proper setting before use.
• Follow capacities marked on boom; capacity decreases as boom lengthens.
• Wear ANSI-approved safety goggles and heavy-duty work gloves during use.
• Verify replacement jack has same rating, mounting points, and maximum length.
• Inspect before every use; do not use if parts loose or damaged.
• Keep your work area clean and well lit. Cluttered work areas invite accidents.
• Keep bystanders, children, and visitors away while operating engine crane. Distractions can
cause you to lose control.
• Stay alert. Watch what you are doing, and use common sense when operating a jack. Do not use
a jack while tired or under the influence of drugs, alcohol, or medication. A moment of inattention
while operating jacks may result in serious personal injury.
• Maintain labels and nameplates on the engine crane. These carry important information.

4surewerx.com
OWNER’S MANUAL
ASSEMBLY INSTRUCTIONS
For safety and ease of assembly, use two people to assemble the Folding Engine Crane
IMPORTANT! Do not tighten any bolts until you are fully finished with assembly. Otherwise, parts will not line up properly
1. Slide legs into front of the base.
2. Lock legs in place using the bolts and spring pins. First, insert the bolts and then insert the ring pins.
Lift up on the front of the base until the holes line up. After the two bolts and two ring pins are inserted,
put the two spring washers and two nuts in place. Insert the two ring pins through the small holes.
3. Use tow bolts and washers to fasten the handle to the post.
4. Use the bolts, washers, and nuts to secure the bottom of the post to the base
5. Use two bolts, washers, and nuts to fasten the lower ends of the supports to the outside of the frame,
then use one bolt, washer, and nut to fasten the top ends of the supports to the post.
6. Use the bolt, washer, and nut to attach the boom to the top of the post.
7. Use a bolt, washer, and nut to attach lower end of the jack to the post and another bolt, washer, and nut to
attach the top of the jack to the boom.
8. Slide the boom extension into the boo and use the bolt, washer, and nut to secure at the desired load rating.
Use the bolt, washer, and nut to attach the hook and chain to the end of the boom extension.
1
3
2
4

5
surewerx.com
5
7
6
8

6surewerx.com
This is the safety alert symbol used for the OPERATING INSTRUCTIONS section of this manual to alert you to potential personal
injury hazards. Obey all instructions to avoid possible injury or death. Read the ENTIRE IMPORTANT SAFETY INFORMATION
section at beginning of this manual including all text under subheadings therein before set-up or use of this product.
NOTE: Once assembly is fully completed, tighten ALL bolts before initial operation
LIFTING AND LOWERING
1. Locate the hole on the boom with a weight limit higher than the weight you
will be lifting. For example: Locate the 1 TON hole on the boom for a load
that is under one ton.
2. Adjust the boom extension so the hole furthest from the hook-end aligns
with the chosen hole on the boom. Secure into place by inserting the bolt
through all aligned holes and tightening in place with the washer and nut.
WARNING: Do not stand under an object that is being lifted by the engine crane.
Be aware of the possibility of a load slipping off the hook and chain. An item that
falls from the crane can cause serious injury.
3. Move the crane so that the hook and chain is directly above the item to be lifted.
4. Securely attach the hook and chain to the item.
5. To raise the boom, turn the jack's release valve fully clockwise (right).
Insert the handle into the jack and pump (up and down) repeatedly until
the item has been lifted to the desired height.
WARNING! Be sure to fully tighten the release valve or else the jack
may lower or may not be able to reach the full height.
WARNING! DO NOT MOVE THE CRANE WHEN UNDER LOAD.
The casters are not designed to be rolled when the crane is lifting
heavy objects.
6. To lower the crane, SLOWLY turn the jack's release valve counterclockwise (left).
OPERATING INSTRUCTIONS
FOLDING THE FRAME
WARNING! Do not fold crane while loaded.
1. Lower crane all the way.
2. Remove R-pins from the front ring pins. Remove the front ring pins.
Leave rear ring pins in.
3. Raise leg until it rests against handle.
4. Insert a front ring pin into the middle hole of the base for each leg
and reinsert R-pins.
NOTE: Be certain that when unfolding, both ring pins and R-pins are placed back
in the proper places.

7
surewerx.com
BLEEDING INSTRUCTIONS
IMPORTANT! Before first use, check for proper hydraulic oil level and thoroughly test the equipment.
If it does not work properly, bleed excess air from its hydraulic system as follows:
1. Open release valve and lower jack completely.
2. Remove oil plug and fill with hydraulic oil (sold separately) to full level.
3. Apply downward pressure to the boom and pump the jack handle quickly several times.
4. Check the oil fill hole and, if necessary, top off the oil fill hole with hydraulic oil.
5. Replace the oil plug and close the release valve.
6. Test the equipment several times for proper operation before attempting to lift a load. If, after bleeding, the
equipment still does not appear to be working properly, do not use the equipment until it has been repaired
by a qualified service technician.
WARNING! TO PREVENT SERIOUS INJURY FROM ACCIDENTAL OPERATION:
Do not use damaged equipment. If abnormal noise or vibration occurs, have the problem corrected before further use.
NOTE: Procedures not specifically explained in this manual must be performed only by a qualified technician.
1. Before each use, inspect the general condition of the jack. Check for broken, cracked, or bent parts,
loose or missing parts, and any condition that may affect the proper operation of the product. If a
problem occurs, have the problem corrected before further use. Do not use damaged equipment.
2. Before each use, thoroughly test the jack for proper operation prior to its actual use. If the jack
appears not to be working properly, follow bleeding instructions.
3. Change the hydraulic oil at least once every three years:
A. With the jack fully lowered, remove the oil filler plug on the side of the housing.
B. Tip the jack to allow the old hydraulic oil to drain out of the housing completely,
and dispose of the old hydraulic oil in accordance with local regulations.
C. With the jack upright, completely fill the housing with a high quality hydraulic oil (not included)
until the oil just begins to run out of the oil fill hole.
D. Open the valve release screw and pump the handle to bleed air from the system.
E. Reinstall the oil filler plug.
4. Wipe dry with a clean cloth. Then, store the jack in a safe, dry location out of reach of children
and other non-authorized people.
PREVENTATIVE MAINTENANCE

8surewerx.com
This is the safety alert symbol used for the TROUBLESHOOTING section of this manual to alert you to potential personal injury
hazards. Obey all instructions to avoid possible injury or death. Do not use damaged equipment.
WARNING! To prevent serious injury: Use caution when troubleshooting malfunctioning jack. Stay clear of supported load.
Completely resolve all problems before use. If solutions presented in Troubleshooting guide do not solve the problem, have a qualified
technician inspect and repair jack before use. After jack is repaired: Test it carefully without a load by raising and lowering it fully,
checking for proper operation, before returning jack to operation.
SYMPTOM REMEDY
(Make certain that the jack is not supporting a load while attempting a solution)
Jack will not lift at its weight capacity Check that the release valve is closed fully. Bleed air from the system.
Valves may be blocked and may not close fully. To flush the valves:
1. Lower the chain / hook and securely close the release valve.
2. Manually lift the chain / hook several inches.
3. Open the release valve and force the chain/ hook down as quickly as possible.
Jack may be low on oil. Check the oil level and refill if needed.
Jack may require bleeding. See instructions.
Chain and/or hook lowers under load Check that the release valve is closed fully. Bleed air from the system.
Valves may be blocked and may not close fully. To flush the valves:
1. Lower the chain / hook and securely close the release valve.
2. Manually lift the chain / hook several inches.
3. Open the release valve and force the chain/ hook down as quickly as possible.
Pump stroke feels spongy Jack may be low on oil. Check the oil level and refill if needed.
Jack may require bleeding. See instructions.
Chain and/or hook will not lift all the way Jack may be low on oil. Check the oil level and refill if needed.
Jack may require bleeding. See instructions.
Handle moves up when jack is under load Valves may be blocked and may not close fully. To flush the valves:
1. Lower the chain / hook and securely close the release valve.
2. Manually lift the chain / hook several inches.
3. Open the release valve and force the chain/ hook down as quickly as possible.
Oil leaking from filler plug Unit may have too much hydraulic oil inside. Check fluid level and adjust if needed.
TROUBLESHOOTING

9
surewerx.com
2-TON FOLDING ENGINE CRANE
1PCN-216-1P01 FRAME BASE 1
2PCN-216-1P02 FRAME LEG 2
3PCN-216-1P03 CROSS BEAM ASSEMBLY 1
4PCN-216-1P04 BOOM EXTENSION 1
5PCN-216-1P05 SUPPORT STRAP 2
6PCN-216-1P06 HYDRAULIC RAM 1
7PCN-216-1P07 HANDLE GRIP 3
8PCN-216-1P08 PUMP HANDLE 1
9PCN-216-1P09 MAIN SUPPORT POST 1
10 PCN-216-1P10 BOLT 1
11 PCN-216-1P11 BOLT 3
12 PCN-216-1P12 BOLT 2
13 PCN-216-1P13 BUSHING 2
14 PCN-216-1P14 PLASTIC COVER 5
15 PCN-216-1P15 BOLT 1
16 PCN-216-1P16 BOLT 1
17 PCN-216-1P17 BOLT 2
18 PCN-216-1P18 BOLT 2
19 PCN-216-1P19 WASHER 8
20 PCN-216-1P20 WASHER 3
21 PCN-216-1P21 WASHER 1
22 PCN-216-1P22 WASHER 3
23 PCN-216-1P23 BOLT 8
24 PCN-216-1P24 WASHER 24
25 PCN-216-1P25 NUT 1
26 PCN-216-1P26 NUT 8
27 PCN-216-1P27 NUT 3
28 PCN-216-1P28 FRAME PIN W/HAIR PIN 2
29 PCN-216-1P29 BOLT 2
30 PCN-216-1P30 BOLT 16
31 PCN-216-1P31 NUT 24
32 PCN-216-1P32 CASTER B 2
33 PCN-216-1P33 PULL HANDLE 1
34 PCN-216-1P34 RESTRAINT BRACKET 2
35 PCN-216-1P35 PLASTIC COVER 1
36 PCN-216-1P36 R-PIN 2
37 PCN-216-1P37 CASTER A 4
38-49 PCN-216-1P46 HOOK ASSEMBLY 1
REF PART NUMBER DESCRIPTION REQ REF PART NUMBER DESCRIPTION REQ REF PART NUMBER DESCRIPTION REQ
PROD. NO. 030319
MOD. NO. 216-1

10 surewerx.com
Boom Extensions
Position Capacity
(tons)
Capacity
(lbs)
Boom
Length
Min
Height
Max
Height
11/2 1,000 54.7" /88.2"
2 1 2,000 47. 6 " /82.9"
31-1/2 3,000 40.6" 9.4" 7 7. 4"
4 2 4,000 33.5" 15.7" 72.1"
SPECIFICATIONS
Capacity
(tons)
Capacity
(lbs)
Shipping
weight
Handle
length
Base
Length
Base
Width
(Front)
Base
width
(Rear)
Folded
Height
Wheel
Diameter
Front
Wheel
Diameter
Rear
Wheel
Diameter
Middle
24,000 86 kgs 498 mm 1,656 mm 1,000 mm 800 mm 1,530 mm Ф90x31 Ф90x31 Ф75x28
2-TON FOLDING ENGINE CRANE
PROD. NO. 030319
MOD. NO. 216-1
This manual suits for next models
1
Table of contents
Popular Construction Equipment manuals by other brands


Manitowoc
Manitowoc Grove GMK 4100L-1 operating manual

Siemens
Siemens SIMOTION D4x5-2 operating instructions

Premier Tech Aqua
Premier Tech Aqua Conder ASP Series Installation, operation and maintenance

Thern
Thern 5BH5 owner's manual

Rebar Tools
Rebar Tools Diamond DBC-16H manual

Halfen
Halfen HIT-BX instructions