manuals.online logo
Brands
  1. Home
  2. •
  3. Brands
  4. •
  5. Surtek
  6. •
  7. Construction Equipment
  8. •
  9. Surtek 137024 Dimensions and installation guide

Surtek 137024 Dimensions and installation guide

137024
Pluma Hidráulica con Extensiones
Hydraulic Shop Crane
ATENCIÓN: Lea, entienda y siga las instrucciones de seguridad contenidas en este
documento, antes de operar esta herramienta.
WARNING: Read, understand and follow the safety rules in this document, before operating this tool.
INSTRUCCIONES GENERALES
GENERAL INFORMATION
La falta de atención en estas advertencias puede provocar la caída de la carga. El daño en la pluma
hidráulica y/o falla en la pluma hidráulica puede provocar lesiones personales o daños en la propiedad.
Failure to heed these warnings may result in loss of load. Damage to engine crane and/or engine crane failure resulting
in personal injury or property damage.
No sobrecargue la pluma hidráulica más allá de la capacidad máxima especificada para cada posición.
La sobre carga puede causar falla o daño en la pluma hidráulica.
Do not overload engine crane beyond rater capacity of each specified boom position. Overloading can cause damage to
or failure of the crane.
Siempre use la grúa en una superficie nivelada capaz de sostener la carga. El uso de la grúa en
superficies que no sean planas y solidas puede dar lugar a la inestabilidad de la grúa y la posible caída
de la carga.
Always use crane on hayd level surface capable of sustaining the load. Use of crane on other than hard level surfaces can
result in crane instability and possible loss of load.
La carga debe estar en la posición más baja posible antes de moverla. Mueva la carga lenta y
suavemente para evitar la oscilación no controlada y la posible pérdida de carga.
Boom and load must be in lowesst possible position before moving. Move load slowly and smoothly to avoid
uncontrolled swing and possible loss of load.
Nunca trabaje debajo de la carga.
Never work under load.
Pare el bombeo cuando el pistón de levante llegue hasta la marca roja para evitar el posible mal
funcionamiento.
Stop pumping when the ram lifts up to the red stop mark provided on the ram to prevent the jack prom possible
malfunction.
El producto solo es para propósitos de levante, NO para soportar cargas.
For lifting purpose only, NOT for supporting loads.
2t
Capacidad de carga máxima.
Maximum load capacity.
Manual de Usuario y Garantía
User’s Manual and Warranty
2
INSTRUCCIONES DE OPERACIÓN
OPERATING INSTRUCTIONS
Revise los manuales del fabricante de vehículos para el
procedimiento adecuado de movimiento del motor.
Rafter to vehicle manufacturer's approved service manual for proper
engine removal procedure.
Para elevar la carga / To raise load
Cierre la válvula de liberación girando la manija de la bomba
en sentido de las manecillas del reloj. Inserte la manija en la
ranura y bombee para elevar la pluma a la altura deseada.
Close release valve by turning pump handle clockwise. Insert handle
into handle sleeve and pump to raise boom to desired height.
Para bajar la carga / To lower load
Gire lentamente la válvula de liberación contrario a las
manecillas del reloj.
SLOWLY turn release valve counter-clockwise.
Para añadir aceite / To add oil
Retraiga totalmente el pistón y añada aceite para incrementar
el nivel. Use solo aceite para pistones hidráulicos.
Fully collapse jack and add oil to increase oil level up to oil plug. Use
only hydraulic jack oil.
MANTENIMIENTO E INSPECCIÓN
MAINTENANCE & INSPECTION
• Mantenga todas las piezas móviles limpias y bien lubricadas.
Cuando agregue o cambie el aceite use siempre un aceite
para gato de buen grado. Evite mezclar diferentes grados
de aceite.
Keep all moving parts clean and well lubricated. When adding
or replacing oil, always use a good grade hydraulic jack oil. Avoid
mixing different grades types of oil.
• NO use líquido de frenos, alcohol, glicerina, detergente,
aceite para motor o aceite sucio. Los fluidos incorrectos
pueden causar daños internos graves al mecanismo. Cuando
añada aceite tenga cuidado de no introducir algún objeto o
suciedad al sistema.
DO NOT use brake fluid, alcohol, glycerine, detergent, motor oil or
dirty oil. Improper fluid can cause serious internal damage to long
ram. When adding oil, be very careful not to permit dirt or foreign
matter to get into the system.
• Revise cada 3 meses el sistema hidráulico.
Check ram and plunger every three months for any signs of rust or
corrosion.
• La inspección visual debe ser realizada por cada usuario
antes de la operación de la pluma, deberá buscar fracturas,
puntos con soldadura dañada y partes faltantes o dañadas.
Cualquier pluma hidráulica que parezca dañada en alguna
forma debe ser retirada del uso inmediatamente.
Visual inspection shall be made before each use of the crane,
checking for cracks, cracked welds and missing and/or damaged
parts. Any crane that appears to be damaged in any way shall be
removed from service immediately.
• Debido a los riesgos potenciales asociados con el mal
uso de equipo de este tipo. NO SE DEBEN REALIZAR
MODIFICACIONES AL PRODUCTO.
Because of the potential hazards associated with the misuse of
equipment of this type. No modifications shall be made to the
product.
• Mantenga la pluma hidráulica y el pistón en la parte más
baja cuando no esté en uso.
Store crane with boom in fully lowered position and hydraulic ram
valve closed when not in use.
DATOS TÉCNICOS
TECHNICAL DATA
Capacidad de levante posición 1
Lifting capacity position 1
2 t (2 000 kg)
Capacidad de levante posición 2
Lifting capacity position 2
1,5 t (1 500 kg)
Capacidad de levante posición 3
Lifting capacity position 3
1 t (1 000 kg)
Capacidad de levante posición 4
Lifting capacity position 4
0,5 t (500 kg)
Altura mínima del brazo
Maximum lifting height min. jib ext
79 1/2” (2 019 mm)
Altura máxima del brazo
Maximum lifting height max. jib ext
99 1/4” (2 520 mm)
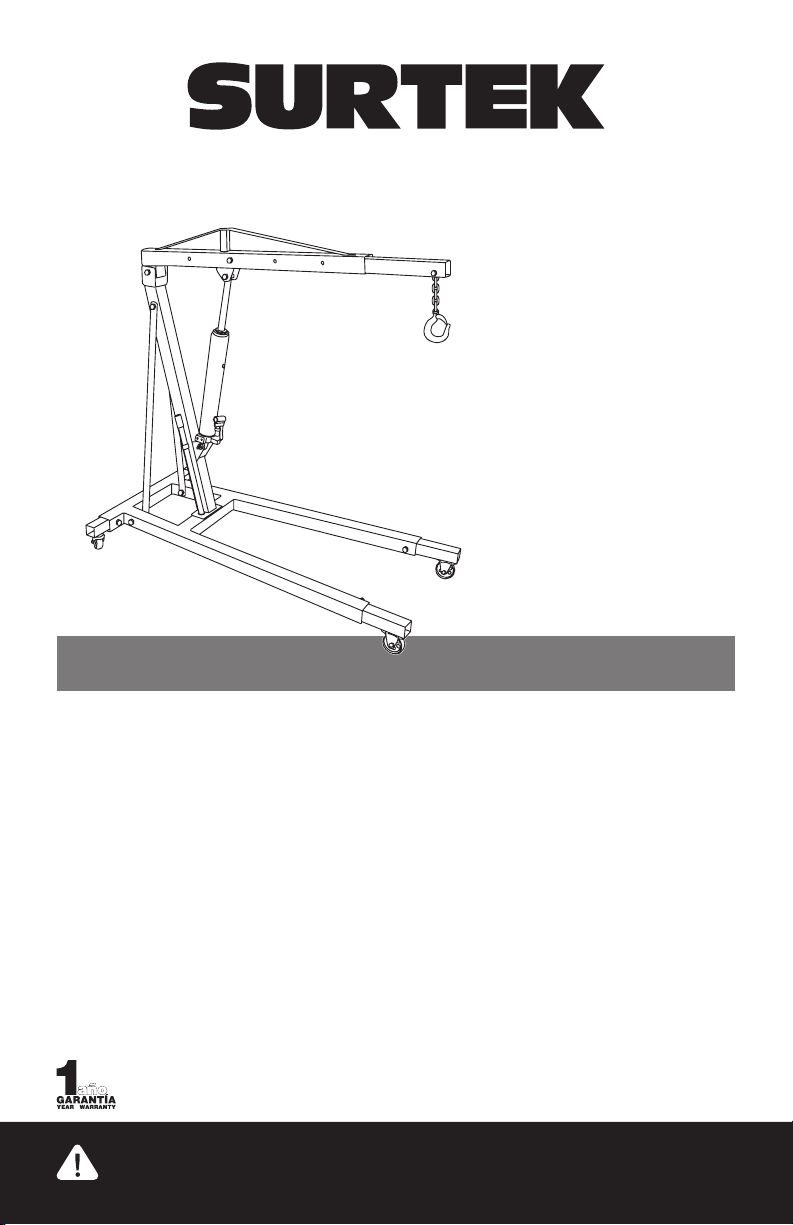
INSTRUCCIONES DE ENSAMBLE
ASSEMBLY INSTRUCTIONS
NOTA. Todos los ensambles y ajustes deben realizarse con “la
fuerza de la mano” hasta el paso 11.
NOTE: All fasteners should be only "hand tight” until step 11.
1. Unir las extensiones frontales A (3) al soporte posterior (12)
usando tornillos (14) y tuercas (21). / Attach front legs A (3) to
extension support (12) using bolts (14) and nuts (21).
2. Unir las extensiones posteriores (1) a las extensiones
frontales A (3) usando tornillos (18) y tuercas (20). / Attach rear
support (1) into front legs A (3) using bolts (18) and nuts (20).
3. Deslice las extensiones posteriores (2) en el soporte posterior
(1) con las ruedas hacia abajo y asegure con tornillos (22). / Slide
rear leg extensions (2) into rear support (1) with caster wheels facing
down and secure with bolts (22).
4. Deslice las extensiones frontales B (4) en las extensiones
frontales A (3) con las ruedas hacia abajo y asegure con
tornillos (22). / Slide front leg B (4) into front legs A (3) with caster
wheels facing down and secure with bolts (22).
5. Conecte el poste de soporte principal (9) a la extensión del
soporte (12) usando tornillos (13) y tuercas (21). / Connect main
support post (9) to extensión support (12) using bolts (13) and nuts (21).
6. Conecte las correas de soporte (5) entre la extensión frontal
A (3) y la parte superior del poste principal (9) usando tornillos
(24) y tuercas (20). / Connect support straps (5) between front leg
A (3) and top of main support post (9) using bolts (24) and nuts (20).
7. Conecte la pluma (10) al poste de soporte principal (9)
usando tornillos (16) y tuercas (19). / Connect boom (10) to main
support post (9) using bolt (16) and nut (19).
8. Deslice la extensión de la pluma (11) dentro de la pluma
(10) asegurándose que las cadenas y ganchos estén hacia
abajo. Asegure con tornillos (23) y tuercas (20) en la capacidad
deseada. / Slide boom extension (11) into boom (10) making sure that
slot for chain & hook faces down. Secure with bolt (23) and nut ( 20 )
at desired capacity.
9. Conecte el pistón hidráulico (6) al poste de soporte principal
(9) y a la pluma (10) usando tornillos (17) y tuercas (20). /
Connect hydraulic ram (6) to main support post (9) and to boom (10)
using bolts (17) & nuts (20).
10. Instale la cadena y los ganchos (8) con tornillos (15) y
tuercas (21). / Install chain & hook assembly (8) with bolt (15) and
nut (21).
11. Apriete todos los tornillos. / Tighten all tasteners.
3
#Descripción
Description
Cantidad
Quantity
1
Válvula de bloqueo / Valve block
1
2
Rondana de cobre / Copper
washer
1
3
Cilindro / Cylinder
1
4
O-ring / O-ring
1
5
O -ring / O-ring retainer
1
6
Pistón / Ram
1
7
Tuerca / Nut
1
8
O-ring / O-ring
1
9
Empaque / Sealing gasket
1
10
Tanque de aceite / Oil tank
1
11
Válvula del aceite / Oil plag
1
12
Empaque / Seal ring
1
13
Tubo / Tube
1
14
Tornillo / Bolt
1
15
SCREP / Screp
2
16
Balín / Ball
1
#Descripción
Description
Cantidad
Quantity
17
Empaque / Seal ring
1
18
Válvula de liberación /Selease
spindle
19
Balín / Ball
1
20
Rondana de cobre /Copper
washer
1
21
Cilindro de la bomba / Pump
cylinder
1
22
O -ring / O-ring
1
23
O-ring posterior /Back-up ring
1
24
Émbolo / Plunger
1
25
Bomba / Pump-link
1
26
Maneral / Handle
1
27
Entrada del maneral / Handle
socket
1
28
Eje / Shaft
2
29
Chaveta / Cotter pin
2
#Descripción
Description
Cantidad
Quantity
1
Soporte posterior / Rear support
1
2
Extensión posterior / Rear leg extension
2
3
Extensión frontal A / Front leg extension A
2
4
Extensión frontal B / Front leg extensionB
2
5
Soporte de correa / Support strap
2
6
Piston hidráulico / Hydraulic ram
1
7
Maneral / Rump handle
1
8
Gancho y cadena / Hook and chain assembly
1
9
Poste para soporte principal / Main support post
1
10
Pluma / Crane
1
11
Extensión de la pluma / Crane extension
1
12
Extensión del soporte / Extension support
1
13
Tornillo / Bolt M14 x 100
2
14
Tornillo / Bolt M14 x 110
2
15
Tornillo / Bolt M14 x 80
1
16
Tornillo / Bolt M18 x 110
1
17
Tornillo / Bolt M16 x 90
2
18
Tornillo / Bolt M16 x 100
2
19
Tuerca / Nut M18
1
20
Tuerca / Nut M16
6
21
Tuerca / Nut M14
5
22
Tornillo / Bolt M14 x 30
4
23
Tornillo / Bolt M16 x 90
1
24
Tornillo / Bolt M16 x 110
1
LISTA DE COMPONENTES
/
COMPONENTS LIST
LISTA DE PIEZAS DE REPUESTO
/
REPAIR PARTS LIST
Problema / Problem
Causa / Cause Solución / Solution
No sostiene la carga.
Will not hold load.
Suciedad en las
válvulas.
Dirt on valve seats.
• Baje el brazo. / Lower lifting jib.
• Cierre la válvula de alivio y remueva el tapón de aceite. /
Close the release valve and remove oil filler plug.
• Ponga un pie en la extensión frontal de la pluma y jale
el brazo hasta su máxima altura. / Place one foot on the
leg and pull up the lifting jib to its full height by hand.
• Abra la válvula de llenado. / Open the release valve to
lower the lifting jib.
• Cierre y ponga el tapón de aceite. / Worn seals.
No levanta la carga.
Will not lift load. Bloqueo del aire.
Air block. • Abra la válvula de alivio y remueva el tapón de
aceite. / Open the release valve and remove oil filler
plug.
• Bombee unas cuantas veces y cierre la válvula de
alivio. / Pump handle a couple of full strokes and close
the release valve.
No bombea
completamente.
Pump will not lift to its
full height.
El envase puede
estar sobrellenado.
The reservoir could be
over filled.
• Revise el nivel de aceite. / Check the oil level.
No baja
completamente.
Does not lower
completely.
Bloqueo de aire.
Air block. • Expulse el aire removiendo el tapón de aceite. /
Expel the air removing the oil plug.
• Lubrique las partes movibles. / Lubricate moving
parts.
Póliza de garantía. Este producto está garantizado por URREA HERRAMIENTAS PROFESIONALES, S.A. DE C.V., km 11,5 Carr. A El Castillo,
45680 El Salto, Jalisco. UHP900402Q29, Teléfono 01 33 3208-7900 contra defectos de fabricación y mano de obra con su reposición o
reparación sin cargo por el período de 1 año. Para hacer efectiva esta garantía, deberá presentar el producto acompañado de su compro-
bante de compra en el lugar de adquisición del producto o en el domicilio de nuestra planta mismo que se menciona en el primer párrafo
de esta garantía. En caso de que el producto requiera de partes o refacciones acuda a nuestros distribuidores autorizados.
Los gastos que se deriven para el cumplimiento de esta garantía serán cubiertos por Urrea Herramientas Profesionales, S.A. de C.V. Esta
garantía no será efectiva en los siguientes casos:
a).- Cuando la herramienta se haya utilizado en condiciones distintas a las normales.
b).- Cuando el producto hubiera sido alterado de su composición original o reparado por personas no autorizadas por el fabricante o
importador respectivo.
This product has 1 year warranty by Urrea Herramientas Profesionales S.A. de C.V. against any manufacturing defect, with its repair or
replacement during its life expectancy. The warranty is not applicable if the product does not show the URREA brand, if the product is worn
out by its daily use, shows signs of abuse, damage, its original composition has been altered, or specifies a different warranty. In order to
make the warranty effective, the product must be taken to the company or to the place of purchase along with its receipt.
IMPORTADO POR / IMPORTED BY: URREA HERRAMIENTAS PROFESIONALES S.A. DE C.V. km 11,5 Carretera a El Castillo, C.P. 45680 El
Salto, Jalisco, México Tel. 01 (33) 3208-7900 Made in China / Hecho en China R.F.C. UHP900402Q29 04-H15
SELLO DEL DISTRIBUIDOR
FECHA: / /
137024
POSIBLES PROBLEMAS Y SOLUCIONES / POSSIBLE PROBLEMS AND SOLUTIONS

Other Surtek Construction Equipment manuals

Surtek 137021 Dimensions and installation guide

Surtek

Surtek 137021 Dimensions and installation guide

Surtek 137050 Dimensions and installation guide

Surtek

Surtek 137050 Dimensions and installation guide

Popular Construction Equipment manuals by other brands

Renson Fixscreen 100 Slim (F) installation instructions

Renson

Renson Fixscreen 100 Slim (F) installation instructions

MetalTech M-MRT51010 OPERATIONAL SAFETY AND ASSEMBLY INSTRUCTIONS

MetalTech

MetalTech M-MRT51010 OPERATIONAL SAFETY AND ASSEMBLY INSTRUCTIONS

Sky Climber Air CCB user manual

Sky Climber

Sky Climber Air CCB user manual

Komatsu WB93S-5 F50003 Operation & maintenance manual

Komatsu

Komatsu WB93S-5 F50003 Operation & maintenance manual

Toro MMX-658H-P Operator's manual

Toro

Toro MMX-658H-P Operator's manual

Dynapac CC1000 instruction manual

Dynapac

Dynapac CC1000 instruction manual

Storch Steam Master manual

Storch

Storch Steam Master manual

XCMG XZ320 Operation instructions

XCMG

XCMG XZ320 Operation instructions

Palfinger PK9001-EH Operator's manual

Palfinger

Palfinger PK9001-EH Operator's manual

IMT Telescopic III Series Parts & Specifications

IMT

IMT Telescopic III Series Parts & Specifications

RaycoWylie i4500 instruction manual

RaycoWylie

RaycoWylie i4500 instruction manual

Altrad PCX 450 Operator's manual

Altrad

Altrad PCX 450 Operator's manual

Innotech QUAD-11 manual

Innotech

Innotech QUAD-11 manual

Jancy Engineering JB2400 Operator's manual

Jancy Engineering

Jancy Engineering JB2400 Operator's manual

Ashland Earthmovers I-155XL2 parts manual

Ashland Earthmovers

Ashland Earthmovers I-155XL2 parts manual

Auto Crane HC-6 NEXSTAR owner's manual

Auto Crane

Auto Crane HC-6 NEXSTAR owner's manual

UTIFORM Delta-Mini instructions

UTIFORM

UTIFORM Delta-Mini instructions

Greenlee 555-22 instruction manual

Greenlee

Greenlee 555-22 instruction manual

manuals.online logo
manuals.online logoBrands
  • About & Mission
  • Contact us
  • Privacy Policy
  • Terms and Conditions

Copyright 2025 Manuals.Online. All Rights Reserved.