Suunto X6HR User manual

www.suunto.com
INSTRUCTION MANUAL


1
CUSTOMERSERVICECONTACTS
Suunto Oy Phone +358 9 875870
Fax +358 9 87587301
Suunto USA Phone 1 (800) 543-9124
Canada Phone 1 (800) 776-7770
Suunto Europe Phone +33 3 90 20 74 30
Fax +33 3 90 20 74 40
Suunto Web Site www.suunto.com

2
TABLEOFCONTENTS
1.GENERALINFORMATION ........................................................................................5
1.1. Care and Maintenance..........................................................................5
1.1.1. Care of the X6HR ......................................................................5
1.1.2. Care of the Transmitter Belt.....................................................6
1.2. Water Resistance .................................................................................6
1.3. Battery Replacement of the X6HR .........................................................7
1.4. Battery Replacement of the Transmitter Belt .......................................9
2.HOWTOUSEYOURSUUNTOX6HR ..................................................................... 11
2.1. Display ................................................................................................ 11
2.1.1. Mode Symbols........................................................................ 11
2.1.2. Function Symbols...................................................................12
2.2. Buttons ................................................................................................13
2.2.1. Short and Long Press ............................................................13
2.2.2. Start Button.............................................................................13
2.2.3. Stop/CLButton .......................................................................14
2.2.4. Suunto Button ........................................................................14
2.2.5. Arrow Buttons .......................................................................15
2.2.6. Button Lock ............................................................................15
2.3. Menus ................................................................................................16
2.3.1. Basic Menu Structure ............................................................16
2.3.2. Navigating in Menus ...............................................................17
2.4. Heart Rate monitor and Transmitter Belt ............................................18
2.4.1. Electromagnetic Interference.................................................18
2.4.2. Warnings ................................................................................18

3
2.4.3. Use of the X6HR and Transmitter Belt in
a water environment..............................................................19
2.4.4. Activating the Heart Rate Monitor..........................................19
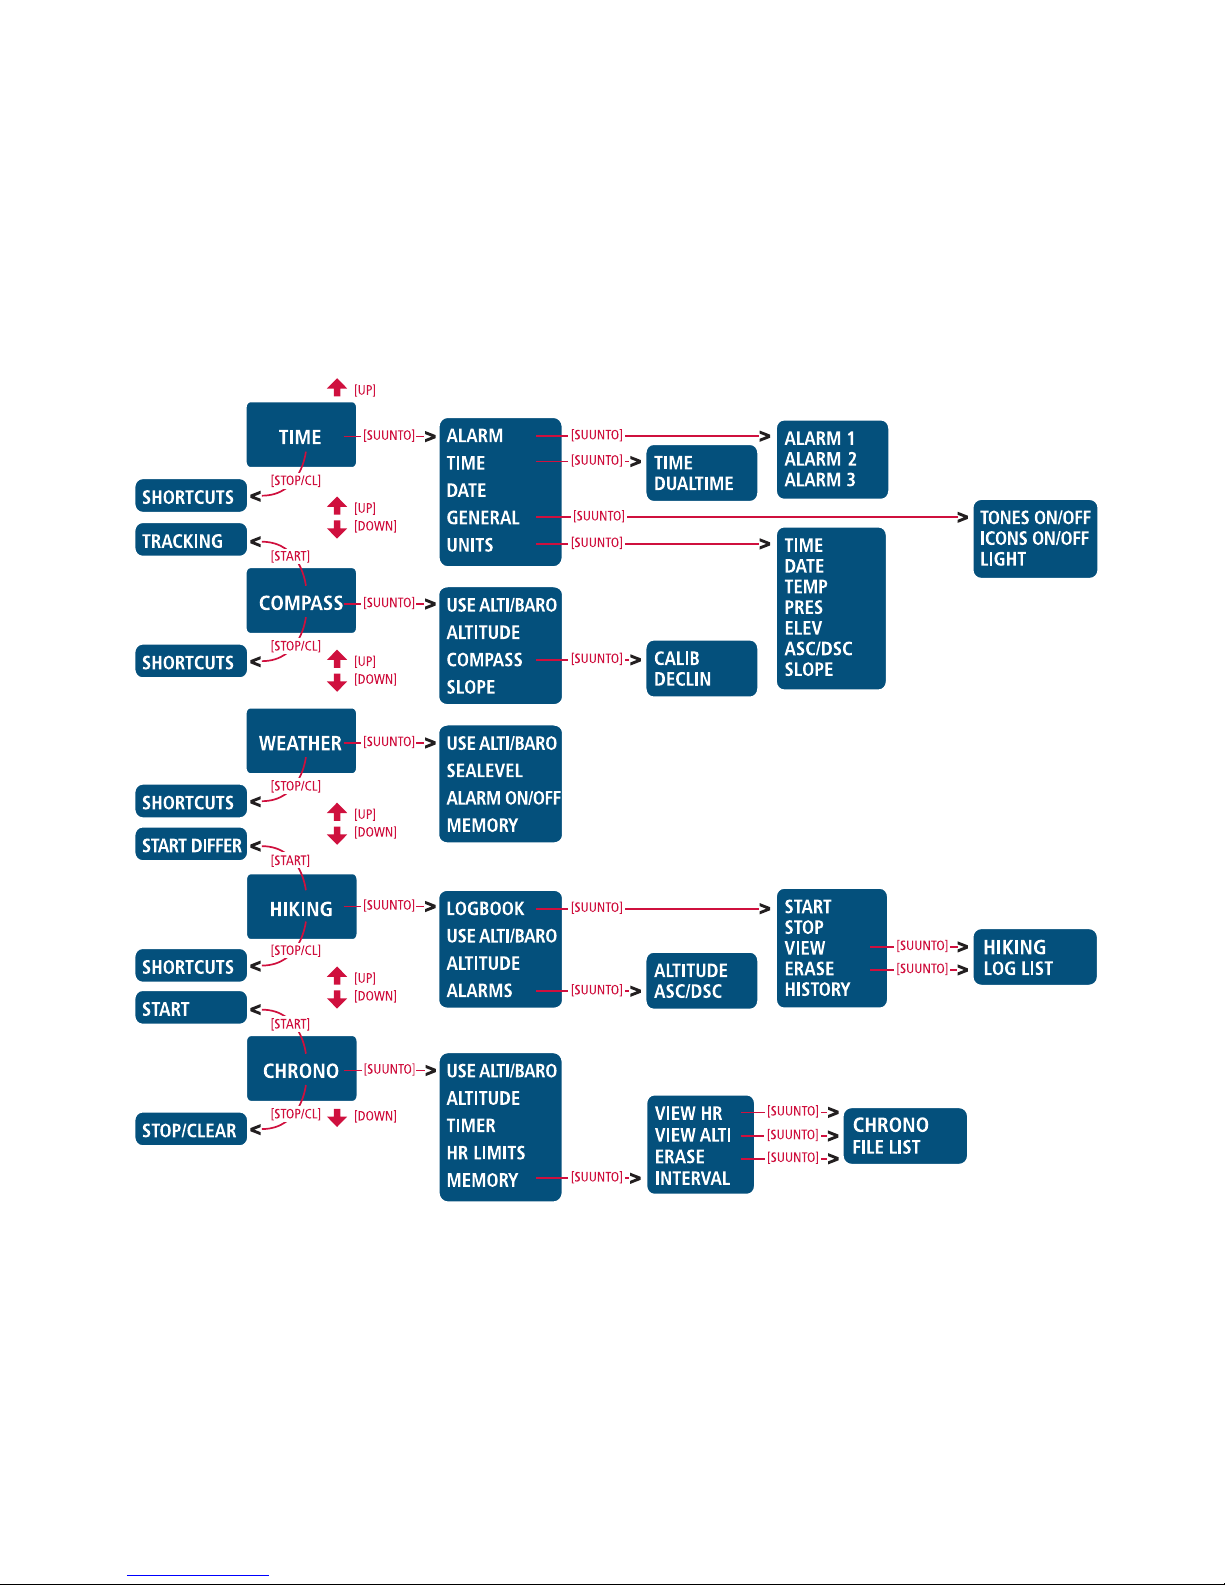
3.MODES...................................................................................................................21
3.1. General Information ............................................................................21
3.2. TimeMode ...........................................................................................21
3.2.1. Main Display ...........................................................................21
3.2.2. Alarm ......................................................................................22
3.2.3. Time ........................................................................................24
3.2.4. Date ........................................................................................25
3.2.5. General...................................................................................26
3.2.6. Units .......................................................................................27
3.3. Compass Mode ...................................................................................31
3.3.1. Main Display ...........................................................................31
3.3.2. Use .........................................................................................32
3.3.3. Altitude/Sealevel ....................................................................33
3.3.4. Compass ................................................................................34
3.3.5. Slope ......................................................................................36
3.4. Weather Mode.....................................................................................37
3.4.1. Main Display ...........................................................................37
3.4.2. Use .........................................................................................38
3.4.3. Sealevel..................................................................................38
3.4.4. Alarm ......................................................................................39
3.4.5. Memory...................................................................................40
3.5. HikingMode .........................................................................................41
3.5.1. Main Display ...........................................................................41

4
3.5.2. Logbook..................................................................................42
3.5.3. Use .........................................................................................46
3.5.4. Altitude ...................................................................................46
3.5.5. Alarms ....................................................................................46
3.6. Chrono ................................................................................................48
3.6.1. MainDisplay ...........................................................................48
3.6.2. Use .........................................................................................49
3.6.3. Altitude ...................................................................................50
3.6.4. Timer .......................................................................................50
3.6.5. HRLimits.................................................................................52
3.6.6. Memory...................................................................................53
4.ADDITIONALFEATURES ........................................................................................58
4.1. PC Interface ........................................................................................58
4.1.1. Transferring Data...................................................................58
4.1.2. Suunto Activity Manager Features ........................................59
4.2. SuuntoSports.com ..............................................................................61
4.2.1. System Requirements ............................................................62
4.2.2. SuuntoSports.com Sections ..................................................62
4.2.3. Getting Started .......................................................................64
5.TECHNICALDATA..................................................................................................65
6.COPYRIGHTANDTRADEMARKNOTICE...............................................................66
7.CECOMPLIANCE ...................................................................................................67
8.LIMITSOFLIABILITYANDISO9001COMPLIANCE ..............................................67

5
1. GENERALINFORMATION
Suunto X6HR Wristop Computer is a reliable high precision electronic instrument in-
tended for recreational use. Outdoor enthusiasts and endurance athletes who enjoy
such sports as mountain climbing, running and biking can rely on Suunto X6HR’s
accuracy.
NOTE: X6HR should not be substituted for obtaining measurements that require
professional or industrial precision and should not be used to obtain measurements
when skydiving, hang gliding, paragliding, gyrocopter riding and flying small aircraft.
X6HR features five main functions: TIME,ALTIMETER, BAROMETER, COMPASS and
HEART RATE MONITOR. Each function provides several sub modes further enhanc-
ing the usefulness to its owner. All key features and modes are discussed in detail in
chapter 3.
1.1. CARE AND MAINTENANCE
1.1.1. Care of X6HR
Perform only the procedures described in this manual. Never attempt to disassemble
or service your Suunto X6HR. Protect your Suunto X6HR from shocks, extreme heat
and prolonged exposure to direct sunlight. If not in use, your Suunto X6HR should be
stored in a clean, dry environment at room temperature.
Suunto X6HR can be wiped clean with a lightly moistened (warm water) cloth.
If there are stubborn stains or marks, you can apply mild soap to the area. Do not
expose Suunto X6HR to strong chemicals such as gasoline, cleaning solvents, ac-
etone, alcohol, insect repellents, adhesives and paint, as they may damage the unit’s
seals, case and finish. Keep the PC interface contacts clean with e.g. a toothbrush.
Make sure the area around the sensor is free of dirt and sand. Never insert any
objects into the sensor opening.

6
1.1.2. Care of Transmitter Belt
Wash the transmitter with mild soap and water after each use. Rinse with pure
water; dry thoroughly and carefully.
Store in a cool dry place. Never store the transmitter wet. Moisture keeps the elec-
trodes wet and transmitter activated, thereby shortening the life of the battery.
Do not bend or stretch the transmitter as this may damage the electrodes.
1.2.WATER RESISTANCE
Suunto X6HR is water resistant up to 100 m/330 ft. However, it is not a diving instru-
ment and therefore it should not be used to obtain data under water.
The transmitter belt is water resistant to 20m/66ft. It is suitable for swimming but
should not be used in diving. Refer to chapter 2.4.3. for information about using X6HR
and the transmitter belt in water.

7
1.3. BATTERYREPLACEMENT OF THE X6HR
Suunto X6HR operates on a 3-Volt lithium cell,
type: CR 2032. The life expectancy is approxi-
mately 12 months in Time/Weather modes.
A low-battery warning indicator is activated
on the display when approximately 5–15 per-
cent of the battery capacity is still available.
When this occurs we recommend replacing
the battery. However, extremely cold weather
may activate the low battery warning indica-
tor, even though the battery is still fully opera-
tional. If the battery warning indicator activates
intemperatures above10°C(50°F), replacethe
battery.
NOTE: Heavy use of the backlight, altimeter,
compass and heart rate monitor will signifi-
cantly reduce battery life.
To replace the battery
1. Insert a coin into the slot located on the bat-
tery compartment cover on the backside of
Suunto X6HR.
2. Turn the coin counterclockwise until it is
alignedwiththeopen position marker,or even
slightly further for easy opening.
3. Remove the battery compartment cover.
➦➦
➦➦
➦
➥➥
➥➥
➥

8
Ensure that the Oring and all surfaces are
clean and dry. Do not stretch the O ring.
4. Remove the old battery carefully.
5. Place the new battery into the battery com-
partment with the positive side facing up.
6. With the Oring in the correct position, re-
place the battery compartment cover and turn
it clockwise with a coin until it is aligned with
the closed position marker.
NOTE: Battery replacement should be
performed with extreme care to ensure that the
Suunto X6HR remains water-resistant. Careless
battery replacement may void warranty.
➥➥
➥➥
➥
➦➦
➦➦
➦

9
1.4. BATTERY REPLACEMENT OF THE
TRANSMITTER BELT
The transmitter belt operates on a 3-Volt lithium
cell, type: CR 2032.
The transmitter belt’s average expected bat-
tery life is 300 hours of use in ideal operating
temperatures.
When X6HR is not receiving a signal but the
transmitter belt is active, a change of battery
might be necessary. Refer to chapter 2.4. for
other factors that may interfere with the cor-
rect signal.
To change the battery
1. Insert a coin into the slot located on the bat-
tery compartment cover on the backside of
the transmitter belt.
2. Turn the coin counterclockwise until it is
alignedwiththeopen position marker,or even
slightly further for easy opening.
3. Remove the battery compartment cover. En-
sure that the O ring and all surfaces are
clean and dry. Do not stretch the O ring.
4. Carefully remove the old battery.
5. Place the new battery into the battery com-
partment with the positive side facing up.
O
E
P
N
E
S
O
L
C
N
P
E
O
L
E
S
O
C
O
P
E
N
S
E
L
C
O
N
P
E
O
L
E
S
O
C
E
O
P
N
E

10
6. With the Oring in the correct position, replace the battery compartment cover and
turn it clockwise with a coin until it is aligned with the closed position marker.
NOTE: Suunto recommends that the battery cover and the O ring are changed
simultaneously with the battery to ensure that the transmitter remains clean and
waterresistant. Replacement covers are available with replacement batteries.
NOTE: Battery covers of the transmitter belt and the wristop computer are not
interchangeable.

11
2. HOW TO USE YOUR SUUNTO
X6HR
2.1. DISPLAY
When your Suunto X6HR leaves the factory, it
is in sleep mode, with the display empty. Long
press (> 2 s) any button to activate the X6HR.
The text “DEFRAG OF MEMORY” is displayed and
after a few seconds the Time mode is acti-
vated. Later on, you can select which mode is
displayed.For informationaboutsetting thecor-
rect time, refer to chapter 3.2.3.
In addition to mode-specific information, the
Suunto X6HR display includes several symbols.
2.1.1. Mode Symbols
The mode symbols on the left of the display
indicate the active mode:
Time
Compass
Weather
Hiking
Chrono

12
2.1.2. Function Symbols
Function symbols indicate that either a function (such as Alarm) has been activated
or something needs to be done (battery symbol). The function symbols are:
Alarm
Active, when at least one of the alarms is on.
Weather/Altitude/HRalarm
Active, when weather alarm, altitude alarm, asc/dsc alarm or HR limits alarm is on.
Logbook
Active, when the hiking logbook is recording data.
Chrono
Active, when the chrono is on and recording data to a file.
Use alti/baro
Indicates, whether the air pressure sensor is used to measure altitude or used as a
barometer.
If you select the air pressure to be displayed as altitude, the symbol is next to the
Compass mode symbol. If you select the air pressure to be displayed as weather
information, the symbol is next to the Weather mode symbol. For more information,
refer to page 29.
Battery
Active, when 5–15 percent of the battery capacity is left and the battery should be
replaced.
Button Lock
Active, when the button lock is activated.

13
Heart Rate
Active, when the heart rate monitor is receiv-
ing heart rate signal. Flashes in sync with the
heart rate.
2.2. BUTTONS
2.2.1. Short and Long Press
The buttons have different functions depend-
ing on how long they are pressed.
The ordinary press or short press means that
the button is pressed quickly.
The long press means that the button is
pressed for more than 2 seconds.
2.2.2. Start Button
Short press
• In Chrono mode, starts timing and saves and
displays the intermediate times.
• In Hiking mode, saves the mark points (alti-
tude, heart rate and time).
Long press
• Activates the backlight when the backlight is
not set to off. For more information on
backlight settings, see page 27.

14
2.2.3. Stop/CL Button
Short press
• Returns to the previous menu level or to the previous selection without accepting
the selection.
• In the Chrono mode, stops timing.
• In other mode main displays, acts as a shortcut button that toggles the lowest field
of the main display between three different alternatives. The selection stays active
even if the mode or menu level is changed.
Long press
• Returns to the main display of the current mode without accepting the last selection.
• In Chrono mode, resets the stopwatch.
2.2.4. Suunto Button
Short press
• Scrolls to a lower menu level.
• Accepts the selections made with arrows and moves to the next phase.
• After the last selection, returns to the settings menu.
• With two possible selections (e.g. light on/off), activates the selection and accepts
the selections made with arrows.
Long press
• Returns to the main display of the current mode and accepts the selection.
• With two possible selections (e.g. light on/off), accepts the selection and returns
directly to the main display of the current mode.
• In the main display of all modes, activates or deactivates the heart rate limits alarm.

15
2.2.5. Arrow Buttons
Short press
• Changes modes in the mode main display.
• Scrolls the menus up and down, and logbook and memory forward and back.
• Changes the values. The up arrow increases the value and the down arrow
decreases the value.
• With two possible selections (e.g. light on/off), both arrows change the value.
2.2.6. Button Lock
The button lock prevents buttons being pushed accidentally. If the button lock is
activated and you try to press a button, the message “UNLOCK PRESS SUUNTO” is dis-
played.
Activating the lock
To activate the lock
1. Press the Suunto button. Suunto X6HR moves to the function menu.
2. Press the Start button within 2 seconds. The buttons are locked and Suunto X6HR
moves to the main display of the current mode.
Unlocking the lock
To unlock the button lock
1. Press the Suunto button. The following text is displayed: “NOW PRESS START”.
2. Press the Start button within 2 seconds.

16
2.3. MENUS
2.3.1. Basic Menu Structure

17
The menus are organized hierarchically under the modes. When you select a mode,
its main display appears. When you press Suunto in the mode’s main display, the
mode’s function menu is displayed. The function menu includes several functions
and all the functions include sub-functions or settings. This constructs a hierarchical
menu structure.
2.3.2. Navigating in Menus
The menu items can be scrolled with the up and down arrow buttons on the right side
of Suunto X6HR. Three menu items can be displayed at the same time.
The menu item that is currently active and can thus be selected is displayed in
reversed color. On the right side of the display there is an indicator bar showing the
total number of menu items. The number of the active menu item is displayed next to
the indicator bar.
You can move deeper into the hierarchy by selecting a menu item and pressing the
Suunto button. If you want to return one step up in the hierarchy, press the Stop/CL
button. Remember that pressing only the Stop/CL button does not save the changes—
first they have to be accepted using the Suunto button.
If you want to return directly to the main display of the active mode, press either the
Suunto button (saves the changes) or the Stop/CL button (discards the last change)
for more than 2 seconds.
Suunto X6HR has been designed to guide you as much as possible when you navi-
gate in the menus. When you perform a function, Suunto X6HR often automatically
returns to the menu that you are likely to use next. Also, for example, if you try to do
something that is impossible, Suunto X6HR first displays a message and then auto-
matically recommends a function in reversed color to help you use the functions.

18
2.4. HEART RATE MONITORAND TRANSMITTER BELT
The heart rate monitor is the premier feature of the Suunto X6HR. It provides the user
with a versatile instrument for measuring and analyzing physical performance in
different conditions. When used in conjunction with the altimeter function, the heart
rate monitor allows the user to observe changes in heart rate during ascents and
descents and the impact of altitude on heart rate. The heart rates can be recorded in
X6HR memory and transferred to a PC for analysis. The heart rate data is available in
Hiking and Chrono modes.
2.4.1. Electromagnetic interference
Disturbances may occur near high voltage power lines, traffic lights, overhead lines
of electric railways, electric bus lines or trams, televisions, car motors, bike comput-
ers, some motor driven exercise equipment, cellular phones or when you walk through
electric security gates.
It is best to position the Wristop computer within 3 feet or 0,9 meters of the transmitter.
Ensure no other transmitters are within that range; signals from other transmitter(s)
can cause an incorrect readout.
Repeated kinetic shock to the X6HR may cause an incorrect heart rate readout and
should be avoided.
2.4.2. Warnings
Persons who have a pacemaker, defibrillator, or other implanted electronic device
use the heart rate monitor at their own risk. Before starting the initial use of the heart
rate monitor, we recommend an exercise test under a doctor’s supervision. This will
ensure the safety and reliability of the pacemaker and heart rate monitor when being
used simultaneously.
Other manuals for X6HR
1
Table of contents
Other Suunto Watch manuals

Suunto
Suunto OW202 User manual

Suunto
Suunto X9i User manual

Suunto
Suunto G9 User manual

Suunto
Suunto X6 User manual

Suunto
Suunto AMBIT3 RUN 2.4 User manual

Suunto
Suunto AMBIT3 PEAK 2.4 User manual

Suunto
Suunto X6HR User manual

Suunto
Suunto AMBIT2 S User manual

Suunto
Suunto AMBIT3 RUN 2.5 User manual

Suunto
Suunto CORE User manual

Suunto
Suunto N3i User manual

Suunto
Suunto D4i User manual

Suunto
Suunto X9_en. User manual

Suunto
Suunto D9tx User manual

Suunto
Suunto Vector User manual

Suunto
Suunto Observer User manual

Suunto
Suunto N3 User manual

Suunto
Suunto SPARTAN ULTRA 2.6 User manual

Suunto
Suunto Spartan User manual

Suunto
Suunto M-9 User manual