Suvie S020M User manual

Multi-Zone Cooking
and Refrigeration
www.suvie.com
This product is intended for HOUSEHOLD USE ONLY
Model No. S020M Suvie Kitchen Robot User Manual
FILLWATERABOVETHELINE
Ver. 04202101

Model No. S020M1Model No. S020M 2
IMPORTANT SAFETY INSTRUCTIONS FCC (Federal Communications
Commission)
SAVE THESE INSTRUCTIONS
To reduce the risk of burns, electric shock, fire, or injury to
persons when using your Suvie, be sure to follow the basic
safety precautions in this section.
WARNING
Spilled food can cause serious burns. Keep the appliance and
cord away from children. Never drape the cord over the edge of a
counter, never use an outlet below the counter, and never use an
extension cord with this appliance.
When using electrical appliances, ALWAYS follow basic safety precautions including
all of the following:
1. Read all instructions.
2. Do not touch hot surfaces directly; use handles or knobs.
3. To protect against electrical shock do not immerse cord or plugs in water or
other liquid.
4. Close supervision is necessary when any appliance is used by or near children.
5. Unplug from outlet before cleaning. Allow to cool before inserting or removing
parts.
6. Do not operate any appliance with a damaged cord or plug or after the appliance
malfunctions or has been damaged in any manner. Contact help@suvie.com for
examination, repair, or adjustment.
7. The use of accessory attachments not recommended by the appliance
manufacturer may cause injuries.
8. Do not use outdoors.
9. Do not let the cord hang over the edge of a table or counter, or to touch hot
surfaces.
10. Do not place on or near a hot gas or electric burner, or in a heated oven.
11. Extreme caution must be used when moving an appliance containing hot oil or
other hot liquids.
12. Always attach plug to appliance first, then plug cord into the wall outlet. To
disconnect, turn any control to “off”, then remove plug from the wall outlet.
13. Do not use appliance for anything other than its intended use.
14. Use extreme caution when removing trays or disposing of hot water or grease.
15. Do not clean with metal scouring pads. Pieces can break off the pad and touch
electrical parts, creating a risk of electric shock.
16. Intended for countertop use only.
Note:
This equipment has been tested and found to comply with the limits for a
Class B digital device, pursuant to part 15 of the FCC Rules. These limits
are designed to provide reasonable protection against harmful interference
in a residential installation. This equipment generates uses and can radiate
radio frequency energy and, if not installed and used in accordance with
the instructions, may cause harmful interference to radio communications.
However, there is no guarantee that interference will not occur in a particular
installation. If this equipment does cause harmful interference to radio or
television reception, which can be determined by turning the equipment off
and on, the user is encouraged to try to correct the interference by one or
more of the following measures:
•
Reorient or relocate the receiving antenna.
•
Increase the separation between the equipment and receiver.
•
Connect the equipment into an outlet on a circuit different from that to which
the receiver is connected.
•
Consult the dealer or an experienced radio/TV technician for help. This device
should be installed and operated with minimum 20 cm between the radiator
and your body.
The users manual for an intentional or unintentional radiator shall caution the user
that changes or modifications not expressly approved by the party responsible for
compliance could void the user’s authority to operate the equipment. In cases where
the manual is provided only in a form other than paper, such as on a computer disk
or over the Internet, the information required by this section may be included in the
manual in that alternative form, provided the user can reasonably be expected to
have the capability to access information in that form.
WARNING
This equipment may generate or use radio frequency energy. Changes or
modifications to this equipment may cause harmful interference unless the
modifications are expressly approved in the instruction manual. The user could lose
the authority to operate this equipment if an unauthorized change or modification is
made.

Model No. S020M3Model No. S020M 4
Before Using Your Suvie
DANGER
Do not operate Suvie if the cord or plug becomes damaged, if the appliance
malfunctions, or if the Suvie is dropped or damaged in any manner. Contact Suvie
immediately for examination, repair, or electrical or mechanical adjustment.
WARNING
• Place Suvie on a clean, solid, even surface to help prevent it from slipping. An anti-
tip bracket may be attached to the back of the appliance and the wall behind it for
extra stability, especially if there are young children in the house.
• Never use the Suvie in combination with parts or equipment from older
generations of Suvie. Never use your Suvie with damaged accessories.
• The use of attachments or items not recommended or sold by Suvie may cause
fire, electric shock, or injury.
• The Suvie can generate a constant flow of steam while cooking. Keep away from
any hot steam that escapes the appliance during operation. Steam may also leave
traces of moisture on your countertop. Be mindful of objects that sit near your
appliance.
• Scalding due to food that has overheated may occur if attempting to use quantities
of food in excess of a tray’s capacity. If overheating occurs, unplug the appliance
and allow it to cool. Use care when removing all components as they may stay hot
for some time.
• To avoid scalding, burn injury, and laceration hazard, do not attempt to open the
Suvie door by force. Only open the door when the program is complete.
• Fire hazard: Keep Suvie away from outside heat sources to avoid risk of fire.
• Trays will be hot: Always use an oven mitt when removing trays after cooking as
they may be extremely hot.
• Not intended for use by children: Close supervision is necessary when the Suvie is
used by or near children.
• You may get burned or scalded by escaping hot food or steam or by touching hot
surfaces.
• Remove all trays carefully to prevent contents from spilling or splashing.
Safety Symbols
How To Contact Suvie
These safety alert symbols can be found throughout the
guide, alerting you to potential hazards. It’s important to
comply with these directives to avoid possible injury or death.
DANGER Indicates a hazardous situation which you must prevent to
avoid death or injury.
WARNING Indicates a hazardous situation which you should prevent to
avoid possible death or injury.
CAUTION Indicates a hazardous situation which you must prevent to
avoid injury.
NOTICE Specifies a good practice or conveys important information.
Contact us with questions or concerns.
Email: [email protected]
• Changes or modifications not expressly approved by the party responsible for
compliance could void the user’s authority to operate the equipment.
• This device should be installed and operated with minimum 20 cm between the
radiator and your body.
This device complies with part 15 of the FCC’s Rules. Operation is subject to the
following two conditions:
1. This device may not cause harmful interference.
2. This device must accept any interference received, including interference that
may cause undesirable operation.

Model No. S020M5Model No. S020M 6
Welcome to
BEFORE OPERATING THIS PRODUCT, IT IS IMPORTANT TO READ,
UNDERSTAND, AND FOLLOW THESE INSTRUCTIONS.
PLEASE SAVE THIS BOOKLET FOR FUTURE REFERENCE.
• Damaged accessories may cause injury. If any Suvie accessories are damaged
during food preparation, discard food. Contact help@suvie.com for a replacement
accessory.
• Never remove the reservoir or add more water during a cook.
• Do not modify your Suvie or any accessories.
• Never leave Suvie unattended while it is in Broil, Bake, Roast, or Rapid Cook
mode.
• Keep your Suvie away from the edge of your counter to help prevent it from falling
off. Specific set up instructions are on Page 11 of this manual.
CAUTION
• Never overload trays beyond their top or, with the starch pan, their recommended
fill level.
• Be sure to keep the Broiler element clean of any food after use.
• Unplug the Suvie from outlet before cleaning.
• Do not put the Suvie appliance in water or other liquid.
• Suvie recommends using only distilled water in the appliance.
NOTICE
SAVE THESE INSTRUCTIONS

Model No. S020M7Model No. S020M 8
Cool-to-Cook Refrigerating vs Scheduling when Using Bake, Roast, Broil,
and Rapid Cook Functions:.............................................................................26
Frozen to Cook.................................................................................................26
Sous Vide..........................................................................................................27
Slow Cook ........................................................................................................27
Roast.................................................................................................................28
Bake ..................................................................................................................28
Broil...................................................................................................................29
Warm & Reheat ................................................................................................29
Steam................................................................................................................30
Egg Mode .........................................................................................................30
Suvie Starch Cooker Expanded Functions:...........................................................31
Rice ...................................................................................................................31
Pasta .................................................................................................................31
Healthy Grains..................................................................................................31
COOK SETTINGS FOR SUVIE SMART MEALS..............................................................32
The Tap Zone............................................................................................................32
Safe Packaging with Suvie Smart Meals ...............................................................32
MODIFYING COOK SETTINGS OR CANCELLING YOUR MEAL ..................................34
Easily Make Changes to Your Meal or Cancel It Entirely .......................................34
SCHEDULING SUVIE FROM YOUR PHONE...................................................................35
Suvie Automatically Updates the Mobile App .......................................................36
When Dinner Will Finish...........................................................................................36
Monitor the Status of Your Suvie ............................................................................36
WHEN COOKING IS COMPLETE ....................................................................................37
SUVIE CONTROL PANEL AND FEATURES ....................................................................37
CLEANUP AND MAINTENANCE.....................................................................................41
EXPAND YOUR MEAL WITH THE SUVIE STARCH COOKER........................................41
DESCALE YOUR SUVIE ...................................................................................................42
Keep Your Suvie Looking Brand New.....................................................................42
Descaling Your Machine..................................................................................42
Cleaning Your Reservoir..................................................................................43
Contents of this Manual
IMPORTANT SAFETY INSTRUCTIONS ............................................................................1
FCC (FEDERAL COMMUNICATIONS COMMISSION) .....................................................2
SAFETY SYMBOLS............................................................................................................3
HOW TO CONTACT SUVIE ................................................................................................3
BEFORE USING YOUR SUVIE...........................................................................................4
TECHNICAL DATA ..............................................................................................................9
GETTING TO KNOW YOUR NEW PERSONAL CHEF.....................................................10
COUNTERTOP PLACEMENT ..........................................................................................11
GROUNDING INSTRUCTIONS ........................................................................................12
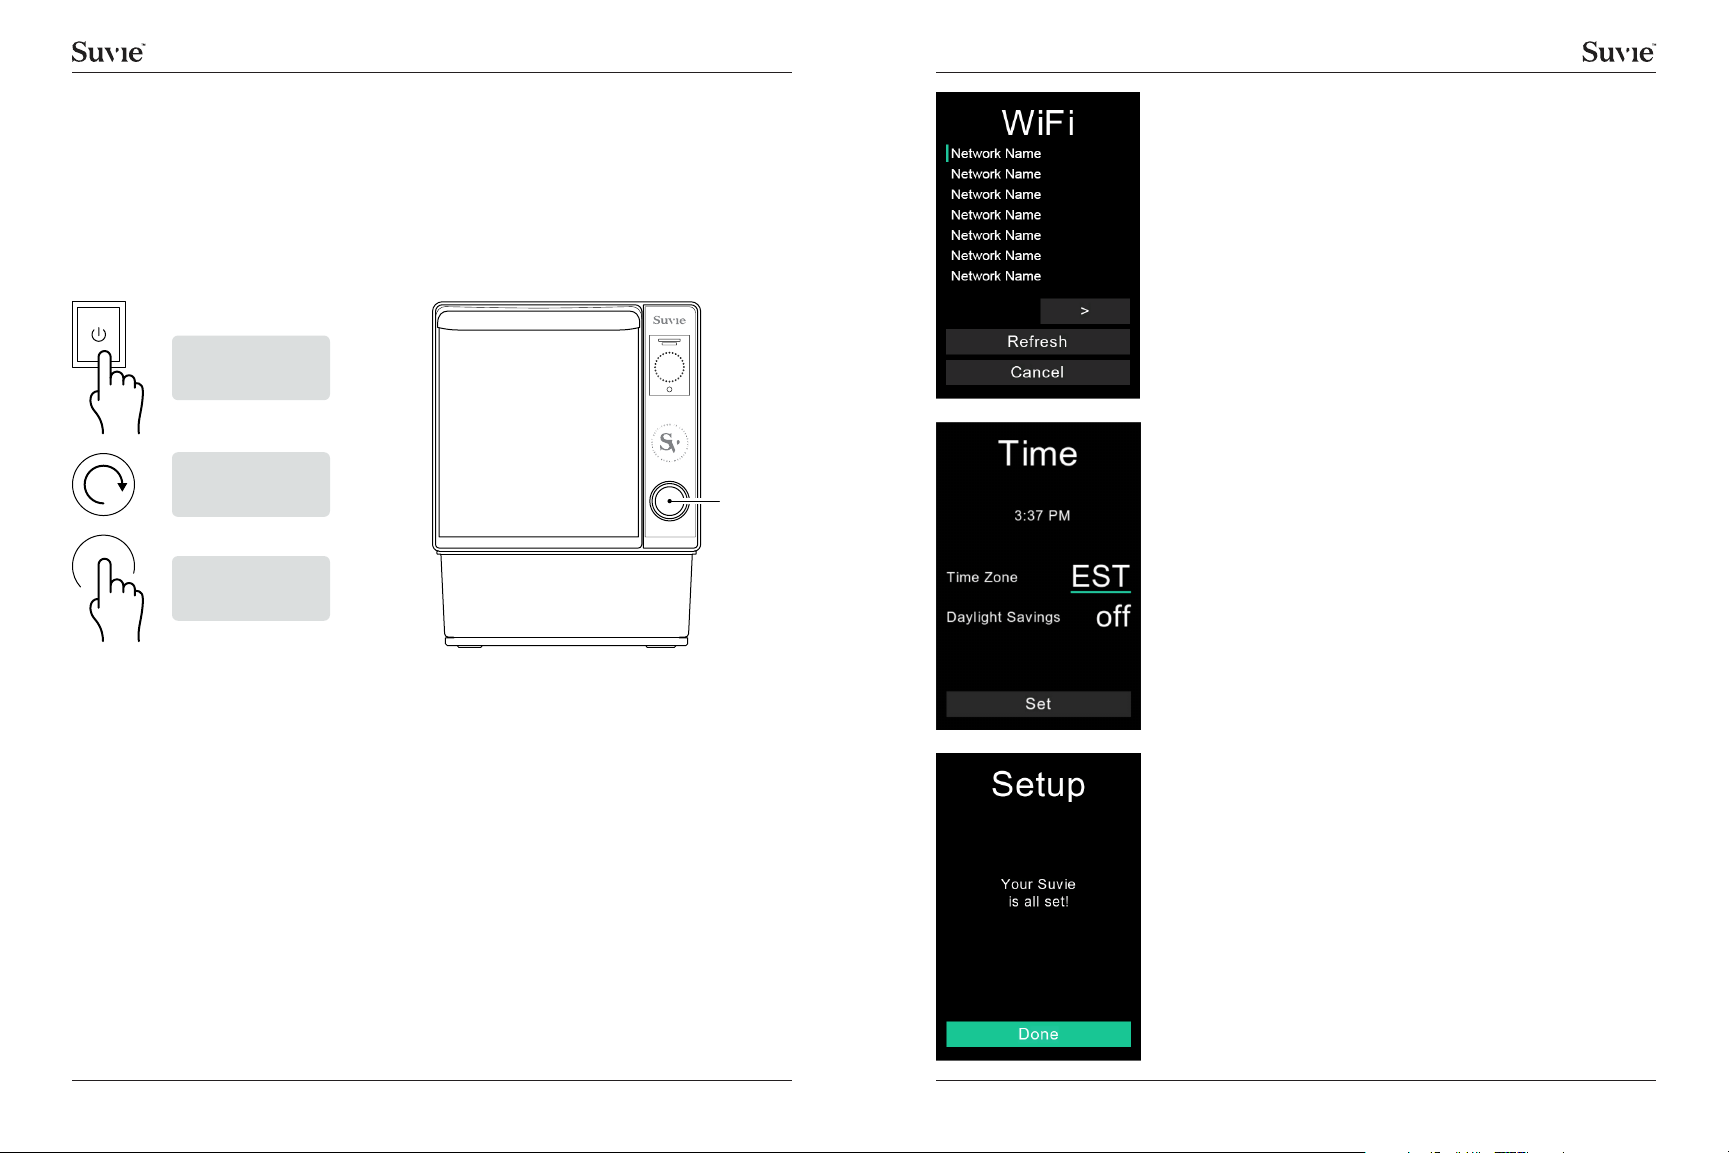
QUICK ON-SCREEN SETUP ...........................................................................................13
YOUR SUVIE ACCOUNT..................................................................................................15
FILLING THE WATER RESERVOIR..................................................................................15
Water Level & Placement ........................................................................................15
Water Bubbling When In Use ..................................................................................16
REFRIGERATION INFORMATION ...................................................................................17
COOLING AFTER COMPLETING A COOK ..................................................................... 17
Safely Cool To Prepare Your Next Meal .................................................................17
TAKING YOUR FOOD FROM COOL-TO-COOK..............................................................17
How Suvie Calculates Cook Time...........................................................................18
YOUR SUVIE PANS ..........................................................................................................18
HOW IT WORKS ...............................................................................................................19
Simple Preparation Steps for Multi-Zone Cooking ...............................................19
Cooking Zone Function Capabilities ......................................................................23
Sous Vide Time & Temp Chart ................................................................................24
Vegetable Roasting Recommendations.................................................................24
Protein Roasting Chart............................................................................................25
COOKING FUNCTIONS ...................................................................................................25
Suvie Core Functions: .............................................................................................25
Cool to Cook ....................................................................................................25
Waiting for the chart ................................................................................................25

Model No. S020M9Model No. S020M 10
The Suvie appliance uses water with two zones of temperature control to independently
cook your ingredients. Please be aware that some cooking functions require the reservoir
to be filled with water prior to cooking. Suvie will prompt you to fill the reservoir when
needed.
Once you’ve loaded your Wi-Fi connected Suvie appliance, recipes will automatically
download, and you may use the Tap Zone with your Smart Meals to confirm what
will be cooked. Refrigeration will then begin if you choose to schedule your meal at a
later time.
If using your own ingredients, you will have the option to choose your desired
cooking function, and set the appropriate cooking temperatures/times manually
using one of the My Cook functions. See page 36 for instructions when cooking
using your own ingredients).
You can also use your phone to schedule or reschedule your meal when away from
the unit (see instructions on page 33).
Getting To Know Your New Personal
Chef
TROUBLESHOOTING ......................................................................................................44
SERVICE AND SUPPORT ................................................................................................46
Technical Data
Submitted to UL for U.S. Approval
Certification Marks
55.0 poundsWeight
3.5” Color LCD Screen, Resolution 480 x 320 with push-
button rotary dial
Control Panel
1.75 L × 2 PansSuvie Pan Volume
110-120 VAC 50/60Hz
Maximum power consumption 1,400W (110V / 15A)
Detachable power cord, 30 inches in length
Power
Height: 17.0 inches
Width: 13.0 inches
Depth: 19.0 inches
Dimensions
1,400 W power consumption with protection against
overheating
Heating System
13.0 in
17.0 in
19.0 in
FILLWATER
ABOVETHE
LINE
Power Switch
on the back
Reservoir &
Lid
LCD Display
Tap Zone
Control Knob
Power Cord
Suvie Pan &
Cooking Zone 1 (upper)
1 Steam Rack
Suvie Pan &
Cooking Zone 2 (lower)

Model No. S020M11 Model No. S020M 12
WARNING
• A child or adult can tip the appliance causing serious injury or death. An anti-tip
bracket should be installed at the back of the appliance and attached to the wall
behind it for extra stability and protection.
• Do not install your Suvie over a range cooktop or other appliance that produces
heat. Installation of your Suvie near a heat source can adversely affect the
operation and possibly cause damage.
• Never use an extension cord with Suvie.
Grounding Instructions
The Suvie appliance must be grounded while in use to protect the operator
from electrical shock. Suvie is equipped with a 3-conductor cord and a 3-prong
grounding-type plug to fit the proper grounding-type receptacle. The appliance has a
plug similar to the figure above.
The grounding tab which extends from the adapter must connect to the permanent
ground in the outlet box. Plug your Suvie into a GFCI (Ground Fault Circuit
Interrupter) if within 6 feet from a sink.
Countertop Placement
• Remove all packing materials and accessories. Examine your Suvie for any
damage such as dents or broken components.
• Remove any protective film on the oven or component surfaces.
• To prevent damage, do not block any inlet or outlet openings.
CAUTION
Leave at least 1”
free above appliance
Leave 6” from the back
Leave 4” from the left
Leave 4” from the right
Use in a room that is
no warmer than 75
degrees Fahrenheit
Place near sink
Do not lean or place
any objects on top
of Suvie
Place on counter top surfaces
that can withstand possible moisture
from steam condensation
Leave Suvie upright for 24 hours prior to refrigerating or scheduling to allow
coolant to settle.

Model No. S020M13 Model No. S020M 14
Date and time will then be set automatically. You may
adjust the time zone, and there is an option for daylight
savings.
Once all settings have been confirmed, Suvie will
download updates automatically, and then will reboot.
Please be patient as this process may take several
minutes to complete. Once the setup has finished,
Suvie will show you a complete screen and your
appliance is now ready to use.
The first time you plug in your Suvie, the on-screen instructions will guide you
through a simple setup process.
This setup includes: setting the date & time, connecting to WiFi, and downloading the
latest Smart Meal recipes.
Quick On-Screen Setup
Push the control
knob to select an
option.
Turn the control
knob to see
options.
Turn On: Turn on
using the power
switch on back
A list of detectable Wi-Fi networks will appear. Rotate
the dial to select the network Suvie will use to connect
to the Internet.
Press the control knob to make your selection.
Enter your password by rotating the dial and pressing
on each character.
Control
Knob

Model No. S020M15 Model No. S020M 16
There are two methods to fill the water reservoir:
1. Pull up to remove the reservoir from the appliance and fill it to the fill line
indicated in your nearby sink. When replacing the reservoir, be sure to push
down firmly to ensure proper placement; then cover with lid.
2. Fill a pitcher with water and pour directly into the reservoir placed in the unit until
the water level reaches the fill line indicated.
ONLY FILL THE RESERVOIR WITH WATER WHEN PROMPTED.
The water in the unit is used for refrigeration as well as cooking for some functions.
For functions that require water, Suvie will prompt you to fill the reservoir with water
when needed. Do not add water to the reservoir unless propmed on the LCD dispaly.
Please be aware that Suvie will not use all of the water in the reservoir while cooking
or cooling. Suvie will only use the exact amount of water needed and this water will
evaporate over time, without needing to drain.
WARNING
• Never remove the reservoir while Suvie is cooking or refrigerating.
WARNING
• We recommend using distilled water in your Suvie. Never use anything in the
reservoir other than water or cleaning solution as indicated by Suvie.
• Do not add additional water to the reservoir once the unit begins cooking or
refrigerating.
NOTICE
Your Suvie Account
Your Suvie will automatically register once it has been connected to WiFi.
To login to your Suvie account go to: https://app.suvie.com
Your Suvie account can be used to:
• Order Suvie Smart Meals
• Update shipping address
• Update billing information
• Update account name and phone number
Looking for Suvie recipes? Visit https://blog.suvie.com
Filling the Water Reservoir
Water Level & Placement
Water Bubbling When In Use
ONLY FILL RESERVOIR WHEN PROMPTED
ON DISPLAY
Not all cooking functions require the the water
reservoir to be filled prior to use.
• The reservoir will steam and get hot while cooking. Do not touch the reservoir
while it is in use.
CAUTION
• Water inside your reservoir will boil and bubble while cooking. Do not touch the
water reservoir when in use, as it may be hot.
This bubbling and noise is completly normal and is expected behavior.
CAUTION
FILL LINE
FILL LINE
Do not fill above the line
indicated on the side of the
reservoir.

Model No. S020M17 Model No. S020M 18
Suvie uses a water-based cooling method (refrigerant type R513a) similar to that of
your household refrigerator to keep your ingredients cold until they are ready to be
cooked. Suvie is designed to keep your food under 41°F as per FDA safe storage
guidelines. For best refrigeration performance, please make sure to follow our
counter-top placement guidelines on page 11.
By refrigerating your vegetables and proteins, Suvie allows you the convenience of
being able to load ingredients either in the morning before work or in the evening
before bed, so you have a perfectly cooked meal that is ready to enjoy when you
want it. Suvie is designed to refrigerate a meal up to one day prior to cooking and not
longer.
Refrigeration Information
Safely Cool To Prepare Your Next Meal
Cooling After Completing a Cook
Loading your meal into Suvie the night before is a great way to save time. For best
refrigeration performance, please allow Suvie to rest with the door open for at least 2
hours after cooking before scheduling your next meal.
Simply tell Suvie when you want to eat, and Suvie performs meticulous calculations
to ensure a perfectly prepared and timed meal.
Start times vary in each of the different cooking zones based on the method of
cooking.
After you’ve filled the reservoir, a typical Suvie cool-to-cook process is generally as
follows:
• Your Suvie is rapidly cooled to create a safe environment for your ingredients.
• When ready to begin cooking, Suvie stops cooling and begins to heat the water
surrounding the cooking zones until it reaches the desired temperature and cook
time.
• The broiler finishes your vegetables and proteins.
• Your meal is ready to plate and serve.
Taking Your Food From Cool-to-Cook
How Suvie Calculates Cook Time
Enter Component Time & Temperature Settings
Loading your meal into Suvie the night before is a great way to save time. For best
refrigeration performance, please allow Suvie to rest for at least 2 hours if you have just
used your Suvie to cook.
The Time & Temperature chart can also be found online at: suvie.com/cook-time-temp
Cooking frozen proteins? No need to thaw, simply select “frozen” once prompted on the
display while setting up your meal. Suvie will automatically adjust the cook settings to
acount for your frozen proteins. If cooking using the Rapid Cook function, be sure to load
only frozen ingredients. Suvie will automatically thaw your food when using this function.
How Long Will My Meal Take To Cook?
Similar to a standard oven, Suvie requires time to preheat, which can vary from 30-60
minutes. Slow cook meals take between 3-10 hours to complete. Suvie will automatially
calculate this pre-heat time. We recommend using the schedule function for maximum
convenience.
For more information regarding how Suvie calculates cooking times, please visit: http://
blog.suvie.com/cook-times
Your Suvie Pans
The two Suvie pans included with your appliance can
be used interchangeably between both cooking zones.
These pans are dishwasher safe.
A steam rack is also included with your Suvie appliance
and is dishwasher safe.

Model No. S020M19 Model No. S020M 20
How It Works
Simple Preparation Steps for Multi-Zone Cooking
Your Suvie can make between 1-8+ servings depending on which cook function is
used. Please follow the instructions below to begin cooking. Be aware that certain
functions are limited in each zone, based on which cooking method is used. Please
review the instructions and function chart below.
• Never overfill or use any ingredients that extend beyond the
capacity of the pans.
CAUTION
STEP 3: ADD YOUR BOTTOM ZONE INGREDIENTS
Next, add your bottom-zone ingredients.
Using the Sous Vide Function?
If you are cooking your proteins using the sous vide function, place
your vacuum-sealed, pre-seasoned protein into the removable Suvie
pan and fill it with water until the protein are submerged. If using a
Suvie-provided Smart Meal, these packages are ready out-of-the-
box.
For All Other Cook Functions:
Remove proteins from packaging before cooking.
A sous-vide compatible bag is any plastic bag that is food safe, rated for high-temp
cooking, and can be sealed securely so that the water surrounding it does not touch
the protein itself. You may use a vacuum sealer or a store-bought sealable bag.
STEP 4: CHOOSE YOUR TOP ZONE FUNCTION
If you are using our Smart Meal service, Suvie will
automatically detect the appropriate cooking function
after the meal card has been scanned.
If you are cooking using your own ingredients, choose
a top-zone cooking function from the list of available
options. Please be aware that the top-zone functions
available are limited based on the function used in the
bottom-zone. For more information on cooking zone
combinations please reference page 27.
placeholder
STEP 2: CHOOSE YOUR BOTTOM ZONE FUNCTION
If you are using our Smart Meal service, simply hold
the meal card on the Tap Zone above the control knob
and your Suvie will automatically set the appropriate
cook functions for your meal. Follow the on-screen
instructions.
If you are cooking using your own ingredients, next
navigate to My Cook and select your desired bottom-
zone function from the list of available options. Next,
enter the desired cooking times/temperatures. For a list
of recommended cook times/temps, please reference the
chart on page 28.
placeholder
STEP 1: ONLY FILL THE WATER RESERVOIR WHEN PROMPTED ON DISPLAY
NOT ALL FUNCTIONS REQUIRE WATER! Only fill the water
reservoir if you are scheduling your meal, or when Suvie
prompts you on the display.
Fill the removable reservoir with water to the fill line indicated
on the side of the reservoir, approximately 1⁄4 inch below the
top of the reservoir. This water is used for both refrigerating
and cooking your meal. Never add water during cooling or
cooking.

Model No. S020M21 Model No. S020M 22
STEP 8: (OPTIONAL) FINISH BY BROILING
After your Suvie has finished cooking your meal, you will have the option to broil
your proteins and vegetables to achieve a desired finish. Please be aware that due
to safety regulations when using the broiler, you must be present to initiate the broil
stage. The maximum broil time is 10 mins. If you need additional time, simply start
the broil again.
STEP 7: SCHEDULE YOUR MEAL OR COOK NOW
Lastly, choose: schedule, refrigerate, or cook now.
Schedule:
This function allows you to enter the time you’d like your
meal to be completed. When using the sous vide or
slow cook function, Suvie will automatically refrigerate
your ingredients until it begins cooking to complete your
meal at the time entered. When using either the bake,
roast, or broil function, Suvie will continue to refrigerate
your meal until you initiate the cooking process.
Refrigerate:
This function will refrigerate your ingredients until you
initiate the cook process, either on the mobile app or
the unit itself.
Cook Now:
This function will begin the cooking process right away.
STEP 6: (OPTIONAL) CHOOSE YOUR STARCH COOKER FUNCTION
If you have the Suvie Starch Cooker attachment, choose your starch cook function,
enter the desired cooking time, and load your dry starches directly into the starch
cooker.
STEP 5: ADD YOUR TOP ZONE INGREDIENTS
Next, add your top-zone ingredients.
Using the Sous Vide Function?
If you are cooking your proteins using the sous vide function, place
your vacuum-sealed, pre-seasoned protein into the removable Suvie
pan and fill it with water until the protein are submerged. If using a
Suvie-provided Smart Meal, these packages are ready out-of-the-
box.
For All Other Cook Functions:
Remove proteins from packaging before cooking.
A sous-vide compatible bag is any plastic bag that is food safe, rated for high-temp
cooking, and can be sealed securely so that the water surrounding it does not touch
the protein itself. You may use a vacuum sealer or a store-bought sealable bag.
• Proteins MUST be removed from any plastic packaging
before broiling.
CAUTION

Model No. S020M23 Model No. S020M 24
Sous Vide Time & Temp Chart
Protein Type Time Rare Med Well
Fish 30 mins —130° 135°
Shellfish 30 mins —130° 135°
Steak, Lamb, Duck 60 mins 130° 135° 145°
Pork 60 mins 135° 140° 150°
Ground Beef or Pork 60 mins 145° 150° 155°
Chicken Breast 60 mins —155° 160°
Chicken Thigh 60 mins —160° 165°
Ground Poultry 60 mins —165° 170°
*Cook for 30 mins, per 1 inch of thickness
Vegetable Roasting Recommendations
Vegetable Type Time
Asparagus 6 mins
Broccoli Florets* 6 mins
Brussel Sprouts* 9 mins
Butternut Squash** 45 mins
Carrots 20 mins
Cauliflower Florets* 8 mins
Green Beans 7 mins
Leafy Greens 5 mins
Shredded/Noodle Cut 4 mins
Summer Squash 9 mins
Sweet Potato** 45 mins
* Cut in half ** Cut into 1 inch cubes
Food Safe Temperature Disclaimer
Consuming raw or undercooked meats, poultry, seafood, shellfish, or eggs may
increase your risk of foodborne illness.
Cooking Zone Function Capabilities
Both the top and bottom cooking zone can perform all cooking functions, however
some may not be used in combination with another. Please reference the chart below
for zone-function combinations.
TOP
Sous Vide
Slow Cook
Steam
Re-Heat
BOTTOM
Sous Vide
Slow Cook
Steam
Re-Heat
Bake
Broil
Roast
If any of these are selected,
these cannot be selected
Bake
Broil
Roast

Model No. S020M25 Model No. S020M 26
Frozen to Cook
Go from frozen to fully cooked in as little as 25 minutes with fast cooking speeds and
a radiating heat element.
How to Cook from Frozen:
Simply scan the meal card from one of our Rapid Cook Smart Meals.
If using your own ingredients, select the “from frozen” setting when prompted on the
display.
Technical Specifications:
Temp Range: 37°F - 210°F
Time Range: 20 minutes - 24 hours
Cold Source: Compressor
Heat Source: Bottom Heaters + Broiling Elements
Suvie Core Functions:
Cool to Cook
Suvie is the only smart countertop appliance that automatically refrigerates then
cooks your food.
How to Schedule Your Meal:
Please note only certainly functions are able to be scheduled in advance. Those
functions where cool-to-cook is allowed will be indicated below.
Simply fill the water reservoir when prompted, then select “schedule” after loading
your ingredients.
Technical Specifications:
Temp Range: 37°F - 210°F
Time Range: 4 hours - 24 hours
Cold Source: Compressor
Heat Source: Bottom Heaters
Cool-to-Cook Refrigerating vs Scheduling when Using
Bake, Roast, Broil, and Rapid Cook Functions:
Suvie uses a powerful quartz broiler when the Roast, Bake, Broil and Rapid Cook
functions are used. Due to these high temperatures, and for your safety, you must be
present during these phases of cooking.
When using these functions, Suvie can still refrigerate your meal, however, you
must manually start the cooking process by clicking the start button on the
display. Because of this requirement, you cannot schedule meals to begin cooking
automatically.
Suvie is capable of performing 11 cooking functions independently
and 15 total functions when paired with the optional Suvie Starch
Cooker add-on. Please review the details of each function and
cooking instructions below:
Cooking Functions
Protein Roasting Chart
Protein Type Time Rare Med Well
Fish 30 mins —130° 135°
Shellfish 30 mins —130° 135°
Steak, Lamb, Duck 60 mins 130° 135° 145°
Pork 60 mins 135° 140° 150°
Ground Beef or Pork 60 mins 145° 150° 155°
Chicken Breast 60 mins —155° 160°
Chicken Thigh 60 mins —160° 165°
Ground Poultry 60 mins —165° 170°
*Cook for 30 mins, per 1 inch of thickness
Waiting for the chart

Model No. S020M27 Model No. S020M 28
Bake
Uses more even heat for cakes and gentler cooing, perfect for your favorite desserts.
How to Bake:
1. Remove ingredients from packaging and place in Suvie pan.
2. Select the bake function and enter your desired baking temperature and cook
time
3. Please refer to the FDA safe cooking temperatures on page 29.
Technical Specifications:
Temp Range: 250°F - 350°F
Time Range: 1 min - 1 hour
Heat Source: Broiling Elements + Bottom Heaters
Roast
High temp roasting is ideal for crispy vegetables and perfect meats, fish and other
proteins.
How to Roast:
1. Remove ingredients from packaging and place in Suvie pan.
2. Select the roast function and enter your desired roasting temperature and cook
time
3. Please refer to the FDA safe cooking temperatures on page 29.
Technical Specifications:
Temp Range: 350°F - 450°F
Time Range: 1 min - 1 hour
Heat Source: Broiling Elements + Bottom Heaters
Slow Cook
Low, slow, and hands-off cooking for soups, stews, and short ribs.
How to Slow Cook:
1. Remove ingredients from packaging and place in Suvie pan.
2. Fill the water reservoir with water to the fill line indicated.
3. Select the slow cook function and enter your desired HIGH (205*F) or LOW
(185*F) temperature and cook time settings (up to 12 hours).
Technical Specifications:
Temp Range: 185°F - 205°F
Time Range: 30 min - 12 hours
Heat Source: Bottom Heaters + Water Circulation
Scheduling Allowed Requires Water
Sous Vide
Water-based cooking for perfect proteins cooked at a low tempera- ture for a long
duration of time.
How to Sous Vide:
1. When using the sous vide function, ingredients MUST be vacuum-sealed.
2. Cover ingredients with water. Suvie will not automatically fill the Suvie pan.
3. Fill the water reservoir with water to the fill line indicated.
4. Select the sous vide function and enter your desired cooking time & temperature
settings.
Please refer to the time & temperature chart located on page 28
Technical Specifications:
Temp Range: 125°F - 180°F
Time Range: 30 min - 4 hours
Heat Source: Bottom Heaters + Water Circulation
Scheduling Allowed Requires Water

Model No. S020M29 Model No. S020M 30
Steam
Gently cook fish, prepare veggies without oil, or steam dumplings.
How to Steam:
1. Insert steam rack into Suvie pan.
2. Remove ingredients from packaging and place them in Suvie pan.
3. Add ½ cup of water in each Suvie pan to be steamed
4. Select the steam function and enter your desired steam time.
Please refer to the steam time & temperature chart located on page 28
TIP: For best results, cut up vegetables to be steamed into 1” pieces.
Technical Specifications:
Temp Range: 150°F - 200°F (steam)
Time Range: 1 min - 1 hour
Heat Source: Bottom Heaters
Scheduling Allowed Requires Water
Warm & Reheat
Suvie uses it’s gentle pan heaters to reheat your food and hold it at a temperature of
up to 140F for up to 4 hours.
How to Warm & Reheat:
1. Remove ingredients from packaging and place in Suvie pan.
2. Fill the water reservoir with water to the fill line indicated.
3. Select the reheat function and enter your desired reheat time
Technical Specifications:
Temp Range: 200°F
Time Range: 1 min - 4 hours
Heat Source: Bottom Heaters
Scheduling Allowed Requires Water
Broil
Crisping function adds a gorgeous finish to your meal using the top broiler heating
elements.
How to Broil:
1. Remove ingredients from packaging and place in Suvie pan.
2. Select the broil function and enter your desired broil time.
3. Please refer to the FDA safe cooking temperatures on page 28.
TIP: For best results, pat protein dry with a paper towel before broiling. When
broiling vegetables, strain out excess water from the pan and drizzle olive oil on top.
Technical Specifications:
Temp Range: 480°F+
Time Range: 1 min - 1 hour
Heat Source: Broiling Elements

Model No. S020M31 Model No. S020M 32
The Tap Zone
Your meal card contains a NFC chip allowing Suvie to easily auto-detect each recipe
and cooking instructions. Simply hold the logo on the meal card to the logo on the
Suvie, located above the control dial. Once successful, you will hear a beep sound,
and the display will indicate the recipe selected.
Cook Settings for Suvie Smart Meals
Every Suvie Smart Meal comes in Suvie smart packaging that tells your Suvie
appliance how, when, and for how long to cook the meal.
Safe Packaging with Suvie Smart Meals
With Suvie Smart Meals, all component packaging is safe for food preparation and
cooking.
STEP 1: Locate the meal card provided and follow the simple loading instructions.
STEP 2: Hold the meal card directly on the Tap Zone to load the recipe onto your
Suvie. When successful, you will hear a beep and see the recipe name appear on the
display.
Easily Adjust Cook Times To Your Preferences
With our Suvie Smart Meals, you can always customize the cook settings for each
of your meal components. To do so, after scanning the meal card, simply click the
“Customize” button. Next, you may adjust the times and temperatures for your
desired doneness.
For exmple, when cooking using the sous vide function, if you prefer your steak to be
cooked well done, adjust the protein temperature to 145 °F.
Egg Mode
With the optional egg tray, cook your most creative egg breakfast options.
Technical Specifications:
Temp Range: 150°F - 200°F
Time Range: 1 min - 4 hours
Heat Source: Bottom Heaters
Scheduling Allowed Requires Water
How to Cook Eggs:
1. Insert the egg tray directly into a Suvie pan.
2. Crack open eggs and place into the egg tray.
3. Fill the pan with water surrounding the egg
tray before placing it into Suvie.
4. Fill the water reservoir with water to the fill
line indicated.
5. Select the egg cooker function and enter your desired cook time.
Cooking from Frozen?
No need to thaw your ingredients prior to loading. When prompted on the display,
simply select ‘yes’ when Suvie asks if you are cooking frozen ingredients.
Suvie will then automatically defrost and will adjust the cook settings as required.

Model No. S020M33 Model No. S020M 34
IMPORTANT: If you are cooking a different
vegetable than what is listed on the meal card, you
must scan the card first; then you may enter the
appropriate vegetable cook time for what you are
using.
For more information on time/temp settings, please see
the Quick Reference Card or visit: http://blog.suvie.
com/cook-times
STEP 3: When prompted, fill the water reservoir to the fill line indicated.
STEP 4: Select Cook Now to begin cooking right away, or schedule it to finish at a
later time.
TIP: If cooking your meal right away, Suvie may require an additional pre-heat time
depending on the recipe.
STEP 5: Once your meal finishes cooking, you may choose to broil it for added
quality and appearance.
IMPORTANT: Be sure to remove proteins from their packaging before broiling.
Cooking from Frozen? Simply click the “from frozen” option when prompted, no
thawing required.
After your Suvie begins cooking, you can adjust the cook settings within 10 mins
of starting the cook. If your Suvie is still refrigerating, you can adjust the settings
anytime. To make changes, turn the control dial and select the “Modify” button, then
make your changes and select “Update”.
You can also cancel a cook after it has started by using the control dial to scroll to
and select the “End Cook” button.
Modifying Cook Settings or
Cancelling Your Meal
Easily Make Changes to Your Meal or Cancel It Entirely

Model No. S020M35 Model No. S020M 36
Scheduling Suvie From Your Phone
You control scheduling with the Suvie mobile app anytime and from anywhere
throughout your day.
With the app, you’ll always know what is cooling or cooking, and you can update the
time you want to eat right up to the moment Suvie starts to cook.
Visit www.suvie.com/app for links to download your iOS or Google Play app today.
Whether you are using Suvie Smart Meals or your own ingredients and recipes, Suvie
relays the programming information to your Suvie mobile app for easy remote control
by phone or tablet — you can easily specify the meal completion time your want, and
Suvie will take care of the rest.
Suvie Automatically Updates the Mobile App
If your plans change and your arrival time will be later than the already set meal
completion time, it’s easy to make a change in the Suvie mobile app. If the meal is
already cooked, simply tell Suvie to keep your meal warm until you arrive.
When Dinner Will Finish
The mobile app always informs you on the progress of your meal. You can see if
the food has begun cooking, the time remaining, and know exactly the moment it’s
ready.
Monitor the Status of Your Suvie

Model No. S020M37 Model No. S020M 38
When Cooking Is Complete
When cooking is complete, the Control Panel will read “Done” and it will provide
timing information for your Broil, if you wish to use this feature.
• Do NOT open the Suvie door until the display indicates that cooking is done.
The interior of Suvie will be extremely hot and steam will be in use.
CAUTION
• The pans will be extremely hot when cooking is complete. Be sure to always use
oven mitts.
CAUTION
Suvie Control Panel and Features
This is the standby
screen with the current
date and time. The
appliance’s Wi-Fi
connection is also
indicated here.
Rotate the dial to move
among menu items,
then press the dial to
make your selection.
After putting your ingredients into your Suvie for a
standard My Cook cycle (rather than a Slow Cook
cycle), the screen will present the options for setting the
temperature in each zone.
After setting the zone temperatures, select one of the
following: Cook Now, Refrigerate, Schedule, or Cancel.
When using Suvie Smart Meals and the Tap Zone, your
Suvie automatically detects the recipe.
When your cook cycle is complete, the screen will
indicate the recommended amount of time for broiling.
You may choose to start the broil or skip this step.
If you are using your own ingredients and recipes, the
screen indicates the total time remaining until cooking
is complete.
In this figure, the blue snowflake icon indicates that your
Suvie is in Refrigerate mode.
Table of contents
Other Suvie Kitchen Appliance manuals