SWAN-MATIC C950 User manual


C-950 Crimper Press
Thank You for purchasing the C-950 Swan-Matic Crimper and Corking Press. The C950
is proudly built in the USA by Automation Devices in Fairview, PA.
For any technique assistance please feel free to call 814-474-5561.
Contents
Set-up ………………………..………..…………………….. 3
Maintenance ………………………….……………………. 4
Swan-Matic Warranty .…..…………………………………….. 5
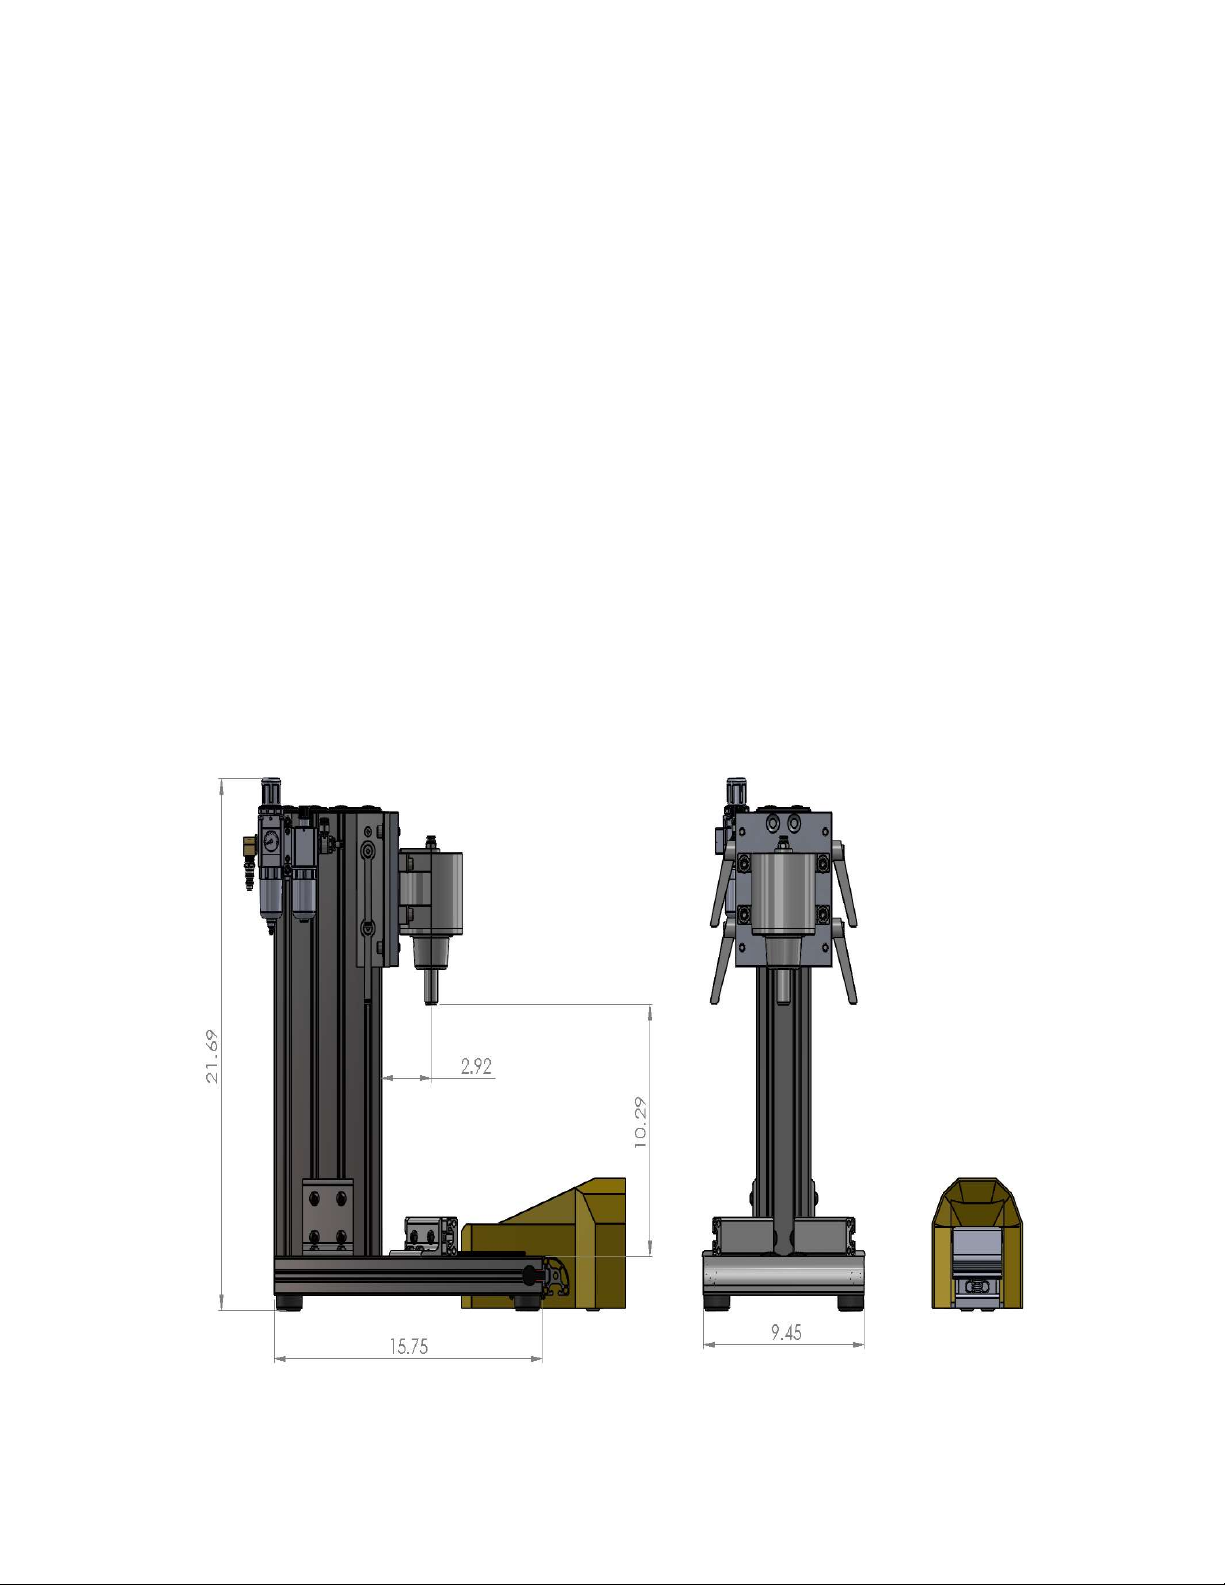
Machine Diagram ………………………………………….. 6
Parts List .………………………………….……………….. 7
Machine Specifications .…………………………….……. 8
Set-up and Operation Instruction
Carefully unpack the m a c h i n e and any other associated equipment which
may be in the container and check for damage. Set the machine on a level
surface. Please observe all a safety regulations in your facility. Do not place fingers
between ram head and cap/cork being pressed.
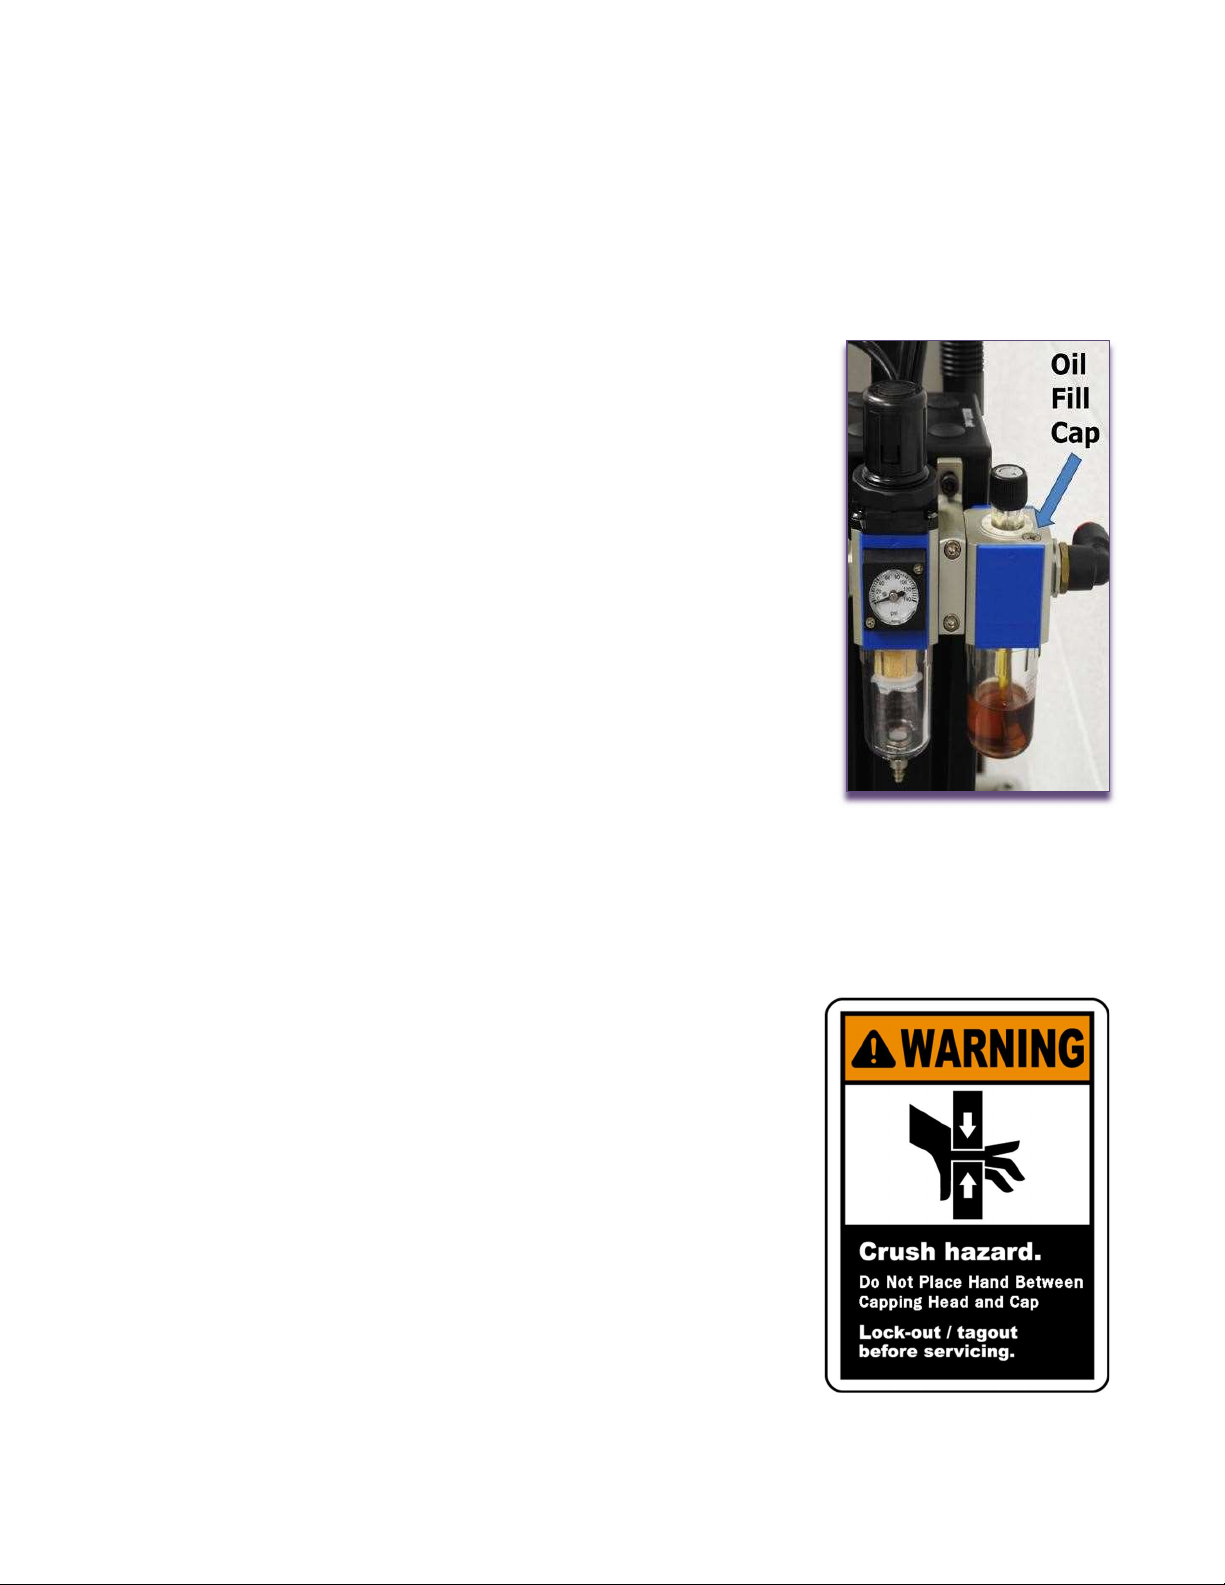
1. Add oil to air supply oiler on the side of the machine.
Use any type of light weight air tool oil. Food grade air
tools oils are also permissible. The oiler is located after
the high pressure air regulator. The fill cap is the small
Philips screw on top of the oiler. Fill to the top of the
glass bowl. Put cap back on.
2. Connect to clean air supply. Recommended operating
pressure is 80psi.
.
3. DO NOT Cycle machine.
4. Loosen head lock handles on each side of the capping
head and slide head to upmost position. Slightly tighten
lock handles to temporarily hold head in place. Use
CAUTION when loosening head lock handles, the head
assembly may feel heavy to certain individuals.
5. Adjust the regulator knob on top of the Main Regulator to 10-15 psi by lifting
(unlocking) and rotating the regulator knob counter clockwise to decrease
regulated pressure. Note: There are arrows printed in the top of the knob
indicating pressure change directions.
6. Place bottle directly under driving ram.
7. Adjust the bottle locator blocks up to the back side of
the bottle in a “V” formation. Each locator block can be
adjusted left and right in addition to the angle of each
can be changed. Tighten down locator bolts.
8. Adjust head down to a position that will place the end
of the driving ram approximately .75 inch (2cm) above
the uncorked cork (cork slightly pressed into bottle) or
cap.
9. Tighten handles firmly.
10. Remove the bottle from the locator blocks.
Continued on next page

11. With the regulator still set at 10-15psi (minimum setting),
cycle the machine. The ram should cycle down when the
peddle is depressed, then return when the peddle is
released. If the cycle is abrupt or to fast for the operator,
adjust the flow control valve located on the front of the
regulator in a clockwise direction. This will slow down
cycle time.
12. Place the bottle under the ram with the cork in place.
13. Place hands away from cork, preferably on the table
surface.
14. With safety glasses on, cycle the machine.
15. It is very likely the ram will touch the cork but not necessarily press it in
completely. That’s OK.
16. If the cork did not press completely in, turn air pressure up 5psi at a time until the
desired result is achieved. To increase down stroke pressure, rotate the regulator
knob to the right (clockwise). To decrease down stroke pressure, rotate the
regulator knob to the left (counter clockwise).
17. Repeat steps 13-16 until desired results are obtained.
NOTE: The full length of the cylinder stroke is not used in most applications. In fact,
your air consumption will be less and your cycle times will be shorter with shorter
strokes.
Maintenance
There is only one required maintenance item. Add oil to air supply
oiler on the side of the machine when low. Use any type of light
weight air tool oil. Food grade air tools oils are also permissible. The
oiler is located after the high pressure air regulator. The fill cap is the
small Philips screw on top of the oiler. Fill to the top of the glass bowl.
Put cap back on.
The oil flow adjustment has a range of 0-10. Swan-Matic machines
are designed to run at <1 on the dial. Just below the adjustment knob
there is a sight glass. In that sight glass is a drip nipple. There should
be a drop of oil on the end of that nipple after cycling the machine
several times. After running the machine for an hour or so, you should
see or feel a light amount of oil in your airline to the cylinder. You should never see oil
dripping from any air cylinders or driving tools.

SWAN-MATIC WARRANTY
Automation Devices, Inc. warrants the materials and goods supplied under the
subject customer’s purchase order to be as specified and of good quality. No
specific time life shall be stated, since the results of good workmanship are of
timeless age, and good quality, properly used, shall be self-evident.
This warranty does not cover damage resulting from accident, transportation,
normal wear of parts, negligent use or misuse of the product, incorrect electrical
voltage or current, usage contrary to operating instructions, alterations or repairs by
other than Automation Devices, Inc., factory personnel. In the case of
transportation damage, please pursue recovery for damage through your freight
carrier.
If the product should become defective, we will repair or replace it, at our option,
free of charge. This service is available by returning the product to our factory,
freight prepaid, and we will return your product to you, freight collect.
This warranty does not include cost of inconvenience, damage due to product
failure, transportation damage, or the like. This warranty applies only to the
physical repair or replacement of the defective goods and specifically excludes any
incidental or consequential damages or additional liability thereof. Some states do
not allow exclusion or limitation of incidental or consequential damages. This
warranty also gives specific legal rights, although you may have other rights,
which vary from state to state


C950 Bottle Cap Crimper
1008 Isolator Foot
C901 Main Column
C902L Base Plate, Left
C902R Base Plate, Right
C903 Base Plate, Front Rail
C904 Column Support Bracket 6 Hole
C908 V Block Mount Bracket
C909 V Block Back Stop
C910 Bolt Assembly: M8 x 16.00mm Black
C911 Anchor Fastener, Column
C912 Fasteners Push-in Plastic
C913 End Cap Plastic
C914 Tread Strip 10"
C916 T-Nut with Spring 5M-.80
C917 Pneumatic Tubing, Polyurethane, Black, 1/4" OD, per foot
C919 Fitting Elbow 1/4" tube to 1/4" NPT Flow Control
C924 Fitting Straight 1/4" tube to 1/4" NPT
C928 Regulator 20-130psi
C930 Pneumatic Lubricator
C932 T-Bracket Modular
C933 Pneumatic Foot Pedal 4 Way 5 Port
C940 M5-.8 x 12mm SHCS
C946 Street Elbow 1/4" NPT
C947 Quick Disconnect 1/4 M NPT
1046 5/16-18 x 1" SHCS
C924 Fitting Straight 1/4" tube to 1/4" NPT
C937 Unibearing Assembly
C938 40 Series “L” Handle Linear Bearing Brake Kit
C945 5/16 Black-Oxide 18-8 Stainless Steel Washer
C951 Air Cylinder 3" Bore 2" Stroke
C981 Adaptor Plate for Unibearing to Main Cylinder
Machine Specifications
C950
“The Crimper”
By Swan-Matic
Cycles per Minute Variable Speed 45 cpm max
Down Force 675 lbs @ 120psi
Stroke 2 inches
Weight 17.25 lbs
Shipping weight 30 lbs
Finish Hard Anodize Black
Air Supply Clean 130psi max CFM
Table of contents
Other SWAN-MATIC Industrial Equipment manuals


Popular Industrial Equipment manuals by other brands

LiftEquip
LiftEquip TW160 operating manual

Eastwood
Eastwood 30721 instructions

BERGHOF
BERGHOF B-Fortis CC-Prime Series user manual

ABB
ABB XAC26216 Operation manual

Bühler technologies
Bühler technologies GAS 222.21 E 2 Series Installation and operation instruction

Polar Instruments
Polar Instruments GRS550 user guide


