designed for life
Helpline Number: 01733 404703
WWW.SWAN-BRAND.CO.UK
Helpline Number:
01733 404703
WWW.SWAN-BRAND.CO.UK
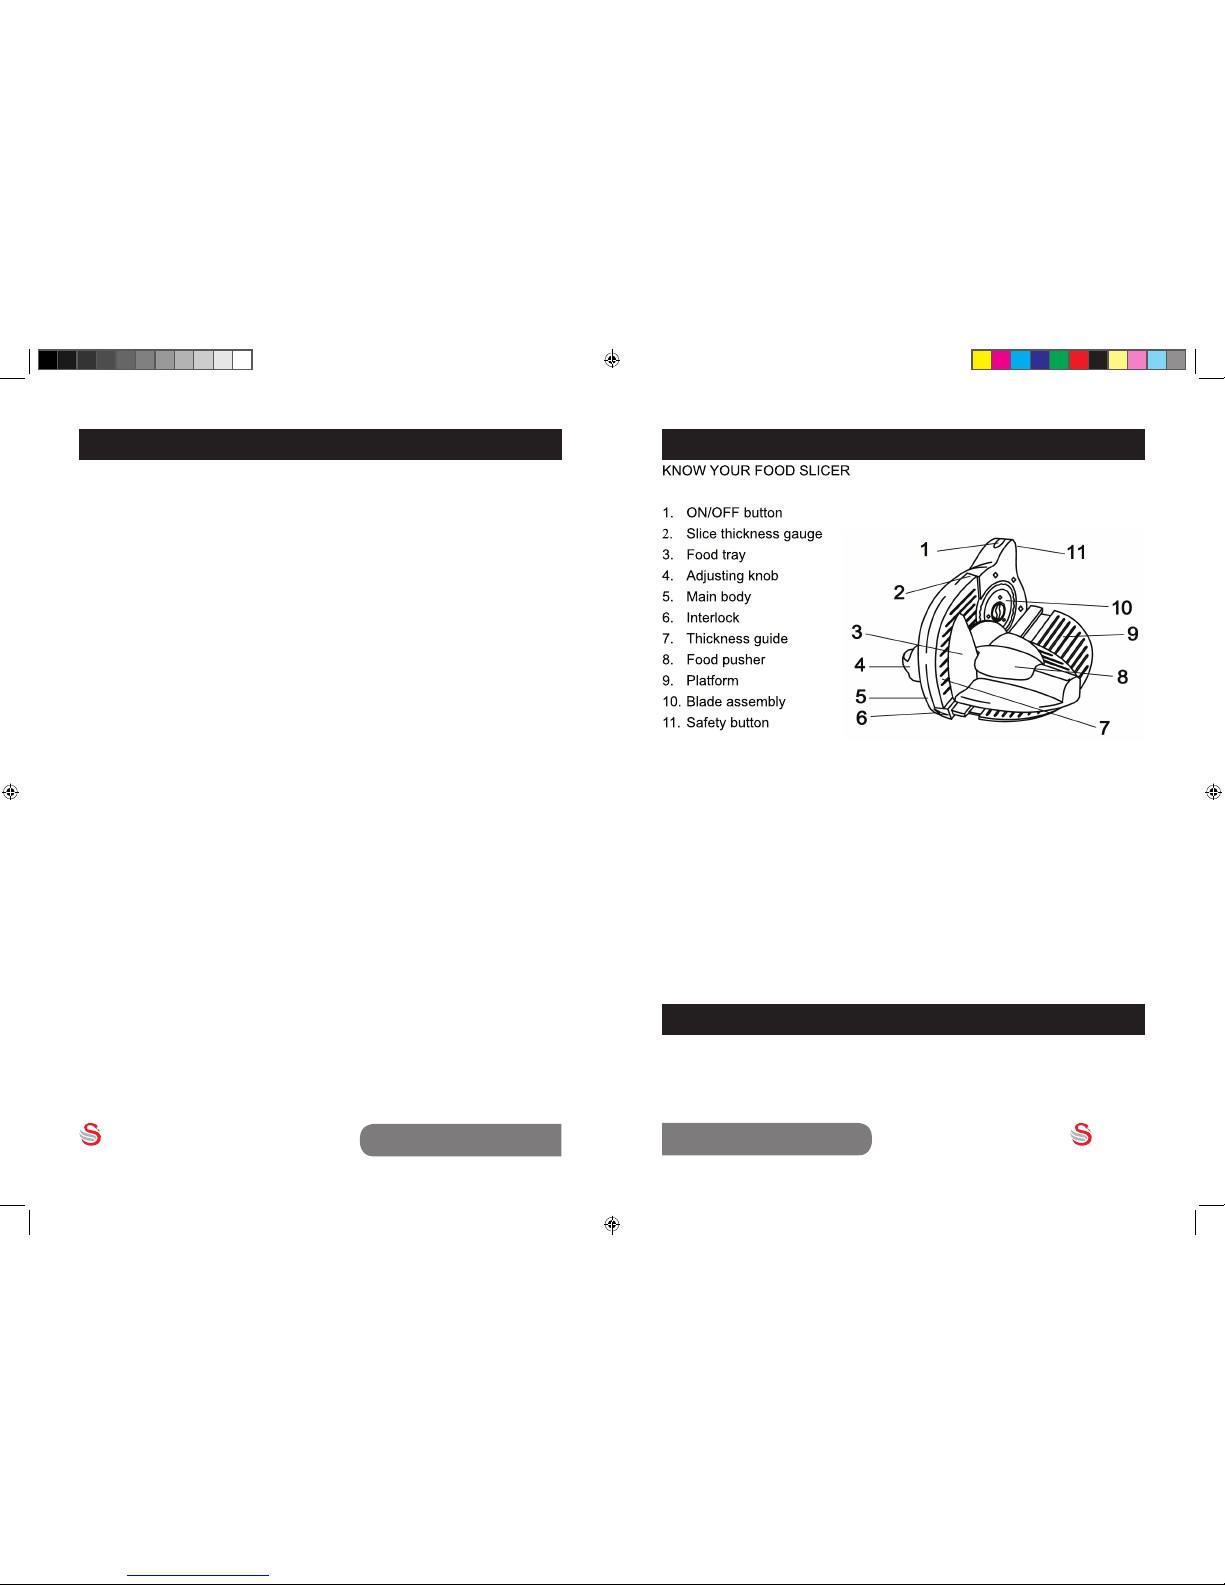
How to Use
REMOVING AND REPLACING THE BLADE
CAUTION: USE EXTREME CAUTION WHEN HANDLING THE BLADE
1) Make certain that the Food Slicer is OFF and UNPLUGGED. Turn the Blade Assem-
bly (10) clockwise to unlock it. Pull out the Blade Assembly.
BEFORE FIRST USE AND AFTER EVERY USE, CLEAN THE BLADE IN WARM
SOAPY WATER. RINSE AND DRY THOROUGHLY
2) To reinsert the Blade Assembly (10), line up the tabs on the Blade Assembly (10)
with the slots in the Small Gear. Once the Blade Assembly is seated with the Small
Gear, turn the Blade Assembly anti-clockwise to lock it in position.
OPERATIONAL NOTES
1. Please choose a suitable speed range for the food that needs processing, according
to its degree of thickness and/or degree of hardness.
Speed 1: the food is soft and thin
Speed 2: the food is thick and hard
Speed 3: the food is extremely thick and hard
2. Locate the Food Slicer on a non-slip counter surface. The person using the Food
Slicer will be positioned in the area behind the Food Tray (3). The person’s left hand
will be on the Food Pusher (8) with thumb behind the thumb guard. The person’s right
hand will be operating the Safety Button (11) and the ON/OFF Button (1).
CAUTION: KEEP FINGERS AWAY FROM THE BLADE ASSEMBLY AT ALL
TIMES.
In order to slice with the Food Slicer. Both the ON/OFF Button (1) and the
Safety Button (11) must be pushed down at the same time. If either is not
pushed down, the Food Slicer will not operate. Use your right hand to
operate the ON/OFF Button (1) and the Safety Button (11).
Your left hand should rest on the outer edge (furthest from the Blade Assem-
bly) of the Food Pusher (8) with your thumb protected behind thumb guard.
When slicing meat, the Food Pusher (8) should push the meat towards the
Blade Assembly as you slide the Food Tray (3) back and forth. Move the Food
Tray (3) back and forth steadily across the Blade Assembly (10).
CAUTION: KEEP THE FINGERS AND HANDS ALWAYS BEHIND THE FOOD
PUSHER AND CLEAR OF THE SPINNING BLADE ASSEMBLY.
ToturnofftheFoodSlicer,takengersoffoftheON/OFFbuttonandthe
Safety Button.
Set the Adjust Knob (13) for the thickness of the
slice that you desire.
Turn the Adjust Knob (13) clockwise for thicker
slices and counterclockwise to make the slices thin-
ner.
Set the Adjust Knob (13) for the thickness of the slice that you desire. Turn the Adjust
Knob (13) clockwise for thicker slices and counterclockwise to make the slices thinner.
Slide the Food Tray out away from the Blade and towards the operator. Place
the food to be sliced on the Food Tray. Position the Food Pusher (8) so that
it can hold the food to be sliced as the Food Tray (3) is moved towards the
Blade Assembly (10).
FOR BEST RESULTS
Chill meats thoroughly before slicing.
Slice meats wafer thin.
Meats should be boneless.
Fishandthinsteakswillslicebetterifpartiallyfrozen.
When slicing warm roasts, make certain to remove strings before slicing.
CLEANING AND MAINTENANCE
1. Never use Steel Wool or scouring powder on any part of the Food Slicer.
2. Before assembling the Food Slicer, and with the electrical plug unplugged, thorough-
ly wipe off all parts with a clean rag using warm soapy water and a mild anti-bacterial
detergent. In addition, the following parts can be cleaned in a dishwasher, Food Pusher
(8). Blade Assembly (10), and Food Tray (3). Clean the Food Slicer after every use.
Failure to follow all cleaning instructions and warnings may result in serious illness due
to food poisoning.
STORAGE: Line up the Adjusting Plate with the Blade. Remove the Food Pusher (8)
and Food Tray (3), Fold up the Platform (9) against the Main Body (5). Wrap the Cord
and store it under the Food Slicer. Store the entire unit in a sealed clean plastic bag.
The Food Slicer should be stored in a location that is out of reach of children.
SP10060N.indd 6-7 26/02/2013 11:03