Swegon TBLZ-1-49-a GOLD User manual

GB.TBLZ49.091201
We reserve the right to alter specifications without notice. www.swegon.com 1
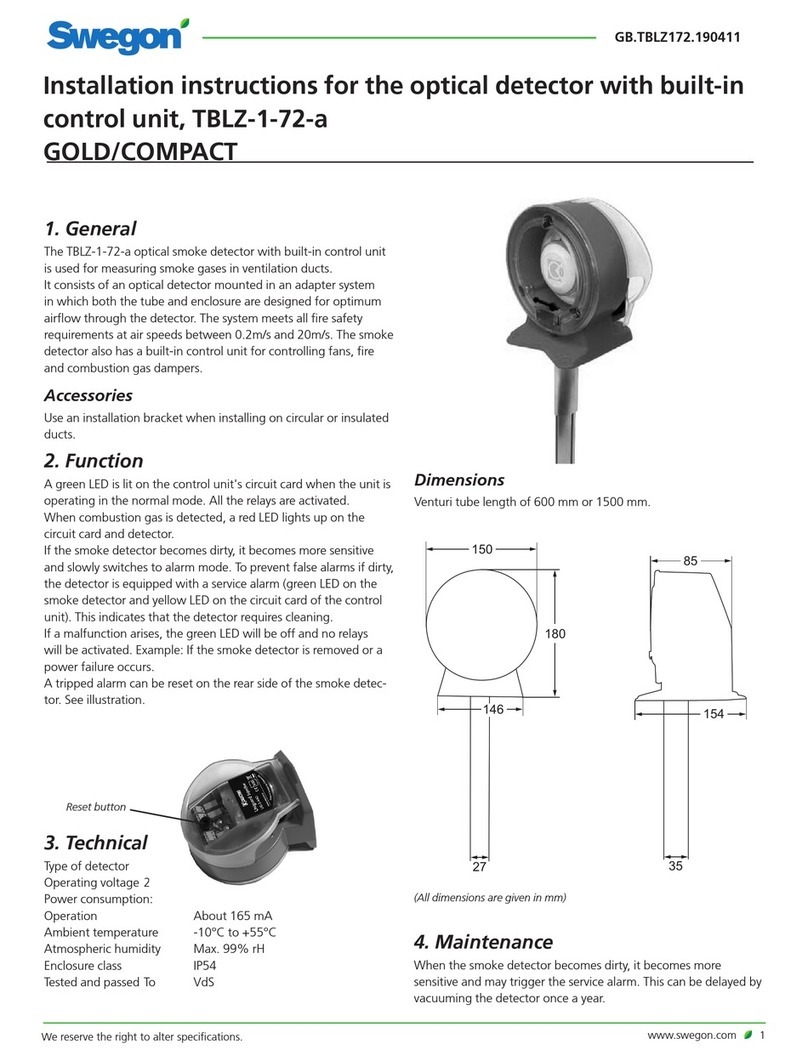
150
146
180
27
85
154
35
Smoke detector installation TBLZ-2-49-a
GOLD/COMPACT
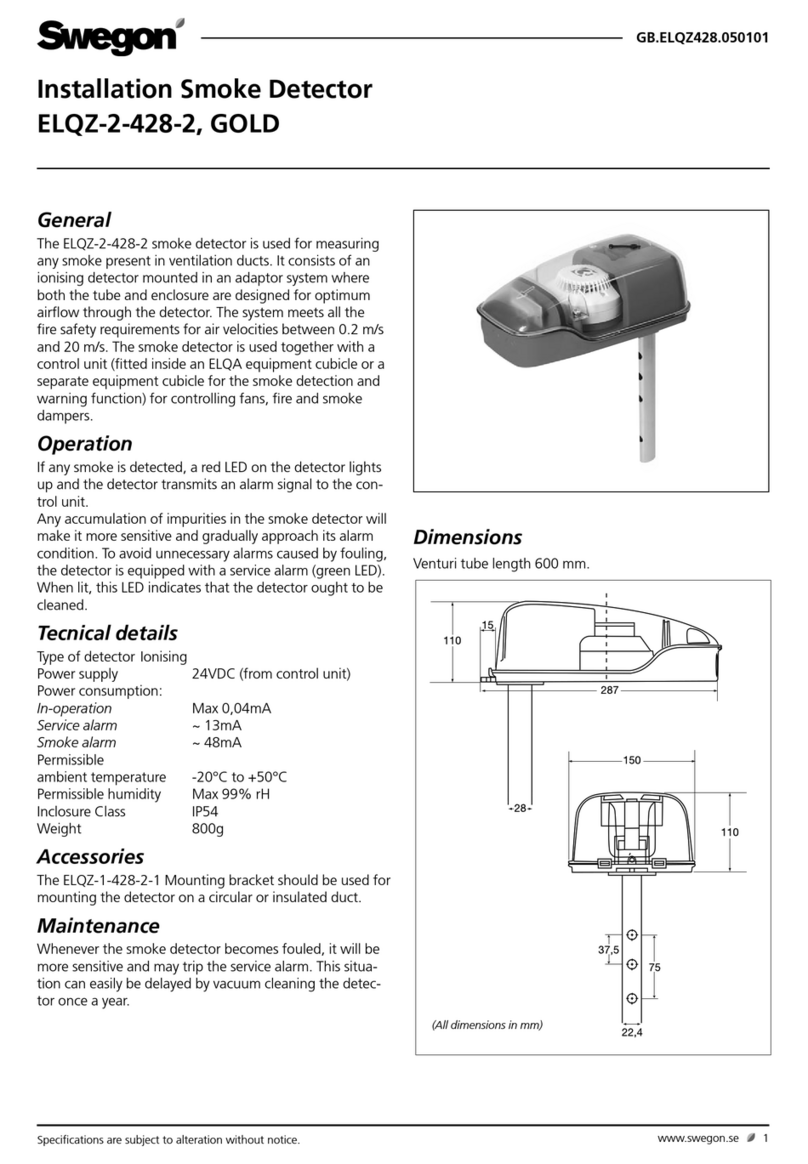
1. General
Smoke detector TBLZ-1-49-a is used to measure smoke
gases in ventilation ducts. It consists of an optical detector
mounted in an adapter system in which both the tube and
enclosure are designed for optimum airflow through the
detector. The system meets all fire safety requirements at
air speeds between 0.2m/s and 20m/s. The smoke detec-
tor is used together with a control unit (installed in equip-
ment cubicle ELQA or separate equipment cubicle for
smoke function) for controlling fans, smoke and combus-
tion gas dampers.
Accessories
Use an installation bracket when installing on circular or
insulated ducts.
2. Function
When combustion gas is detected the LED on the detector
lights red and the alarm signal is forwarded to the control
unit.
If the smoke detector becomes dirty, it becomes more sen-
sitive and switches to alarm mode more slowly. To prevent
false alarms if dirty, the detector is equipped with a service
alarm (green LED). This indicates that the detector requires
cleaning.
3. Technical Data
Detector type Optical
Operating voltage 24VDC (from control unit)
Power consumption:
In-operation Max 0.04mA
Service alarm ~ 13mA
Combustion gas alarm ~ 50mA
Ambient
temperature -20°C to +50°C
Humidity Max 99% rH
Degree of protection IP54
Weight 800g
Dimensions
Venturi tube length of 600 mm or 1500 mm.
(All dimensions are given in mm)
4. Maintenance
When the smoke detector becomes dirty, it becomes more
sensitive and may trigger the service alarm. This can be
delayed by vacuuming the detector once a year.

GB.TBLZ49.091201
We reserve the right to alter specifications without notice.
2 www.swegon.com
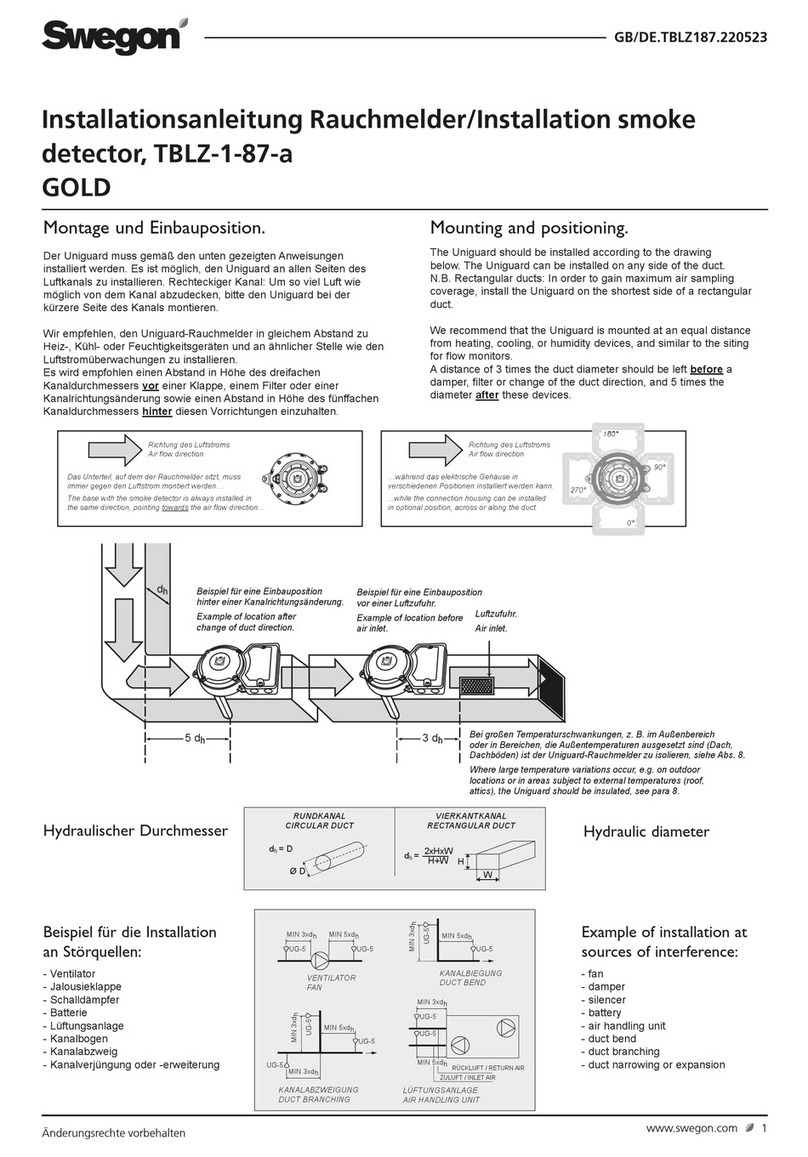
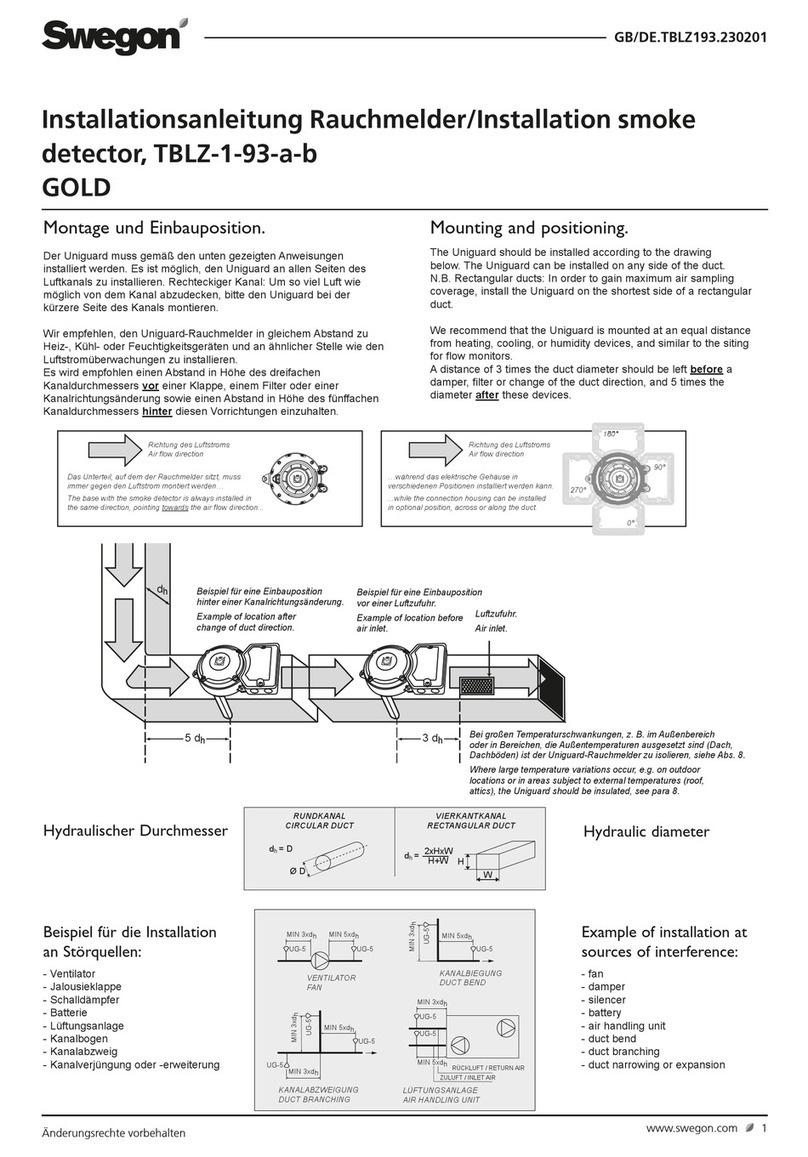
5. Installation and location
Position the smoke detector in the direction of flow, accord-
ing to the arrow on the cover. The smoke detector is loca-
tion-independent and can be installed on any side of the
duct.
In the event of large temperature differences, e.g. outside
or in cold attics, the detector must be insulated from the
surrounding air (due to the risk of condensation build-up in
the detector housing).
To ensure optimum combustion gas detection the smoke
detector must be positioned so that the distance to the
nearest interfering source in the duct (see example of inter-
fering sources below), in the direction of airflow, is the
same as 3 x the duct’s hydraulic diameter. Nearest location
after an interfering source must be at least 5 x the duct’s
hydraulic diameter.
MIN 3xdhMIN 5xdh
GX GX
MIN 3xdhMIN 5xdh
GX GX
MIN 3xdhMIN 5xdh
GX GX
MIN 3xdhMIN 5xdh
GX GX
MIN 3xdhMIN 5xdh
GX GX
MIN 5xdh
GX
MIN 3xdh
GX
MIN 5xdh
GX
MIN 3xdh
GX
GX
MIN 3xdh
GX
GX
MIN 3xdh
MIN 5xdh
d = D
Ø D
h
d =
h
2xHxB
H+B H
B
Hydraulic diameter
CIRCULAR DUCT
RECTANGULAR DUCT
MIN 3xdhMIN 5xdh
GX GX
MIN 3xdhMIN 5xdh
GX GX
MIN 3xdhMIN 5xdh
GX GX
MIN 3xdhMIN 5xdh
GX GX
MIN 3xdhMIN 5xdh
GX GX
MIN 5xdh
GX
MIN 3xdh
GX
MIN 5xdh
GX
MIN 3xdh
GX
GX
MIN 3xdh
GX
GX
MIN 3xdh
MIN 5xdh
d = D
Ø D
h
d =
h
2xHxB
H+B H
B
Examples of sources of disturbance
FAN DAMPER
SILENCER COIL
BEND
BRANCH
ADAPTER EXTRACT AIR
SUPPLY AIR
AIR HANDLING UNIT

GB.TBLZ49.091201
We reserve the right to alter specifications without notice. www.swegon.com 3
• Open the cover above the junction hood by lifting the
catch.
• Insert the cable through any cable grommet.
When using another type of grommet, remove them
premounted by first pressing through one side and then
through the other (1-2).
• Connect wiring according to the wiring diagram in the
instructions for equipment cubicles.
1
2
Drill holes in the duct.
• Make holes without 38 mm installation bracket.
• Make holes with 51 mm installation bracket
(see point 9).
3
Do not cut this end!
• Measure the ventilation duct.
• Cut the tube.
• The tubes must cover at least 90% of the duct’s width.
Detectors with venturi tubes of 600 mm are intended for
ducts with a max. duct width of 600 mm.
• Insert the end plug.
• Insert the seal onto the tube.
• Insert the tube into the bottom of the detector box.
• Lock the tube using the stop screw
4
• Install the tube and detector on the duct.
• Secure the detector box at 3 points at the markings of
the arrows.
Important! IMPORTANT!
The direction arrows (see the shape
of the detector’s base or the top of
the housing) must point in the same
direction as the air flow in the duct.
End plug
Stop screw
Seal
5Flow indicator.
The detector is equipped with an indicator, a red
plastic tab, which, when the detector is correctly
installed, swings out due to the air flow.
6Electrical installation.
Important!
If the indicator does not
move, consider moving
the detector or install a
fan tube.
Flow indicator
Venturi tube with auxiliary fan
7Performance checks.
Check the detector using the smoke detector
tester in spray form.
• Move the "test hole plug" to the
side and then quickly spray.
In the event of a deployed alarm the
LED lights red on the circuit board
and the detector. In the event of a
deployed service alarm the LED on
the circuit board lights yellow and
green on the detector.
• Reinstall the test hole plug.
Important!
Do NOT drill holes for signs or similar
in the plastic cover. This can cause
leakage that seriously affects the
function of the detector.

GB.TBLZ49.091201
We reserve the right to alter specifications without notice.
4 www.swegon.com
Installation bracket TBLZ-1-53 for circular ducts or
insulated flat ducts.
The duct diameter can be as small as 100 mm
using the bracket.
• Check that the direction of the arrows is towards the direction of ow.
• Check that the plug for the test hole is properly installed.
• Check that the ow indicator shows ow (rocks).
• Full scale tests with smoke generator are recommended to check the function.
Troubleshooting.
The smoke detector deploys without any smoke
present.
• The smoke detector is faulty, dirty or positioned so that
condensation can build up, see point 8. The detector
insert must be replaced.
Only the control unit triggers an alarm.
• Check that the termination resistor is installed in the last
smoke detector.
• Check that the coil’s resistance is 2.2kΩfrom the control
unit.
• Check that the control unit is OK by installing the 2.2kΩ
resistor in the smoke detector output on the control unit.
• Use a voltmeter to check that 21-24 VDC with the cor-
rect polarity is in terminal 1 (-) and terminal 2 (+).
10
8
9
The installation bracket is supplied flat.
The installation bracket is easy to
bend/shape so that it fits circular or
flat ducts.
Secure the bracket’s
legs to the duct.
Hole ø 51
mm.
Rubber
seal
Circular duct. Insulated flat duct.
Rubber
seal
Final checks
Installing different tubes in different duct widths.
Venturi tube 600 mm. Venturi tube 1200 mm.
Hole
ø 38 mm
Hole
ø 38 mm
Cut the venturi
tube to the correct
length
The Venturi tube
must go through
the entire duct.
Important!
Hole ø 51 mm
Max. tube of 30 mm outside the duct.
For ducts less than 600 mm use ven-
turi tube of 600 mm, standard.
For ducts between 600 mm and 1400
mm, use venturi tube of 1500 mm.
• Cut the tube to the
correct length.
• Insert the end plug.
• Install the seal
• Install rubber seal TET
26-35 as a bearing.
This manual suits for next models
1
Table of contents
Other Swegon Smoke Alarm manuals
Popular Smoke Alarm manuals by other brands

Honeywell
Honeywell ADEMCO 5806 installation instructions

DSC
DSC FSA-210 Series Installation and operating instructions

Smartwares
Smartwares 10.006.74 user manual

Cabletech
Cabletech SMOKE & CO URZ0413 owner's manual

Mircom
Mircom MIX-2251AP Installation and maintenance instructions

Bosch
Bosch FERION 4000 O instructions

Xtrails
Xtrails VESDA-E VEP-A00 Product guide

Ei Electronics
Ei Electronics Ei144 Heat User instructions

olympia electronics
olympia electronics BSR-6057/A/MAR quick start guide

ABB
ABB COMMANDER 150 user guide

Pittway
Pittway System Sensor B524BI Installation and maintenance instructions

HST
HST HD103B Installation and maintenance instructions