manuals.online logo
Brands
  1. Home
  2. •
  3. Brands
  4. •
  5. SWELLPRO
  6. •
  7. Quadcopter
  8. •
  9. SWELLPRO Splash Drone 3 User manual

SWELLPRO Splash Drone 3 User manual

Note: During the return process, only the (right) steering stick can be controlled.When the
drone returns to the point of departure, and commences its descent, the left joystick will
only control the direction (Heading) of the drone, the right joystick controls the
forward/back and sideways functions, in order to select and land at the chosen landing
point. If you need to take control of the drone, you need to switch the Return Home switch
to Normal position.
Hold the rotor of motor tight while supporting the arm
upwards with the other hand, take the corresponding
propeller to install. Press the propeller spinner hard and
rotate to fasten it properly. It's available to remove the
propeller in the opposite way.
1.1.4 Flight Control
2. Propeller
2.2.1 Propeller Installation / Removal
Propeller CCW Propeller CW Propeller
Picture
Propeller
Direction
Propeller
Installation Install on the motor with CCW mark Install on the motor with CW mark
Do not get too close to the rotating propellers and motors, to avoid cuts or injury.
1.1.3 Flight Mode Switch
Payload Release Switch
1.1.2 Camera Control Switch
Camera Control Switch
Return Home Flight Mode Switch
Right StickLeft Stick
U
p
T
u
r
n
R
i
g
h
t
D
o
w
n
T
u
r
n
L
e
f
t
F
o
r
w
a
r
d
R
i
g
h
t
B
a
c
k
w
a
r
d
L
e
f
t
U
p
T
u
r
n
R
i
g
h
t
D
o
w
n
T
u
r
n
L
e
f
t
F
o
r
w
a
r
d
R
i
g
h
t
B
a
c
k
w
a
r
d
L
e
f
t
1. The Left joystick controls the drone ascent and descent (up and down
movement) and the nose direction (left and right movement )
2. The right joystick controls the forward / backward movement of the drone,
and the left / right flight movement of the drone
Quick Guide
Flight Safety
V1.0
1. Cover/hatch screw
2. Quick release carbon fiber propeller
3. Nose direction
4. Flight indication lights (Front – 2 Red,
Rear – 2 Green)
5. Gimbal damping ball
6. Waterproof gimbal and camera
8. Left power button
9. USB Port
10. Hanger ring
11. Right power button
12. Power status lights
13. Right Joystick
14. Return-Home switch
1. Remote Antenna
2. Left pairing button
3. Gimbal pan control
4. Camera switch
5. Airdrop switch
6. Left Joystick
7. Working Status lights
15. Flight mode switch
16. Gimbal tilt control
thumbwheel
17. Right pairing button
18. Video antenna
19. FPV Screen
7. Landing gear
8. Gimbal quick release screw
9. Waterproof cable plug/socket
10. Rubber foot
11. Waterproof brushless motor
12. Propeller Spinner
13. GPS top cover/hatch
Normal
Return Home
GPS
Smart Cruise
AT T I
Photo
Preview
Video
OFF
Airdrop
04 05 06 07
01 02 03
www.swellpro.com
Splash Drone Remote Controller
Disclaimer and warning
Nose Direction
Note: When opening the top cover, be careful of the GPS cable, When
closing the top cover, please make sure to place the hatch in such a way
that the arrow faces the front of the drone.
Power Button
Auto search/
Menu Select
Band / Increase (+)
Menu / Menu Selection
Channel / Decrease (-)
- Please make sure you have a comprehensive understanding of the Splash
drone, and all the necessary measures required to implement a successful
return home function, in the event of an emergency.
- Please be well prepared before each flight, avoid any violent or excessive
operations.
- Please maintain strict compliance with the local laws, any flying in NO-FLY
ZONEs is prohibited.
- Any illegal & improper use or operation of this product is highly prohibited.
- Any invasion & violation against another person/s right of privacy is not
allowed. Before using this product, it remains the duty of the drone pilot to
comply with the local laws regarding privacy protection.
- Any invasion or flying over another person/s property is not allowed, please
agree with any person/s regarding any potential breech of privacy before the
proposed flight.
- Any flights in or around the strong magnetic fields are highly prohibited,
these influential factors include wireless electricity emission towers,
High-voltage transmission lines, transformer substations, radar and other
magnetic sources or metal objects.
- DO NOT fly the Splash drone under the influence of alcohol, drugs or any
other physical or mental impediment.
- Please don't fly the drone with a malfunctioning radio controller - Please fly
the drone away from crowds.
This product is not a toy, and should only be operated by persons over the
age of 18. Please keep it out of reach of children, and pay particular
attention to the possible scenarios of children's unexpected appearance
during ight operation.
Be sure to read this document carefully before using the product, to fully
understand your legal rights, responsibilities and safety instructions. Failure to
do so, may cause property damage, safety accidents and personal safety risks.
Once this product is used, it is deemed that you have understood, recognized
and have accepted all the terms and conditions of this statement. The user is
responsible for all the consequences of his actions and consequences. The user
agrees to use the product for his sole & legal purpose, and agrees with the
terms & conditions of this agreement, and other relevant policies & guidelines
that may be specified by SwellPro.
Under the maximum permission by law and approved circumstances, SwellPro
is exempt of liability for any indirect, punitive, consequential, special or criminal
damages, including the purchase cost, or for loss of income due to the loss of
use of the drone.
SwellPro is exempt from the user's liabilities for damage(s) to person/s or
property, or injuries incurred directly or indirectly from the use of this
product in the following conditions:
- Damage(s) or injuries incurred when users are under the influence of alcohol,
drugs.
- Any malfunction caused by operators' failure to follow the guidance of the
manual to assemble and set up, or operate the drone as described, and
designed.
- Damage(s) or injuries that may occur due to failure to study the tutorial
videos, and the user manual before flying the drone.
- Damage(s) or injuries caused to person/s or property, due to failure in
correctly calibrating the UAV as outlined in the manual, prior to flight.
- Damage(s) or injuries incurred as a result of the use or installation of any
unauthorized third party accessories or counterfeit parts - which were not
provided and approved of by SwellPro.
- Damage(s) or injuries as a result of flying the drone out of eyesight range, or
more than 300m away from the controller.
- Damage(s) or injuries caused by flying the drone in areas of magnetic fields &
radio interference.
- Damage(s) or injuries caused by flying a NO-FLY ZONE that is regulated by
local laws & rules.
- Damage(s) or injuries including crashes, loss of control or water ingress
caused by abusing or modifying the original drone structure,
- Damage(s) or injuries caused by using broken & ageing components.
- Damage(s) or injuries caused by continuing to fly the drone even if the low
battery alarm is activated.
- Damage(s) or injuries caused by failure to wash the components with fresh
water after flying over or near the sea & corrosive waters.
- Damage(s) or injuries that have occurred when the drone has been subjected
to the following conditions or situations: collision, fire, explosion, floods,
tsunamis, ice, snow, avalanche, flooding, landslide, earthquake, etc.
- Damage(s) or injuries incurred by intentionally dropping or crashing the
splash drone into the water from a high altitude, especially water ingress into
the drone fuselage and Gimbal malfunction.
- Damage(s) or injuries incurred by intentionally dropping or crashing the
Splash drone to the ground from a high altitude, especially water leakage into
the drone fuselage and Gimbal frame as a result of this collision.
- Other Damage(s) or injuries that are not SwellPro's liability.
1. Remote Controller
Open the battery compartment, connect the power cord, insert the battery
properly.
1.1 Remote Controller Operation
1.1.1 Payload Release Switch
Splash Drone
Quick Guide
Splash Drone
Quick Guide
Splash Drone
Quick Guide
Splash Drone
Quick Guide
CW Propeller SlotCCW Propeller Slot
www.facebook.com/swellpro/
01
02
03
04
05
06
07
08
09
10
11
12
13
01
02
03
04
05
06
07
08
09 10
11
12
13
14
15
16
17
18
19
4. Take O
Accelerometer Calibration LED
5. Landing
Operation Method
3. Preparation Before Flying
3.1 Calibration
Calibration is necessary in any of the following cases:
1. First time use of the drone.
2. Following sustained flight in ATTI mode.
3. If, when pushing up the THROTTLE joystick, without moving the right
(AIRLERON) joystick, and the drone drifts at an angle, while in ATTI mode.
4. If the drone has been subjected to heavy shaking during transportation.
5. If, following a successful compass calibration, the motors do unlock, but the
red LED stays on solid when trying to start up the motors.
Accelerometer Calibration Steps:
1.Place the drone on a horizontal surface, power on the controller, followed by
the drone, after hearing a “DI” tone, switch to “Return-Home” mode on the
controller.
2. Place the left joystick into the right lower corner(45°) position, and the right
joystick into the upper right corner(45°) position.
3. Maintain the above gesture for 2 seconds, until the light changes to a fast
flashing red (blinking). The drone then enters into its accelerometer calibration
process. Wait until the light stops blinking, and goes to a slow red flash, now
release the joysticks. The accelerometer calibration is now complete.
Calibration is necessary in below cases:
1. Before flying drone for the first time.
2. If 100KM or more away from the last compass calibration location.
3. The drone has been crashed/dropped by accident.
4. The drone keeps swaying / drifting during flight.
5. If the drone has incurred or was subjected to a heavy shaking during
transportation.
6. If the RED light stays on, and the motors can’t be unlocked.
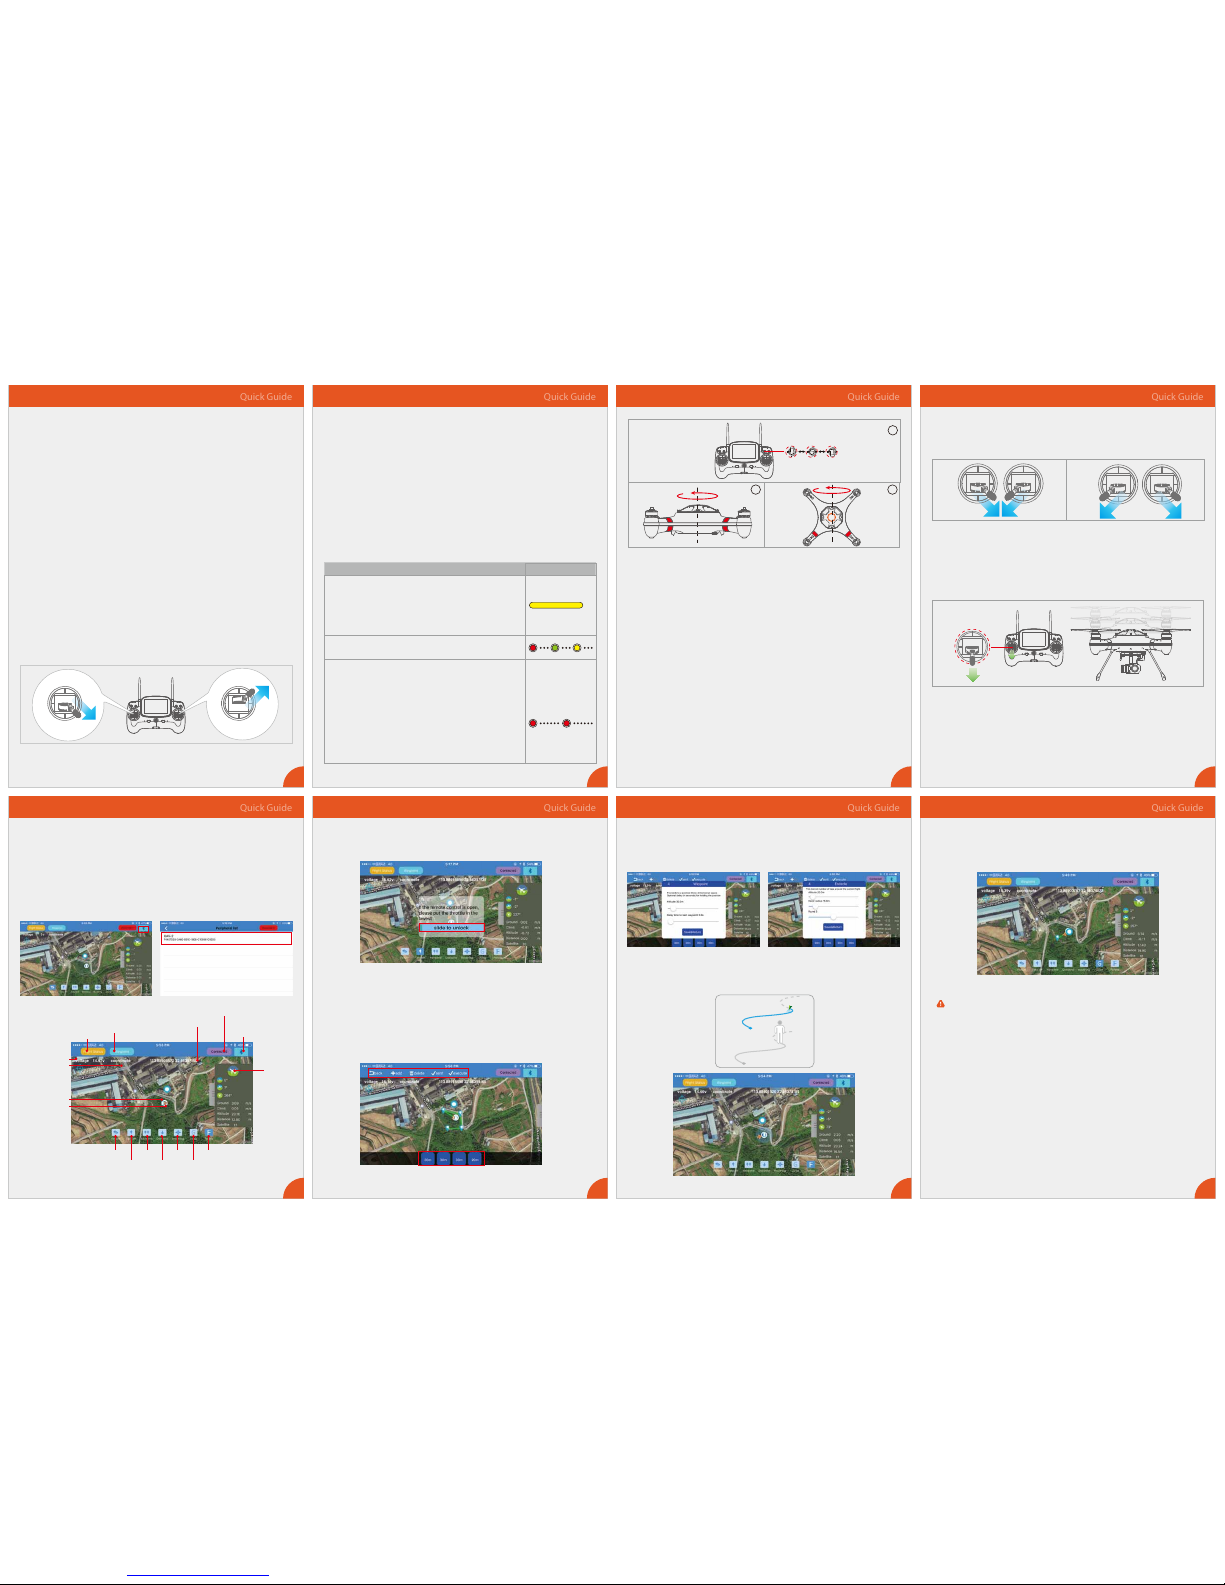
3.1.2 Compass Calibration
Please Note: It is recommended to calibrate the compass at the proposed
ying area before ying. Flying anywhere close to any magnetic
interference is HIGHLY DISCOURAGED. (Please make sure to keep far away
from the following: High-Voltage transmission power lines, Emitting base
stations, metal objects, etc.)
1. Place the drone onto a horizontal surface, power on
the controller, and then power on the drone. After the
“DI” sound, fast flick the mode switch from GPS-Smart
Cruise-ATTI and ATTI-Smart Cruise-GPS, when the yellow
light is on, the system enters into compass calibration.
2. Hold the drone horizontally, rotate counter clockwise
until the green LED light turns on.
3. Swing the drone to a vertical plane, with the nose
pointing downward, rotate the drone counter clockwise
until the LED changes to a blinking red-green-yellow,
indicating the completion of the calibration. If the
calibration procedure failed, the RED light will be on for 3
seconds, you will need to redo the calibration. (It may be
necessary to do a six-sided calibration if the two-sided
calibration will not successfully calibrate, for more
information, please refer to the manual.)
1. Place the drone in an open area at least 3 meters away from you, or others.
2. Put the Return Home mode switch in the Normal position, and the flight
mode switch into either GPS or ATTI mode, and then power on the remote
control.
3. Make sure that each part of the drone is connected properly. And the
propellers are installed correctly
When the drone is powered on, the drone will do a self-check, and when
complete, it will issue a "DI" sound.
Note: While the drone is completing its self-check, please keep the drone
stationary.
4. If ATTI mode is selected, there is no need to wait, you can unlock the motors
and proceed to takeoff and fly immediately, however, in GPS mode, it is
necessary to wait until the number of satellites is a minimum of 9, before
attempting to unlock the motors.
Unlocking: Pull both the left and right joysticks simultaneously towards the
inner side of the lower side, at an angle of 45 degrees, and maintain this
position for 3 seconds, the motors will now be unlocked, and will start rotating.
To lock the motors: Pull both the left and the right joysticks outwards to the
lower sides at an angle of 45 degrees to stop , and lock the motors.
1. Pull the throttle stick to lowest position until the drone land on the ground,
wait 2-3 seconds, the motor will be locked.
2. Power off the drone, and then power off the controller.
2. Power on the Bluetooth datalink module, switch on the GPS and Bluetooth on
your smartphone. Find the corresponding Bluetooth Link (e.g: UAV-2…) and link
it (Note: when the bluetooth is linked, the blue light on the Bluetooth datalink
module will stop blinking).
3. Run the “Swellpro Fly” APP, click the Bluetooth icon to link the device (UAV..).
When it links, you will see the drone parameters on the screen, e.g battery
voltage, GPS coordinates, height, distance, GPS signal etc.
6.1 How to use
1. Download Swellpro Fly App into your iPhone. Or download the APK from
www.swellpro.com for your Android phone.
6. APP CONTROL
5. The APP allows you to start flying the drone, land, ascend, hover, return home,
flight path setting, follow me and point to fly.
6. Fight path setting:
a). click “+”, click the map to set the flight point, you will see all the selected flight
points on the bottom of the screen. You can delete them.
b). Click below the flight point, you can choose the height, hovering time and
other options. Save and click “Run”, the drone will start flying according to the
set path.
4. Once you have a minimum of 9 GPS satellites, you can unlock the drone and
start flying with controller, or use the APP to unlock the motors and start flying.
7. Follow Me: The target (to be followed) should carry the Bluetooth Datalink
and the (connected) smart phone, the drone recognizes the GPS coordinates of
the smartphone. Press the “Follow Me” button, the drone will then start
following.
8. Point-to-Fly: Click the “Point-to-Fly” button, and then click the target point
on the map, the drone will start flying to the point and hover there.
3.1.1 Accelerometer Calibration
Starting / Stopping the Motors
LockUnlock
Flight Data
Flight Data
Connection Status
Bluetooth Datalink
Connection Icon
Flight Path Select GPS coordinates
Return Home
Take Off Descend
Ascend Hover
Point to Fly
Follow Me
For the full manual, please get it at: www.swellpro.com.
2
1
3
08 09 10 11
12 13 14 15
Follow Me Note:
1. The APP control needs to have a good wireless communication
environment, if you see the drone does not respond to your order, it
might be subjected to interference, please try again.
2. If the drone continually fails to respond to your APP commands,
please use the controller to operate the drone. Just switch the ight
mode switch for one single operation; the controller will take over the
control of the drone.
3. The Bluetooth data link module is paired with the corresponding
module onboard the drone. Normally, it won’t link to other drones.
When you see many drones or Bluetooth datalink units working in the
same place, please make sure you link to the right drone.
GPS coordinates
Drone and it’s
flying direction
Battery voltage
Latitude &
longitute
Splash Drone
Quick Guide
Splash Drone
Quick Guide
Splash Drone
Quick Guide
Splash Drone
Quick Guide
Splash Drone
Quick Guide
Splash Drone
Quick Guide
Splash Drone
Quick Guide
Splash Drone
Quick Guide

Other manuals for Splash Drone 3

7

Other SWELLPRO Quadcopter manuals

SWELLPRO Splash Drone Pro User manual

SWELLPRO

SWELLPRO Splash Drone Pro User manual

SWELLPRO Splash Drone Pro User manual

SWELLPRO

SWELLPRO Splash Drone Pro User manual

SWELLPRO Splash Drone Auto User manual

SWELLPRO

SWELLPRO Splash Drone Auto User manual

SWELLPRO Spry+ User manual

SWELLPRO

SWELLPRO Spry+ User manual

Popular Quadcopter manuals by other brands

Reely Foldable Drone G-Sense operating instructions

Reely

Reely Foldable Drone G-Sense operating instructions

Parrot MAMBO FLY quick start guide

Parrot

Parrot MAMBO FLY quick start guide

dji GeoSnap PPK Integration guide

dji

dji GeoSnap PPK Integration guide

Action Drone AD2 user manual

Action Drone

Action Drone AD2 user manual

ACME zoopa Q evo 550 QUICKLAUNCH

ACME

ACME zoopa Q evo 550 QUICKLAUNCH

Kaiser Baas Alpha Pro Drone Complete user guide

Kaiser Baas

Kaiser Baas Alpha Pro Drone Complete user guide

Align MR25 user manual

Align

Align MR25 user manual

4DRC 4D-V20 user guide

4DRC

4DRC 4D-V20 user guide

Anakin Club Racer SKY-HERO user manual

Anakin Club Racer

Anakin Club Racer SKY-HERO user manual

SKY-HERO Anakin Assembly & instruction manual

SKY-HERO

SKY-HERO Anakin Assembly & instruction manual

Aerpro APHUB X4 user manual

Aerpro

Aerpro APHUB X4 user manual

REVELL FUNTIC user manual

REVELL

REVELL FUNTIC user manual

YIBOO UJ819 instruction manual

YIBOO

YIBOO UJ819 instruction manual

Hubsan X4 DESIRE instruction manual

Hubsan

Hubsan X4 DESIRE instruction manual

Skynet DR-XL instruction manual

Skynet

Skynet DR-XL instruction manual

SKY-HERO Anakin user guide

SKY-HERO

SKY-HERO Anakin user guide

Ares Ethos PQ instruction manual

Ares

Ares Ethos PQ instruction manual

Carrera RC RC Power 370502002 Assembly and operating instructions

Carrera RC

Carrera RC RC Power 370502002 Assembly and operating instructions

manuals.online logo
manuals.online logoBrands
  • About & Mission
  • Contact us
  • Privacy Policy
  • Terms and Conditions

Copyright 2025 Manuals.Online. All Rights Reserved.